engine VAUXHALL ADAM 2017 Workshop Manual
[x] Cancel search | Manufacturer: VAUXHALL, Model Year: 2017, Model line: ADAM, Model: VAUXHALL ADAM 2017Pages: 241, PDF Size: 7.33 MB
Page 141 of 241

Driving and operating139Deactivation
TC can be switched off when spinningof drive wheels is required: press b
briefly.
A status message appears in the
Driver Information Centre when TC is
deactivated.
When TC is deactivated, ESC
remains active.
TC is reactivated by pressing b
again. A status message pops up in the Driver Information Centre when
TC is reactivated.
TC is also reactivated the next time
the ignition is switched on.
Fault
If there is a fault in the system the
control indicator b illuminates
continuously and a message or a
warning code appears in the Driver
Information Centre. The system is not
operational.
Have the cause of the fault remedied by a workshop.
Electronic Stability Control
Electronic Stability Control (ESC)
improves driving stability when
necessary, regardless of the type of
road surface or tyre grip.
As soon as the vehicle starts to
swerve (understeer/oversteer),
engine output is reduced and the wheels are braked individually.
ESC operates in combination with the Traction Control system (TC). It
prevents the drive wheels from
spinning.
ESC is operational after each engine start as soon as control indicator b
extinguishes.
When ESC operates b flashes.
9 Warning
Do not let this special safety
feature tempt you into taking risks
when driving.
Adapt speed to the road
conditions.
Control indicator b 3 87.
Page 143 of 241

Driving and operating141Activation
Press B when engine is running. The
system works from standstill up to
22 mph, and in reverse gear. Above
this speed the system changes to
normal mode. When activated, City
mode engages automatically below
22 mph.
An illuminated LED in the City mode
button indicates that the system is
active.
Additionally, a message pops-up in
the Driver Information Centre.
City mode remains active during an Autostop, but is only operationalwhen the engine is running.
Stop-start system 3 128.
Deactivation
Press B; LED in the button
extinguishes and a message pops-up in the Driver Information Centre.
Each time the engine is started, City
mode is deactivated.
Fault
In the event of a fault in the system,
c illuminates and a message is
displayed in the Driver Information
Centre.
Vehicle messages 3 96.
System calibration
If control indicators c and b
illuminate simultaneously, a
calibration of the power steering
system is necessary. This can occur
e.g. when turning the steering wheel for one rotation with ignition switched
off. In this case switch on ignition and
turn steering wheel once from lock to
lock.
If control indicators c and b do not
extinguish after calibration, seek the
assistance of a workshop.
Page 145 of 241

Driving and operating143
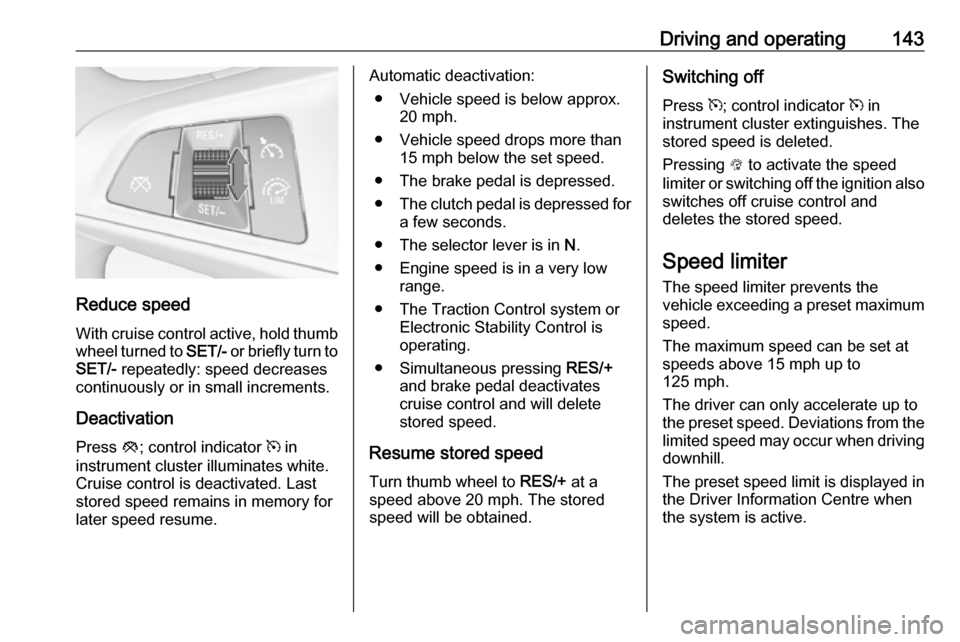
Reduce speedWith cruise control active, hold thumb
wheel turned to SET/- or briefly turn to
SET/- repeatedly: speed decreases
continuously or in small increments.
Deactivation Press y; control indicator m in
instrument cluster illuminates white. Cruise control is deactivated. Last
stored speed remains in memory for
later speed resume.
Automatic deactivation:
● Vehicle speed is below approx. 20 mph.
● Vehicle speed drops more than 15 mph below the set speed.
● The brake pedal is depressed.
● The clutch pedal is depressed for
a few seconds.
● The selector lever is in N.
● Engine speed is in a very low range.
● The Traction Control system or Electronic Stability Control is
operating.
● Simultaneous pressing RES/+
and brake pedal deactivates
cruise control and will delete
stored speed.
Resume stored speed
Turn thumb wheel to RES/+ at a
speed above 20 mph. The stored
speed will be obtained.Switching off
Press m; control indicator m in
instrument cluster extinguishes. The
stored speed is deleted.
Pressing L to activate the speed
limiter or switching off the ignition also switches off cruise control and
deletes the stored speed.
Speed limiter
The speed limiter prevents the
vehicle exceeding a preset maximum
speed.
The maximum speed can be set at
speeds above 15 mph up to
125 mph.
The driver can only accelerate up to
the preset speed. Deviations from the
limited speed may occur when driving
downhill.
The preset speed limit is displayed in
the Driver Information Centre when
the system is active.
Page 157 of 241

Driving and operating155Side blind spot alert is active from
speeds of 6 mph up to 87 mph.
Driving faster than 87 mph
deactivates the system, indicated by
low lighting warning symbols B in
both exterior mirrors. Reducing the
speed again will extinguish the
warning symbols. If a vehicle is then
detected in the blind zone, the
warning symbols B will illuminate as
normal on the relevant side.
When the vehicle is started, both
exterior mirror displays will briefly
illuminate to indicate that the system
is operating.
The system can be activated or
deactivated in the Info-Display,
vehicle personalisation 3 99.
Deactivation is indicated by a
message in the Driver Information
Centre.
Detection zones The detection zones start at the rear
bumper and extend approx. three metres rearwards and to the sides.
The height of the zone is between
approx. 0.5 metres and two metres off
the ground.Side blind spot alert is designed to
ignore stationary objects, e.g.
guardrails, posts, curbs, walls and
beams. Parked vehicles or oncoming
vehicles are not detected.
Fault
Occasional missed alerts can occur
under normal circumstances and will
increase in wet conditions.
Side blind spot alert does not operate when the left or right corners of the
rear bumper are covered with mud,
dirt, snow, ice, slush, or in heavy
rainstorms. Cleaning instructions
3 207.
In the event of a fault in the system or if the system does not work due to
temporary conditions, a message is
displayed in the Driver Information
Centre. Seek the assistance of a
workshop.Fuel
Fuel for petrol engines Only use unleaded fuel that complies
with European standard EN 228 or
E DIN 51626-1 or equivalent.
The engine is capable of running with
fuel that contains up to 10% ethanol
(e.g. named E10).
Use fuel with the recommended
octane rating. A lower octane rating
can reduce engine power and torque
and slightly increases fuel
consumption.Caution
Do not use fuel or fuel additives
that contain metallic compounds
such as manganese-based
additives. This may cause engine
damage.
Page 158 of 241

156Driving and operatingCaution
Use of fuel that does not comply toEN 228 or E DIN 51626-1 or
equivalent can lead to deposits or
engine damage.
Caution
Use of fuel with a lower octane
rating than the lowest possible
rating could lead to uncontrolled combustion and engine damage.
The engine specific requirements
regarding octane rating are given in
the engine data overview 3 219. A
country specific label at the fuel filler
flap can supersede the requirement.
Fuel for liquid gas operation Liquid gas is known as LPG
(Liquefied Petroleum Gas) or under
its French name GPL (Gaz de Pétrole Liquéfié). LPG is also known as
Autogas.
LPG consists mainly of propane and
butane. The octane rating is between 105 and 115, depending on the
butane proportion. LPG is stored
liquid at around five to ten bar
pressure.
The boiling point depends on the
pressure and mixing ratio. At ambient
pressure, it is between -42 °C (pure
propane) and -0.5 °C (pure butane).Caution
The system works at an ambient
temperature of approx. -8 °C to
100 °C.
Full function of the LPG system can only be guaranteed with liquid gas
which complies with the minimum
requirements of DIN EN 589.
Fuel selector
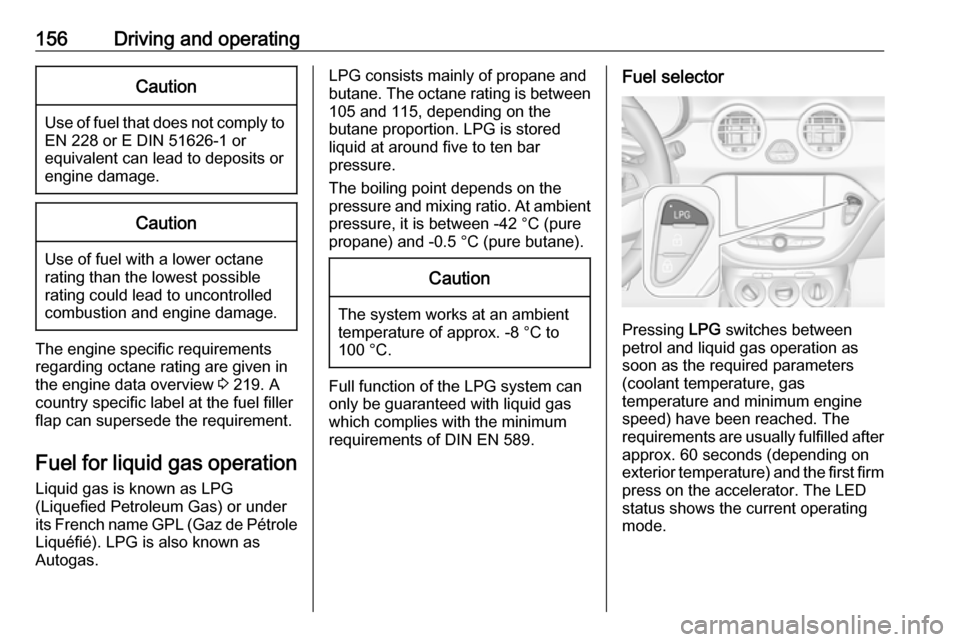
Pressing LPG switches between
petrol and liquid gas operation as
soon as the required parameters (coolant temperature, gas
temperature and minimum engine
speed) have been reached. The
requirements are usually fulfilled after
approx. 60 seconds (depending on
exterior temperature) and the first firm press on the accelerator. The LED
status shows the current operating
mode.
Page 159 of 241

Driving and operating157LED off:petrol operationLED
flashes:checking conditions for
fuel transition to liquid
gas operation.
Illuminates if conditions
are fulfilled.LED illu‐
minates:liquid gas operationLED
flashes
five
times
and
extin‐
guishes:liquid gas tank is empty
or failure in liquid gas
system. A message is
displayed in the Driver
Information Centre.
If the fuel tank is empty, the engine
will not start.
The selected fuel mode is stored and
reactivated at the next ignition cycle if
conditions allow.
As soon as the liquid gas tanks are
empty, petrol operation is
automatically engaged until the
ignition is switched off.
When switching automatically
between petrol or gas operation, a
brief delay of engine tractive power
may be noticeable.
Every six months, run the petrol tank
down until control indicator Y
illuminates, then refuel. This helps
maintain fuel quality and system
function for petrol operation.
Fill the tank completely at regular intervals to prevent corrosion in the
tank.
Faults and remedies
If gas mode is not possible, check the following:
● Is there enough liquid gas present?
● Is there enough petrol present for
starting?
Due to extreme temperatures in
combination with the gas
composition, it may take slightly
longer before the system switches
from petrol to gas mode.
In extreme situations, the system may
also switch back to petrol mode if the
minimum requirements are not
fulfilled. If conditions allow, it might be possible to manually switch back to
liquid gas operation.Seek the assistance of a workshop in
the event of all other faults.Caution
Repairs and adjustments may only be made by trained specialists in
order to maintain the safety and
warranty on the LPG system.
Liquid gas is given a particular odour
(odorised) so that any leaks can be
detected easily.
9 Warning
If you smell gas in the vehicle or in
the immediate vicinity, switch to petrol mode immediately. No
smoking. No naked flames or
ignition sources.
If the gas odour persists, do not start
the engine. Have the cause of the
fault remedied by a workshop.
When using underground car parks,
follow the instructions of the operator
and local laws.
Page 164 of 241

162Vehicle careVehicle careGeneral Information...................162
Accessories and vehicle modifications .......................... 162
Vehicle storage ........................163
End-of-life vehicle recovery .....163
Vehicle checks ........................... 164
Performing work ......................164
Bonnet ..................................... 164
Engine oil ................................. 165
Engine coolant ......................... 166
Washer fluid ............................ 166
Brakes ..................................... 167
Brake fluid ............................... 167
Vehicle battery ......................... 167
Wiper blade replacement ........169
Bulb replacement .......................170
Halogen headlights ..................170
Front turn signal lights .............172
Tail lights ................................. 174
Side turn signal lights ..............177
Number plate light ...................177
Interior lights ............................ 178
Instrument panel illumination ...178
Electrical system ........................179
Fuses ....................................... 179Engine compartment fuse box . 180
Instrument panel fuse box .......182
Vehicle tools .............................. 184
Tools ........................................ 184
Wheels and tyres .......................185
Winter tyres ............................. 185
Tyre designations ....................185
Tyre pressure .......................... 186
Tyre pressure monitoring system .................................... 187
Tread depth ............................. 190
Changing tyre and wheel size . 191
Wheel covers ........................... 191
Tyre chains .............................. 191
Tyre repair kit .......................... 192
Wheel changing .......................196
Spare wheel ............................ 198
Jump starting ............................. 203
Towing ....................................... 204
Towing the vehicle ...................204
Towing another vehicle ...........206
Appearance care .......................207
Exterior care ............................ 207
Interior care ............................. 209General Information
Accessories and vehicle modifications
We recommend the use of genuine
parts and accessories and factory approved parts specific for your
vehicle type. We cannot assess or guarantee reliability of other products
- even if they have a regulatory or
otherwise granted approval.
Any modification, conversion or other changes made to standard vehicle
specifications (including, without
limitation, software modifications,
modifications of the electronic control
units) may invalidate the warranty
offered by Vauxhall. Furthermore,
such changes may impact fuel
consumption, CO 2 emissions and
other emissions of the vehicle and
cause the vehicle to no longer
conform to the type approval,
impacting the validity of your vehicle
registration.
Page 165 of 241

Vehicle care163Caution
When transporting the vehicle on
a train or on a recovery vehicle, the
mud flaps might be damaged.
Vehicle storage
Storage for a long period of time
If the vehicle is to be stored for several months:
● Wash and wax the vehicle.
● Have the wax in the engine compartment and underbody
checked.
● Clean and preserve the rubber seals.
● Fill up fuel tank completely.
● Change the engine oil.
● Drain the washer fluid reservoir.
● Check the coolant antifreeze and
corrosion protection.
● Adjust tyre pressure to the value specified for full load.
● Park the vehicle in a dry, wellventilated place. Engage first or
reverse gear. Prevent the vehicle from rolling.
● Do not apply the parking brake.
● Open the bonnet, close all doors and lock the vehicle.
● Disconnect the clamp from the negative terminal of the vehicle
battery. Beware that all systems are not functional, e.g. anti-theft
alarm system.
Putting back into operation When the vehicle is to be put back into
operation:
● Connect the clamp to the negative terminal of the vehicle
battery. Activate the electronics
of the power windows.
● Check tyre pressure.
● Fill up the washer fluid reservoir.
● Check the engine oil level.
● Check the coolant level.
● Fit the number plate if necessary.End-of-life vehicle recovery
Information on end-of-life vehicle
recovery centres and the recycling of
end-of-life vehicles is available on our
website. Only entrust this work to an
authorised recycling centre.
Gas vehicles must be recycled by a
service centre authorised for gas
vehicles.
Page 166 of 241

164Vehicle careVehicle checks
Performing work9 Warning
Only perform engine compartment
checks when the ignition is off.
The cooling fan may start
operating even if the ignition is off.
9 Danger
The ignition system uses
extremely high voltage. Do not
touch.
Bonnet
Opening
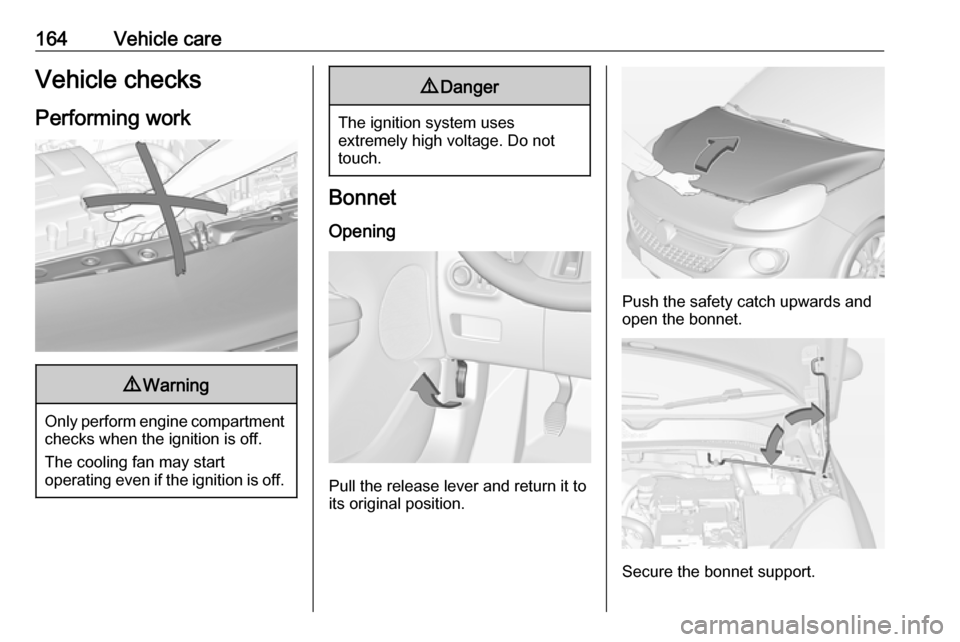
Pull the release lever and return it to
its original position.
Push the safety catch upwards and open the bonnet.
Secure the bonnet support.
Page 167 of 241

Vehicle care165If the bonnet is opened during an
Autostop, the engine will be restarted
automatically for safety reasons.
Closing Before closing the bonnet, press the
support into the holder.
Lower the bonnet and allow it to fall
into the latch from a low height
(20-25 cm). Check that the bonnet is
engaged.Caution
Do not press the bonnet into the
latch, to avoid dents.
Engine oil
Check the engine oil level manually
on a regular basis to prevent damage
to the engine. Ensure that the correct specification of oil is used.
Recommended fluids and lubricants
3 212.
The maximum engine oil
consumption is 0.6 l per 1000 km.
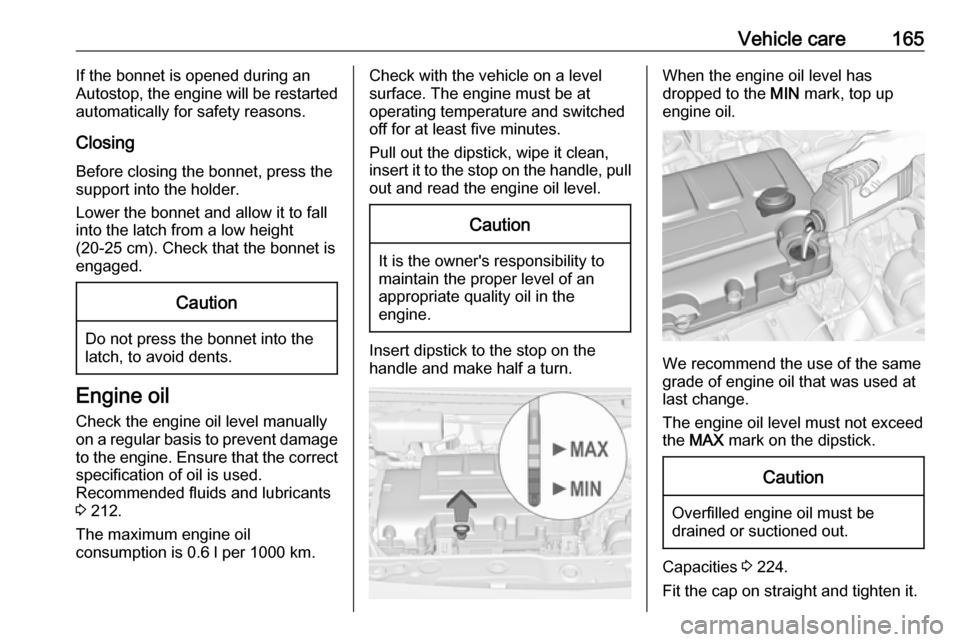
Check with the vehicle on a level
surface. The engine must be at
operating temperature and switched
off for at least five minutes.
Pull out the dipstick, wipe it clean, insert it to the stop on the handle, pull
out and read the engine oil level.Caution
It is the owner's responsibility to
maintain the proper level of an
appropriate quality oil in the
engine.
Insert dipstick to the stop on the
handle and make half a turn.
When the engine oil level has
dropped to the MIN mark, top up
engine oil.
We recommend the use of the same
grade of engine oil that was used at
last change.
The engine oil level must not exceed
the MAX mark on the dipstick.
Caution
Overfilled engine oil must be
drained or suctioned out.
Capacities 3 224.
Fit the cap on straight and tighten it.