rear vents VAUXHALL ADAM 2017 Owner's Manual
[x] Cancel search | Manufacturer: VAUXHALL, Model Year: 2017, Model line: ADAM, Model: VAUXHALL ADAM 2017Pages: 241, PDF Size: 7.33 MB
Page 13 of 241
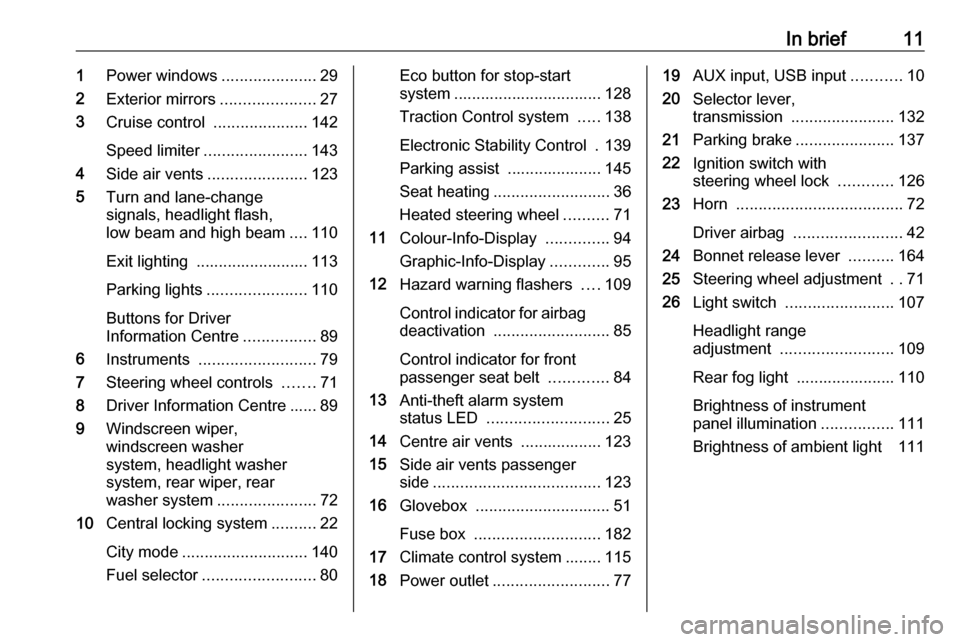
In brief111Power windows .....................29
2 Exterior mirrors .....................27
3 Cruise control .....................142
Speed limiter ....................... 143
4 Side air vents ...................... 123
5 Turn and lane-change
signals, headlight flash,
low beam and high beam ....110
Exit lighting ......................... 113
Parking lights ...................... 110
Buttons for Driver
Information Centre ................89
6 Instruments .......................... 79
7 Steering wheel controls .......71
8 Driver Information Centre ...... 89
9 Windscreen wiper,
windscreen washer
system, headlight washer
system, rear wiper, rear
washer system ......................72
10 Central locking system ..........22
City mode ............................ 140
Fuel selector ......................... 80Eco button for stop-start
system ................................. 128
Traction Control system .....138
Electronic Stability Control . 139
Parking assist ..................... 145
Seat heating .......................... 36
Heated steering wheel ..........71
11 Colour-Info-Display ..............94
Graphic-Info-Display .............95
12 Hazard warning flashers ....109
Control indicator for airbag
deactivation .......................... 85
Control indicator for front
passenger seat belt .............84
13 Anti-theft alarm system
status LED ........................... 25
14 Centre air vents .................. 123
15 Side air vents passenger
side ..................................... 123
16 Glovebox .............................. 51
Fuse box ............................ 182
17 Climate control system ........ 115
18 Power outlet .......................... 7719AUX input, USB input ...........10
20 Selector lever,
transmission ....................... 132
21 Parking brake ......................137
22 Ignition switch with
steering wheel lock ............126
23 Horn ..................................... 72
Driver airbag ........................ 42
24 Bonnet release lever ..........164
25 Steering wheel adjustment ..71
26 Light switch ........................ 107
Headlight range
adjustment ......................... 109
Rear fog light ...................... 110
Brightness of instrument
panel illumination ................111
Brightness of ambient light 111
Page 17 of 241

In brief15Rear window washer
Push lever.
Washer fluid is sprayed on the rear
window and the wiper wipes a few
times.
Rear window wiper/washer 3 74.
Climate control
Heated rear window
The heating is operated by pressing
Ü .
Heated rear window 3 30.
Heated exterior mirrors
Pressing Ü also activates the heated
exterior mirrors.
Heated exterior mirror 3 28.
Demisting and defrosting the
windows
● Set air distribution control to l.
● Press V.
● Set temperature control to warmest level.
● Set fan speed to highest level.
● Switch on heated rear window Ü.
● Open side air vents as required and direct them towards the doorwindows.
Climate control system 3 115.
Page 40 of 241

38Seats, restraintsBelt force limitersOn the front seats, stress on the body
is reduced by the gradual release of
the belt during a collision.
Belt pretensioners
In the event of a head-on or rear-end
collision of a certain severity, the front
seat belts are tightened.9 Warning
Incorrect handling (e.g. removal or
fitting of belts) can trigger the belt
pretensioners.
Deployment of the belt pretensioners
is indicated by continuous illumination
of control indicator v 3 85.
Triggered belt pretensioners must be replaced by a workshop. Belt
pretensioners can only be triggered
once.
Notice
Do not affix or install accessories or
other objects that may interfere with
the operation of the belt
pretensioners. Do not make any
modifications to belt pretensioner components as this will invalidate
the vehicle type approval.
Three-point seat belt
Fasten
Withdraw the belt from the retractor,
guide it untwisted across the body
and insert the latch plate into the
buckle. Tighten the lap belt regularly
while driving by pulling the shoulder
belt.
Sport seat: Feed seat belt through
belt mount on backrest when
fastening seat belt.
Loose or bulky clothing prevents the
belt from fitting snugly. Do not place
objects such as handbags or mobile
phones between the belt and your body.
9 Warning
The belt must not rest against hard
or fragile objects in the pockets of
your clothing.
Seat belt reminder X 3 84.
Page 117 of 241
Climate control115Climate controlClimate control systems.............115
Heating and ventilation system 115
Air conditioning system ...........116
Electronic climate control system .................................... 118
Air vents ..................................... 123
Adjustable air vents .................123
Fixed air vents ......................... 123
Maintenance .............................. 123
Air intake ................................. 123
Pollen filter ............................... 123
Air conditioning regular operation ................................ 124
Service .................................... 124Climate control systems
Heating and ventilation system
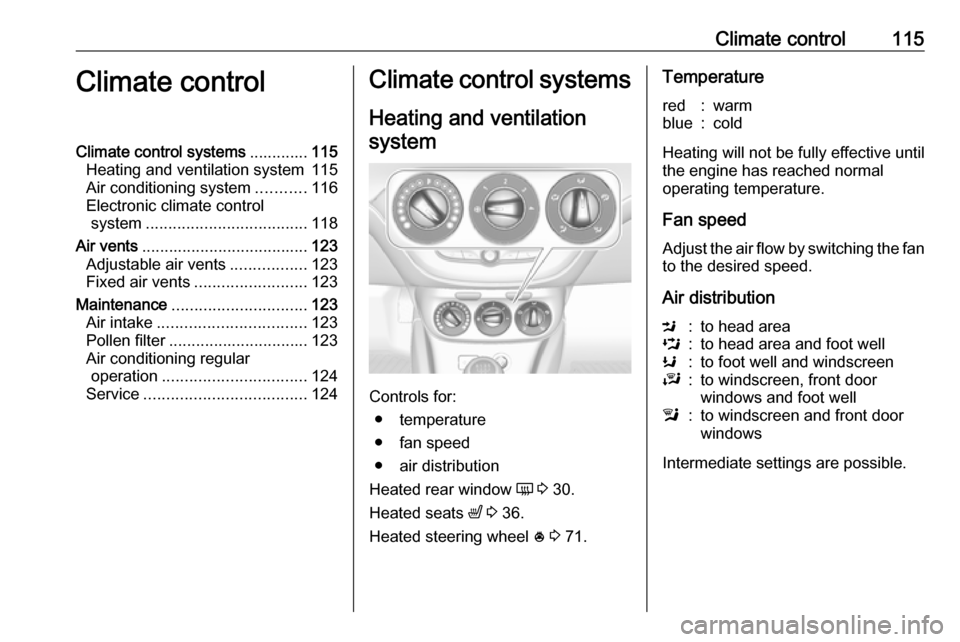
Controls for: ● temperature
● fan speed
● air distribution
Heated rear window Ü 3 30.
Heated seats ß 3 36.
Heated steering wheel * 3 71.
Temperaturered:warmblue:cold
Heating will not be fully effective until
the engine has reached normal
operating temperature.
Fan speed
Adjust the air flow by switching the fan
to the desired speed.
Air distribution
M:to head areaL:to head area and foot wellK:to foot well and windscreenJ:to windscreen, front door
windows and foot welll:to windscreen and front door
windows
Intermediate settings are possible.
Page 118 of 241
116Climate controlDemisting and defrosting the
windows
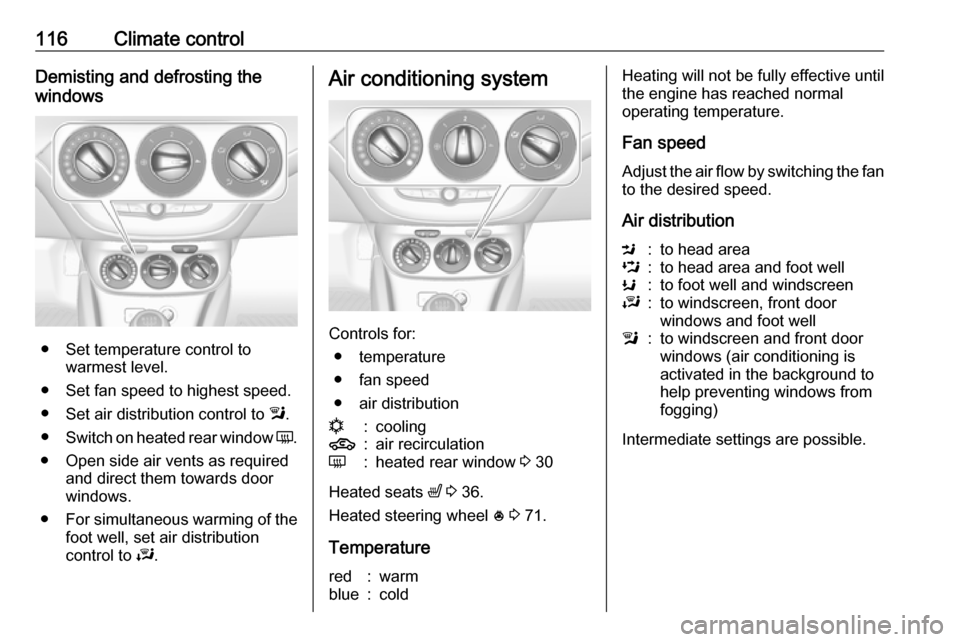
● Set temperature control to warmest level.
● Set fan speed to highest speed.
● Set air distribution control to l.
● Switch on heated rear window Ü.
● Open side air vents as required and direct them towards door
windows.
● For simultaneous warming of the
foot well, set air distribution
control to J.
Air conditioning system
Controls for:
● temperature
● fan speed
● air distribution
n:cooling4:air recirculationÜ:heated rear window 3 30
Heated seats ß 3 36.
Heated steering wheel * 3 71.
Temperature
red:warmblue:coldHeating will not be fully effective until
the engine has reached normal
operating temperature.
Fan speed
Adjust the air flow by switching the fan
to the desired speed.
Air distributionM:to head areaL:to head area and foot wellK:to foot well and windscreenJ:to windscreen, front door
windows and foot welll:to windscreen and front door
windows (air conditioning is
activated in the background to
help preventing windows from
fogging)
Intermediate settings are possible.
Page 120 of 241

118Climate control
●Switch on cooling n.
● Air recirculation system 4 on.
● Set temperature control to coldest level.
● Set fan speed to highest level.
● Set air distribution control to M.
● Open all vents.
Demisting and defrosting the
windows l
● Set temperature control to
warmest level.
● Set fan speed to highest level.
● Set air distribution control to l.
● Switch on heated rear window Ü.
● Open side air vents as required and direct them towards the doorwindows.
Notice
If air distribution mode l is selected
while engine is running, an Autostop
will be inhibited until another air
distribution is selected.
If air distribution mode l is selected
while the engine is in an Autostop,
the engine will restart automatically.
Stop-start system 3 128.
Electronic climate control system
Page 121 of 241

Climate control119Controls for:● fan speed
● temperature
● air distributionn:coolingAUTO:automatic mode4:manual air recirculationV:demisting and defrostingÜ:heated rear window 3 30
Heated seats ß 3 36.
Heated steering wheel * 3 71.
In Automatic mode temperature, fan
speed and air distribution are
regulated automatically.
Climate control settings are shown on the Info-Display. Setting
modifications are briefly popped-up,
superimposed over the currently
displayed menu.
The electronic climate control system
is only fully operational when the
engine is running.
Automatic mode AUTO
Basic setting for maximum comfort: ● Press AUTO, the air distribution
and fan speed are regulated
automatically. The LED in the
button illuminates to indicate
activation.
● Open all air vents to allow optimised air distribution in
automatic mode.
● Press n to switch on optimal
cooling and demisting. The LED in the button illuminates to
indicate activation.
● Set the preselected temperature using the centre rotary knob.Recommended temperature is
22 °C.
Temperature preselection
Set temperature by turning the centre
rotary knob to the desired value. It is
indicated in the display of the switch.
For reasons of comfort, change
temperature only in small increments.
Page 197 of 241

Vehicle care19514. Detach the tyre repair kit. Pushcatch on bracket to remove
sealant bottle from bracket. Screw the tyre inflation hose to the free
connection of the sealant bottle.
This prevents sealant from
escaping. Stow tyre repair kit in
load compartment.
15. Remove any excess sealant using a cloth.
16. Take the label indicating maximum permitted speed from
the sealant bottle and affix in the
driver's field of view.
17. Continue driving immediately so that sealant is evenly distributedin the tyre. After driving approx.
six miles (but no more than ten
minutes), stop and check tyre
pressure. Screw compressor air
hose directly onto tyre valve and
compressor when doing this.
If tyre pressure is more than 1.3 bar , set it to the correct value.
Repeat the procedure until there
is no more loss of pressure.
If the tyre pressure has fallen
below 1.3 bar, the vehicle must
not be used. Seek the assistance
of a workshop.
18. Stow away tyre repair kit in load compartment.
Reinstall floor cover. Rear floor
storage cover 3 65.
Notice
The driving characteristics of the
repaired tyre are severely affected, therefore have this tyre replaced.
If unusual noise is heard or the
compressor becomes hot, turn
compressor off for at least
30 minutes.
The built-in safety valve opens at a
pressure of seven bar (102 psi).
Note the expiry date of the kit. After
this date its sealing capability is no
longer guaranteed. Pay attention to
storage information on sealant
bottle.
Replace the used sealant bottle. Dispose of the bottle as prescribed
by applicable laws.
The compressor and sealant can be used from approx. -30 °C.
The adapters supplied can be used
to pump up other items e.g.
footballs, air mattresses, inflatable
dinghies etc. They are located on the
underside of the compressor. To
remove, screw on compressor air hose and withdraw adapter.
Page 211 of 241
Vehicle care209Glass panelNever clean with solvents or abrasive
agents, fuels, aggressive media
(e.g. paint cleaner, acetone-
containing solutions etc.), acidic or
highly alkaline media or abrasive
pads. Do not apply wax or polishing
agents to the glass panel.
Wheels and tyres Do not use high-pressure jet
cleaners.
Clean rims with a pH-neutral wheel
cleaner.
Rims are painted and can be treated
with the same agents as the body.
Paintwork damage
Rectify minor paintwork damage with
a touch-up pen before rust forms.
Have more extensive damage or rust areas repaired by a workshop.
Underbody Some areas of the vehicle underbody
have a PVC undercoating while other
critical areas have a durable
protective wax coating.After the underbody is washed, check
the underbody and have it waxed if
necessary.
Bitumen/rubber materials could
damage the PVC coating. Have
underbody work carried out by a
workshop.
Before and after winter, wash the
underbody and have the protective
wax coating checked.
Liquid gas system9 Danger
Liquid gas is heavier than air and
can collect in sink points.
Take care when performing work
at the underbody in a pit.
For painting work and when using a
drying booth at a temperature above
60 °C, the liquid gas tank must be
removed.
Do not make any modifications to the
liquid gas system.
Rear carrier system
Clean the rear carrier system with a
steam-jet or high-pressure jet cleaner
at least once a year.
Operate the rear carrier system
periodically if not in regular use, in
particular during winter.
Interior care
Interior and upholstery
Only clean the vehicle interior,
including the instrument panel fascia
and panelling, with a dry cloth or
interior cleaner.
Clean the leather upholstery with
clear water and a soft cloth. In case of heavy soiling, use leather care.
The instrument cluster and the
displays should only be cleaned using
a soft damp cloth. If necessary use a
weak soap solution.
Clean fabric upholstery with a
vacuum cleaner and brush. Remove
stains with an upholstery cleaner.
Page 237 of 241

235Convex shape .............................. 27
Coolant and antifreeze ...............212
Cruise control ...................... 89, 142
Cupholders .................................. 51
Curtain airbag system .................. 44
D
Danger, Warnings and Cautions ...4
Daytime running lights ...............109
Declaration of conformity ............227
Door open .................................... 89
Doors ............................................ 24
Driver assistance systems ..........142
Driver Information Centre .............89
Driving hints ................................ 125
E Electric adjustment ......................27
Electrical system......................... 179
Electronic climate control system 118
Electronic driving programmes ..135
Electronic Stability Control.......... 139
Electronic Stability Control and Traction Control system ............87
Electronic Stability Control off....... 87 End-of-life vehicle recovery .......163
Engine compartment fuse box ...180
Engine coolant ........................... 166
Engine coolant temperature gauge ....................................... 81
Engine data ............................... 219Engine exhaust .......................... 131
Engine identification ...................215
Engine oil ................... 165, 212, 216
Engine oil pressure ......................88
Entry lighting .............................. 113
Event data recorders ..................231
Exit lighting ................................ 113
Exterior care .............................. 207
Exterior light ................................. 89
Exterior lighting ....................12, 107
Exterior mirrors ............................. 27
F Fault ........................................... 135
First aid ......................................... 67
First aid kit ................................... 67
Fixed air vents ........................... 123
Flex-Fix system ............................ 53
Folding mirrors ............................. 27
Front airbag system .....................42
Front seats.................................... 33 Front storage ................................ 52
Front turn signal lights ...............172
Fuel............................................. 155
Fuel consumption - CO 2-
Emissions ............................... 161
Fuel for liquid gas operation .......156
Fuel for petrol engines ...............155
Fuel gauge ................................... 80Fuel selector ................................ 80
Fuses ......................................... 179
G Gauges ......................................... 79
Glass panel .................................. 31
Glovebox ..................................... 51
Graphic-Info-Display .....................95
H Halogen headlights ....................170
Hand brake ......................... 136, 137
Hazard warning flashers ............109
Headlight flash ........................... 108
Headlight range adjustment ......109
Headlights................................... 107
Headlights when driving abroad 109
Head restraint adjustment .............8
Head restraints ............................ 32
Heated mirrors ............................. 28
Heated rear window ..................... 30
Heated steering wheel .................71
Heating ........................................ 36
Heating and ventilation system . 115
High beam ........................... 89, 108
Hill start assist ........................... 137
Horn ....................................... 13, 72
I
Identification plate .....................215
Ignition switch positions .............126