battery VAUXHALL ANTARA 2015 Owner's Guide
[x] Cancel search | Manufacturer: VAUXHALL, Model Year: 2015, Model line: ANTARA, Model: VAUXHALL ANTARA 2015Pages: 223, PDF Size: 6.07 MB
Page 176 of 223

174Vehicle care
FuseCircuitAMPAmplifierAPO JACK
(CONSOLE)Power outlet
(centre console)APO JACK
(REAR CARGO)Power outlet
(load compart‐
ment)AWD/VENTAll-wheel drive,
ventilationBCM (CTSY)Courtesy lightsBCM (DIMMER)Instrument illu‐
minationBCM (INT LIGHT
TRLR FOG)Interior lights,
trailer fog lightBCM (PRK/TRN)Parking lights,
turn signalsBCM (STOP)Brake lightsBCM (TRN SIG)Turn signalsBCM (VBATT)Battery voltageFuseCircuitCIMCommunica‐
tions Integration
ModuleCLSTRInstrument
clusterDRLDaytime running
lightsDR/LCKDriver door lockDRVR PWR
SEATDriver power
seatDRV/PWR
WNDWDriver power
windowF/DOOR LOCKFuel filler flapFRT WSRFront washerFSCMFuel systemFSCM/VENT SOLFuel system,
vent solenoidHEATING MAT
SWHeating mat
switchHTD SEAT PWRSeat heatingFuseCircuitHVAC BLWRClimate control,
air conditioning
fanIPCInstrument panel clusterISRVM/RCMInterior mirror,
remote compass moduleKEY CAPTUREKey captureL/GATETailgateLOGISTIC MODELogistic modeOSRVMExterior mirrorsPASS PWR
WNDWPassenger
power windowPWR DIODEPower diodePWR MODINGPower modingRADIORadioRR FOGHeated rear
window
Page 177 of 223

Vehicle care175
FuseCircuitRUN 2Power battery
key on runRUN/CRNKRun crankSDM (BATT)Safety Diag‐
nosis Module
(Battery)SDM (IGN 1)Safety Diag‐
nosis Module
(Ignition)SPARE-S/ROOFSunroofS/ROOF BATTSunroof batterySSPSPower steeringSTR/WHL SWSteering wheelTRLRTrailerTRLR BATTTrailer batteryFuseCircuitXBCMExport Body
Control ModuleXM/HVAC/DLCXM satellite
radio, climate
control, data link
connection
After changing of defective fuses
close the fuse box cover and press
until it engages.
If the fuse box cover is not closed
correctly, malfunctions may occur.
Vehicle tools
Tools
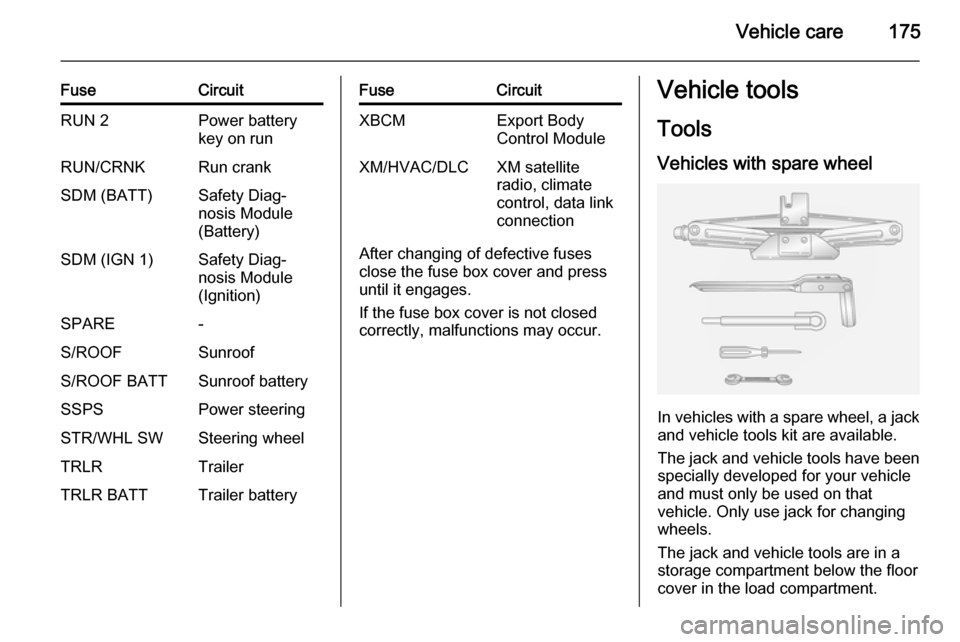
Vehicles with spare wheel
In vehicles with a spare wheel, a jack and vehicle tools kit are available.
The jack and vehicle tools have been
specially developed for your vehicle
and must only be used on that
vehicle. Only use jack for changing
wheels.
The jack and vehicle tools are in a
storage compartment below the floor
cover in the load compartment.
Page 186 of 223

184Vehicle care
Pull the floor cover handle upwards
3 69.
Vehicle tools 3 175.Caution
Do not allow objects to protrude
above the top of the rear floor
storage compartment, to avoid
damage to the storage area and
the load compartment floor.
1. Release the sealant filler hose 1
and the power plug 2.
2. Unscrew valve cap from defective
tyre.
Screw the sealant filler hose onto
the tyre valve.
3. Connect the power plug to the power outlet. Unplug all items
from other power outlets.
4. Switch on ignition. To avoid discharging the battery, werecommend running the engine.
5. Turn the selector switch anticlockwise to the sealant +
air position.
6. Press the on/off button to turn the
tyre repair kit on. The tyre is filled
with sealant.
The pressure gauge briefly shows a high pressure while the sealant
canister is emptying. Then the
pressure starts to drop.
All of the sealant is pumped into
the tyre. Then the tyre is inflated.
7. Inflate the tyre to the recommended inflation pressure
using the pressure gauge. The
prescribed tyre pressure should
be obtained within 10 minutes
3 210 . When the correct pressure
Page 192 of 223

190Vehicle care
Only mount one temporary spare
wheel. Do not drive faster than
50 mph. Take curves slowly. Do not
use for a long period of time.
When the temporary spare wheel is
fitted, do not take the vehicle through an automatic vehicle wash with guide rails. The temporary spare wheel may
get caught on the rails, causing
damage to the tyre, wheel and other
vehicle parts.
The use of tyre chains is not permitted on the temporary spare wheel.
Tyre chains 3 183.
Directional tyres Fit directional tyres such that they rollin the direction of travel. The rolling
direction is indicated by a symbol
(e.g. an arrow) on the sidewall.
The following applies to tyres fitted
opposing the rolling direction:
■ Driveability may be affected. Have the defective tyre renewed as soon
as possible and have the wheel
balanced and fitted to the vehicle.■ Do not drive faster than 50 mph.
■ Drive particularly carefully on wet and snow-covered road surfaces.9 Warning
Storing a jack, a wheel or other
equipment in the load
compartment could cause injury if they are not fixed in place
properly. During a sudden stop or
a collision, loose equipment could
cause personal injury or damage
to the vehicle.
Always store the jack and vehicle
tools in their respective storage
compartments and secure them properly.
Always place the damaged wheel
in the load compartment, secured
in the spare wheel well with the
screw-in retainer.
Jump starting
Do not start with quick charger.
A vehicle with a discharged battery can be started using jump leads and
the battery of another vehicle.9 Warning
Be extremely careful when starting
with jump leads. Any deviation
from the following instructions can
lead to injuries or damage caused
by battery explosion or damage to the electrical systems of both
vehicles.
9 Warning
Avoid contact of the battery with
eyes, skin, fabrics and painted
surfaces. The fluid contains
sulphuric acid which can cause
injuries and damage in the event
of direct contact.
■ Never expose the battery to naked flames or sparks.
Page 193 of 223

Vehicle care191
■ A discharged battery can alreadyfreeze at a temperature of 0 °C.
Defrost the frozen battery before
connecting jump leads.
■ Wear eye protection and protective
clothing when handling a battery.
■ Use a booster battery with the same voltage (12 Volts). Its
capacity (Ah) must not be much less than that of the discharged
battery.
■ Use jump leads with insulated terminals and a cross section of at
least 16 mm 2
(25 mm 2
for diesel
engines).
■ Do not disconnect the discharged battery from the vehicle.
■ Switch off all unnecessary electrical
consumers. The Infotainment
system may be damaged if
switched on while jump starting.
■ Do not lean over the battery during jump starting.
■ Do not allow the terminals of one lead to touch those of the other
lead.■ The vehicles must not come into contact with each other during the
jump starting process.
■ Apply the electrical parking brake 3 137, transmission in neutral,
automatic transmission in P.
■ Open the positive terminal protection caps of both batteries.
Lead connection order:
1. Connect the red lead to the positive terminal 1 of the booster
battery.
2. Connect the other end of the red lead to the positive terminal 2 of
the discharged battery.
3. Connect the black lead to the negative terminal 3 of the booster
battery.
4. Connect the other end of the black
lead to a vehicle grounding point,
such as the engine block 4 or an
engine mounting bolt. Connect as far away from the discharged
battery as possible, however at
least 60 cm.
Route the leads so that they cannot
catch on rotating parts in the engine
compartment.
To start the engine: 1. Start the engine of the vehicle providing the jump start.
2. After 5 minutes, start the other engine. Start attempts should be
made for no longer than
15 seconds at an interval of
1 minute.
3. Allow both engines to idle for approx. 3 minutes with the leads
connected.
Page 194 of 223

192Vehicle care
4. Switch on electrical consumers(e.g. headlights, heated rear
window) of the vehicle receiving
the jump start.
5. Operate discharged vehicle for approx. 20 minutes to allow for
adequate battery recharging.
6. Reverse above sequence exactly when removing leads.Towing
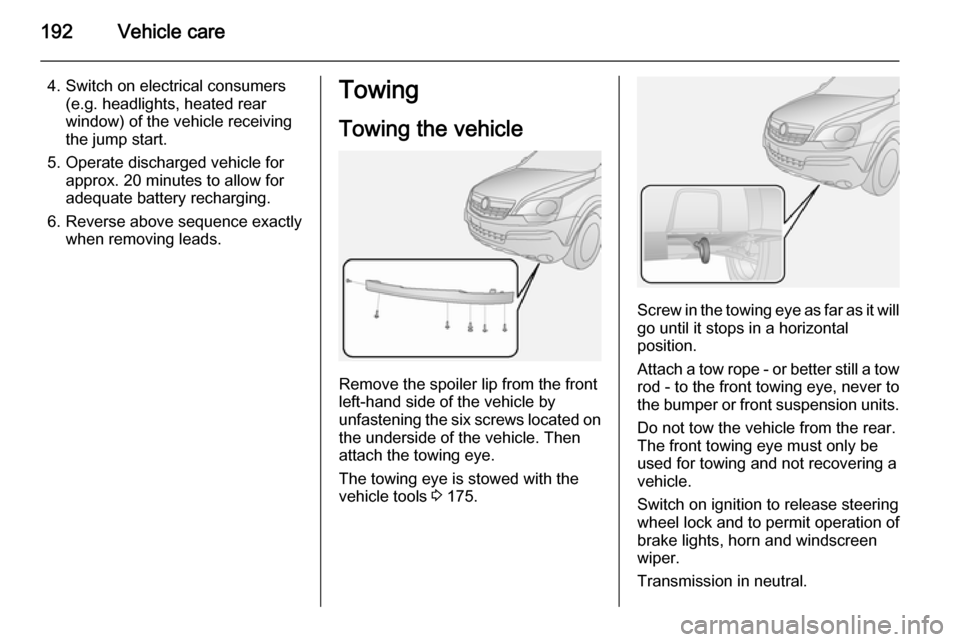
Towing the vehicle
Remove the spoiler lip from the front
left-hand side of the vehicle by
unfastening the six screws located on the underside of the vehicle. Then
attach the towing eye.
The towing eye is stowed with the
vehicle tools 3 175.
Screw in the towing eye as far as it will
go until it stops in a horizontal
position.
Attach a tow rope - or better still a tow
rod - to the front towing eye, never to
the bumper or front suspension units.
Do not tow the vehicle from the rear.
The front towing eye must only be
used for towing and not recovering a
vehicle.
Switch on ignition to release steering wheel lock and to permit operation of
brake lights, horn and windscreen
wiper.
Transmission in neutral.
Page 218 of 223

216IndexAAccessories and vehicle modifications .......................... 152
Accessory sockets ........................78
Active head restraints .............34, 35
Adjustable air vents ...................120
Airbag and belt tensioners ...........84
Airbag deactivation ......................49
Airbag label................................... 44 Airbag system .............................. 44
Air conditioning regular operation ................................ 121
Air conditioning system .............. 116
Air intake .................................... 121
Air vents...................................... 120
All wheel drive .....................86, 134
Antilock brake system ................ 137
Antilock brake system (ABS) .......86
Anti-theft alarm system ..........25, 92
Anti-theft locking system .............. 24
Appearance care ........................194
Apply footbrake ............................ 90
Armrest ......................................... 40
Armrest storage ........................... 58
Automatic anti-dazzle ..................30
Automatic dimming ......................29
Automatic headlight levelling system ...................................... 91
Automatic level control .......107, 141Automatic light control ...............106
Automatic transmission ........85, 130
AUX input ..................................... 58
B Battery .......................................... 84
Battery discharge protection ......114
Battery, jump starting.................. 190
Belt pretensioners......................... 41
Belts.............................................. 41
Bicycle rack .................................. 58
Board-Info-Display .......................92
Bonnet ....................................... 154
Bonnet open ................................. 91
Brake and clutch fluid .................198
Brake assist ............................... 139
Brake fluid .................................. 157
Brakes ............................... 137, 157
Brake system ............................... 85
Breakdown.................................. 192
Bulb replacement ....................... 161
C Capacities .................................. 209
Card holder ................................... 56
Car Pass ...................................... 19
Catalytic converter ................85, 129
CD tray ......................................... 56
Central locking system ................21
Centre console storage ...............58
Page 222 of 223

220
T
Tachometer ................................. 80
Tailgate ......................................... 23
Tailgate open ............................... 91
Tail lights ................................... 165
Technical data ............................ 205
Three-point seat belt .................... 42
Tools .......................................... 175
Top-tether fastening eyes ............55
Tow bar....................................... 147
Towing ................................ 147, 192
Towing another vehicle .............193
Towing a trailer ........................... 148
Towing equipment .....................149
Towing the vehicle .....................192
Trailer coupling ........................... 147
Trailer indicator ............................ 91
Trailer stability assist .................151
Trailer towing ............................. 148
Transmission ............................... 16
Transmission display ...........81, 130
Tread depth ............................... 182
Trip computer in Board-Info- Display ................................... 101
Trip computer in Graphic-Info- Display or Colour-Info-Display 103
Trip odometer .............................. 80
Turn and lane-change signals ...109
Turn signal ................................... 84Tyre chains ................................ 183
Tyre changing ............................. 186
Tyre designations ......................177
Tyre pressure ....................100, 178
Tyre pressure monitoring system ....................... 89, 100, 178
Tyre pressures ........................... 210
Tyre repair kit ............................. 183
Tyres and wheel size, changing. 182
U
Ultrasonic parking assist ...... 87, 143
Underseat storage .......................57
Upholstery, cleaning ...................196
Upshift ......................................... 86
Using this manual ..........................3
V Vehicle battery ........................... 158
Vehicle checks............................ 153
Vehicle data ................................ 202
Vehicle data recording and privacy ..................................... 213
Vehicle dimensions .................... 207
Vehicle Identification Number ....200
Vehicle jack ................................ 175
Vehicle security ............................ 24
Vehicle specific data ......................3
Vehicle storage ........................... 152
Vehicle tools ............................... 175Vehicle unlocking ........................... 6
Vehicle weight ........................... 207
Ventilation ................................... 115
W
Warning chimes .........................100
Warning lights ............................... 80
Warning triangle .......................... 70
Washer and wiper systems .........14
Washer fluid ............................... 157
Washing the vehicle ...................194
Welcome lighting ........................113
Wheel changing .........................186
Wheel covers ............................. 182
Wheels and tyres .......................177
Windows ....................................... 30
Windscreen................................... 30
Windscreen wiper/washer ...........74
Winter tyres ............................... 177
Wiper blade replacement ..........161
X Xenon headlights .......................163