stop start VAUXHALL ANTARA 2015 Owner's Guide
[x] Cancel search | Manufacturer: VAUXHALL, Model Year: 2015, Model line: ANTARA, Model: VAUXHALL ANTARA 2015Pages: 223, PDF Size: 6.07 MB
Page 134 of 223

132Driving and operating
transmission will automatically shift toa lower gear, even in manual mode,
to prevent the engine from stalling.
If a higher gear is selected when
vehicle speed is too low, or a lower
gear when vehicle speed is too high,
the shift is not executed.
In manual mode, no automatic
shifting to a higher gear takes place
at high engine revolutions.
Gears can be skipped by moving the
selector lever repeatedly at short
intervals.
After stopping, 1st gear is
automatically selected. When starting
on slippery surfaces, tip selector lever forwards to engage 2nd gear.
To move back to position D, move
selector lever back to the right.
Electronic driving
programmes ■ Following a cold start, the operating
temperature programme increasesengine speed to quickly bring the
catalytic converter to the required
temperature.Kickdown
In both automatic and manual modes, if the accelerator pedal is pressed
down completely the transmission
shifts to a lower gear depending on
engine speed. Full engine power is
available for acceleration.
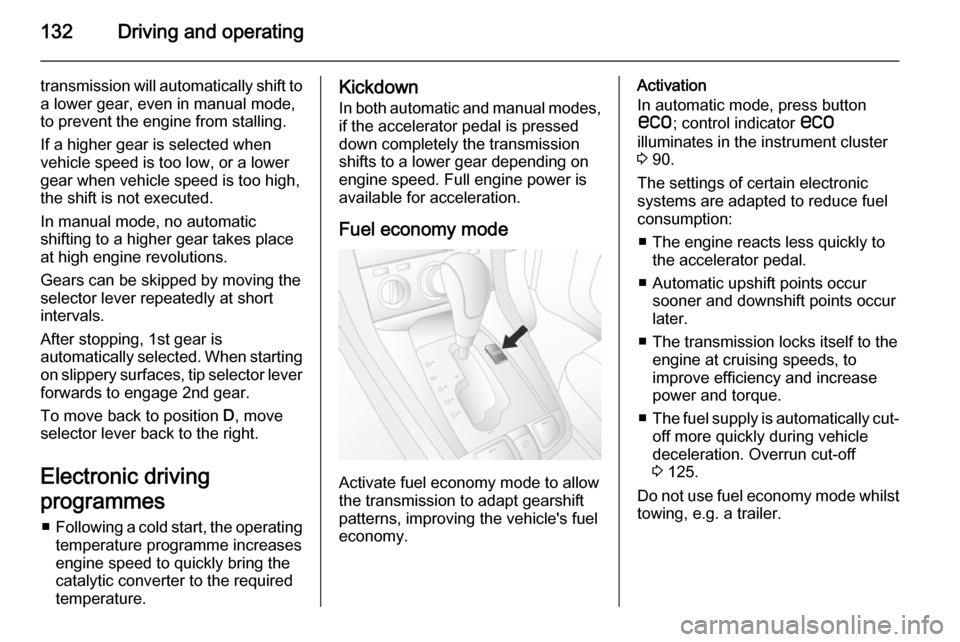
Fuel economy mode
Activate fuel economy mode to allow
the transmission to adapt gearshift
patterns, improving the vehicle's fuel
economy.
Activation
In automatic mode, press button
s ; control indicator s
illuminates in the instrument cluster 3 90.
The settings of certain electronic
systems are adapted to reduce fuel
consumption:
■ The engine reacts less quickly to the accelerator pedal.
■ Automatic upshift points occur sooner and downshift points occur
later.
■ The transmission locks itself to the engine at cruising speeds, to
improve efficiency and increase
power and torque.
■ The fuel supply is automatically cut-
off more quickly during vehicle
deceleration. Overrun cut-off
3 125.
Do not use fuel economy mode whilst towing, e.g. a trailer.
Page 141 of 223

Driving and operating139
movement. Seek the assistance of a
workshop to have the cause of the
fault remedied.
Brake assist
If the brake pedal is depressed
quickly and forcefully, maximum
brake force is automatically applied
(full braking).
Maintain steady pressure on the
brake pedal for as long as full braking
is required. Maximum brake force is
automatically reduced when the
brake pedal is released.
Hill start assist
The system helps prevent unintended movement when driving away on
inclines.
When releasing the foot brake after
stopping on an incline, the brakes
remain on for a further 2 seconds. The brakes release automatically as soon
as the vehicle begins to accelerate.Ride control systems
Electronic Stability Control
Electronic Stability Control (ESC)
improves driving stability when
necessary, regardless of the type of
road surface or tyre grip. It also
prevents the drive wheels from
spinning.
As soon as the vehicle starts to
swerve (understeer/oversteer),
engine output is reduced and the
wheels are braked individually. This
considerably improves the driving
stability of the vehicle on slippery road
surfaces.
ESC is operational as soon as control indicators b and t extinguish in the
instrument cluster after switching on the ignition.
When ESC is active b flashes 3 87.9 Warning
Do not let this special safety
feature tempt you into taking risks
when driving.
Adapt speed to the road
conditions.
Deactivation
With ESC active, if wheels are
slipping on wet, snowy or icy roads,
engine speed may not increase when
accelerator pedal is depressed. The
vehicle may not move.
Page 156 of 223

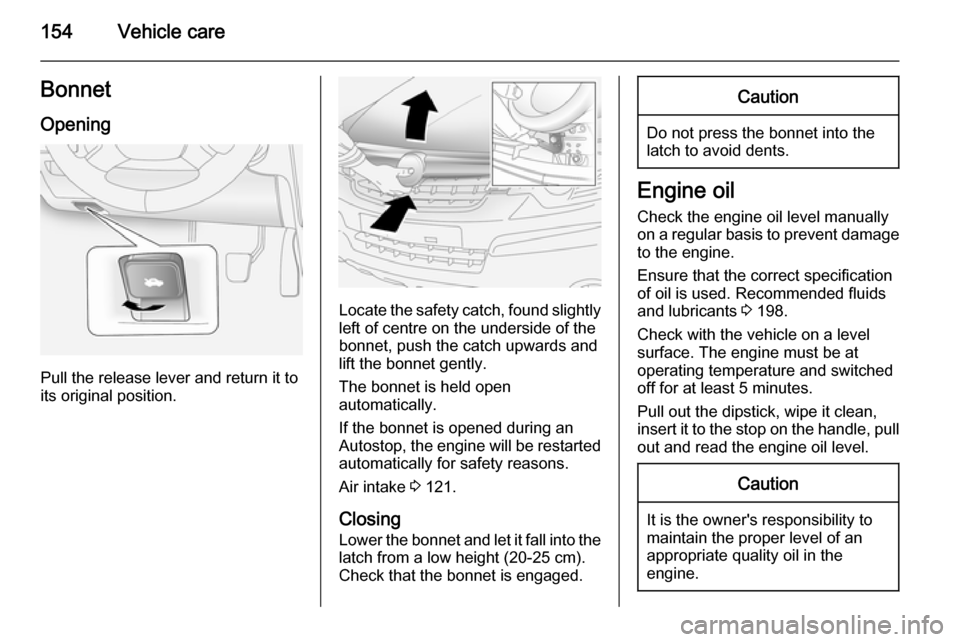
154Vehicle careBonnetOpening
Pull the release lever and return it to
its original position.
Locate the safety catch, found slightly left of centre on the underside of the
bonnet, push the catch upwards and
lift the bonnet gently.
The bonnet is held open
automatically.
If the bonnet is opened during an Autostop, the engine will be restarted automatically for safety reasons.
Air intake 3 121.
Closing
Lower the bonnet and let it fall into the latch from a low height (20-25 cm).
Check that the bonnet is engaged.
Caution
Do not press the bonnet into the
latch to avoid dents.
Engine oil
Check the engine oil level manually on a regular basis to prevent damage
to the engine.
Ensure that the correct specification
of oil is used. Recommended fluids
and lubricants 3 198.
Check with the vehicle on a level
surface. The engine must be at
operating temperature and switched
off for at least 5 minutes.
Pull out the dipstick, wipe it clean, insert it to the stop on the handle, pull
out and read the engine oil level.
Caution
It is the owner's responsibility to
maintain the proper level of an
appropriate quality oil in the
engine.
Page 160 of 223

158Vehicle careCaution
Only use high-performance brake
fluid approved for the vehicle.
Brake fluid 3 198.
Brake fluid level control indicator R
3 85.
Clutch fluid
9 Warning
Clutch fluid is poisonous and
corrosive. Avoid contact with eyes, skin, fabrics and painted surfaces.
If the fluid in the reservoir falls below
the MIN mark, seek the assistance of
a workshop.
Clutch fluid 3 198.
Vehicle battery Vehicles without stop-start system
will be equipped with a lead acid
battery. Vehicles with stop-start
system will be equipped with an
AGM vehicle battery which is not a
lead acid battery.
The vehicle battery is maintenance-
free provided that the driving profile
allows sufficient charging of the
battery. Short-distance-driving and
frequent engine starts can discharge
the vehicle battery. Avoid the use of
unnecessary electrical consumers.
Batteries do not belong in household
waste. They must be disposed of at
an appropriate recycling collection
point.
Laying up the vehicle for more than
6 weeks can lead to battery
discharge. Disconnect the clamp from the negative terminal of the vehicle
battery.
Ensure the ignition is switched off
before connecting or disconnecting
the vehicle battery.
The anti-theft alarm siren must be
deactivated as follows: Switch the ignition on then off, disconnect the
vehicle's battery within 15 seconds.
Page 161 of 223

Vehicle care159
Retrofitted electrical or electronic
accessories can place an additional load on the vehicle battery or
discharge the battery. Seek the
assistance of a workshop regarding technical possibilities, such as fitting
a more powerful battery.
Ensure the ignition is switched off
before reconnecting the vehicle
battery. Then perform the following actions:
1. Set date and time in the information display 3 77.
2. If necessary, activate the power windows and sun roof 3 30, 3 32.
In order to prevent the vehicle battery
from discharging, some consumers
such as the courtesy lights
automatically switch off after a delay.
Charge a disconnected vehicle
battery every 6 weeks.
Vehicle battery discharge protection
3 114.Replacing the vehicle battery
Notice
Any deviation from the instructions
given in this paragraph may lead to
a temporary deactivation of the stop-
start system.
When the vehicle battery is being
replaced, please ensure that there
are no open ventilation holes in the
vicinity of the positive terminal. If a
ventilation hole is open in this area, it
must be closed off with a dummy cap, and the ventilation in the vicinity of the
negative terminal must be opened.
Only use batteries that allow the fuse
box to be mounted above the vehicle
battery.
In vehicles with stop-start system,
ensure to have the AGM (Absorptive
Glass Mat) vehicle battery replaced
with an AGM battery again.
An AGM battery can be identified by
the label on the battery. We
recommend the use of an original
Vauxhall battery.
Notice
Using an AGM vehicle battery
different from the original Vauxhall
vehicle battery may result in a lower performance of the stop-start
system.
We recommend that you have the
vehicle battery replaced by a
workshop.
Stop-start system 3 125.
Page 162 of 223

160Vehicle care
Charging the vehicle battery9Warning
On vehicles with stop-start
system, ensure that the charging potential does not exceed
14.6 volts when using a battery
charger. Otherwise the vehicle
battery might be damaged.
Jump starting 3 190.
Warning label
Meaning of symbols: ■ No sparks, naked flames or smoking.
■ Always shield eyes. Explosive gases can cause blindness or
injury.
■ Keep the vehicle battery out of reach of children.
■ The vehicle battery contains sulfuric acid which could cause
blindness or serious burn injuries.
■ See the Owner's Manual for further
information.
■ Explosive gas may be present in the vicinity of the vehicle battery.Diesel fuel filter
Drain diesel fuel filter of residual
water at every engine oil change.
Place a container underneath the
filter housing. Turn drain plug
anticlockwise using a suitable
screwdriver, to drain off the water.
The filter is drained as soon as diesel fuel emerges from the port. Retighten
the drain plug by turning it clockwise.
With engine switched off, turn ignition
key to ON, wait approx. 5 seconds,
and turn key to LOCK to perform
priming operation. Perform this
Page 173 of 223

Vehicle care171
FuseCircuitABSAnti-lock Brake
SystemA/CClimate control,
air conditioning
systemBATT1Instrument panel
fuse boxBATT2Instrument panel
fuse boxBATT3Instrument panel
fuse boxBCMBody Control
ModuleECMEngine Control
ModuleECM PWR TRNEngine Control
Module, Power‐
trainENG SNSREngine sensorsEPBElectrical parking
brakeFuseCircuitFAN1Cooling fanFAN3Cooling fanFRT FOGFront fog lightsFRT WPRFront wiperFUEL/VACFuel pump,
vacuum pumpHDLP WASHERHeadlight washerHI BEAM LHHigh beam (left-
hand)HI BEAM RHHigh beam (right-
hand)HORNHornHTD WASH/MIRHeated washer
fluid, heated exte‐
rior mirrorsIGN COIL AIgnition coilIGN COIL BIgnition coilLO BEAM LHLow beam (left-
hand)FuseCircuitLO BEAM RHLow beam (right-
hand)PRK LP LHParking light (left-
hand)PRK LP RHParking light
(right-hand)PWM FANPulse width modu‐ lation fanREAR DEFOGHeated rear
windowREAR WPRRear wiperSPARE–STOP LAMPBrake lightsSTRTRStarterTCMTransmission
Control ModuleTRLR PRL LPTrailer parking
lights
Page 181 of 223

Vehicle care179
Notice
In countries where the tyre pressure
monitoring system is legally
required, the use of wheels without
pressure sensors will invalidate the
vehicle type approval.
The TPMS sensors monitor the air
pressure in the tyres and transmit tyre pressure readings to a receiver
located in the vehicle.
Each tyre, including the spare, should be checked monthly when cold and
inflated to the recommended inflation
pressure 3 210.
Low tyre pressure conditionA detected low tyre pressure
condition is indicated by control
indicator w 3 89.
If w illuminates, stop as soon as
possible and inflate the tyres as
recommended 3 210.
When the system detects a
malfunction, w will flash for approx.
one minute and then remain
continuously illuminated. This
sequence will continue upon
subsequent vehicle start-ups as long as the malfunction exists.
When w is illuminated, the system
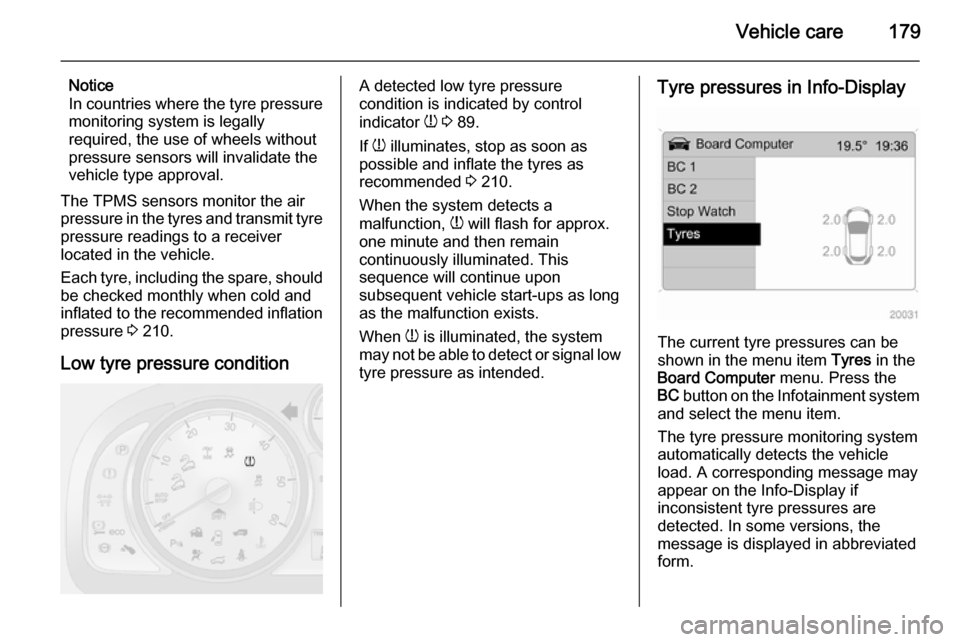
may not be able to detect or signal low tyre pressure as intended.Tyre pressures in Info-Display
The current tyre pressures can be
shown in the menu item Tyres in the
Board Computer menu. Press the
BC button on the Infotainment system
and select the menu item.
The tyre pressure monitoring system
automatically detects the vehicle
load. A corresponding message may appear on the Info-Display if
inconsistent tyre pressures are
detected. In some versions, the
message is displayed in abbreviated
form.
Page 183 of 223

Vehicle care181
TPMS sensor matching process
Each TPMS sensor has a unique
identification code. The identification
code must be matched to a new tyre/ wheel position after rotating the tyres
or replacing one or more of the TPMS
sensors.
The TPMS sensor matching process
should also be performed after
replacing a spare tyre with a road tyre containing a TPMS sensor. The
control indicator w and the warning
message should extinguish at the
next ignition cycle.
The sensors are matched to the tyre/
wheel positions, using a TPMS
relearn tool, in the following order:
■ left front tyre
■ right front tyre
■ right rear tyre
■ left rear tyre
Consult your workshop for service or
to purchase a relearn tool.
There are two minutes to match the
first tyre/wheel position, and
five minutes overall to match all fourtyre/wheel positions. If it takes longer,
the matching process stops and must be restarted.
The TPMS sensor matching process
is as follows:
1. Apply the electrical parking brake 3 137 ; on vehicles with automatic
transmission move the selector
lever to position P.
2. Turn the ignition on 3 124.
3. Initiate the TPMS Learn Mode by simultaneously pressing buttons
p and q on the radio remote
control,
- or -
Press the INFO button on the
Infotainment system until a tyre
learn message appears on the
Info-display. Press and hold the
OK button.
The horn sounds twice and the left front turn signal also illuminates
as confirmation that Learn Mode
has been enabled.
4. Start with the left front tyre.5. Place the relearn tool against the tyre sidewall, near the valve stem.Then press the button to activatethe TPMS sensor. A horn chirp
confirms that the sensor
identification code has been
matched to this tyre and wheel
position. The next relevant turn
signal illuminates.
6. Proceed to the right front tyre, and
repeat the procedure in Step 5.
7. Proceed to the right rear tyre, and
repeat the procedure in Step 5.
8. Proceed to the left rear tyre, and repeat the procedure in Step 5.
The horn sounds twice to indicate
the sensor identification code has been matched, and the TPMS
sensor matching process is no
longer active.
9. Turn off the ignition.
10. Set all four tyres to the recommended inflation pressure
3 210.
Page 192 of 223

190Vehicle care
Only mount one temporary spare
wheel. Do not drive faster than
50 mph. Take curves slowly. Do not
use for a long period of time.
When the temporary spare wheel is
fitted, do not take the vehicle through an automatic vehicle wash with guide rails. The temporary spare wheel may
get caught on the rails, causing
damage to the tyre, wheel and other
vehicle parts.
The use of tyre chains is not permitted on the temporary spare wheel.
Tyre chains 3 183.
Directional tyres Fit directional tyres such that they rollin the direction of travel. The rolling
direction is indicated by a symbol
(e.g. an arrow) on the sidewall.
The following applies to tyres fitted
opposing the rolling direction:
■ Driveability may be affected. Have the defective tyre renewed as soon
as possible and have the wheel
balanced and fitted to the vehicle.■ Do not drive faster than 50 mph.
■ Drive particularly carefully on wet and snow-covered road surfaces.9 Warning
Storing a jack, a wheel or other
equipment in the load
compartment could cause injury if they are not fixed in place
properly. During a sudden stop or
a collision, loose equipment could
cause personal injury or damage
to the vehicle.
Always store the jack and vehicle
tools in their respective storage
compartments and secure them properly.
Always place the damaged wheel
in the load compartment, secured
in the spare wheel well with the
screw-in retainer.
Jump starting
Do not start with quick charger.
A vehicle with a discharged battery can be started using jump leads and
the battery of another vehicle.9 Warning
Be extremely careful when starting
with jump leads. Any deviation
from the following instructions can
lead to injuries or damage caused
by battery explosion or damage to the electrical systems of both
vehicles.
9 Warning
Avoid contact of the battery with
eyes, skin, fabrics and painted
surfaces. The fluid contains
sulphuric acid which can cause
injuries and damage in the event
of direct contact.
■ Never expose the battery to naked flames or sparks.