turn signal VAUXHALL ANTARA 2015 Owner's Manual
[x] Cancel search | Manufacturer: VAUXHALL, Model Year: 2015, Model line: ANTARA, Model: VAUXHALL ANTARA 2015Pages: 223, PDF Size: 6.07 MB
Page 13 of 223

In brief11
1Side air vents .....................120
2 Fixed air vents .................... 121
3 High beam .......................... 107
Headlight flash ...................107
Turn and lane-change
signals ................................ 109
Exit lighting ......................... 113
Parking lights .....................110
Cruise control ....................... 91
4 Remote control on
steering wheel ......................73
Trip computer .....................101
5 Horn ..................................... 74
6 Instruments .......................... 80
7 Windscreen wiper and
washer system, headlight
washer system .....................74
Rear window wiper and
washer system .....................768Info-Display .......................... 95
Check control, tyre
pressure monitoring
system ................................ 178
Trip computer .....................101
9 Centre air vents .................. 120
10 Hazard warning flashers ....108
Parking assist ..................... 143
Electronic Stability Control . 139
Descent control system ...... 140
Status LED for anti-theft
alarm system ........................ 25
Folding exterior mirrors ........28
Eco button for stop/start
system ................................. 125
11 Infotainment system .............10
12 Front passenger airbag ........47
13 Status LEDs for front
passenger airbag .................49
Control indicator for front
passenger seat belt .............42
14 Glovebox .............................. 5715Fuse box ............................ 172
16 Climate control system ....... 115
17 Ignition switch with
steering wheel lock ............124
18 Accelerator pedal ...............124
19 Driver airbag ........................ 47
20 Brake pedal ........................ 137
21 Clutch pedal ....................... 123
22 Steering wheel adjustment ..73
23 Bonnet release ...................154
24 Coin storage ......................... 56
25 Card holder .......................... 56
26 Light switch ........................ 106
Automatic light control .......106
Instrument illumination .......111
Rear fog light ...................... 110
Front fog lights ...................109
Headlight range
adjustment ......................... 107
Page 15 of 223
In brief13
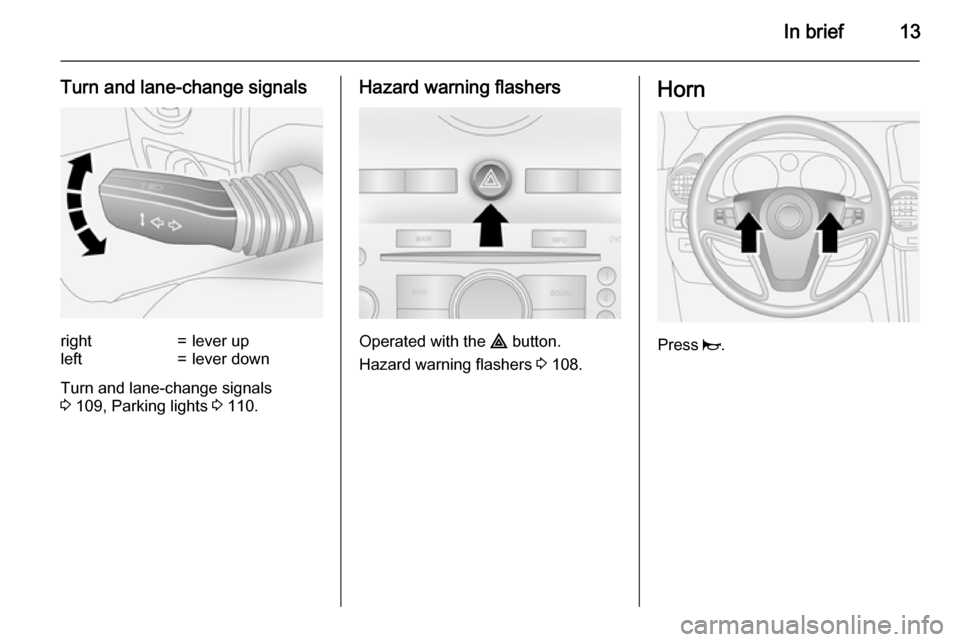
Turn and lane-change signalsright=lever upleft=lever down
Turn and lane-change signals
3 109, Parking lights 3 110.
Hazard warning flashers
Operated with the ¨ button.
Hazard warning flashers 3 108.
Horn
Press j.
Page 32 of 223
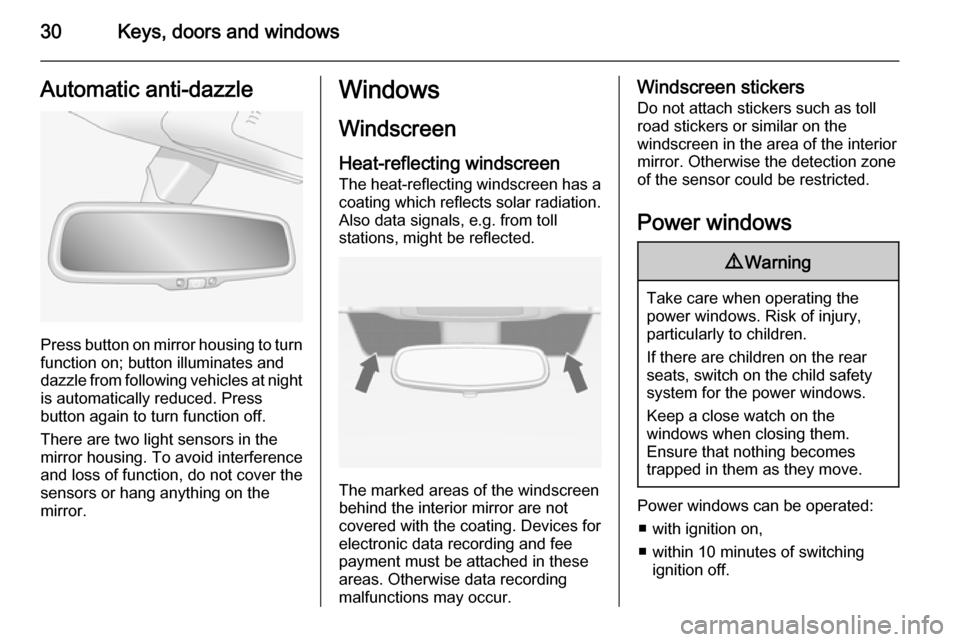
30Keys, doors and windowsAutomatic anti-dazzle
Press button on mirror housing to turn
function on; button illuminates and
dazzle from following vehicles at night
is automatically reduced. Press
button again to turn function off.
There are two light sensors in the
mirror housing. To avoid interference
and loss of function, do not cover the
sensors or hang anything on the mirror.
Windows
Windscreen
Heat-reflecting windscreen The heat-reflecting windscreen has a
coating which reflects solar radiation.
Also data signals, e.g. from toll
stations, might be reflected.
The marked areas of the windscreen
behind the interior mirror are not
covered with the coating. Devices for
electronic data recording and fee
payment must be attached in these
areas. Otherwise data recording
malfunctions may occur.
Windscreen stickers
Do not attach stickers such as toll
road stickers or similar on the
windscreen in the area of the interior
mirror. Otherwise the detection zone
of the sensor could be restricted.
Power windows9 Warning
Take care when operating the
power windows. Risk of injury,
particularly to children.
If there are children on the rear seats, switch on the child safety
system for the power windows.
Keep a close watch on the
windows when closing them.
Ensure that nothing becomes
trapped in them as they move.
Power windows can be operated:
■ with ignition on,
■ within 10 minutes of switching ignition off.
Page 86 of 223

84Instruments and controlsTurn signal
O illuminates or flashes green.
The relevant control indicator flashes
when the turn signal is switched on
3 109.
Rapid flashing: failure of a turn signal bulb or the associated fuse or failure
of a turn signal light on trailer.
Both control indicators flash when the
hazard warning flashers are active
3 108.
Bulb replacement 3 161, Fuses
3 167.
Turn signals 3 109.
Seat belt reminder Seat belt reminder for front
seats X for driver's seat illuminates or
flashes red.
k for front passenger's seat
illuminates or flashes red, when the
seat is occupied.When the engine is running, if seat
belt is not engaged, the control
indicator will flash for 100 seconds
then illuminate until seat belt is
fastened.
If vehicle speed exceeds 14 mph, the
control indicator will flash for
100 seconds along with a warning
chime and remains illuminated until seat belt is fastened.
Fastening the seat belt 3 41.
Front passenger seat belt reminder k
3 42.
Airbag and belt tensioners v illuminates red.
When the ignition is switched on, v
flashes briefly. If it does not flash,
stays lit or flashes during driving,
there is a fault in the airbag system.
Seek the assistance of a workshop.
The airbags and belt pretensioners
may fail to trigger in the event of an
accident.
Deployment of the belt pretensioners
or airbags is indicated by continuous
illumination of v.9
Warning
Have the cause of the fault
remedied immediately by a
workshop.
Belt pretensioners, airbag system
3 41, 3 44.
Charging system
p illuminates red.
Illuminates when the ignition is
switched on and extinguishes shortly
after the engine starts. If it does not
illuminate, seek the assistance of a
workshop.
Illuminates when the engine is running
Stop vehicle and switch off engine.
Battery is not charging. Engine
cooling may be interrupted. The
brake servo unit may cease to be
effective.
Page 102 of 223
100Instruments and controlsVehicle messagesWarning chimes
When starting the engine or whilst driving
Only one warning chime will sound at a time.
The warning chime regarding
unfastened seat belts has priority
over any other warning chime.
■ If seat belt is not fastened.
■ When operating the turn and lane- change signals.
■ When the vehicle is being driven and the electrical parking brake is
applied 3 137.
■ When releasing the electrical parking brake without applying the
foot brake 3 90.
■ If there is a fault in the braking system 3 85.
■ If the parking assist detects an object 3 143.■ During automatic self-cleaning of
the diesel particle filter 3 128.
■ In vehicles equipped with engine overspeed warning; when vehicle
speed exceeds 75 mph 3 91.
When the vehicle is parked and/ or the driver's door is opened ■ When the key is in the ignition switch.
■ With exterior lights on.
Tyre pressure
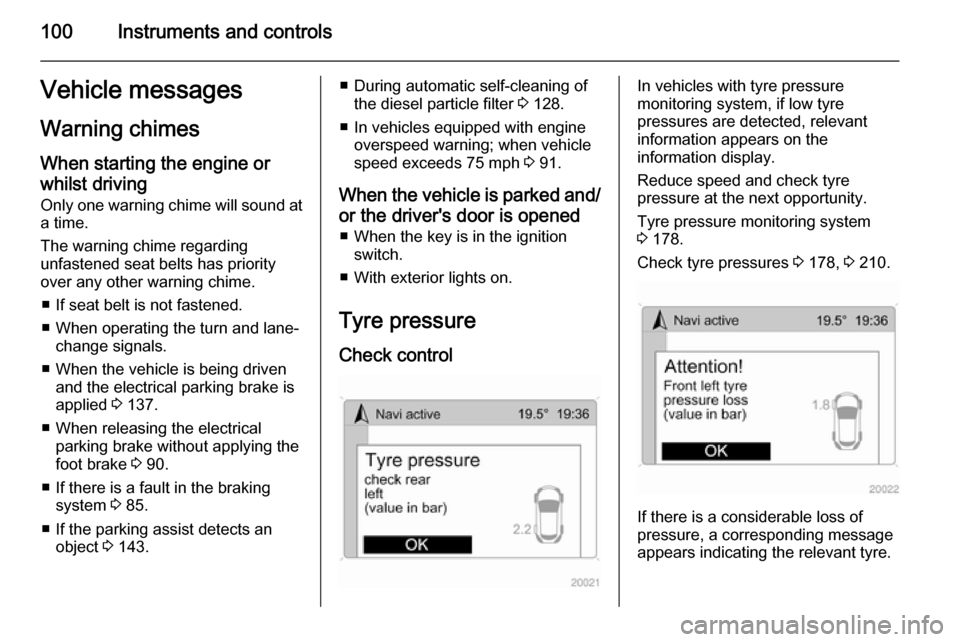
Check controlIn vehicles with tyre pressure
monitoring system, if low tyre
pressures are detected, relevant
information appears on the
information display.
Reduce speed and check tyre
pressure at the next opportunity.
Tyre pressure monitoring system
3 178.
Check tyre pressures 3 178, 3 210.
If there is a considerable loss of
pressure, a corresponding message
appears indicating the relevant tyre.
Page 111 of 223
Lighting109Turn and lane-change
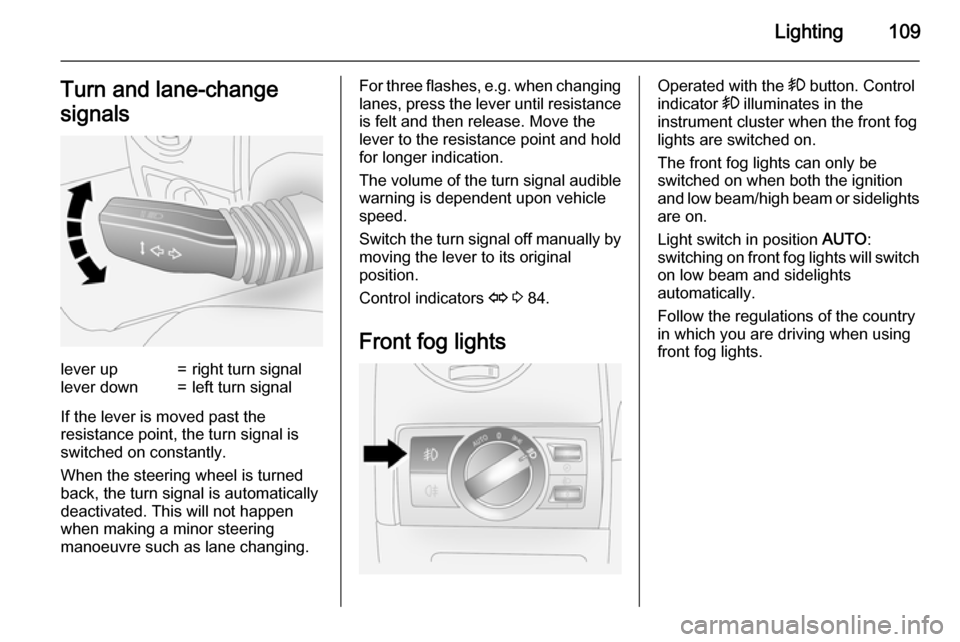
signalslever up=right turn signallever down=left turn signal
If the lever is moved past the
resistance point, the turn signal is
switched on constantly.
When the steering wheel is turned
back, the turn signal is automatically
deactivated. This will not happen
when making a minor steering
manoeuvre such as lane changing.
For three flashes, e.g. when changing
lanes, press the lever until resistance is felt and then release. Move the
lever to the resistance point and hold
for longer indication.
The volume of the turn signal audible
warning is dependent upon vehicle
speed.
Switch the turn signal off manually by moving the lever to its original
position.
Control indicators O 3 84.
Front fog lightsOperated with the > button. Control
indicator > illuminates in the
instrument cluster when the front fog
lights are switched on.
The front fog lights can only be
switched on when both the ignition
and low beam/high beam or sidelights are on.
Light switch in position AUTO:
switching on front fog lights will switch
on low beam and sidelights
automatically.
Follow the regulations of the country
in which you are driving when using
front fog lights.
Page 112 of 223
110LightingRear fog lights
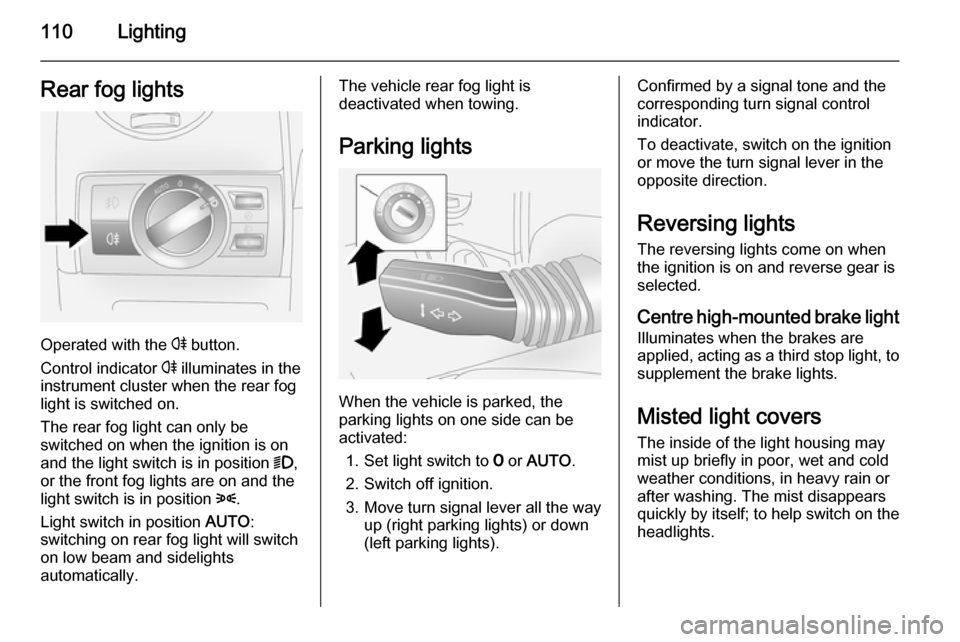
Operated with the r button.
Control indicator r illuminates in the
instrument cluster when the rear fog light is switched on.
The rear fog light can only be
switched on when the ignition is on
and the light switch is in position 9,
or the front fog lights are on and the
light switch is in position 8.
Light switch in position AUTO:
switching on rear fog light will switch
on low beam and sidelights
automatically.
The vehicle rear fog light is
deactivated when towing.
Parking lights
When the vehicle is parked, the
parking lights on one side can be
activated:
1. Set light switch to 7 or AUTO .
2. Switch off ignition.
3. Move turn signal lever all the way up (right parking lights) or down
(left parking lights).
Confirmed by a signal tone and the
corresponding turn signal control
indicator.
To deactivate, switch on the ignition or move the turn signal lever in the
opposite direction.
Reversing lights The reversing lights come on when
the ignition is on and reverse gear is
selected.
Centre high-mounted brake light
Illuminates when the brakes are
applied, acting as a third stop light, to supplement the brake lights.
Misted light covers The inside of the light housing may
mist up briefly in poor, wet and cold weather conditions, in heavy rain or
after washing. The mist disappears
quickly by itself; to help switch on the
headlights.
Page 115 of 223

Lighting113
Rear reading lights
Left and right rear reading lights are
individually operable. Press to
activate and deactivate.
Sunvisor lights
Illuminates when the vanity mirror
cover is opened 3 32.
Lighting features
Entry lighting
Welcome lighting Depending upon outside light
conditions, when unlocking the
vehicle with the remote control the
hazard warning lights flash twice and
the exterior and interior lights
illuminate for 20 seconds. This
function facilitates locating the vehicle
when it is dark.
Exit lighting The low beam and reversing lights
illuminate for 30 seconds after the
driver exits the vehicle and closes the
door.Switching on
1. Switch off ignition.
2. Remove ignition key.
3. Open driver's door.
4. Pull turn signal lever.
5. Close driver's door.
If the driver's door is not closed the
lights switch off after two minutes.
Exit lighting can be deactivated by
inserting the key in the ignition switch or by pulling the turn signal lever
again while the driver's door is open.
Page 165 of 223
Vehicle care163
5. Engage bulb retaining spring andreplace headlamp cap.
6. Reinstall headlamp assembly.
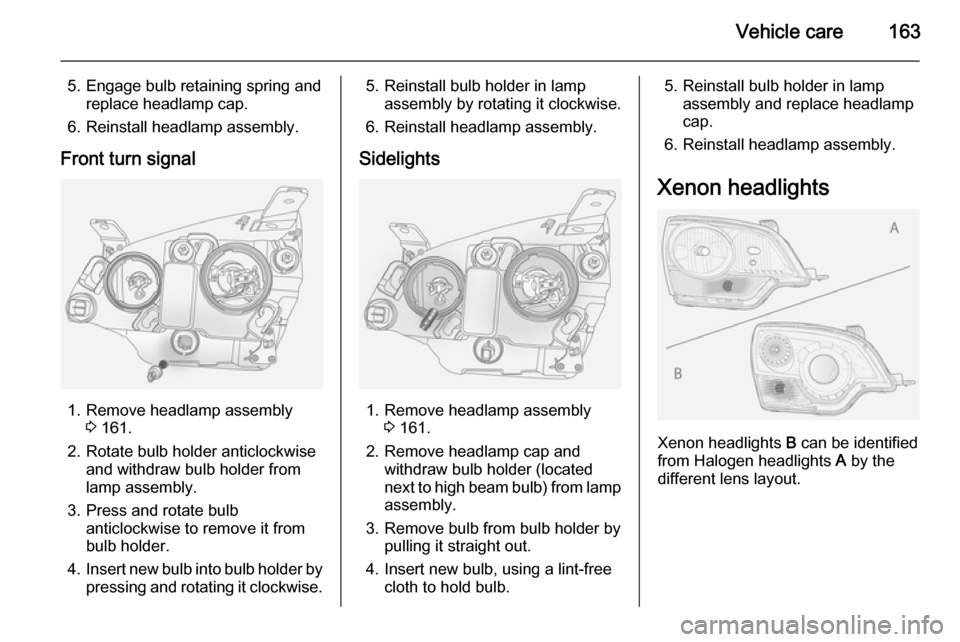
Front turn signal
1. Remove headlamp assembly 3 161.
2. Rotate bulb holder anticlockwise and withdraw bulb holder from
lamp assembly.
3. Press and rotate bulb anticlockwise to remove it from
bulb holder.
4. Insert new bulb into bulb holder by
pressing and rotating it clockwise.
5. Reinstall bulb holder in lamp assembly by rotating it clockwise.
6. Reinstall headlamp assembly.
Sidelights
1. Remove headlamp assembly 3 161.
2. Remove headlamp cap and withdraw bulb holder (located
next to high beam bulb) from lamp
assembly.
3. Remove bulb from bulb holder by pulling it straight out.
4. Insert new bulb, using a lint-free cloth to hold bulb.
5. Reinstall bulb holder in lampassembly and replace headlamp
cap.
6. Reinstall headlamp assembly.
Xenon headlights
Xenon headlights B can be identified
from Halogen headlights A by the
different lens layout.
Page 166 of 223
164Vehicle care
Low and high beam9Danger
Xenon headlights work under
extremely high electrical voltage.
Do not touch. Have bulbs replaced by a workshop.
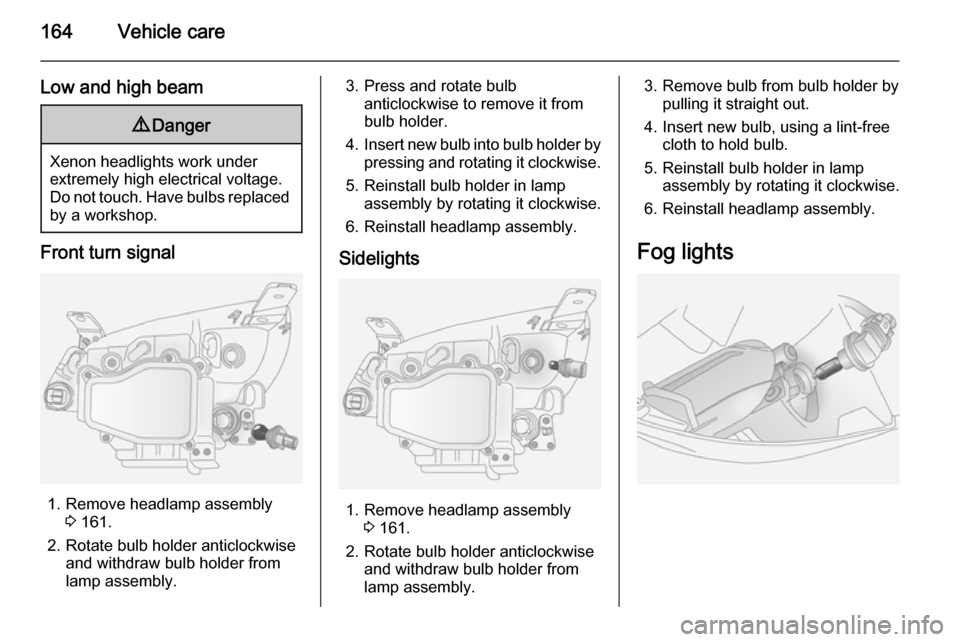
Front turn signal
1. Remove headlamp assembly 3 161.
2. Rotate bulb holder anticlockwise and withdraw bulb holder from
lamp assembly.
3. Press and rotate bulb anticlockwise to remove it from
bulb holder.
4. Insert new bulb into bulb holder by
pressing and rotating it clockwise.
5. Reinstall bulb holder in lamp assembly by rotating it clockwise.
6. Reinstall headlamp assembly.
Sidelights
1. Remove headlamp assembly 3 161.
2. Rotate bulb holder anticlockwise and withdraw bulb holder from
lamp assembly.
3. Remove bulb from bulb holder by pulling it straight out.
4. Insert new bulb, using a lint-free cloth to hold bulb.
5. Reinstall bulb holder in lamp assembly by rotating it clockwise.
6. Reinstall headlamp assembly.
Fog lights