automatic transmission VAUXHALL ASTRA J 2015.75 User Guide
[x] Cancel search | Manufacturer: VAUXHALL, Model Year: 2015.75, Model line: ASTRA J, Model: VAUXHALL ASTRA J 2015.75Pages: 337, PDF Size: 10.17 MB
Page 171 of 337

Driving and operating169
The selected gear is indicated in the
instrument cluster.
If a higher gear is selected when
vehicle speed is too low, or a lower
gear when vehicle speed is too high,
the shift is not executed. This can
cause a message in the Driver
Information Centre (DIC).
In manual mode, no automatic
shifting to a higher gear takes place
at high engine revolutions.
Electronic driving
programmes ■ Following a cold start, the operating
temperature programme increasesengine speed to quickly bring the
catalytic converter to the required
temperature.
■ The automatic neutral shift function
automatically shifts to idling when
the vehicle is stopped with a
forward gear engaged and the
brake pedal is pressed.■ When SPORT mode is engaged, the vehicle shifts at higher engine
speeds (unless cruise control is
on). SPORT mode 3 176.
■ Special programmes automatically adapt the shifting points when
driving up inclines or down hills.
■ When starting off in snowy or icy conditions or on other slippery
surfaces, the electronic
transmission control selects a
higher gear automatically.
Kickdown If the accelerator pedal is pressed
down completely in automatic mode, the transmission shifts to a lower gear
depending on engine speed.
Fault
In the event of a fault, control indicator g illuminates. Additionally, a code
number or a vehicle message is
displayed in the Driver Information
Centre (DIC). Vehicle messages
3 125.The transmission no longer shifts
automatically. Continued travel ispossible with manual shifting.
Only the highest gear is available.
Depending on the fault, 2nd gear may also be available in manual mode.
Shift only when vehicle is at a
standstill.
Have the cause of the fault remedied
by a workshop.
Interruption of power
supply
In the event of an interruption of
power supply, the selector lever
cannot be moved out of the P
position. The ignition key cannot be
removed from the ignition switch.
If the vehicle battery is discharged,
start the vehicle using jump leads
3 277.
If the vehicle battery is not the cause
of the fault, release the selector lever.
1. Apply the parking brake.
Page 175 of 337

Driving and operating173adequate force. For maximum
force, e.g. parking with trailer or on
inclines, pull switch m twice.
The electric parking brake is
applied when control indicator m
illuminates 3 114.
The electric parking brake can always
be activated, even if the ignition is off.
Do not operate electric parking brake
system too often without engine
running, as this will discharge the
vehicle battery.
Before leaving the vehicle, check the electric parking brake status. Control
indicator m 3 114.
Releasing
Switch on ignition. Keep brake pedal
depressed and then push switch m.
Drive away function
Depressing clutch pedal (manual
transmission) or engaging drive gear
(automatic transmission) and then
depressing the accelerator pedal
releases the electric parking brake
automatically. This is not possible
when the switch is pulled at the same
time.
This function also helps driving away
on inclines.
Aggressive drive away may reduce
life time of wear parts.
Dynamic braking when vehicle is
moving
When the vehicle is moving and the
switch m is kept pulled, the electric
parking brake system will decelerate the vehicle, but will not apply
statically.
As soon as the switch m is released,
dynamic braking will be stopped.
Fault
Failure mode of electric parking brake
is indicated by control indicator j and
by a code number or a vehicle
message which is displayed in the
Driver Information Centre (DIC).
Vehicle messages 3 125.Apply electric parking brake: pull and
hold the switch m for more than
5 seconds. If control indicator m
illuminates, electric parking brake is
applied.
Release electric parking brake: push and hold the switch m for more than
2 seconds. If control indicator m
extinguishes, electric parking brake is released.
Control indicator m flashes: electric
parking brake is not fully applied or released. When continuously
flashing, release electric parking
brake and retry applying.
Brake assist
If the brake pedal is depressed
quickly and forcefully, maximum
brake force is automatically applied
(full braking).
Maintain steady pressure on the
brake pedal for as long as full braking
is required. Maximum brake force is
automatically reduced when the
brake pedal is released.
Page 179 of 337

Driving and operating177
■ Antilock brake system (ABS) withcornering brake control (CBC)
■ Automatic transmission
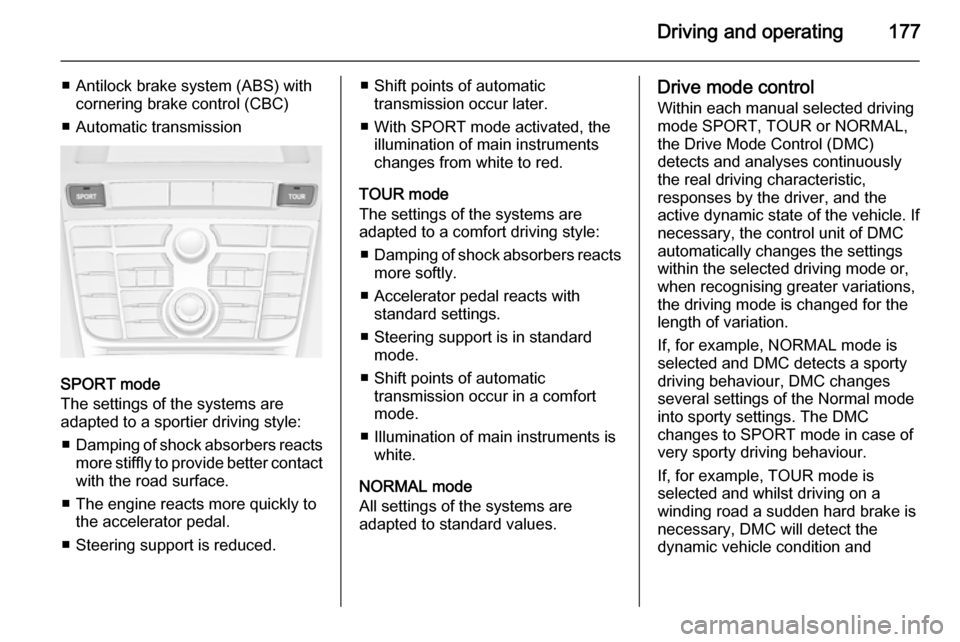
SPORT mode
The settings of the systems are
adapted to a sportier driving style:
■ Damping of shock absorbers reacts
more stiffly to provide better contact with the road surface.
■ The engine reacts more quickly to the accelerator pedal.
■ Steering support is reduced.
■ Shift points of automatic transmission occur later.
■ With SPORT mode activated, the illumination of main instruments
changes from white to red.
TOUR mode
The settings of the systems are
adapted to a comfort driving style:
■ Damping of shock absorbers reacts
more softly.
■ Accelerator pedal reacts with standard settings.
■ Steering support is in standard mode.
■ Shift points of automatic transmission occur in a comfort
mode.
■ Illumination of main instruments is white.
NORMAL mode
All settings of the systems are
adapted to standard values.Drive mode control
Within each manual selected driving
mode SPORT, TOUR or NORMAL,
the Drive Mode Control (DMC)
detects and analyses continuously
the real driving characteristic,
responses by the driver, and the
active dynamic state of the vehicle. If
necessary, the control unit of DMC
automatically changes the settings
within the selected driving mode or,
when recognising greater variations,
the driving mode is changed for the
length of variation.
If, for example, NORMAL mode is selected and DMC detects a sporty
driving behaviour, DMC changes
several settings of the Normal mode
into sporty settings. The DMC
changes to SPORT mode in case of
very sporty driving behaviour.
If, for example, TOUR mode is
selected and whilst driving on a
winding road a sudden hard brake is
necessary, DMC will detect the
dynamic vehicle condition and
Page 181 of 337

Driving and operating179
Personalised settings in the VXR
mode
The driver can select the functions of
the VXR mode when VXR is pressed.
These settings can be changed in the Settings menu in the Info-Display.
Vehicle personalisation 3 131.Driver assistance
systems9 Warning
Driver assistance systems are
developed to support the driver
and not to replace the driver's
attention.
The driver accepts full
responsibility when driving the
vehicle.
When using driver assistance
systems, always take care
regarding the current traffic
situation.
Cruise control
The Cruise control can store and
maintain speeds of approx. 20 to
120 mph. Deviations from the stored
speeds may occur when driving uphill or downhill.
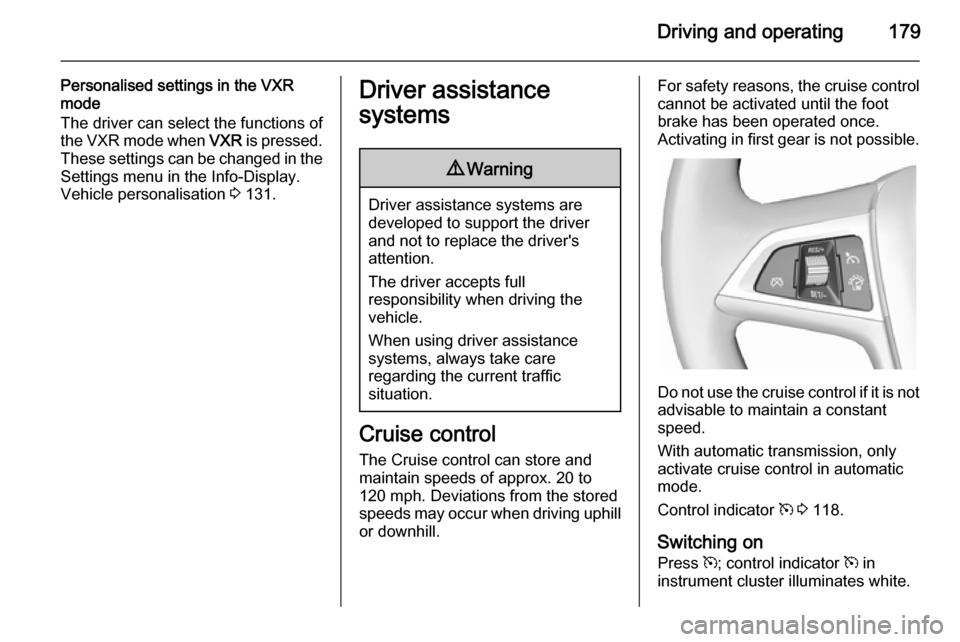
For safety reasons, the cruise controlcannot be activated until the foot
brake has been operated once.
Activating in first gear is not possible.
Do not use the cruise control if it is not advisable to maintain a constant
speed.
With automatic transmission, only
activate cruise control in automatic
mode.
Control indicator m 3 118.
Switching on Press m; control indicator m in
instrument cluster illuminates white.
Page 188 of 337

186Driving and operating
The green illuminated vehicle ahead
control indicator A is displayed in the
speedometer when the system
detects a vehicle in the driving path.
If this symbol does not display, or
displays briefly, adaptive cruise
control will not respond to vehicles
ahead.
Deactivation Adaptive cruise control is deactivated
by the driver when:
■ y is pressed.
■ The brake pedal is depressed.
■ The clutch pedal is depressed for more than four seconds.
■ The gear selector lever of automatic transmission is moved to
N .
The system is also automatically
deactivated when:
■ Vehicle speed slows down below 28 mph or accelerates above
120 mph.
■ The Traction Control system (TC) is
operating for more than
20 seconds.■ The Electronic Stability Control (ESC) is operating.
■ There is no traffic and nothing detected on the road sides for
several minutes. In this case, there
are no radar echoes and the sensor may report that it is blocked.
■ The collision imminent braking system is applying the brakes.
■ The radar sensor is blocked by an ice or water film.
■ A fault is detected in the radar, engine or brake system.
When adaptive cruise control is
deactivated automatically, the control indicator m illuminates white and a
warning symbol is displayed as a pop-
up in the DIC.
The stored speed is maintained.
9 Warning
When adaptive cruise control is
deactivated, the driver must take
over full brake and engine control.
Switching off
Press C to switch off adaptive cruise
control. The control indicator m
extinguishes. The stored speed is
deleted.
Switching off the ignition also
switches off adaptive cruise control
and deletes the stored speed.
Page 265 of 337

Vehicle care263
performed after replacing a spare tyrewith a road tyre containing the TPMS
sensor.
The malfunction light and the warning
message or code should go off at the
next ignition cycle. The sensors are
matched to the tyre/wheel positions,
using a TPMS relearn tool, in the
following order: left side front tyre,
right side front tyre, right side rear tyre and left side rear tyre. The turn signal
light at the current active position is
illuminated until sensor is matched.
Consult your workshop for service or
to purchase a relearn tool. There are
two minutes to match the first tyre/
wheel position, and five minutes
overall to match all four tyre/wheel
positions. If it takes longer, the
matching process stops and must be
restarted.
The TPMS sensor matching process is:
1. Apply the parking brake; on vehicles with automatic
transmission set the selector lever
to P.
2. Turn the ignition on.3. Use MENU on the turn signal
lever to select the Vehicle
Information Menu in the DIC.
4. Turn the adjuster wheel to scroll to
the tyre pressure menu.
5. Press the SET/CLR button to
begin the sensor matching process. A message requesting
acceptance of the process should display.
6. Press the SET/CLR button again
to confirm the selection. The horn sounds twice to signal the
receiver is in relearn mode.
7. Start with the left side front tyre.
8. Place the relearn tool against the tyre sidewall, near the valve stem.
Then press the button to activate
the TPMS sensor. A horn chirp
confirms that the sensor
identification code has been
matched to this tyre and wheel
position.
9. Proceed to the right side front tyre,
and repeat the procedure in
Step 8.10. Proceed to the right side rear tyre,
and repeat the procedure in
Step 8.
11. Proceed to the left side rear tyre, and repeat the procedure in
Step 8. The horn sounds twice to
indicate the sensor identification
code has been matched to the left side rear tyre, and the TPMS
sensor matching process is no
longer active.
12. Turn off the ignition.
13. Set all four tyres to the recommended air pressure level
as indicated on the tyre pressure
label.
14. Ensure the tyre loading status is set according selected pressure
3 118.
Temperature dependency Tyre pressure depends on the
temperature of the tyre. During
driving, tyre temperature and
pressure increase.
Page 279 of 337

Vehicle care277Jump starting
Do not start with quick charger.
A vehicle with a discharged vehicle
battery can be started using jump
leads and the vehicle battery of
another vehicle.9 Warning
Be extremely careful when starting
with jump leads. Any deviation
from the following instructions can
lead to injuries or damage caused
by battery explosion or damage to the electrical systems of both
vehicles.
9 Warning
Avoid contact of the battery with
eyes, skin, fabrics and painted
surfaces. The fluid contains
sulphuric acid which can cause
injuries and damage in the event
of direct contact.
■ Never expose the vehicle battery to
naked flames or sparks.
■ A discharged vehicle battery can already freeze at a temperature of
0 °C. Defrost the frozen vehicle
battery before connecting jump
leads.
■ Wear eye protection and protective
clothing when handling a vehicle
battery.
■ Use a booster vehicle battery with the same voltage (12 Volts). Its
capacity (Ah) must not be much less than that of the discharged
vehicle battery.
■ Use jump leads with insulated terminals and a cross section of at
least 16 mm 2
(25 mm 2
for diesel
engines).
■ Do not disconnect the discharged vehicle battery from the vehicle.
■ Switch off all unnecessary electrical
consumers.
■ Do not lean over the vehicle battery
during jump starting.■ Do not allow the terminals of one lead to touch those of the other
lead.
■ The vehicles must not come into contact with each other during the
jump starting process.
■ Apply the parking brake, transmission in neutral, automatic
transmission in P.
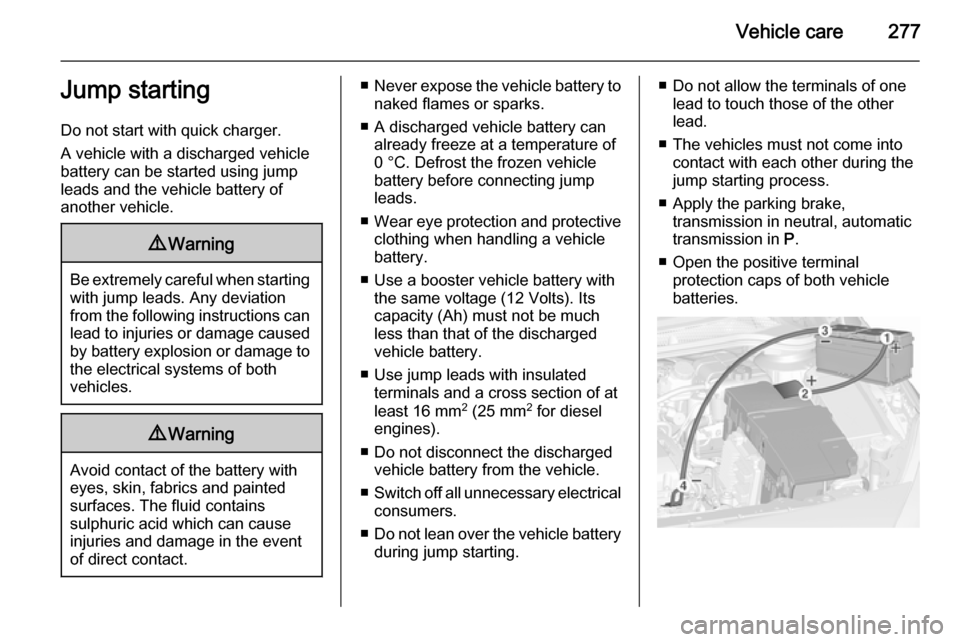
■ Open the positive terminal protection caps of both vehicle
batteries.
Page 281 of 337

Vehicle care279
Screw in the towing eye as far as it will
go until it stops in a horizontal
position.
Attach a tow rope – or better still a tow
rod – to the towing eye.
The towing eye must only be used for towing and not for recovering the
vehicle.
Switch on ignition to release steering
wheel lock and to permit operation of
brake lights, horn and windscreen
wiper.
Transmission in neutral.
Caution
Drive slowly. Do not drive jerkily.
Excessive tractive force can
damage the vehicle.
When the engine is not running,
considerably more force is needed to
brake and steer.
To prevent the entry of exhaust gases from the towing vehicle, switch on the
air recirculation and close the
windows.
Vehicles with automatic transmission: The vehicle must be towed facing
forwards, not faster than 50 mph nor further than 60 miles. In all other
cases and when the transmission is
defective, the front axle must be
raised off the ground.
Seek the assistance of a workshop. After towing, unscrew the towing eye.
Insert cap at the top and engage
downwards.
Towing another vehicle
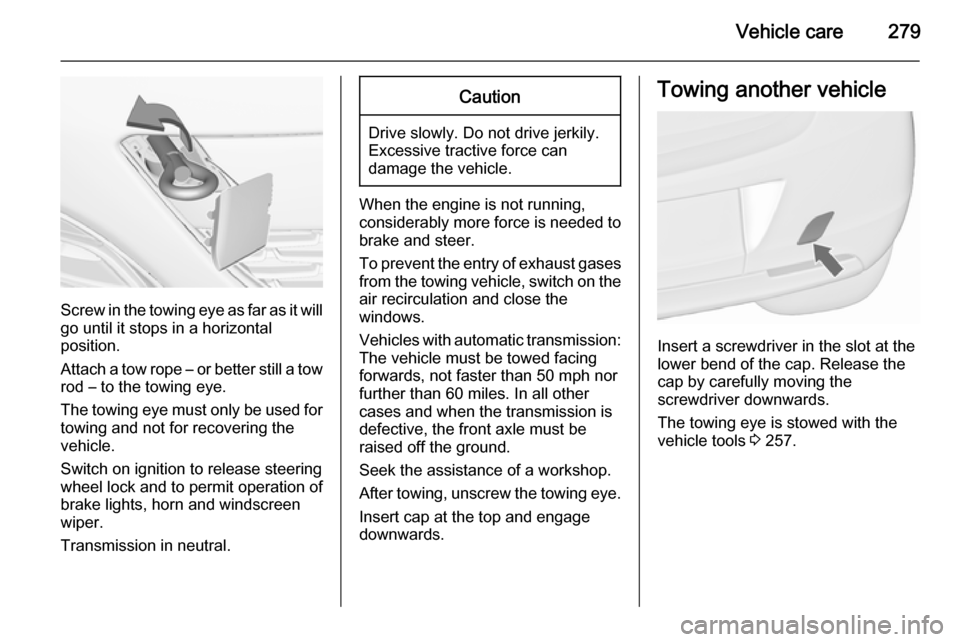
Insert a screwdriver in the slot at the
lower bend of the cap. Release the
cap by carefully moving the
screwdriver downwards.
The towing eye is stowed with the
vehicle tools 3 257.
Page 297 of 337
![VAUXHALL ASTRA J 2015.75 User Guide Technical data295Performance3-door hatchbackEngineA14XERB14NELB14NETA16XHTB16SHTB16SHLMaximum speed 5)
[mph]Manual transmission111 6)120125136143–Automatic transmission––124––1345)
The maxi VAUXHALL ASTRA J 2015.75 User Guide Technical data295Performance3-door hatchbackEngineA14XERB14NELB14NETA16XHTB16SHTB16SHLMaximum speed 5)
[mph]Manual transmission111 6)120125136143–Automatic transmission––124––1345)
The maxi](/img/38/19342/w960_19342-296.png)
Technical data295Performance3-door hatchbackEngineA14XERB14NELB14NETA16XHTB16SHTB16SHLMaximum speed 5)
[mph]Manual transmission111 6)120125136143–Automatic transmission––124––1345)
The maximum speed indicated is achievable at kerb weight (without driver) plus 200 kg payload. Optional equipment could reduce the specified maximum
speed of the vehicle.
6) 4th gear.
EngineA18XERB20NFTB16DTHB16DTL
A20DTH
121 kWA20DTH
96 kW
A20DTR
Maximum speed 5)
[mph]Manual transmission124155123113134–7)140Automatic transmission––––131––5)
The maximum speed indicated is achievable at kerb weight (without driver) plus 200 kg payload. Optional equipment could reduce the specified maximum
speed of the vehicle.
7) Value was not available at time of printing.
Page 298 of 337
![VAUXHALL ASTRA J 2015.75 User Guide 296Technical data
5-door hatchbackEngineB14NELB14NET LPGB14NETB16XERB16SHLMaximum speed5)
[mph]Manual transmission120126126118137Automatic transmission––1241141325) The maximum speed indicated is VAUXHALL ASTRA J 2015.75 User Guide 296Technical data
5-door hatchbackEngineB14NELB14NET LPGB14NETB16XERB16SHLMaximum speed5)
[mph]Manual transmission120126126118137Automatic transmission––1241141325) The maximum speed indicated is](/img/38/19342/w960_19342-297.png)
296Technical data
5-door hatchbackEngineB14NELB14NET LPGB14NETB16XERB16SHLMaximum speed5)
[mph]Manual transmission120126126118137Automatic transmission––1241141325) The maximum speed indicated is achievable at kerb weight (without driver) plus 200 kg payload. Optional equipment could reduce the specified maximum
speed of the vehicle.EngineA16XHTA13DTEB16DTHB16DTLA17DTCMaximum speed 5)
[mph]Manual transmission137109124114116Automatic transmission132––––5) The maximum speed indicated is achievable at kerb weight (without driver) plus 200 kg payload. Optional equipment could reduce the specified maximum
speed of the vehicle.EngineA17DTSA20DTHA20DTRMaximum speed 5)
[mph]Manual transmission123134140Automatic transmission–131–5) The maximum speed indicated is achievable at kerb weight (without driver) plus 200 kg payload. Optional equipment could reduce the specified maximum
speed of the vehicle.