turn signal VAUXHALL ASTRA J 2016.25 Owner's Guide
[x] Cancel search | Manufacturer: VAUXHALL, Model Year: 2016.25, Model line: ASTRA J, Model: VAUXHALL ASTRA J 2016.25Pages: 267, PDF Size: 7.72 MB
Page 180 of 267

178Driving and operatingParking assist systems do not
detect objects outside the
detection range.
Notice
It is possible that the sensor detects a non-existing object caused by
echo disturbance from external
acoustic noise or mechanical
misalignments (sporadic false
warnings may occur).
Make sure that the front number
plate is properly mounted (not bent
and no gaps to the bumper on the left
or right side) and the sensors are
firmly in place.
Advanced parking assist system
may not respond to changes in the
available parking space after
initiating a parking manoeuvre. The
system may recognize an entry, a
gateway, a courtyard or even a crossing as a parking slot. After
selecting reverse gear the system
will start a parking manoeuvre. Take
care regarding the availability of the
suggested parking slot.
Surface irregularities, e.g. on
construction zones, are not detected
by the system. The driver accepts
responsibility.
Notice
After production, the system
requires a calibration. For optimal
parking guidance, a driving distance of at least 6 miles, including a
number of bends, is required.
Side blind spot alert
The Side blind spot alert system
detects and reports objects on either
side of the vehicle, within a specified
"blind spot" zone. The system alerts
visually in each exterior mirror, when
detecting objects that may not be
visible in the interior and exterior
mirrors.
Side blind spot alert uses some of the
advanced parking assist sensors
which are located in the front and rear bumper on both sides of the vehicle.9 Warning
Side blind spot alert does not
replace driver vision.
The system does not detect:
● vehicles outside the side blind zones which may be rapidly
approaching
● pedestrians, cyclists or animals
Before changing a lane, always
check all mirrors, look over the
shoulder and use the turn signal.
When the system detects a vehicle in the side blind zone while driving
forward, either while passing a
vehicle or being passed, an yellow
warning symbol B will illuminate in
the relevant exterior mirror. If the
driver then activates the turn signal,
the warning symbol B starts flashing
yellow as a warning not to change
lanes.
Page 185 of 267
Driving and operating183
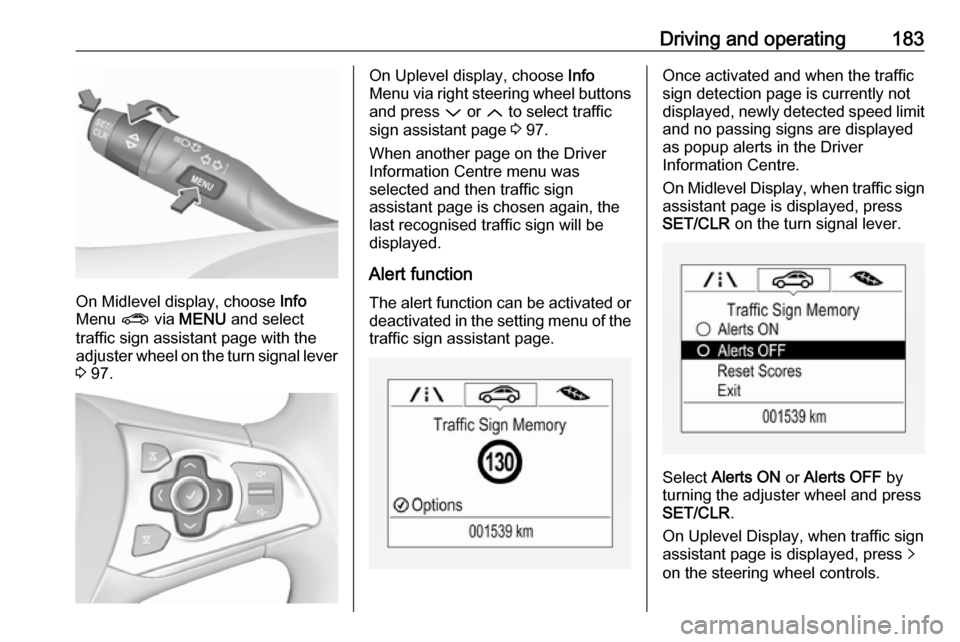
On Midlevel display, choose Info
Menu ? via MENU and select
traffic sign assistant page with the adjuster wheel on the turn signal lever
3 97.
On Uplevel display, choose Info
Menu via right steering wheel buttons
and press P or Q to select traffic
sign assistant page 3 97.
When another page on the Driver Information Centre menu was
selected and then traffic sign
assistant page is chosen again, the
last recognised traffic sign will be
displayed.
Alert function The alert function can be activated or
deactivated in the setting menu of the
traffic sign assistant page.Once activated and when the traffic
sign detection page is currently not
displayed, newly detected speed limit
and no passing signs are displayed
as popup alerts in the Driver
Information Centre.
On Midlevel Display, when traffic sign assistant page is displayed, press
SET/CLR on the turn signal lever.
Select Alerts ON or Alerts OFF by
turning the adjuster wheel and press
SET/CLR .
On Uplevel Display, when traffic sign
assistant page is displayed, press q
on the steering wheel controls.
Page 186 of 267
184Driving and operating
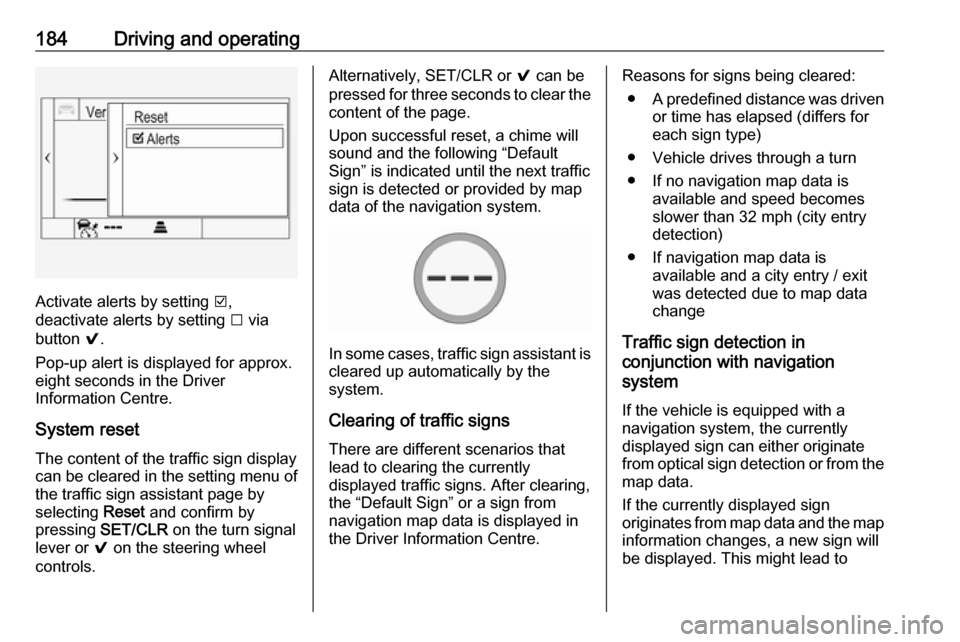
Activate alerts by setting J,
deactivate alerts by setting I via
button 9.
Pop-up alert is displayed for approx.
eight seconds in the Driver
Information Centre.
System reset The content of the traffic sign display
can be cleared in the setting menu of
the traffic sign assistant page by
selecting Reset and confirm by
pressing SET/CLR on the turn signal
lever or 9 on the steering wheel
controls.
Alternatively, SET/CLR or 9 can be
pressed for three seconds to clear the
content of the page.
Upon successful reset, a chime will
sound and the following “Default
Sign” is indicated until the next traffic
sign is detected or provided by map
data of the navigation system.
In some cases, traffic sign assistant is
cleared up automatically by the
system.
Clearing of traffic signs
There are different scenarios that
lead to clearing the currently
displayed traffic signs. After clearing,
the “Default Sign” or a sign from
navigation map data is displayed in
the Driver Information Centre.
Reasons for signs being cleared:
● A predefined distance was driven
or time has elapsed (differs for
each sign type)
● Vehicle drives through a turn
● If no navigation map data is available and speed becomes
slower than 32 mph (city entry
detection)
● If navigation map data is available and a city entry / exit
was detected due to map data
change
Traffic sign detection in
conjunction with navigation
system
If the vehicle is equipped with a
navigation system, the currently
displayed sign can either originate
from optical sign detection or from the
map data.
If the currently displayed sign
originates from map data and the map
information changes, a new sign will
be displayed. This might lead to
Page 187 of 267
Driving and operating185detection of a new sign although no
sign on the road might have been
passed.
Fault
Traffic sign assistant may not operate correctly if:
● The area of the windscreen, where the front camera is
located, is not clean or affected
by foreign items, e.g. stickers.
● Traffic signs are completely or partially covered or difficult to
discern.
● There are adverse environmental
conditions, e.g. heavy rain, snow,
direct sunlight or shadows.
● Traffic signs are incorrectly mounted or damaged.
● Traffic signs do not comply with the Vienna Convention on traffic
signs (Wiener Übereinkommen
über Straßenverkehrszeichen).Caution
The system is intended to help the driver within a defined speed
range to discern certain traffic
signs. Do not ignore traffic signs
which are not displayed by the
system.
The system does not discern any other than the conventional traffic
signs that might give or end a
speed limit.
Do not let this special feature
tempt you into taking risks when
driving.
Always adapt speed to the road
conditions.
The driver assistance systems do not relieve the driver from full
responsibility for vehicle
operation.
Lane keep assist
Lane keep assist helps to avoid
crashes due to unintentional lane
departures. The front camera
observes the lane markings. If the
vehicle approaches a lane marking,
the steering wheel is gently turned to
position the vehicle back into the lane. Override the system by turning the
steering wheel.
Crossing a lane marking significantly
without overriding lane keep assist
starts a visual and acoustic warning.
Unintended lane departure is
assumed
● without using turn signal
● using the turn signal in the opposite direction of the lane
departure
● without braking
● without acceleration
● without active steering.
Notice
The system is switched off during
detection of ambiguous lane
markings, e.g. in construction areas.
Notice
The system may be switched off, if it detects lanes, which are too narrow,
too wide or too much curved.
Page 188 of 267
186Driving and operatingActivation
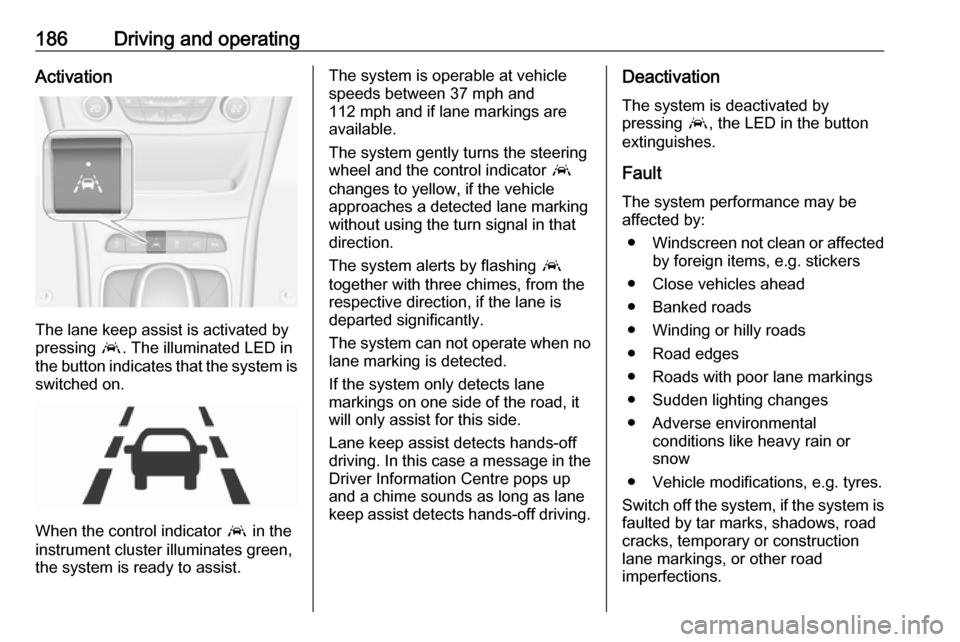
The lane keep assist is activated by
pressing a. The illuminated LED in
the button indicates that the system is switched on.
When the control indicator a in the
instrument cluster illuminates green,
the system is ready to assist.
The system is operable at vehicle
speeds between 37 mph and
112 mph and if lane markings are
available.
The system gently turns the steering
wheel and the control indicator a
changes to yellow, if the vehicle
approaches a detected lane marking
without using the turn signal in that
direction.
The system alerts by flashing a
together with three chimes, from the
respective direction, if the lane is
departed significantly.
The system can not operate when no
lane marking is detected.
If the system only detects lane
markings on one side of the road, it
will only assist for this side.
Lane keep assist detects hands-off
driving. In this case a message in the
Driver Information Centre pops up
and a chime sounds as long as lane
keep assist detects hands-off driving.Deactivation
The system is deactivated by
pressing a, the LED in the button
extinguishes.
Fault
The system performance may be affected by:
● Windscreen not clean or affected
by foreign items, e.g. stickers
● Close vehicles ahead
● Banked roads
● Winding or hilly roads
● Road edges
● Roads with poor lane markings
● Sudden lighting changes
● Adverse environmental conditions like heavy rain or
snow
● Vehicle modifications, e.g. tyres.
Switch off the system, if the system is
faulted by tar marks, shadows, road
cracks, temporary or construction
lane markings, or other road
imperfections.
Page 196 of 267

194Vehicle careVehicle careGeneral Information...................194
Accessories and vehicle modifications .......................... 194
Vehicle storage ........................195
End-of-life vehicle recovery .....195
Vehicle checks ........................... 196
Performing work ......................196
Bonnet ..................................... 196
Engine oil ................................. 197
Engine coolant ......................... 198
Washer fluid ............................ 199
Brakes ..................................... 199
Brake fluid ............................... 199
Vehicle battery ......................... 200
Diesel fuel system bleeding .....201
Wiper blade replacement ........202
Bulb replacement .......................202
Halogen headlights ..................202
Fog lights ................................. 204
Tail lights ................................. 205
Side turn signal lights ..............208
Number plate light ...................209
Interior lights ............................ 210
Instrument panel illumination ...210Electrical system ........................210
Fuses ....................................... 210
Engine compartment fuse box . 211
Instrument panel fuse box .......213
Load compartment fuse box ....215
Vehicle tools .............................. 217
Tools ........................................ 217
Wheels and tyres .......................217
Winter tyres ............................. 217
Tyre designations ....................218
Tyre pressure .......................... 218
Tyre pressure monitoring system .................................... 219
Tread depth ............................. 223
Changing tyre and wheel size . 224 Wheel covers ........................... 224
Tyre chains .............................. 224
Tyre repair kit .......................... 224
Wheel changing .......................227
Spare wheel ............................ 230
Jump starting ............................. 232
Towing ....................................... 234
Towing the vehicle ...................234
Towing another vehicle ...........235
Appearance care .......................236
Exterior care ............................ 236
Interior care ............................. 237General Information
Accessories and vehiclemodifications
We recommend the use of genuine
parts and accessories and factory
approved parts specific for your
vehicle type. We cannot assess or guarantee reliability of other products
- even if they have a regulatory or
otherwise granted approval.
Do not make any modifications to the
electrical system, e.g. changes of
electronic control units (chip tuning).Caution
When transporting the vehicle on
a train or on a recovery vehicle, the
mud flaps might be damaged.
Page 206 of 267
204Vehicle care
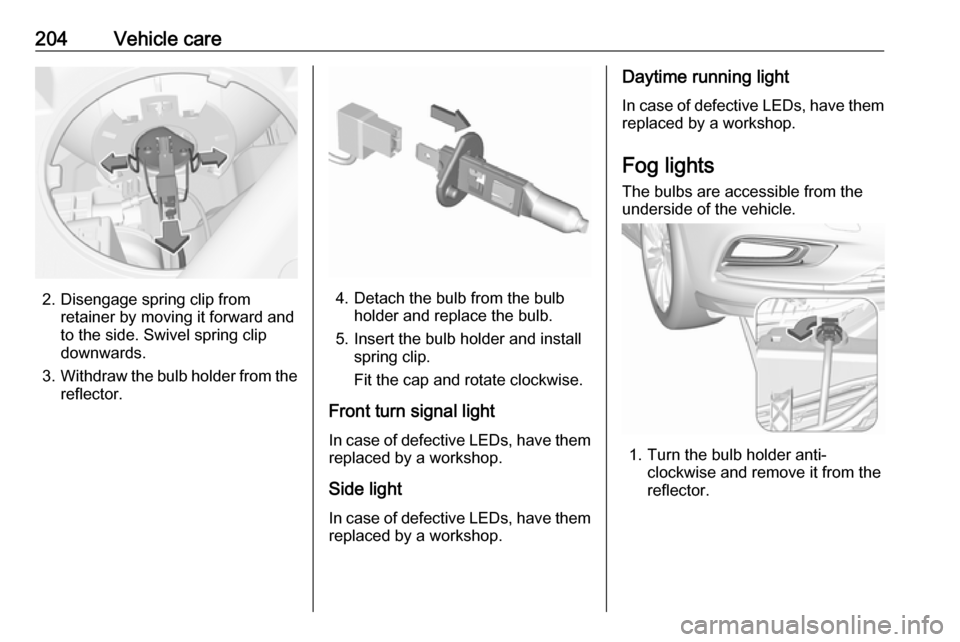
2. Disengage spring clip fromretainer by moving it forward and
to the side. Swivel spring clip
downwards.
3. Withdraw the bulb holder from the
reflector.4. Detach the bulb from the bulb holder and replace the bulb.
5. Insert the bulb holder and install spring clip.
Fit the cap and rotate clockwise.
Front turn signal light In case of defective LEDs, have them
replaced by a workshop.
Side light
In case of defective LEDs, have them replaced by a workshop.
Daytime running light
In case of defective LEDs, have them
replaced by a workshop.
Fog lights
The bulbs are accessible from the
underside of the vehicle.
1. Turn the bulb holder anti- clockwise and remove it from the
reflector.
Page 208 of 267
206Vehicle care
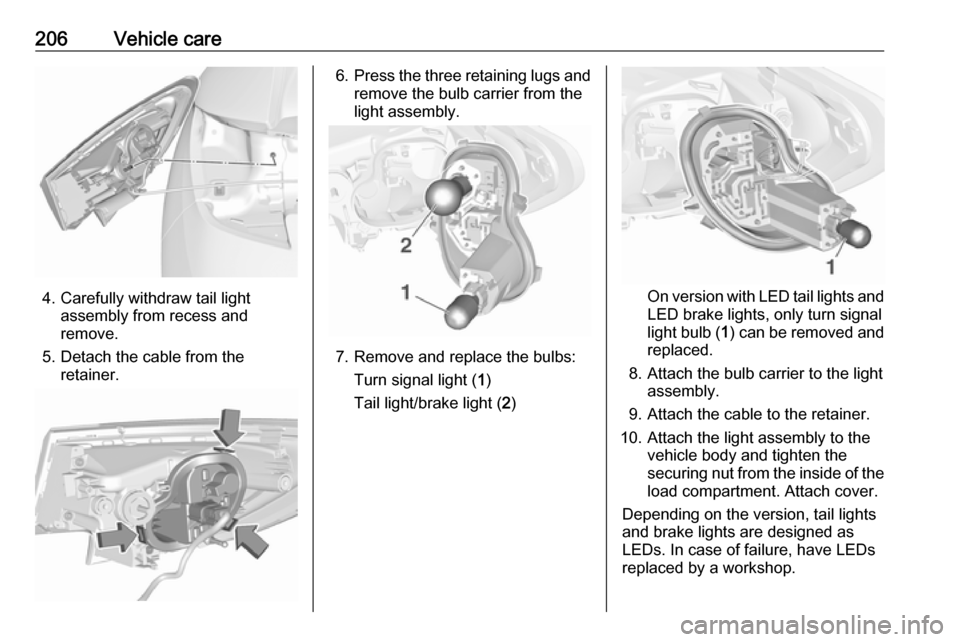
4. Carefully withdraw tail lightassembly from recess and
remove.
5. Detach the cable from the retainer.
6.Press the three retaining lugs and
remove the bulb carrier from the
light assembly.
7. Remove and replace the bulbs:
Turn signal light ( 1)
Tail light/brake light ( 2)
On version with LED tail lights and
LED brake lights, only turn signal
light bulb ( 1) can be removed and
replaced.
8. Attach the bulb carrier to the light assembly.
9. Attach the cable to the retainer.
10. Attach the light assembly to the vehicle body and tighten the
securing nut from the inside of the load compartment. Attach cover.
Depending on the version, tail lights
and brake lights are designed as
LEDs. In case of failure, have LEDs replaced by a workshop.
Page 210 of 267
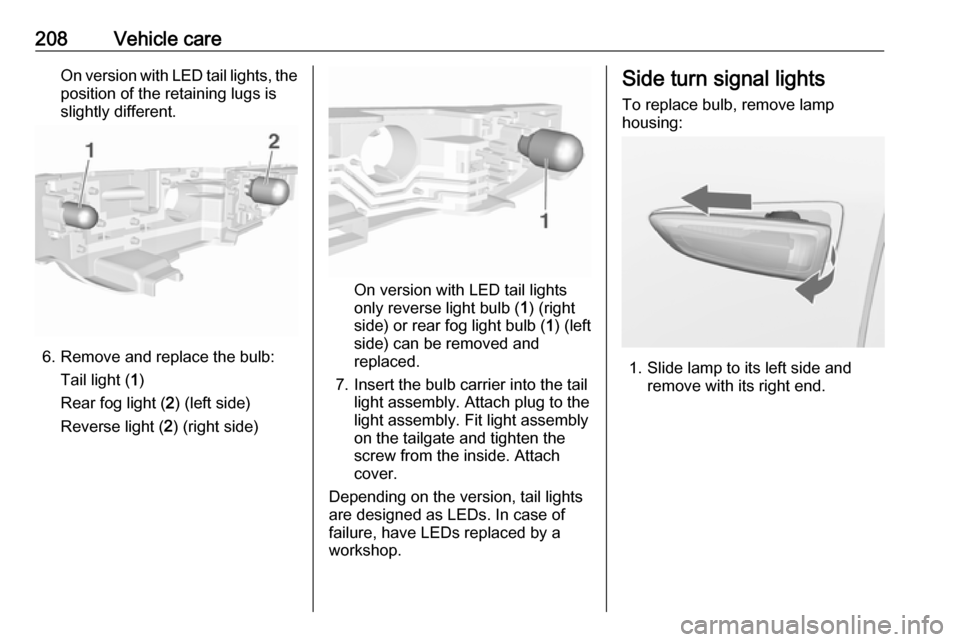
208Vehicle careOn version with LED tail lights, theposition of the retaining lugs is
slightly different.
6. Remove and replace the bulb:
Tail light ( 1)
Rear fog light ( 2) (left side)
Reverse light ( 2) (right side)
On version with LED tail lights
only reverse light bulb ( 1) (right
side) or rear fog light bulb ( 1) (left
side) can be removed and
replaced.
7. Insert the bulb carrier into the tail light assembly. Attach plug to the
light assembly. Fit light assembly on the tailgate and tighten the
screw from the inside. Attach
cover.
Depending on the version, tail lights are designed as LEDs. In case of failure, have LEDs replaced by aworkshop.
Side turn signal lights
To replace bulb, remove lamp
housing:
1. Slide lamp to its left side and remove with its right end.
Page 224 of 267
222Vehicle carewheel and left side rear wheel. Theturn signal light at the current active
position is illuminated until sensor is
matched.
Consult a workshop for service or purchase a relearn tool. There are
two minutes to match the first wheel
position, and five minutes overall to
match all four wheel positions. If it
takes longer, the matching process
stops and must be restarted.
The tyre pressure sensor matching
process is:
1. Apply the parking brake.
2. Turn the ignition on.
3. On vehicles with automatic transmission: set the selector
lever to P.
On vehicles with manual
transmission: select neutral.
4. Midlevel display: Use MENU on the turn signal
lever to select the Vehicle
Information Menu ? in the
Driver Information Centre.
Uplevel display:Press p on the steering wheel to
open main menu page.
Select the Info page with Q or P.
Confirm with 9.
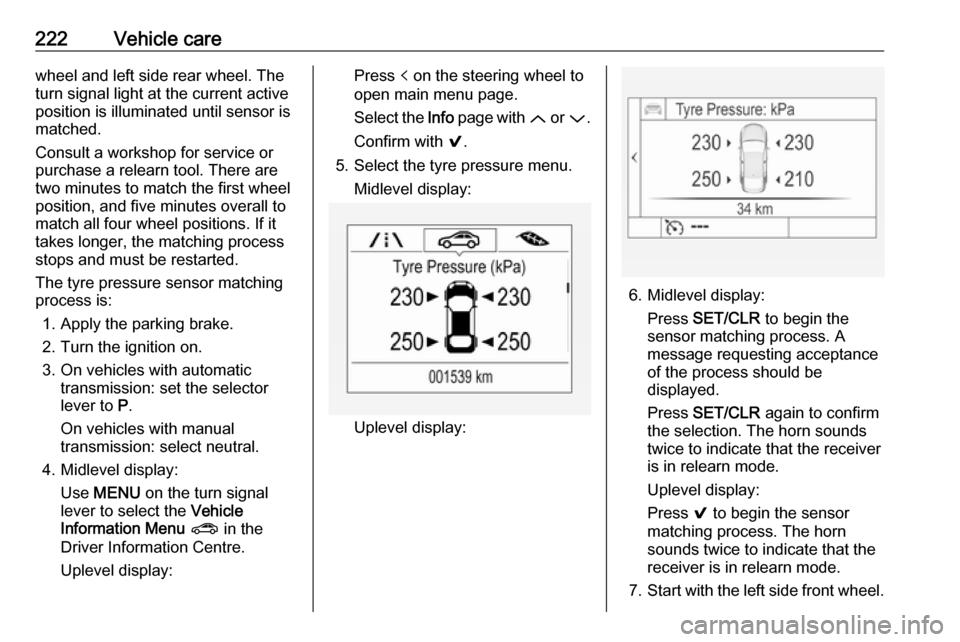
5. Select the tyre pressure menu. Midlevel display:
Uplevel display:
6. Midlevel display: Press SET/CLR to begin the
sensor matching process. A
message requesting acceptance
of the process should be
displayed.
Press SET/CLR again to confirm
the selection. The horn sounds
twice to indicate that the receiver
is in relearn mode.
Uplevel display:
Press 9 to begin the sensor
matching process. The horn
sounds twice to indicate that the receiver is in relearn mode.
7. Start with the left side front wheel.