tyre VAUXHALL ASTRA J 2016.25 Owner's Manual
[x] Cancel search | Manufacturer: VAUXHALL, Model Year: 2016.25, Model line: ASTRA J, Model: VAUXHALL ASTRA J 2016.25Pages: 267, PDF Size: 7.72 MB
Page 18 of 267
![VAUXHALL ASTRA J 2016.25 Owners Manual 16In briefAutomatic transmissionP:park positionR:reverseN:neutral modeD:automatic modeM:manual mode<:upshift]:downshift
The selector lever can only be movedout of P when the ignition is on and
the br VAUXHALL ASTRA J 2016.25 Owners Manual 16In briefAutomatic transmissionP:park positionR:reverseN:neutral modeD:automatic modeM:manual mode<:upshift]:downshift
The selector lever can only be movedout of P when the ignition is on and
the br](/img/38/19346/w960_19346-17.png)
16In briefAutomatic transmissionP:park positionR:reverseN:neutral modeD:automatic modeM:manual mode<:upshift]:downshift
The selector lever can only be movedout of P when the ignition is on and
the brake pedal is applied. To engage
P or R, press the release button.
Automatic transmission 3 150.
Manual transmission automatedN:neutral positionD:automatic modeM:manual mode<:upshift]:downshiftR:reverse
Engage reverse only when vehicle is stationary.
Manual transmission automated
3 154.
Starting off
Check before starting off ● Tyre pressure and condition 3 218, 3 253.
● Engine oil level and fluid levels 3 197.
● All windows, mirrors, exterior lighting and number plates are
free from dirt, snow and ice and
are operational.
● Proper position of mirrors, seats, and seat belts 3 33, 3 41,
3 50.
● Brake function at low speed, particularly if the brakes are wet.
Page 73 of 267
Storage71
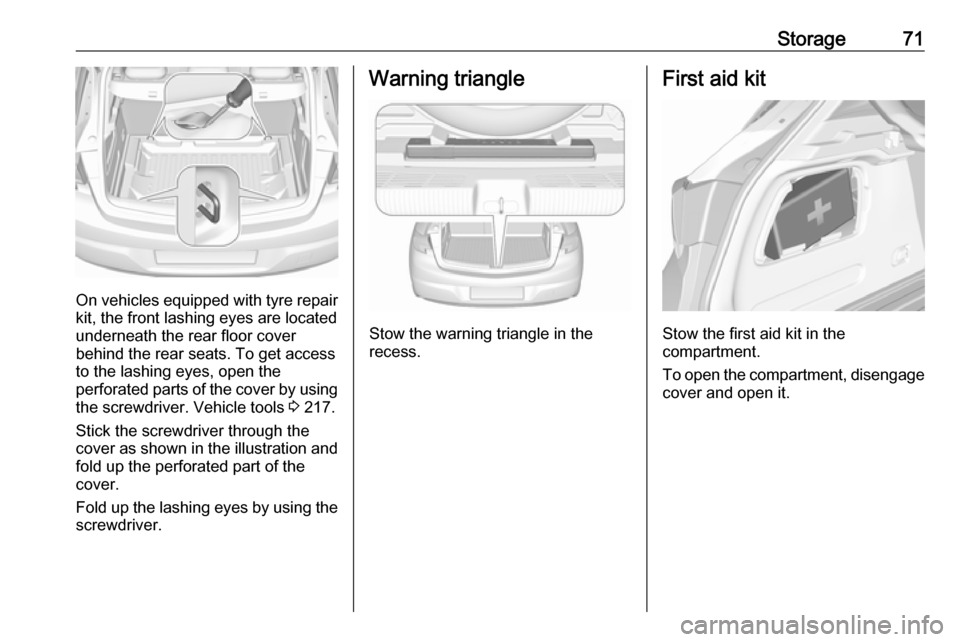
On vehicles equipped with tyre repair
kit, the front lashing eyes are located
underneath the rear floor cover
behind the rear seats. To get access
to the lashing eyes, open the
perforated parts of the cover by using
the screwdriver. Vehicle tools 3 217.
Stick the screwdriver through the cover as shown in the illustration and
fold up the perforated part of the
cover.
Fold up the lashing eyes by using the screwdriver.
Warning triangle
Stow the warning triangle in the
recess.
First aid kit
Stow the first aid kit in the
compartment.
To open the compartment, disengage cover and open it.
Page 75 of 267
Storage73● Do not allow the load to protrudeabove the upper edge of the
backrests.
● Do not place any objects on the load compartment cover or the
instrument panel, and do not
cover the sensor on top of the instrument panel.
● The load must not obstruct the operation of the pedals, parking
brake and gear selector lever, or
hinder the freedom of movement
of the driver. Do not place any
unsecured objects in the interior.
● Do not drive with an open load compartment.9Warning
Always make sure that the load in
the vehicle is securely stowed.
Otherwise objects can be thrown
around inside the vehicle and
cause personal injury or damage
to the load or car.
● The payload is the difference between the permitted gross
vehicle weight (see identification
plate 3 242) and the EC kerb
weight.
To calculate the payload, enter
the data for your vehicle in the
weights table at the front of this
manual.
The EC kerb weight includes
weights for the driver (68 kg),
luggage (7 kg) and all fluids (fuel
tank 90% full).
Optional equipment and
accessories increase the kerb
weight.
● Driving with a roof load increases
the sensitivity of the vehicle to
cross-winds and has a
detrimental effect on vehicle
handling due to the vehicle's
higher centre of gravity.
Distribute the load evenly and secure it properly with retaining
straps. Adjust the tyre pressure
and vehicle speed according to
the load conditions. Check and
retighten the straps frequently.
Do not drive faster than 75 mph.
The permissible roof load is
75 kg. The roof load is thecombined weight of the roof rack and the load.
Page 76 of 267

74Instruments and controlsInstruments and
controlsControls ....................................... 75
Steering wheel adjustment ........75
Steering wheel controls .............75
Heated steering wheel ...............76
Horn ........................................... 76
Windscreen wiper/washer .........76
Rear window wiper/washer .......78
Outside temperature ..................79
Clock ......................................... 79
Power outlets ............................. 81
Power connector .......................82
Ashtrays .................................... 83
Warning lights, gauges and indi‐ cators ........................................... 84
Instrument cluster ......................84
Speedometer ............................. 87
Odometer .................................. 88
Trip odometer ............................ 88
Tachometer ............................... 89
Fuel gauge ................................ 89
Engine coolant temperature gauge ....................................... 89
Service display .......................... 90
Control indicators ......................91Turn signal................................. 91
Seat belt reminder .....................91
Airbag and belt tensioners .........92
Airbag deactivation ....................92
Charging system .......................92
Malfunction indicator light ..........93
Brake and clutch system ...........93
Electric parking brake ................93
Electric parking brake fault ........93
Antilock brake system (ABS) .....94
Gear shifting .............................. 94
Following distance .....................94
Lane keep assist .......................94
Electronic Stability Control off ...94
Electronic Stability Control and Traction Control system ...........94
Traction Control system off .......95
Preheating ................................. 95
Tyre pressure monitoring system ...................................... 95
Engine oil pressure ....................95
Low fuel ..................................... 95
Immobiliser ................................ 96
Exterior light .............................. 96
High beam ................................. 96
High beam assist .......................96
LED headlights .......................... 96
Fog light ..................................... 96
Rear fog light ............................. 96
Cruise control ............................ 96Vehicle detected ahead .............96
Speed limiter ............................. 96
Traffic sign assistant ..................97
Door open .................................. 97
Information displays .....................97
Driver Information Centre ..........97
Info display .............................. 102
Vehicle messages ......................104
Warning chimes .......................105
Battery voltage ........................ 106
Vehicle personalisation ..............106
OnStar ....................................... 113
Page 89 of 267
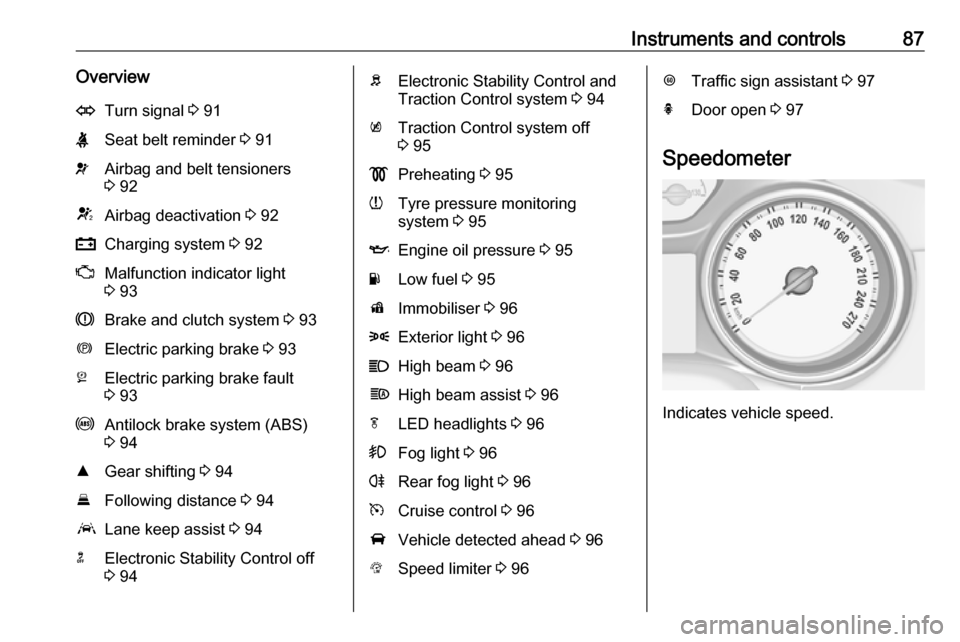
Instruments and controls87OverviewOTurn signal 3 91XSeat belt reminder 3 91vAirbag and belt tensioners
3 92VAirbag deactivation 3 92pCharging system 3 92ZMalfunction indicator light
3 93RBrake and clutch system 3 93mElectric parking brake 3 93jElectric parking brake fault
3 93uAntilock brake system (ABS)
3 94RGear shifting 3 94EFollowing distance 3 94aLane keep assist 3 94nElectronic Stability Control off
3 94bElectronic Stability Control and
Traction Control system 3 94kTraction Control system off
3 95!Preheating 3 95wTyre pressure monitoring
system 3 95IEngine oil pressure 3 95YLow fuel 3 95dImmobiliser 3 968Exterior light 3 96CHigh beam 3 96fHigh beam assist 3 96fLED headlights 3 96>Fog light 3 96rRear fog light 3 96mCruise control 3 96AVehicle detected ahead 3 96LSpeed limiter 3 96LTraffic sign assistant 3 97hDoor open 3 97
Speedometer
Indicates vehicle speed.
Page 97 of 267
Instruments and controls95Traction Control system off
k illuminates yellow.
The system is deactivated.
Preheating
! illuminates yellow.
Preheating of Diesel engine is
activated. Only activates when
outside temperature is low. Start the engine when control indicator
extinguishes.
Tyre pressure monitoring system
w illuminates or flashes yellow.
Illuminates
Tyre pressure loss. Stop immediately
and check tyre pressure.
Flashes
Fault in system or tyre without
pressure sensor mounted (e.g. spare
wheel). After 60 to 90 seconds the
control indicator illuminates
continuously. Consult a workshop.Engine oil pressure
I illuminates red.
Illuminates when the ignition is
switched on and extinguishes shortly
after the engine starts.
Illuminates when the engine is
runningCaution
Engine lubrication may be
interrupted. This may result in
damage to the engine and/or
locking of the drive wheels.
1. Depress clutch.
2. Select neutral gear, set selector lever to N.
3. Move out of the flow of traffic as quickly as possible without
impeding other vehicles.
4. Switch off ignition.
9 Warning
When the engine is off,
considerably more force is needed
to brake and steer. During an
Autostop the brake servo unit will still be operational.
Do not remove key until vehicle is stationary, otherwise the steeringwheel lock could engage
unexpectedly.
Check oil level before seeking
assistance of a workshop 3 197.
Low fuel
Y illuminates or flashes yellow.
Illuminates
Level in fuel tank is too low.
Flashes
Fuel used up. Refuel immediately.
Never run the tank dry.
Refuelling 3 188.
Catalytic converter 3 149.
Page 101 of 267

Instruments and controls99Confirm a main menu page with 9.
Once a main menu page is selected, press Q or P to select subpages.
Press q to open a next folder of the
selected subpage.
Press Q or P to select functions or
to set a numeric value, if required.
Press 9 to select and confirm a
function.
Once a main menu page is selected,
this selection remains stored until
another main menu page is selected.
Subpages are changed by pressing
P or Q.
Vehicle and service messages are
popped-up in the Driver Information
Centre if required. Confirm messages
by pressing 9. Vehicle messages
3 104.
Info Menu The following list contains all possible
Info Menu pages. Some may not be
available for your particular vehicle.
Depending on the display some
functions are symbolised.Turn the adjuster wheel or press Q
or P to select a page:
● trip odometer 1 or A average fuel consumption
average speed
● trip odometer 2 or B average fuel consumption
average vehicle speed
● digital speed
● fuel range
● instantaneous fuel consumption
● remaining oil life
● tyre pressure
● timer
● traffic sign assistant
● following distance
● top consumers
● economy trend
● Eco index
● blank page
On Midlevel display, the pages
Remaining Oil Life , Tyre Pressure ,
Traffic Sign Assistant and FollowingDistance are displayed in the Options
Menu ? . Select by pressing
MENU .
On Midlevel display, the pages Top
Consumers , Economy Trend and Eco
index are displayed in the ECO
Information Menu @. Select by
pressing MENU.
Trip odometer 1/A and 2/B
Trip odometer displays the current
distance since a certain reset.
Trip odometer counts up to a distance
of 9,999 miles then restarts at 0.
To reset on Midlevel display, press SET/CLR for a few seconds, on
Uplevel display, press > and confirm
with 9.
The information of trip odometer page
1/A and 2/B can be reset separately
for odometer, average consumption
and average speed while the
respective display is active.
Average Fuel Consumption
Display of average consumption. The measurement can be reset at any
time and starts with a default value.
Page 102 of 267

100Instruments and controlsTo reset on Midlevel display, press
SET/CLR for a few seconds, on
Uplevel display, press > and confirm
with 9.
Average speed
Display of average speed. The
measurement can be reset at any
time.
To reset on Midlevel display, press
SET/CLR for a few seconds, on
Uplevel display, press > and confirm
with 9.
Digital speed
Digital display of the instantaneous
speed.
Fuel range
Range is calculated from current fuel
level and current consumption. The
display shows average values.
After refuelling, the range is updated
automatically after a brief delay.
When the level in the fuel tank is low,
a message appears on the display
and the control indicator Y in the fuel
gauge illuminates.When the fuel tank has to be refuelled
immediately, a warning message
appears and remains on the display.
Additionally, the control indicator Y in
the fuel gauge flashes 3 95.
Instantaneous Fuel Consumption
Display of the instantaneous
consumption.
Remaining Oil Life
Indicates an estimate of the oil's
useful life. The number in percentage
means the remainder of current oil life 3 90.
Tyre Pressure
Checks tyre pressure of all wheels
during driving 3 219.
Timer
To start and stop, press 9. To reset,
press > and confirm reset.
Traffic sign assistant
Displays the detected traffic signs for
the current route section 3 181.Following Distance
Displays the distance in seconds to a preceding moving vehicle 3 168. If
Adaptive cruise control is active this
page shows the following distance
setting instead.
Top Consumers
List of top comfort consumers
currently switched on is displayed in
descending order. Fuel saving
potential is indicated. A switched-off
consumer disappears from the list
and the consumption value will be
updated.
During sporadic driving conditions,
the engine will activate the rear
window defog automatically to
increase the engine load. In this
event, the rear window defog is
indicated as one of the top
consumers, without activation by the
driver.
Economy Trend
Displays the average consumption
development over a distance of
50 miles. Filled segments display the
consumption in 5 mile steps and
Page 103 of 267
Instruments and controls101shows the effect of topography or
driving behaviour on fuel
consumption.
Economy index
The current fuel consumption is
indicated on an economic scale. For
economical driving adapt the driving style to keep the indicator within the
Eco area. Indicator outside the Eco
area means higher fuel consumption.
Blank page
Shows a blank page without any
information.
Audio Menu
Audio menu enables browsing for
music, selecting from favourites or
changing the audio source.
See Infotainment manual.
Phone Menu
Phone menu enables managing and
performing of phone calls, scrolling through contacts or operating
handsfree phoning.
See Infotainment manual.Navigation Menu
Navigation menu enables route
guidance.
See Infotainment manual.
Options Menu The following list contains all possible
Options Menu pages. Some may not
be available for your particular
vehicle. Depending on the display
some functions are symbolised.
Turn the adjuster wheel or press Q
or P to select a page and follow the
instructions given in the submenus:
● units
● info pages
● speed warning
● tyre loading
● software information
Units
Press SET/CLR or > while units is
displayed. Select imperial or metric
units by turning adjuster wheel or
pressing P. Confirm by pressing
SET/CLR or 9.Info pages
Press > while Info pages is displayed.
A list of all items in the Info Menu is
displayed. Select the functions to be
displayed in the Info page by pressing 9 . Selected pages have a 9 in a
checkbox. Non viewable functions
have a blank checkbox. See Info
Menu above.
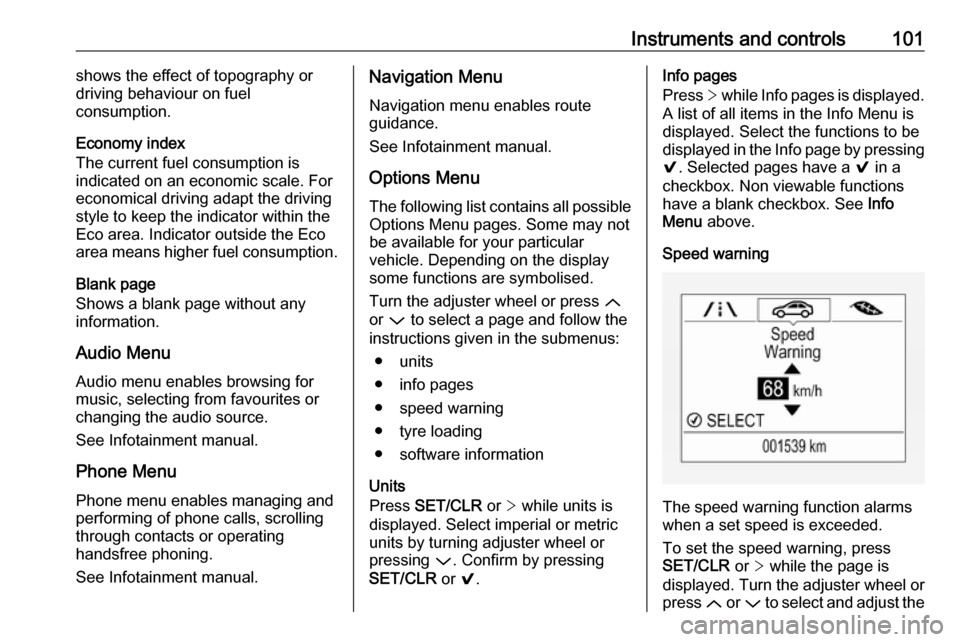
Speed warning
The speed warning function alarms
when a set speed is exceeded.
To set the speed warning, press
SET/CLR or > while the page is
displayed. Turn the adjuster wheel or
press Q or P to select and adjust the
Page 104 of 267
102Instruments and controlsvalue. Press SET/CLR or 9 to set the
speed. Once the speed is set, this feature can be turned off by pressing
SET/CLR or 9 while viewing this
page. If the selected speed limit is
exceeded, a pop-up warning is
displayed with a chime.
Tyre Load
The tyre pressure category according to the actually inflated tyre pressure
can be selected 3 219.
Software information
Displays the open source software
information.
Valet mode
Some functions of the Driver
Information Centre and the Info-
Display can be limited for some
drivers.
Activation or deactivation of valet
mode can be set in the menu
Settings in the vehicle personalisation
menu.
Vehicle personalisation 3 106.
For more information see
Infotainment manual.Info display
The Info-Display is located in the
instrument panel near the instrument
cluster.
Depending on the vehicle
configuration the vehicle has a
● Graphic-Info-Display
or
● 7'' Colour-Info-Display with
touch-screen functionality
or
● 8'' Colour-Info-Display touch-
screen functionality
The Info displays can indicate: ● time 3 79
● outside temperature 3 79
● date 3 79
● Infotainment system, see description in the Infotainment
manual
● indication of rear view camera 3 179
● indication of parking assist instructions 3 170● navigation, see description in the
Infotainment manual
● system messages
● settings for vehicle personalisation 3 106
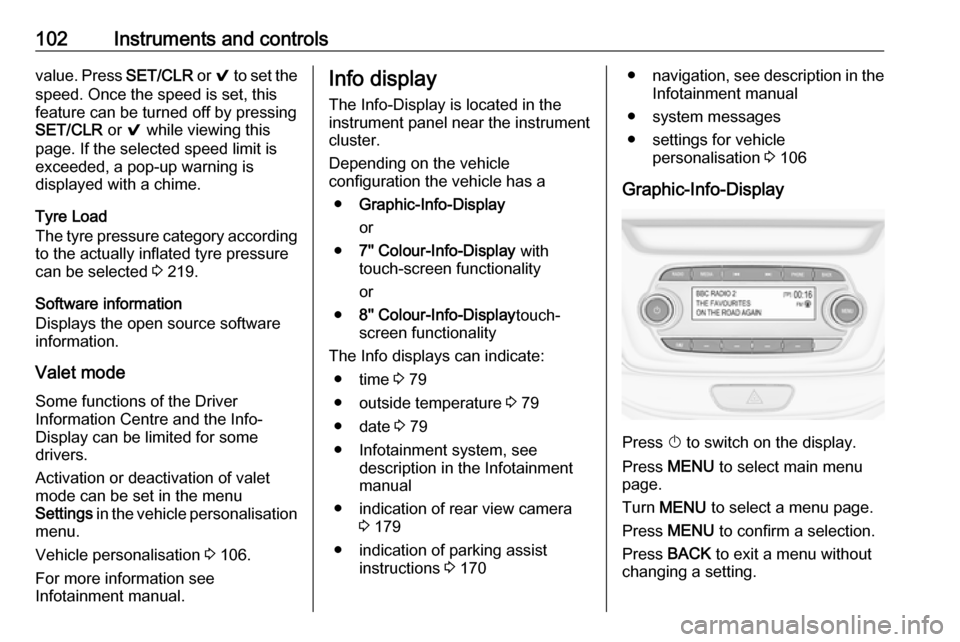
Graphic-Info-Display
Press X to switch on the display.
Press MENU to select main menu
page.
Turn MENU to select a menu page.
Press MENU to confirm a selection.
Press BACK to exit a menu without
changing a setting.