lock VAUXHALL ASTRA J 2016.75 Repair Manual
[x] Cancel search | Manufacturer: VAUXHALL, Model Year: 2016.75, Model line: ASTRA J, Model: VAUXHALL ASTRA J 2016.75Pages: 291, PDF Size: 8.73 MB
Page 175 of 291
Driving and operating173Fault9Warning
If there is a fault in the ABS, the
wheels may be liable to lock due
to braking that is heavier than
normal. The advantages of ABS are no longer available. During
hard braking, the vehicle can no longer be steered and may
swerve.
Have the cause of the fault remedied
by a workshop.
Parking brake
9 Warning
Before leaving the vehicle, check
parking brake status. Control
indicator m must illuminate
constantly.
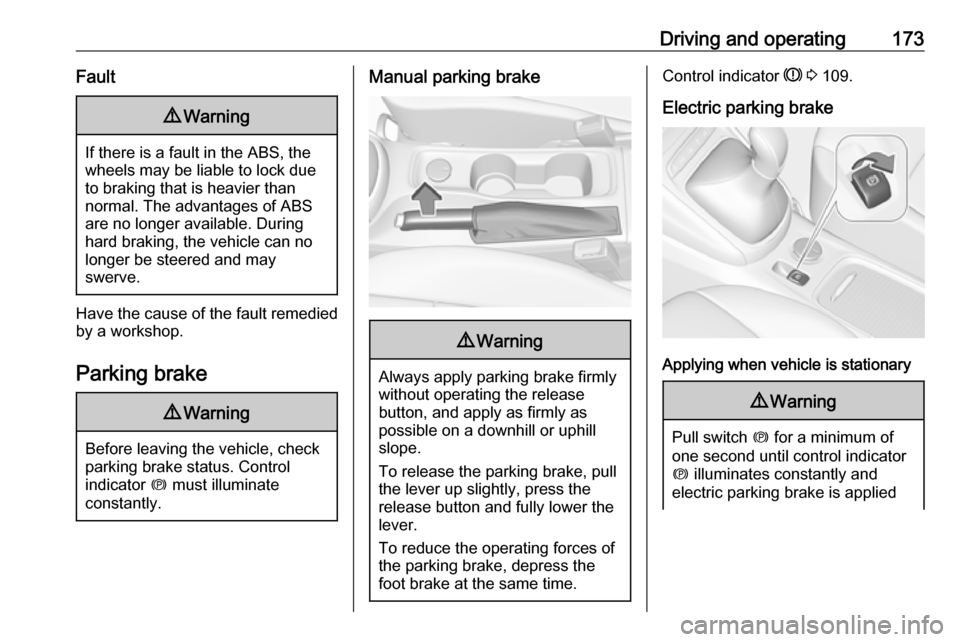
Manual parking brake9 Warning
Always apply parking brake firmly
without operating the release
button, and apply as firmly as
possible on a downhill or uphill
slope.
To release the parking brake, pull
the lever up slightly, press the
release button and fully lower the
lever.
To reduce the operating forces of
the parking brake, depress the
foot brake at the same time.
Control indicator R 3 109.
Electric parking brake
Applying when vehicle is stationary
9 Warning
Pull switch m for a minimum of
one second until control indicator
m illuminates constantly and
electric parking brake is applied
Page 186 of 291
184Driving and operatingIn the following cases, forward
collision alert may not detect a vehicle ahead or sensor performance is
limited:
● on winding roads
● when weather limits visibility, such as fog, rain, or snow
● when the sensor is blocked by snow, ice, slush, mud, dirt,
windscreen damage or affected
by foreign items, e.g. stickers
Following distance indication
The following distance indication
displays the distance to a preceding
moving vehicle. The front camera in
the windscreen is used to detect the
distance of a vehicle directly ahead in
the vehicle's path. It is active at
speeds above 25 mph.
When a preceding vehicle is detected
ahead, the distance is indicated in
seconds, displayed on a page in the
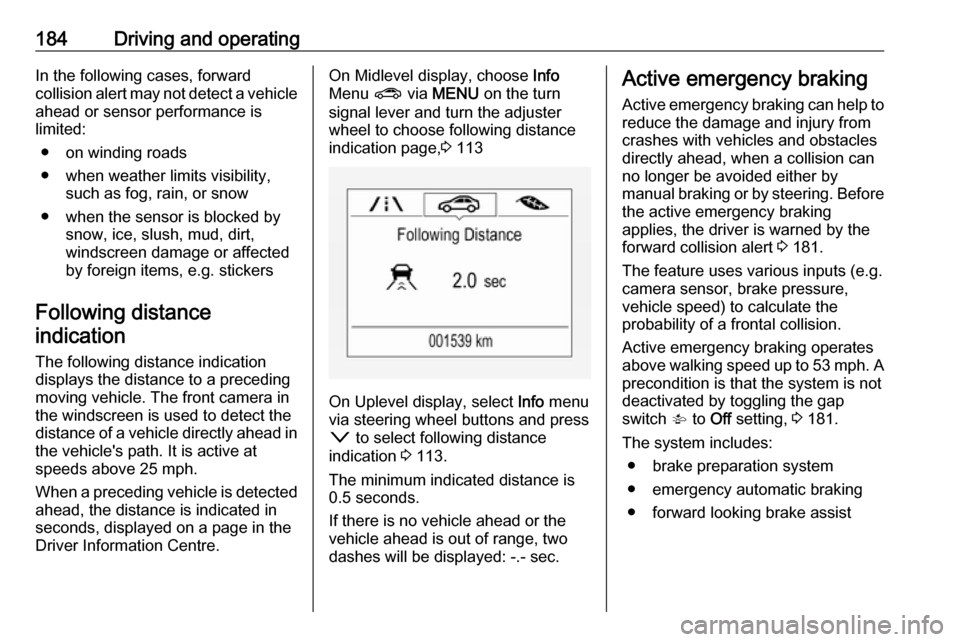
Driver Information Centre.On Midlevel display, choose Info
Menu ? via MENU on the turn
signal lever and turn the adjuster wheel to choose following distance
indication page, 3 113
On Uplevel display, select Info menu
via steering wheel buttons and press o to select following distance
indication 3 113.
The minimum indicated distance is 0.5 seconds.
If there is no vehicle ahead or the
vehicle ahead is out of range, two
dashes will be displayed: -.- sec.
Active emergency braking
Active emergency braking can help toreduce the damage and injury from
crashes with vehicles and obstacles
directly ahead, when a collision can no longer be avoided either by
manual braking or by steering. Before the active emergency braking
applies, the driver is warned by the
forward collision alert 3 181.
The feature uses various inputs (e.g.
camera sensor, brake pressure,
vehicle speed) to calculate the
probability of a frontal collision.
Active emergency braking operates
above walking speed up to 53 mph. A precondition is that the system is not
deactivated by toggling the gap
switch V to Off setting, 3 181.
The system includes: ● brake preparation system
● emergency automatic braking ● forward looking brake assist
Page 187 of 291
Driving and operating1859Warning
This system is not intended to
replace the driver responsibility for driving the vehicle and looking
ahead. Its function is limited to
supplemental use only. The driver must continue to apply the brake
pedal as the driving situation
dictates.
Brake preparation system
When approaching a vehicle ahead
so quickly that a collision is likely, the
brake preparation system slightly
pressurises the brakes. This reduces
the response time, when a manual or automatic braking is requested.
The brake system is prepared so that braking can occur more rapidly.
The system operates up to a speed of 50 mph.
Emergency automatic braking
After the brake preparation and just
before the imminent collision, this
function automatically applies limited
braking to reduce the impact speed of the collision or prohibit a crash.
The system operates up to a speed of 37 mph.
Below a speed of 25 mph the system
can apply full braking.
Forward looking brake assist
In addition to the brake preparation
system and emergency automatic
braking, the forward looking brake
assist function makes the brake assist more sensitive. Therefore,
depressing the brake pedal less
strongly results in immediate hard
braking. This function helps the driver
brake quicker and harder before the
imminent collision.
The system operates up to a speed of 53 mph.9 Warning
Active emergency braking is not
designed to apply hard
autonomous braking or to
automatically avoid a collision. It is designed to reduce the vehicle
speed before a collision. It may not
react for pedestrians or animals.
After a sudden lane change, the
system needs a certain time to
detect the next preceding vehicle.
The complete attention of the
driver is always required while
driving. The driver shall always be ready to take action and apply the
brakes and steer to avoid
collisions. The system is designed to work with all occupants wearingtheir seat belts.
System limitations
The active emergency braking has
limited or no function during rain,
snow or heavy dirt, as the camera
sensor can be covered by a water
film, dust, ice or snow. In case of
sensor blockage, clean the sensor
cover.
Page 206 of 291
204Driving and operating9Danger
Fuel is flammable and explosive.
No smoking. No naked flames or
sparks.
If you can smell fuel in your
vehicle, have the cause of this
remedied immediately by a
workshop.
Caution
In case of misfuelling, do not
switch on ignition.
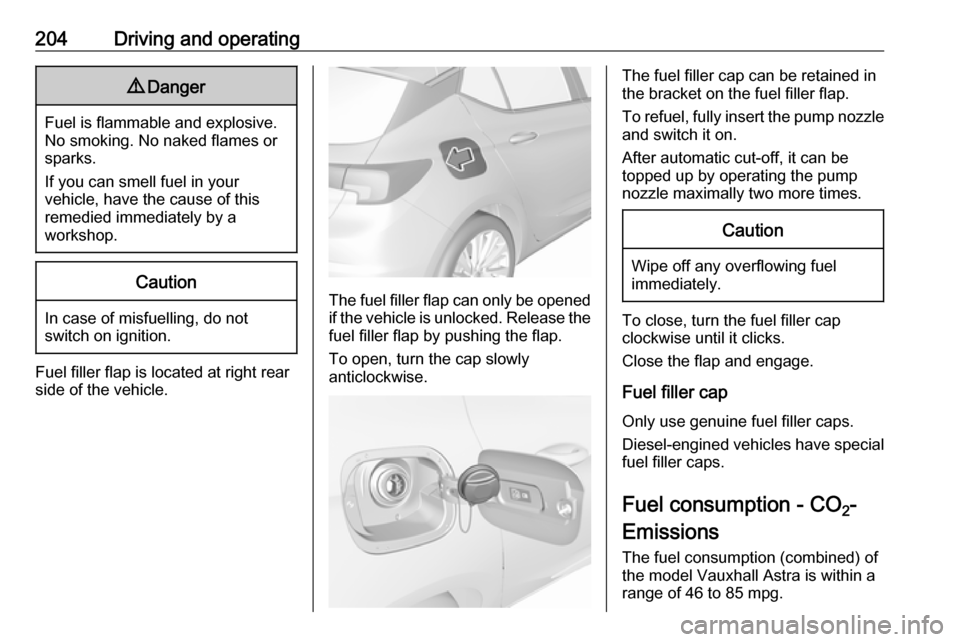
Fuel filler flap is located at right rear
side of the vehicle.
The fuel filler flap can only be opened
if the vehicle is unlocked. Release the
fuel filler flap by pushing the flap.
To open, turn the cap slowly
anticlockwise.
The fuel filler cap can be retained in
the bracket on the fuel filler flap.
To refuel, fully insert the pump nozzle
and switch it on.
After automatic cut-off, it can be
topped up by operating the pump
nozzle maximally two more times.Caution
Wipe off any overflowing fuel
immediately.
To close, turn the fuel filler cap
clockwise until it clicks.
Close the flap and engage.
Fuel filler cap Only use genuine fuel filler caps.Diesel-engined vehicles have special
fuel filler caps.
Fuel consumption - CO 2-
Emissions
The fuel consumption (combined) of
the model Vauxhall Astra is within a
range of 46 to 85 mpg.
Page 210 of 291
208Driving and operatingDisengage and fold down the
connecting socket. Remove the
sealing plug from the opening for the
coupling ball bar and stow it.
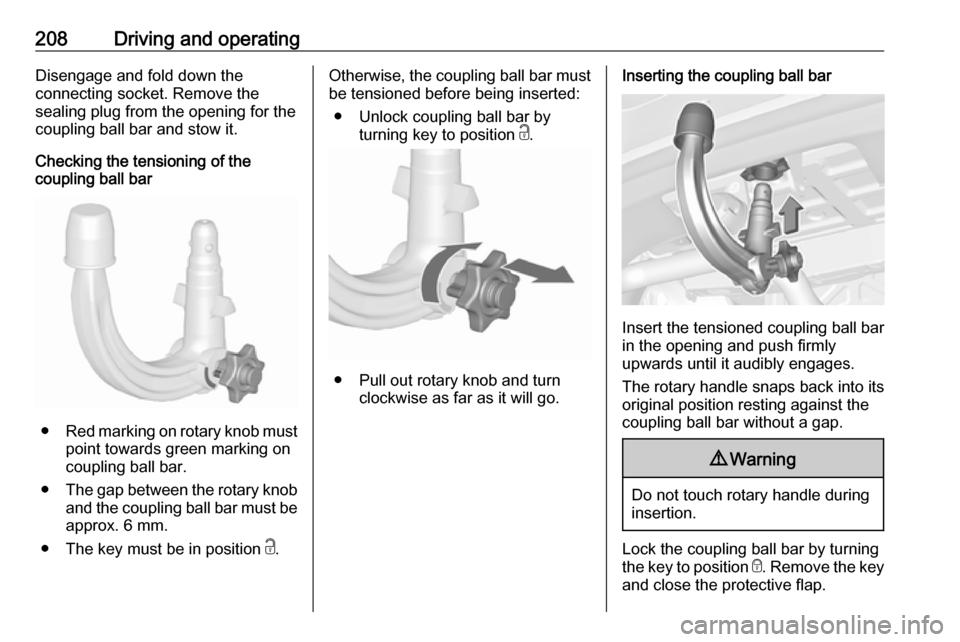
Checking the tensioning of the
coupling ball bar
● Red marking on rotary knob must
point towards green marking on
coupling ball bar.
● The gap between the rotary knob
and the coupling ball bar must be approx. 6 mm.
● The key must be in position c.
Otherwise, the coupling ball bar must
be tensioned before being inserted:
● Unlock coupling ball bar by turning key to position c.
● Pull out rotary knob and turn
clockwise as far as it will go.
Inserting the coupling ball bar
Insert the tensioned coupling ball bar
in the opening and push firmly
upwards until it audibly engages.
The rotary handle snaps back into its
original position resting against the
coupling ball bar without a gap.
9 Warning
Do not touch rotary handle during
insertion.
Lock the coupling ball bar by turning
the key to position e. Remove the key
and close the protective flap.
Page 211 of 291
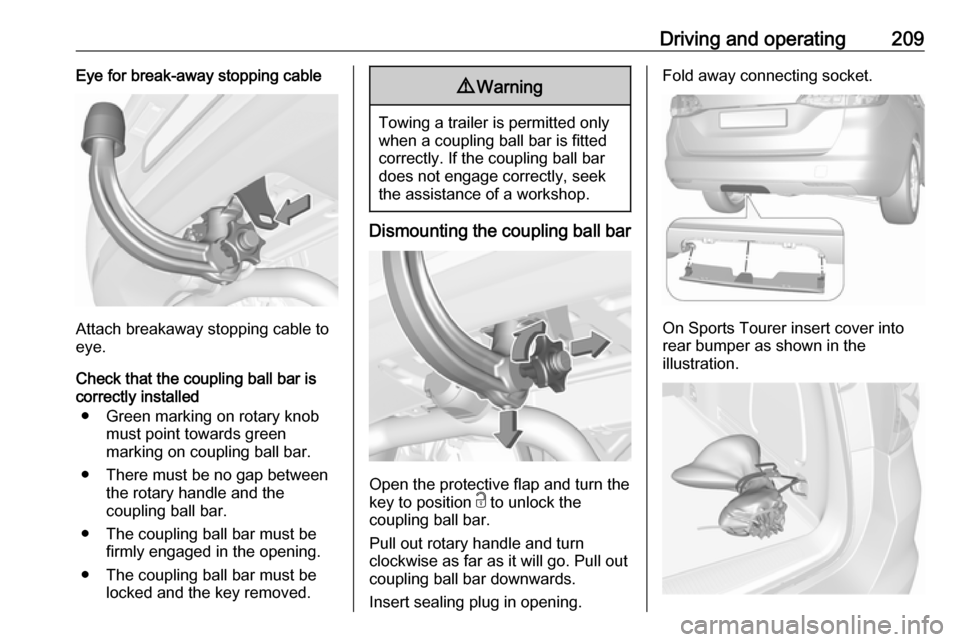
Driving and operating209Eye for break-away stopping cable
Attach breakaway stopping cable to
eye.
Check that the coupling ball bar is correctly installed
● Green marking on rotary knob must point towards green
marking on coupling ball bar.
● There must be no gap between the rotary handle and the
coupling ball bar.
● The coupling ball bar must be firmly engaged in the opening.
● The coupling ball bar must be locked and the key removed.
9Warning
Towing a trailer is permitted only
when a coupling ball bar is fitted correctly. If the coupling ball bardoes not engage correctly, seekthe assistance of a workshop.
Dismounting the coupling ball bar
Open the protective flap and turn the
key to position c to unlock the
coupling ball bar.
Pull out rotary handle and turn
clockwise as far as it will go. Pull out coupling ball bar downwards.
Insert sealing plug in opening.
Fold away connecting socket.
On Sports Tourer insert cover into
rear bumper as shown in the
illustration.
Page 214 of 291

212Vehicle careVehicle storageStorage for a long period of timeIf the vehicle is to be stored for several months:
● Wash and wax the vehicle.
● Have the wax in the engine compartment and underbody
checked.
● Clean and preserve the rubber seals.
● Fill up fuel tank completely.
● Change the engine oil.
● Drain the washer fluid reservoir. ● Check the coolant antifreeze and
corrosion protection.
● Adjust tyre pressure to the value specified for full load.
● Park the vehicle in a dry, well ventilated place. Engage first or
reverse gear or set selector lever
to P. Prevent the vehicle from
rolling.
● Do not apply the parking brake.● Open the bonnet, close all doors and lock the vehicle.
● Disconnect the clamp from the negative terminal of the vehicle
battery. Beware that all systems
are not functional, e.g. anti-theft
alarm system.
Putting back into operation When the vehicle is to be put back into
operation:
● Connect the clamp to the negative terminal of the vehicle
battery. Activate the electronics
of the power windows.
● Check tyre pressure.
● Fill up the washer fluid reservoir.
● Check the engine oil level.
● Check the coolant level.
● Fit the number plate if necessary.End-of-life vehicle recovery
Information on end-of-life vehicle
recovery centres and the recycling of
end-of-life vehicles is available on our website, where legally required. Only
entrust this work to an authorised
recycling centre.
Page 222 of 291
220Vehicle care
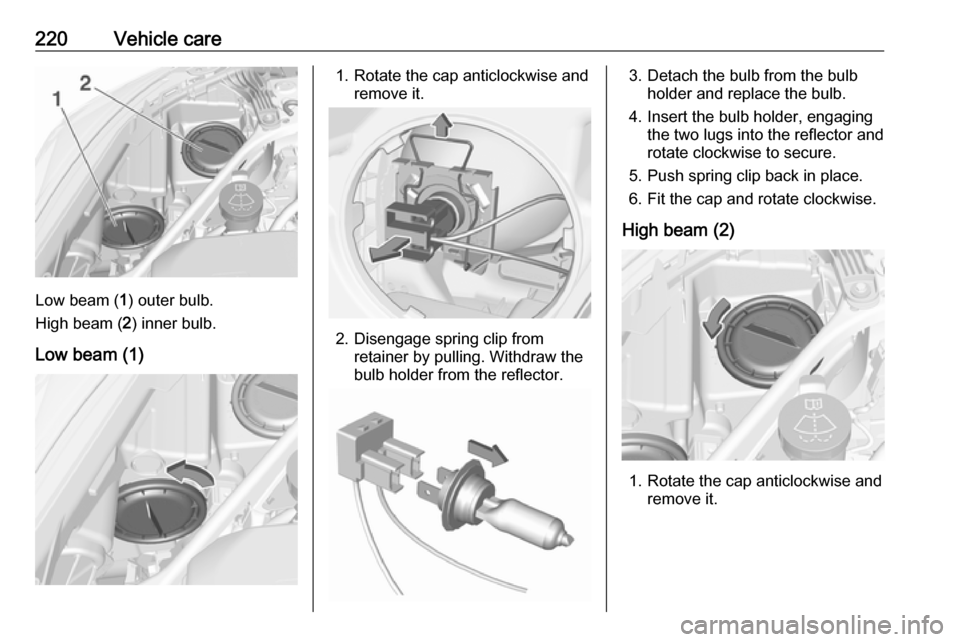
Low beam (1) outer bulb.
High beam ( 2) inner bulb.
Low beam (1)
1. Rotate the cap anticlockwise and remove it.
2. Disengage spring clip fromretainer by pulling. Withdraw the
bulb holder from the reflector.
3. Detach the bulb from the bulb holder and replace the bulb.
4. Insert the bulb holder, engaging the two lugs into the reflector androtate clockwise to secure.
5. Push spring clip back in place.
6. Fit the cap and rotate clockwise.
High beam (2)
1. Rotate the cap anticlockwise and remove it.
Page 223 of 291
Vehicle care221
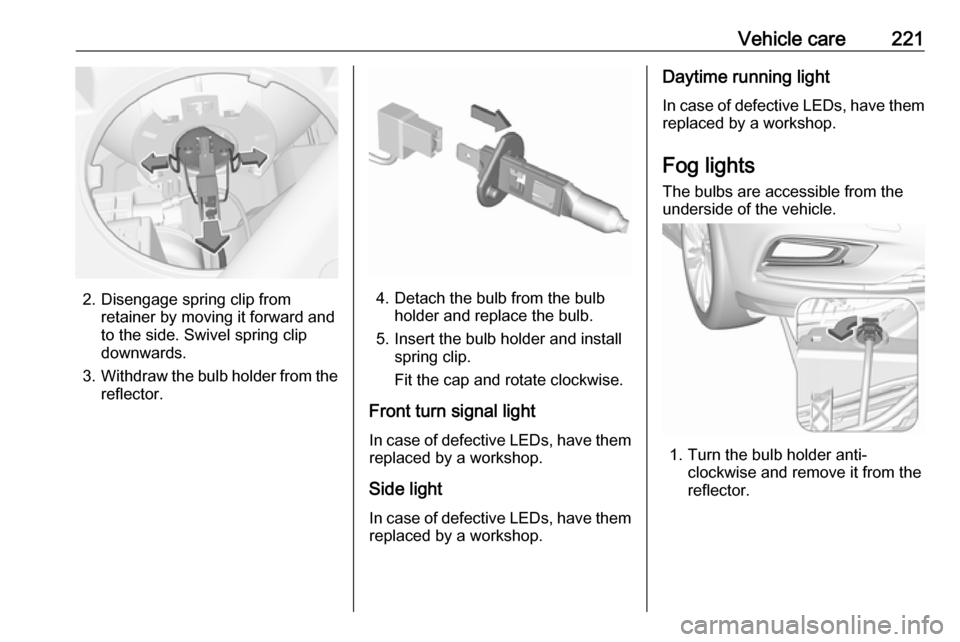
2. Disengage spring clip fromretainer by moving it forward and
to the side. Swivel spring clip
downwards.
3. Withdraw the bulb holder from the
reflector.4. Detach the bulb from the bulb holder and replace the bulb.
5. Insert the bulb holder and install spring clip.
Fit the cap and rotate clockwise.
Front turn signal light In case of defective LEDs, have them
replaced by a workshop.
Side light
In case of defective LEDs, have them replaced by a workshop.
Daytime running light
In case of defective LEDs, have them
replaced by a workshop.
Fog lights
The bulbs are accessible from the
underside of the vehicle.
1. Turn the bulb holder anti- clockwise and remove it from the
reflector.
Page 224 of 291
222Vehicle care
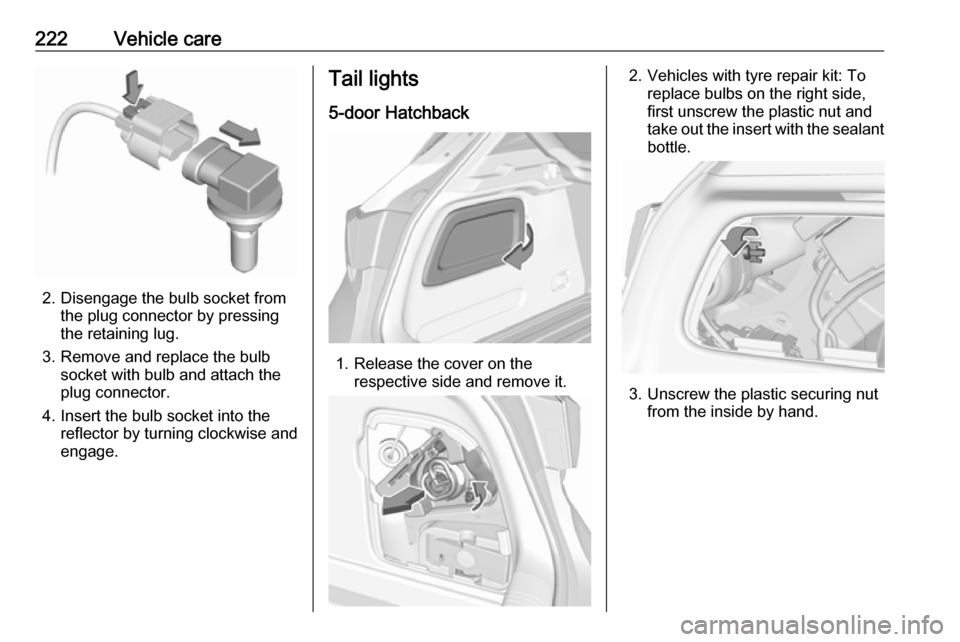
2. Disengage the bulb socket fromthe plug connector by pressing
the retaining lug.
3. Remove and replace the bulb socket with bulb and attach the
plug connector.
4. Insert the bulb socket into the reflector by turning clockwise and
engage.
Tail lights
5-door Hatchback
1. Release the cover on the respective side and remove it.
2. Vehicles with tyre repair kit: To replace bulbs on the right side,
first unscrew the plastic nut and
take out the insert with the sealant
bottle.
3. Unscrew the plastic securing nut from the inside by hand.