light VAUXHALL ASTRA J 2016 User Guide
[x] Cancel search | Manufacturer: VAUXHALL, Model Year: 2016, Model line: ASTRA J, Model: VAUXHALL ASTRA J 2016Pages: 341, PDF Size: 10.35 MB
Page 32 of 341

30Keys, doors and windowsIf the control indicator d flashes when
the ignition is on, there is a fault in the
system; the engine cannot be started. Switch off the ignition and repeat the
start attempt.
If the control indicator continues
flashing, attempt to start the engine
using the spare key and seek the
assistance of a workshop.
Notice
The immobiliser does not lock the
doors. You should always lock the
vehicle after leaving it and switch on the anti-theft alarm system 3 23,
3 28.
Control indicator d 3 117.Exterior mirrors
Convex shape
The convex exterior mirror contains
an aspherical area and reduces blind spots. The shape of the mirror makes
objects appear smaller, which will
affect the ability to estimate
distances.
Electric adjustment
Select the relevant exterior mirror by
turning the control to left (L) or right
(R) . Then swivel the control to adjust
the mirror.
In position 0 no mirror is selected.
Folding mirrors
For pedestrian safety, the exterior
mirrors will swing out of their normal
mounting position if they are struck
with sufficient force. Reposition the mirror by applying slight pressure tothe mirror housing.
Page 36 of 341
34Keys, doors and windowsChild safety system for rear
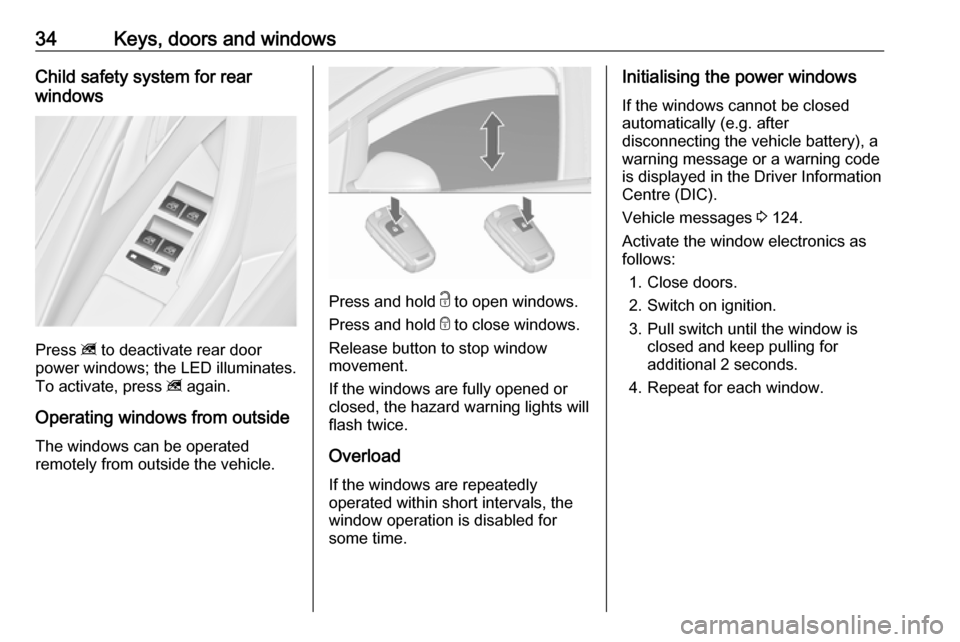
windows
Press z to deactivate rear door
power windows; the LED illuminates.
To activate, press z again.
Operating windows from outside
The windows can be operated
remotely from outside the vehicle.
Press and hold c to open windows.
Press and hold e to close windows.
Release button to stop window
movement.
If the windows are fully opened or
closed, the hazard warning lights will
flash twice.
Overload
If the windows are repeatedly
operated within short intervals, the
window operation is disabled for
some time.
Initialising the power windows
If the windows cannot be closed
automatically (e.g. after
disconnecting the vehicle battery), a
warning message or a warning code
is displayed in the Driver Information
Centre (DIC).
Vehicle messages 3 124.
Activate the window electronics as
follows:
1. Close doors.
2. Switch on ignition.
3. Pull switch until the window is closed and keep pulling for
additional 2 seconds.
4. Repeat for each window.
Page 40 of 341
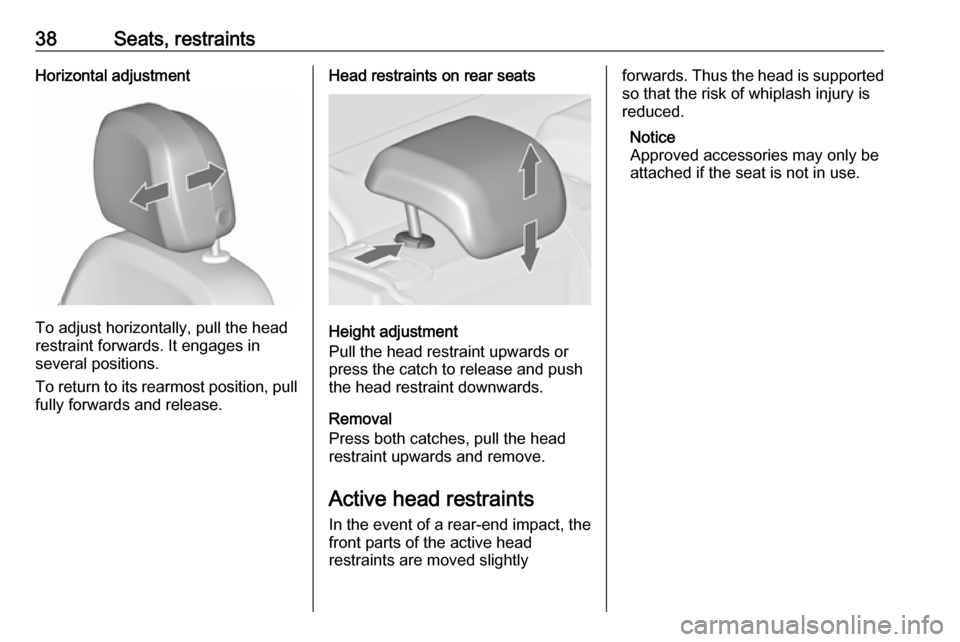
38Seats, restraintsHorizontal adjustment
To adjust horizontally, pull the head
restraint forwards. It engages in
several positions.
To return to its rearmost position, pull fully forwards and release.
Head restraints on rear seats
Height adjustment
Pull the head restraint upwards or
press the catch to release and push the head restraint downwards.
Removal
Press both catches, pull the head restraint upwards and remove.
Active head restraints
In the event of a rear-end impact, the front parts of the active head
restraints are moved slightly
forwards. Thus the head is supported
so that the risk of whiplash injury is
reduced.
Notice
Approved accessories may only be attached if the seat is not in use.
Page 41 of 341
Seats, restraints39Front seats
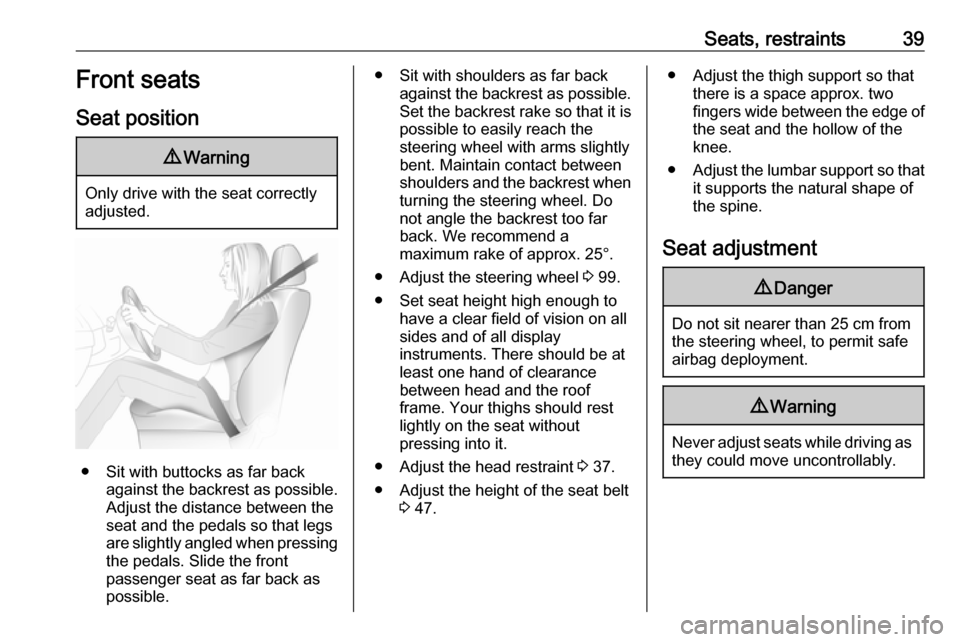
Seat position9 Warning
Only drive with the seat correctly
adjusted.
● Sit with buttocks as far back
against the backrest as possible.
Adjust the distance between the
seat and the pedals so that legs
are slightly angled when pressing
the pedals. Slide the front
passenger seat as far back as
possible.
● Sit with shoulders as far back against the backrest as possible.Set the backrest rake so that it is
possible to easily reach the
steering wheel with arms slightly bent. Maintain contact between
shoulders and the backrest when turning the steering wheel. Do
not angle the backrest too far
back. We recommend a
maximum rake of approx. 25°.
● Adjust the steering wheel 3 99.
● Set seat height high enough to have a clear field of vision on allsides and of all display
instruments. There should be at
least one hand of clearance
between head and the roof
frame. Your thighs should rest
lightly on the seat without
pressing into it.
● Adjust the head restraint 3 37.
● Adjust the height of the seat belt 3 47.● Adjust the thigh support so that
there is a space approx. two
fingers wide between the edge of
the seat and the hollow of the
knee.
● Adjust the lumbar support so that
it supports the natural shape of
the spine.
Seat adjustment9 Danger
Do not sit nearer than 25 cm from
the steering wheel, to permit safe
airbag deployment.
9 Warning
Never adjust seats while driving as
they could move uncontrollably.
Page 45 of 341
Seats, restraints43
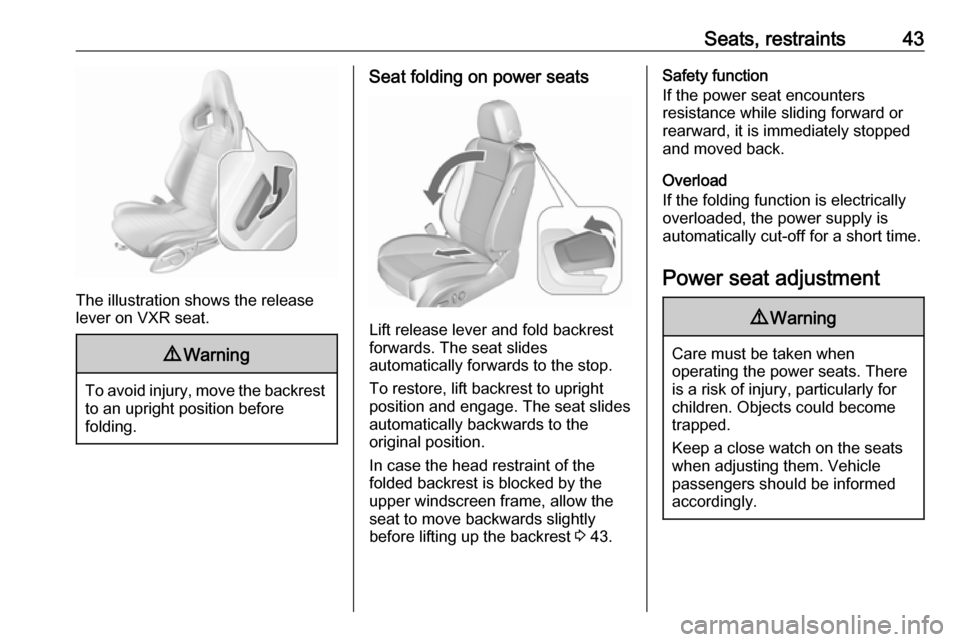
The illustration shows the release
lever on VXR seat.
9 Warning
To avoid injury, move the backrest
to an upright position before
folding.
Seat folding on power seats
Lift release lever and fold backrest
forwards. The seat slides
automatically forwards to the stop.
To restore, lift backrest to upright
position and engage. The seat slides
automatically backwards to the
original position.
In case the head restraint of the
folded backrest is blocked by the
upper windscreen frame, allow the
seat to move backwards slightly
before lifting up the backrest 3 43.
Safety function
If the power seat encounters
resistance while sliding forward or
rearward, it is immediately stopped
and moved back.
Overload
If the folding function is electrically overloaded, the power supply is
automatically cut-off for a short time.
Power seat adjustment9 Warning
Care must be taken when
operating the power seats. There
is a risk of injury, particularly for
children. Objects could become
trapped.
Keep a close watch on the seats
when adjusting them. Vehicle
passengers should be informed
accordingly.
Page 50 of 341
48Seats, restraints9Warning
The belt must not rest against hard
or fragile objects in the pockets of
your clothing.
Seat belt reminder X 3 112.
Height adjustment
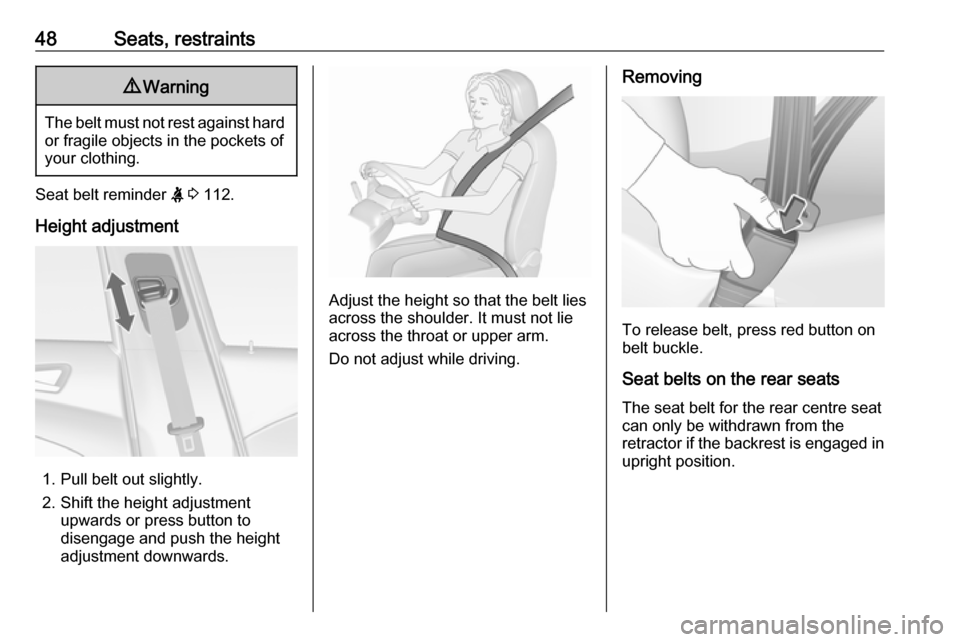
1. Pull belt out slightly.
2. Shift the height adjustment upwards or press button to
disengage and push the height
adjustment downwards.
Adjust the height so that the belt lies across the shoulder. It must not lie
across the throat or upper arm.
Do not adjust while driving.
Removing
To release belt, press red button on
belt buckle.
Seat belts on the rear seats
The seat belt for the rear centre seat
can only be withdrawn from the
retractor if the backrest is engaged in
upright position.
Page 53 of 341
Seats, restraints51
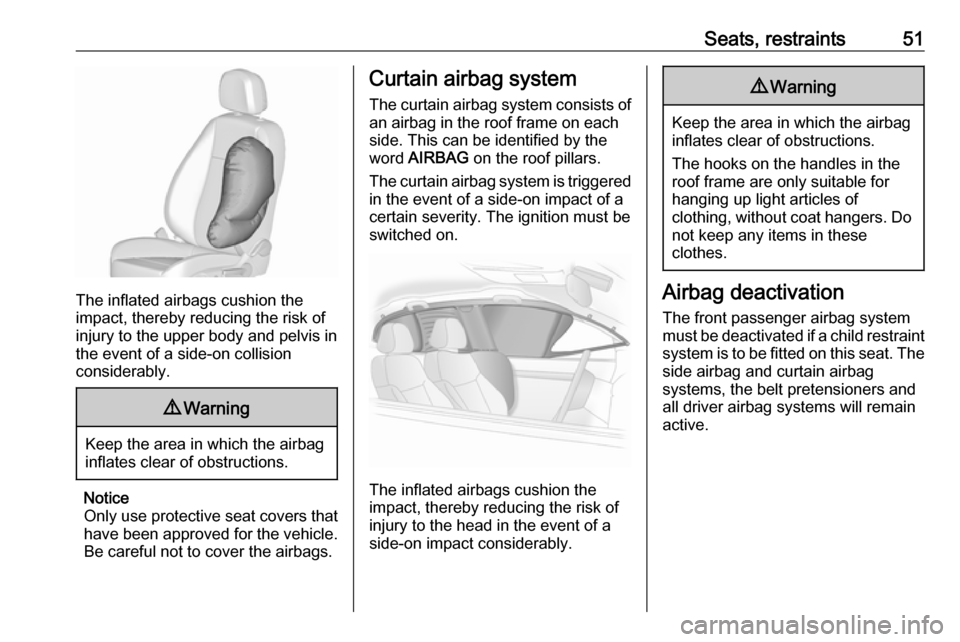
The inflated airbags cushion the
impact, thereby reducing the risk of
injury to the upper body and pelvis in
the event of a side-on collision
considerably.
9 Warning
Keep the area in which the airbag
inflates clear of obstructions.
Notice
Only use protective seat covers that
have been approved for the vehicle.Be careful not to cover the airbags.
Curtain airbag system
The curtain airbag system consists of an airbag in the roof frame on each
side. This can be identified by the
word AIRBAG on the roof pillars.
The curtain airbag system is triggered
in the event of a side-on impact of a
certain severity. The ignition must be
switched on.
The inflated airbags cushion the
impact, thereby reducing the risk of
injury to the head in the event of a
side-on impact considerably.
9 Warning
Keep the area in which the airbag
inflates clear of obstructions.
The hooks on the handles in the
roof frame are only suitable for
hanging up light articles of
clothing, without coat hangers. Do not keep any items in these
clothes.
Airbag deactivation
The front passenger airbag system must be deactivated if a child restraint
system is to be fitted on this seat. The side airbag and curtain airbag
systems, the belt pretensioners and
all driver airbag systems will remain
active.
Page 70 of 341
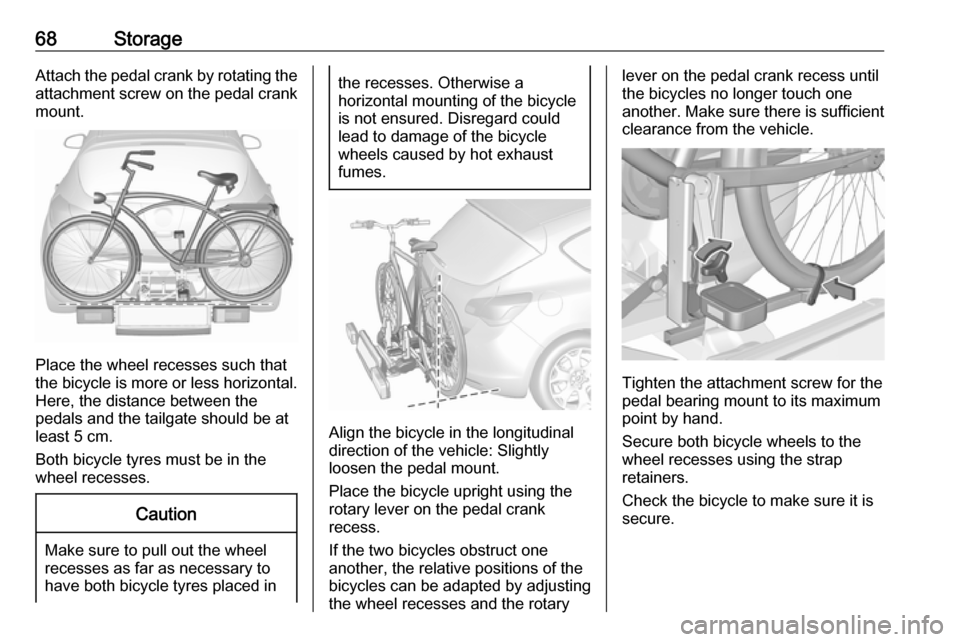
68StorageAttach the pedal crank by rotating the
attachment screw on the pedal crank
mount.
Place the wheel recesses such that
the bicycle is more or less horizontal. Here, the distance between the
pedals and the tailgate should be at
least 5 cm.
Both bicycle tyres must be in the
wheel recesses.
Caution
Make sure to pull out the wheel
recesses as far as necessary to have both bicycle tyres placed in
the recesses. Otherwise a
horizontal mounting of the bicycle
is not ensured. Disregard could
lead to damage of the bicycle
wheels caused by hot exhaust
fumes.
Align the bicycle in the longitudinal direction of the vehicle: Slightly
loosen the pedal mount.
Place the bicycle upright using the
rotary lever on the pedal crank
recess.
If the two bicycles obstruct one
another, the relative positions of the
bicycles can be adapted by adjusting
the wheel recesses and the rotary
lever on the pedal crank recess until
the bicycles no longer touch one
another. Make sure there is sufficient
clearance from the vehicle.
Tighten the attachment screw for the
pedal bearing mount to its maximum
point by hand.
Secure both bicycle wheels to the
wheel recesses using the strap
retainers.
Check the bicycle to make sure it is
secure.
Page 73 of 341
Storage71Push the clamping lever down and
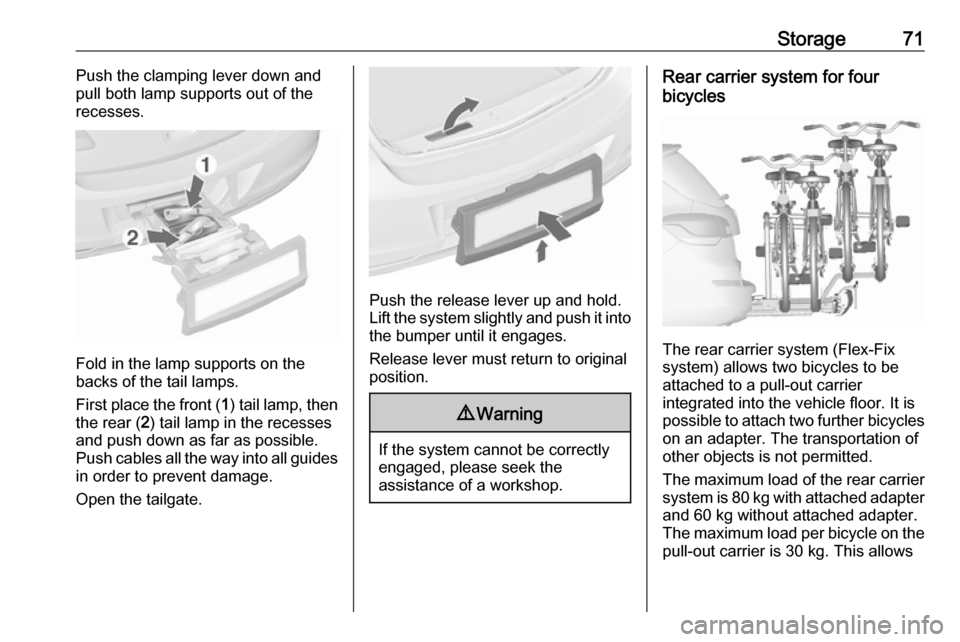
pull both lamp supports out of the recesses.
Fold in the lamp supports on the
backs of the tail lamps.
First place the front ( 1) tail lamp, then
the rear ( 2) tail lamp in the recesses
and push down as far as possible.
Push cables all the way into all guides
in order to prevent damage.
Open the tailgate.
Push the release lever up and hold.
Lift the system slightly and push it into the bumper until it engages.
Release lever must return to original
position.
9 Warning
If the system cannot be correctly
engaged, please seek the
assistance of a workshop.
Rear carrier system for four
bicycles
The rear carrier system (Flex-Fix
system) allows two bicycles to be
attached to a pull-out carrier
integrated into the vehicle floor. It is
possible to attach two further bicycles
on an adapter. The transportation of
other objects is not permitted.
The maximum load of the rear carrier
system is 80 kg with attached adapter and 60 kg without attached adapter.The maximum load per bicycle on the
pull-out carrier is 30 kg. This allows
Page 79 of 341
Storage77It is recommended to attach a
warning sign at the rearmost bicycle
to increase visibility.
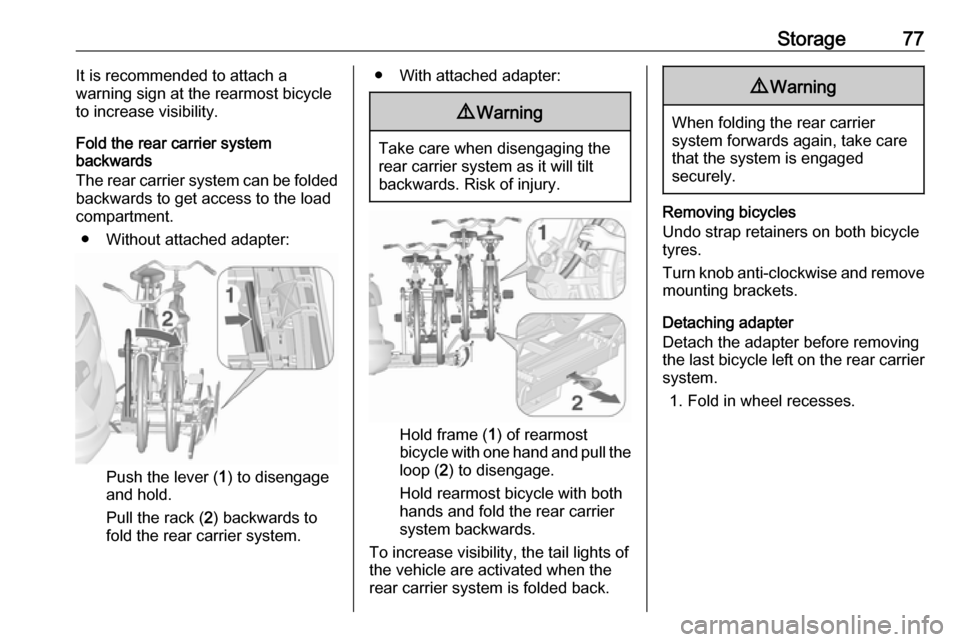
Fold the rear carrier system
backwards
The rear carrier system can be folded
backwards to get access to the load
compartment.
● Without attached adapter:
Push the lever ( 1) to disengage
and hold.
Pull the rack ( 2) backwards to
fold the rear carrier system.
● With attached adapter:9 Warning
Take care when disengaging the
rear carrier system as it will tilt
backwards. Risk of injury.
Hold frame ( 1) of rearmost
bicycle with one hand and pull the
loop ( 2) to disengage.
Hold rearmost bicycle with both
hands and fold the rear carrier
system backwards.
To increase visibility, the tail lights of
the vehicle are activated when the
rear carrier system is folded back.
9 Warning
When folding the rear carrier
system forwards again, take care that the system is engaged
securely.
Removing bicycles
Undo strap retainers on both bicycle
tyres.
Turn knob anti-clockwise and remove
mounting brackets.
Detaching adapter
Detach the adapter before removing the last bicycle left on the rear carrier
system.
1. Fold in wheel recesses.