wiring VAUXHALL ASTRA J 2016 Owner's Manual
[x] Cancel search | Manufacturer: VAUXHALL, Model Year: 2016, Model line: ASTRA J, Model: VAUXHALL ASTRA J 2016Pages: 341, PDF Size: 10.35 MB
Page 245 of 341

Vehicle care243
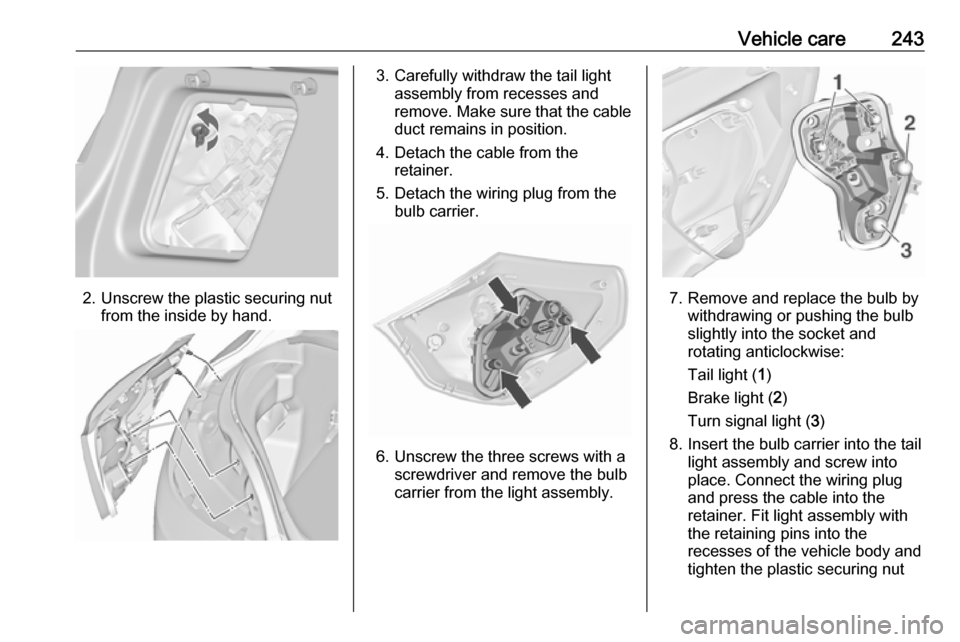
2. Unscrew the plastic securing nutfrom the inside by hand.
3. Carefully withdraw the tail lightassembly from recesses and
remove. Make sure that the cable duct remains in position.
4. Detach the cable from the retainer.
5. Detach the wiring plug from the bulb carrier.
6. Unscrew the three screws with a screwdriver and remove the bulb
carrier from the light assembly.
7. Remove and replace the bulb by withdrawing or pushing the bulb
slightly into the socket and
rotating anticlockwise:
Tail light ( 1)
Brake light ( 2)
Turn signal light ( 3)
8. Insert the bulb carrier into the tail light assembly and screw into
place. Connect the wiring plug
and press the cable into the
retainer. Fit light assembly with
the retaining pins into the
recesses of the vehicle body and
tighten the plastic securing nut
Page 247 of 341

Vehicle care245
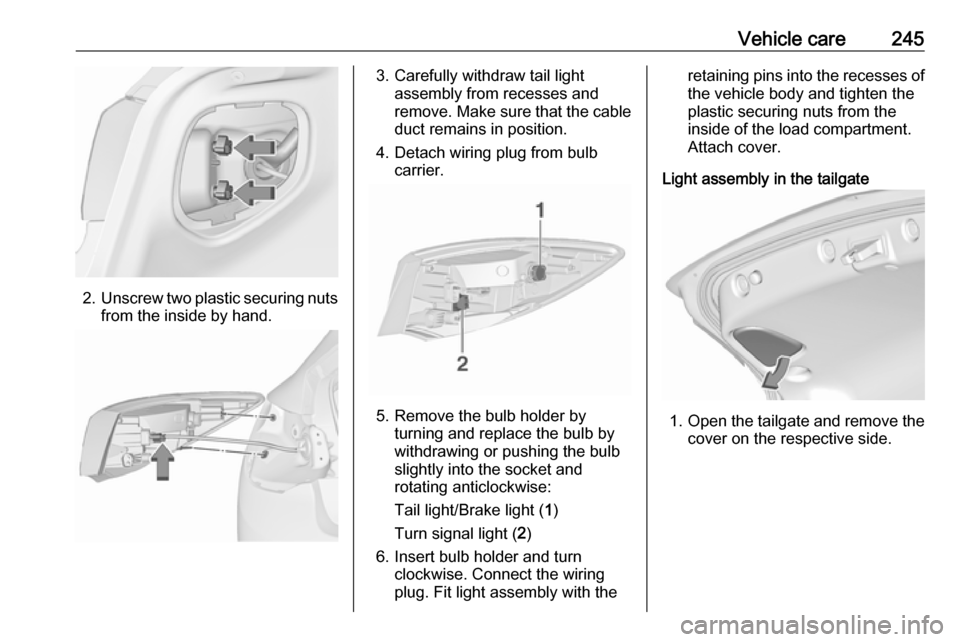
2.Unscrew two plastic securing nuts
from the inside by hand.
3. Carefully withdraw tail light assembly from recesses and
remove. Make sure that the cable duct remains in position.
4. Detach wiring plug from bulb carrier.
5. Remove the bulb holder by turning and replace the bulb by
withdrawing or pushing the bulb
slightly into the socket and rotating anticlockwise:
Tail light/Brake light ( 1)
Turn signal light ( 2)
6. Insert bulb holder and turn clockwise. Connect the wiring
plug. Fit light assembly with the
retaining pins into the recesses of
the vehicle body and tighten the
plastic securing nuts from the
inside of the load compartment.
Attach cover.
Light assembly in the tailgate
1. Open the tailgate and remove the
cover on the respective side.
Page 249 of 341

Vehicle care2474. Carefully withdraw tail lightassembly from recesses and
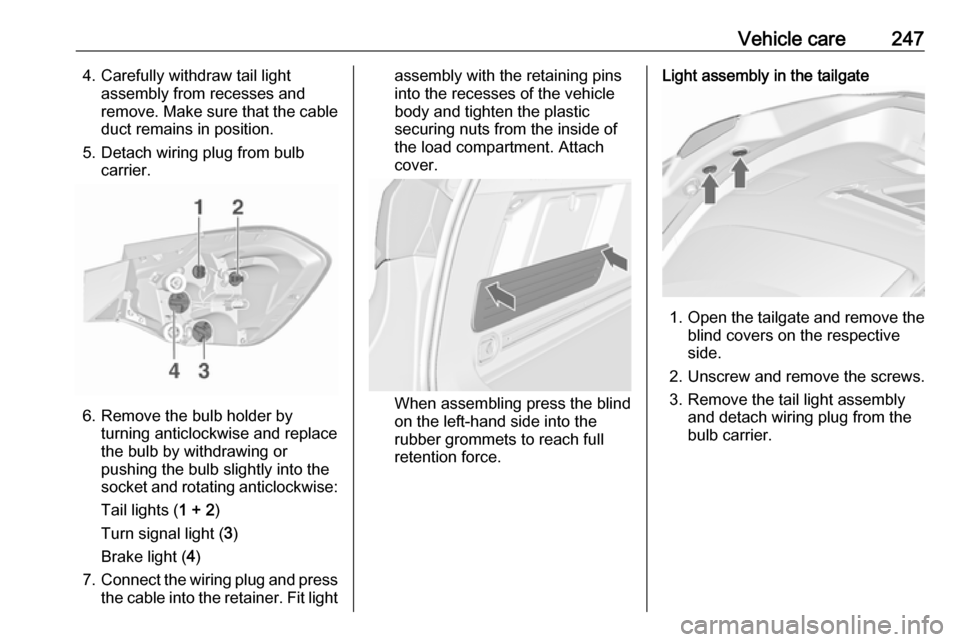
remove. Make sure that the cable duct remains in position.
5. Detach wiring plug from bulb carrier.
6. Remove the bulb holder by turning anticlockwise and replace
the bulb by withdrawing or
pushing the bulb slightly into the
socket and rotating anticlockwise:
Tail lights ( 1 + 2)
Turn signal light ( 3)
Brake light ( 4)
7. Connect the wiring plug and press
the cable into the retainer. Fit light
assembly with the retaining pins
into the recesses of the vehicle
body and tighten the plastic
securing nuts from the inside of
the load compartment. Attach
cover.
When assembling press the blind
on the left-hand side into the
rubber grommets to reach full
retention force.
Light assembly in the tailgate
1. Open the tailgate and remove the
blind covers on the respective
side.
2. Unscrew and remove the screws. 3. Remove the tail light assembly and detach wiring plug from the
bulb carrier.
Page 251 of 341

Vehicle care249
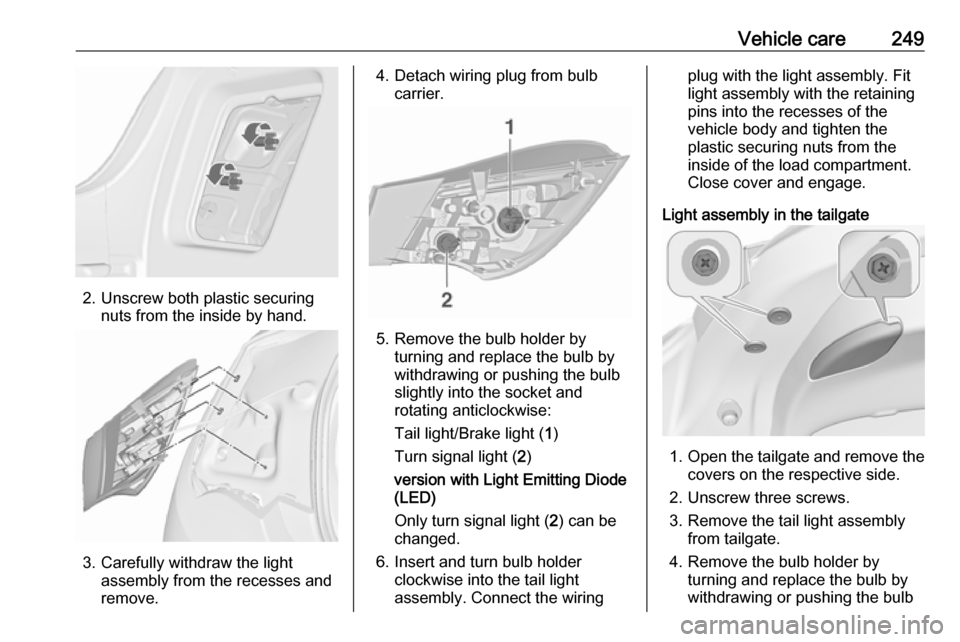
2. Unscrew both plastic securingnuts from the inside by hand.
3. Carefully withdraw the lightassembly from the recesses and
remove.
4. Detach wiring plug from bulb carrier.
5. Remove the bulb holder by turning and replace the bulb by
withdrawing or pushing the bulb
slightly into the socket and rotating anticlockwise:
Tail light/Brake light ( 1)
Turn signal light ( 2)
version with Light Emitting Diode
(LED)
Only turn signal light ( 2) can be
changed.
6. Insert and turn bulb holder clockwise into the tail light
assembly. Connect the wiring
plug with the light assembly. Fit
light assembly with the retaining
pins into the recesses of the
vehicle body and tighten the
plastic securing nuts from the
inside of the load compartment.
Close cover and engage.
Light assembly in the tailgate
1. Open the tailgate and remove the
covers on the respective side.
2. Unscrew three screws.
3. Remove the tail light assembly from tailgate.
4. Remove the bulb holder by turning and replace the bulb by
withdrawing or pushing the bulb