turn signal VAUXHALL ASTRA J 2017.5 Owner's Guide
[x] Cancel search | Manufacturer: VAUXHALL, Model Year: 2017.5, Model line: ASTRA J, Model: VAUXHALL ASTRA J 2017.5Pages: 309, PDF Size: 9.15 MB
Page 245 of 309
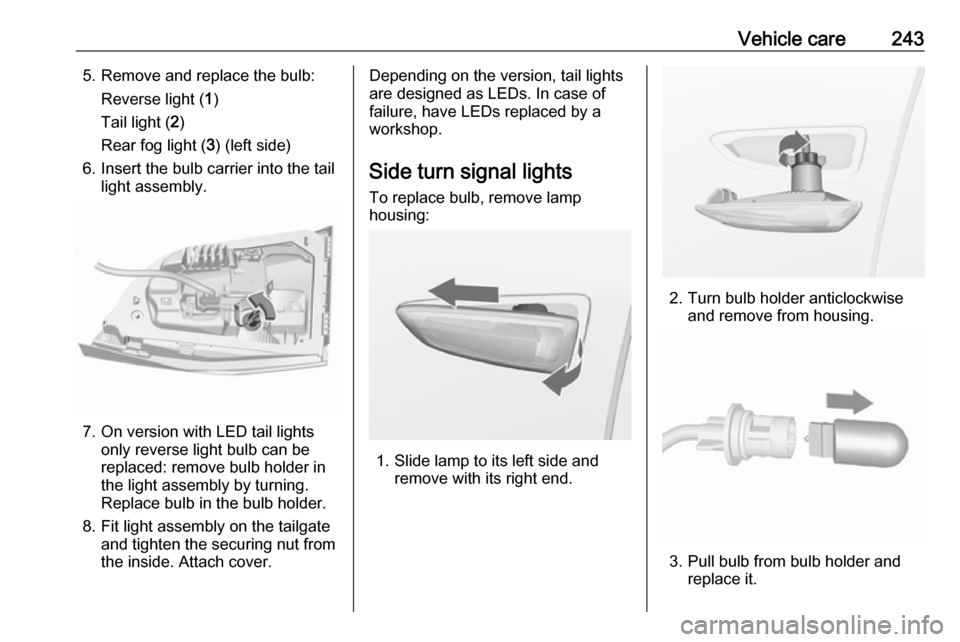
Vehicle care2435. Remove and replace the bulb:Reverse light ( 1)
Tail light ( 2)
Rear fog light ( 3) (left side)
6. Insert the bulb carrier into the tail light assembly.
7. On version with LED tail lightsonly reverse light bulb can be
replaced: remove bulb holder in
the light assembly by turning.
Replace bulb in the bulb holder.
8. Fit light assembly on the tailgate and tighten the securing nut from
the inside. Attach cover.
Depending on the version, tail lights
are designed as LEDs. In case of
failure, have LEDs replaced by a
workshop.
Side turn signal lights
To replace bulb, remove lamp
housing:
1. Slide lamp to its left side and remove with its right end.
2. Turn bulb holder anticlockwiseand remove from housing.
3. Pull bulb from bulb holder and replace it.
Page 259 of 309
Vehicle care257The Tyre load menu only appears
when the vehicle is at a standstill and
the parking brake is applied. On
vehicles with automatic transmission
the selector lever must be in P.
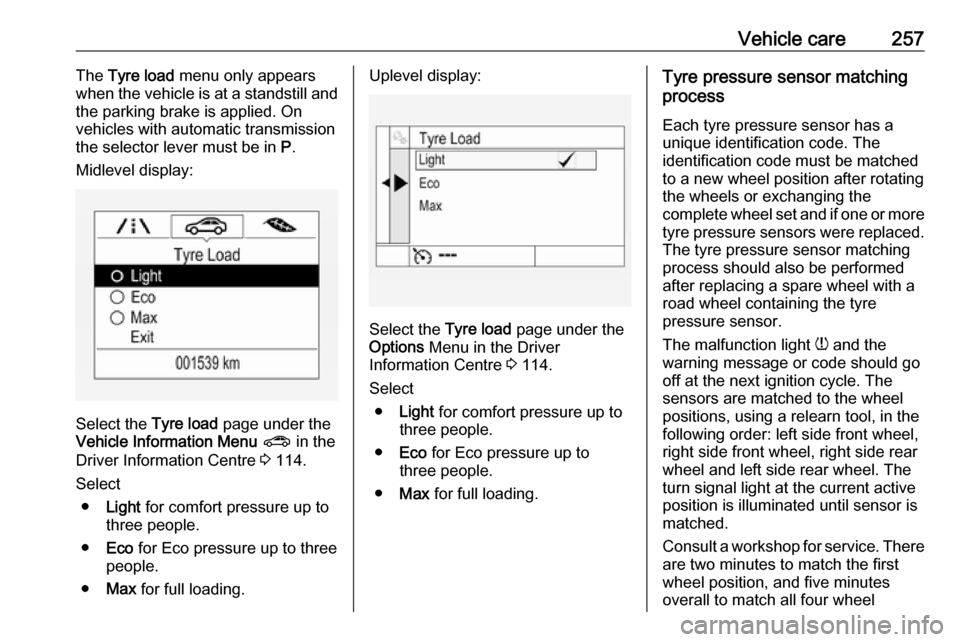
Midlevel display:
Select the Tyre load page under the
Vehicle Information Menu ? in the
Driver Information Centre 3 114.
Select ● Light for comfort pressure up to
three people.
● Eco for Eco pressure up to three
people.
● Max for full loading.
Uplevel display:
Select the Tyre load page under the
Options Menu in the Driver
Information Centre 3 114.
Select ● Light for comfort pressure up to
three people.
● Eco for Eco pressure up to
three people.
● Max for full loading.
Tyre pressure sensor matching
process
Each tyre pressure sensor has a
unique identification code. The
identification code must be matched
to a new wheel position after rotating the wheels or exchanging the
complete wheel set and if one or more tyre pressure sensors were replaced.
The tyre pressure sensor matching
process should also be performed
after replacing a spare wheel with a
road wheel containing the tyre
pressure sensor.
The malfunction light w and the
warning message or code should go
off at the next ignition cycle. The
sensors are matched to the wheel
positions, using a relearn tool, in the following order: left side front wheel,
right side front wheel, right side rear
wheel and left side rear wheel. The
turn signal light at the current active
position is illuminated until sensor is
matched.
Consult a workshop for service. There are two minutes to match the first
wheel position, and five minutes
overall to match all four wheel
Page 260 of 309
258Vehicle carepositions. If it takes longer, the
matching process stops and must be
restarted.
The tyre pressure sensor matching
process is:
1. Apply the parking brake.
2. Turn the ignition on.
3. On vehicles with automatic transmission: set the selector
lever to P.
On vehicles with manual
transmission: select neutral.
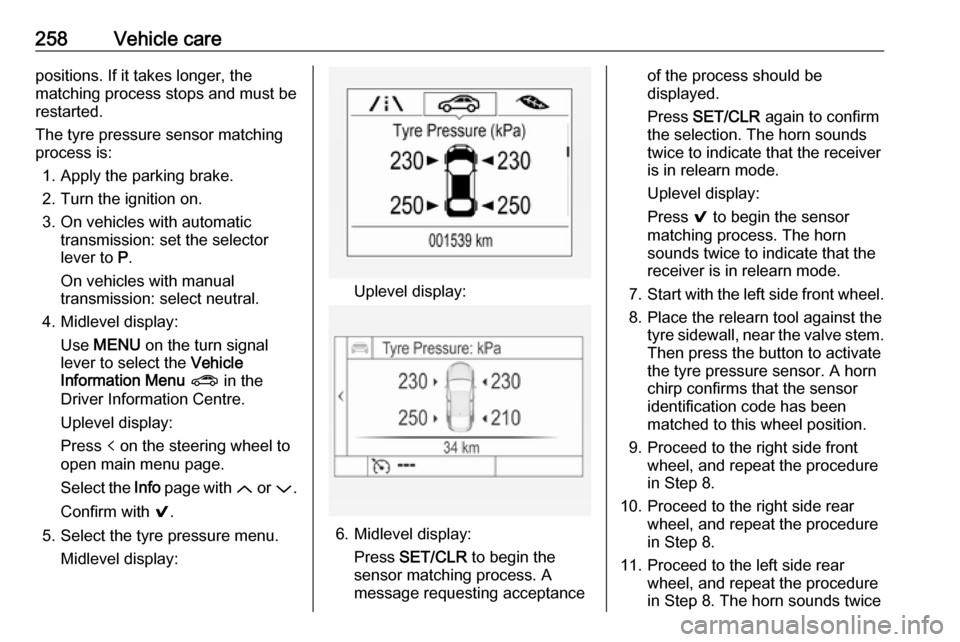
4. Midlevel display: Use MENU on the turn signal
lever to select the Vehicle
Information Menu ? in the
Driver Information Centre.
Uplevel display:
Press p on the steering wheel to
open main menu page.
Select the Info page with Q or P.
Confirm with 9.
5. Select the tyre pressure menu. Midlevel display:
Uplevel display:
6. Midlevel display:Press SET/CLR to begin the
sensor matching process. A
message requesting acceptance
of the process should be
displayed.
Press SET/CLR again to confirm
the selection. The horn sounds
twice to indicate that the receiver
is in relearn mode.
Uplevel display:
Press 9 to begin the sensor
matching process. The horn
sounds twice to indicate that the receiver is in relearn mode.
7. Start with the left side front wheel.
8. Place the relearn tool against the tyre sidewall, near the valve stem.Then press the button to activate
the tyre pressure sensor. A horn
chirp confirms that the sensor
identification code has been
matched to this wheel position.
9. Proceed to the right side front wheel, and repeat the procedure
in Step 8.
10. Proceed to the right side rear wheel, and repeat the procedure
in Step 8.
11. Proceed to the left side rear wheel, and repeat the procedure
in Step 8. The horn sounds twice
Page 307 of 309

305Power connector........................... 97
Power outlets ............................... 96
Power seat adjustment ................49
Power windows ............................ 40
Preheating ................................. 112
Puncture ..................................... 263
Q
Quickheat ................................... 154
R Radio Frequency Identification (RFID) ..................................... 300
Radio remote control ...................20
Reading lights ............................ 143
Rear floor storage cover ..............80
Rear fog light .....................113, 142
Rear seats .................................... 54
Rear storage ................................. 78
Rear view camera ...................... 207
Rear window wiper/washer .......... 93
Recommended fluids and lubricants ........................ 277, 281
Refuelling ................................... 217
Registered trademarks ...............298
Retained power off .....................159
Reversing lights .........................142
Ride control systems ..................178
Roof .............................................. 43
Roof load ...................................... 87
Roof rack ..................................... 86S
Safety belts ................................... 55
Safety net .................................... 83
Seat adjustment ............................. 7
Seat belt ........................................ 8
Seat belt reminder .....................108
Seat belts ..................................... 55
Seat heating Seat heating, front .....................53
Seat heating, rear .....................55
Seat position ................................ 46
Selector lever ..................... 168, 173
Service ............................... 155, 276
Service display .......................... 107
Service information ....................276
Side airbag system ......................61
Side blind spot alert ....................206
Sidelights .................................... 135
Side turn signal lights ................243
Software acknowledgement .......296
Software update ......................... 298
Spare wheel ............................... 266
Speed limiter....................... 114, 183
Speedometer ............................. 103
Sport mode ................................ 180
Starting and operating ................157
Starting off ................................... 16
Starting the engine ....................160
Steering ...................................... 157
Steering wheel adjustment ......9, 90Steering wheel controls ...............90
Stop-start system........................ 162
Storage ......................................... 70
Storage compartments .................70
Sunroof ........................................ 43
Sunvisor lights ........................... 144
Sun visors .................................... 42
Symbols ......................................... 4
T Tachometer ............................... 105
Tail lights ................................... 237
Three-point seat belt .................... 56
Tools .......................................... 252
Tow bar....................................... 220
Towing ................................ 220, 270
Towing another vehicle .............271
Towing equipment .....................222
Towing the vehicle .....................270
Traction Control system ............. 178
Traction Control system off......... 112
Traffic sign assistant ...........114, 210
Trailer coupling ........................... 220
Trailer stability assist .................225
Trailer towing ............................. 221
Transmission ............................... 15
Transmission display .........168, 172
Tread depth ............................... 259
Trip odometer ............................ 104
Turn and lane-change signals ...141
Page 308 of 309

306Turn signal ................................. 108
Tyre chains ................................ 260
Tyre designations ......................253
Tyre pressure ............................ 254
Tyre pressure monitoring system ............................. 112, 255
Tyre pressures ........................... 292
Tyre repair kit ............................. 260
U Ultrasonic parking assist............. 198
Upholstery .................................. 274
Uplevel display ........................... 114
Using this manual ..........................3
V Valet mode ................................. 120
Vehicle battery ........................... 232
Vehicle checks............................ 228
Vehicle data ................................ 281
Vehicle data recording and privacy ..................................... 299
Vehicle detected ahead ..............114
Vehicle dimensions .................... 290
Vehicle Identification Number ....279
Vehicle jack ................................ 252
Vehicle messages .....................122
Vehicle personalisation .............124
Vehicle security ............................ 35
Vehicle specific data ......................3
Vehicle storage ........................... 227Vehicle tools............................... 252
Vehicle unlocking ........................... 6 Vehicle weight ........................... 288
Ventilating ..................................... 53
Ventilation ................................... 146
W
Warning chimes .........................123
Warning lights ............................. 103
Warning triangle .......................... 85
Washer and wiper systems .........13
Washer fluid ............................... 231
Wheel changing .........................263
Wheel covers ............................. 259
Wheels and tyres .......................253
Windows ....................................... 40
Windscreen................................... 40
Windscreen wiper/washer ...........91
Winter tyres ............................... 253
Wiper blade replacement ..........234