key VAUXHALL ASTRA J 2018.5 Infotainment system
[x] Cancel search | Manufacturer: VAUXHALL, Model Year: 2018.5, Model line: ASTRA J, Model: VAUXHALL ASTRA J 2018.5Pages: 183, PDF Size: 3.53 MB
Page 125 of 183
Navigation125
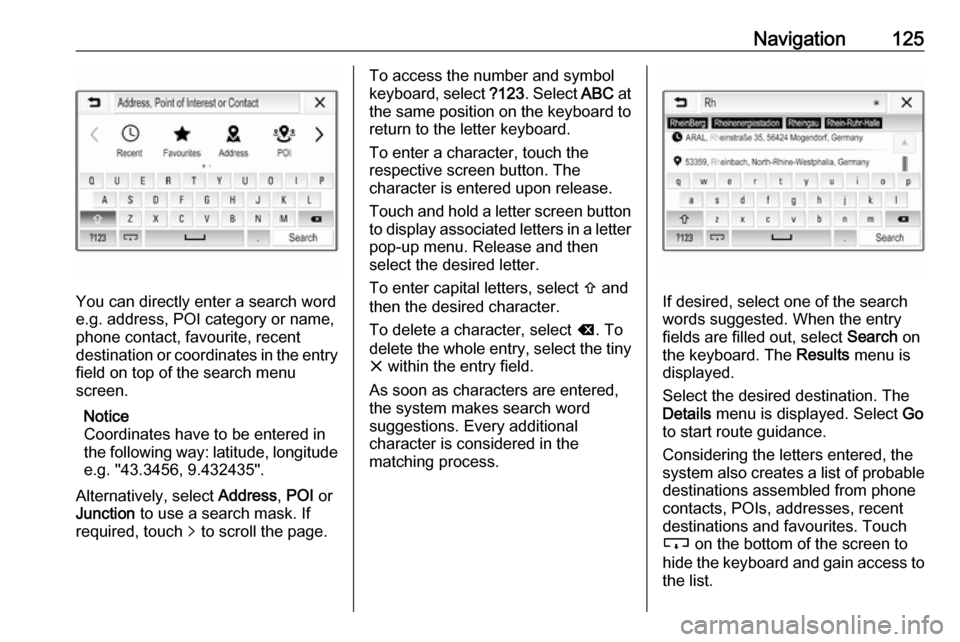
You can directly enter a search word
e.g. address, POI category or name,
phone contact, favourite, recent
destination or coordinates in the entry field on top of the search menu
screen.
Notice
Coordinates have to be entered in
the following way: latitude, longitude
e.g. "43.3456, 9.432435".
Alternatively, select Address, POI or
Junction to use a search mask. If
required, touch q to scroll the page.
To access the number and symbol
keyboard, select ?123. Select ABC at
the same position on the keyboard to return to the letter keyboard.
To enter a character, touch the
respective screen button. The
character is entered upon release.
Touch and hold a letter screen button
to display associated letters in a letter pop-up menu. Release and then
select the desired letter.
To enter capital letters, select b and
then the desired character.
To delete a character, select k. To
delete the whole entry, select the tiny
x within the entry field.
As soon as characters are entered,
the system makes search word
suggestions. Every additional
character is considered in the
matching process.
If desired, select one of the search
words suggested. When the entry
fields are filled out, select Search on
the keyboard. The Results menu is
displayed.
Select the desired destination. The
Details menu is displayed. Select Go
to start route guidance.
Considering the letters entered, the
system also creates a list of probable
destinations assembled from phone
contacts, POIs, addresses, recent
destinations and favourites. Touch
c on the bottom of the screen to
hide the keyboard and gain access to the list.
Page 126 of 183

126NavigationTo redisplay the keyboard, tap within
the entry field.
If desired, select a destination from
the list. The Details menu is
displayed. Select Go to start route
guidance.
Lists with selectable destinations
To access the lists, select ½ on the
map and, if required, touch q to scroll
the page.
Select one of the options:
● Recent : list of destinations
recently used
● Favourites : list of destinations
stored as favourites
● Contacts : list of addresses stored
in the phone book of the mobile
phone currently connected via
Bluetooth
To choose a destination from one of
the lists, scroll through the respective
list and select the desired destination. The Details menu is displayed. Select
Go to start route guidance.Recent destinations
The recent destinations list is
automatically filled with destinations
used in route guidance.
The addresses in the recent
destinations list can be stored as
favourites. Enter the recent
destinations list, select n next to the
desired address to display additional
function buttons and then select f. If
the icon is filled, the address is saved
in the favourites list.
Addresses can be deleted from the
recent destinations list. Enter the
recent destinations list, select n next
to the desired address and then
select e to delete the respective
address.
Favourites
Favourites can be added when a f
icon is displayed next to an address.
When the star icon is filled, the
respective address is stored as a
favourite.The position of a favourite in the list
can be changed. Enter the favourites list, select n next to the desired
favourite to display additional function buttons and then select Q or P.
The name of a favourite can be changed. Enter the favourites list,
select n next to the desired favourite
to display additional function buttons
and then select o. A keyboard is
displayed. Enter the desired name
and then select Done.
Favourites can be deleted. Enter the favourites list, select n next to the
desired favourite to display additional
function buttons and then select f.
The favourite is deactivated (unfilled
star). If you select the icon again, the
favourite is reactivated (filled star).
When leaving the favourites list while
favourites are deactivated, they are
deleted from the list.
Contacts
You can search for addresses within
the list by using the keyboard. Enter
the first letters of the word (name or
Page 127 of 183
Navigation127address) you want to search for. All
entries containing a word starting with
these letters are displayed.
For a detailed description of the
keyboard, see above.
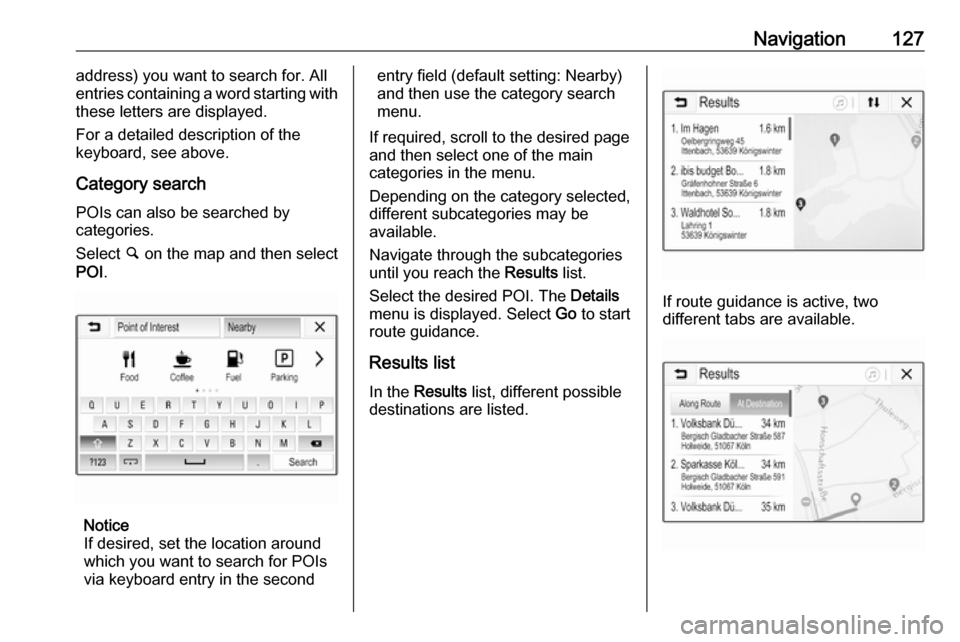
Category search POIs can also be searched by
categories.
Select ½ on the map and then select
POI .
Notice
If desired, set the location around
which you want to search for POIs via keyboard entry in the second
entry field (default setting: Nearby)
and then use the category search
menu.
If required, scroll to the desired page
and then select one of the main
categories in the menu.
Depending on the category selected,
different subcategories may be
available.
Navigate through the subcategories
until you reach the Results list.
Select the desired POI. The Details
menu is displayed. Select Go to start
route guidance.
Results list In the Results list, different possible
destinations are listed.
If route guidance is active, two
different tabs are available.
Page 136 of 183

136Phone
Notice
If no phone is connected, the Device
Management menu can also be
accessed via the phone menu:
Press ; and then select Phone.
3. Touch Search Device . All
discoverable Bluetooth devices in
the environment are displayed in a new search list.
4. Touch the Bluetooth device you wish to pair.
5. Confirm the pairing procedure: ● If SSP (secure simple pairing) is supported:
Confirm the messages on the
Infotainment system and the
Bluetooth device.
● If SSP (secure simple pairing) is not supported:
On the Infotainment system: an Info message is displayed
asking you to enter a PIN
code on your Bluetooth
device.
On the Bluetooth device: enter the PIN code and
confirm your input.
6. The Infotainment system and the device are paired.
Notice
If the Bluetooth device is
successfully paired, h next to the
Bluetooth device indicates that the
phone function is enabled and y
indicates that the Bluetooth music
function is enabled.
7. The phone book is downloaded automatically to the Infotainment
system. Depending on the phone, the Infotainment system must be
allowed access to the phone
book. If required, confirm themessages displayed on the
Bluetooth device.
If this function is not supported by
the Bluetooth device, a
corresponding message is
displayed.
Changing the Bluetooth PIN code
Press ; and then select Settings.
Select Bluetooth and then Change
Pairing PIN to display the respective
submenu. A keypad is displayed.
Enter the desired four-digit PIN code.
To delete an entered number, select
⇦.
Confirm your input by selecting Enter.
Connecting a paired device
Press ; and then select Settings.
Select Bluetooth and then Device
Management to display the
respective menu.
Select the Bluetooth device you wish
to connect. The device is connected.
Notice
The connected device and the
available options are highlighted.
Page 138 of 183
138PhoneOperation
As soon as a connection via
Bluetooth has been set up between
your mobile phone and the
Infotainment system, you can operate many functions of your mobile phone
via the Infotainment system.
Notice
In the hands-free mode, mobile
phone operation is still possible, e.g.
taking a call or adjusting the volume.
After setup of a connection between
the mobile phone and the
Infotainment system, mobile phone
data is transmitted to the Infotainment system. This can take some time
depending on the mobile phone and
the amount of data to be transferred.
During this period, operation of the
mobile phone via the Infotainment
system is possible only to a limited extent.
Notice
Not every mobile phone fully
supports the phone function.
Therefore, deviations from the range
of functions described below are
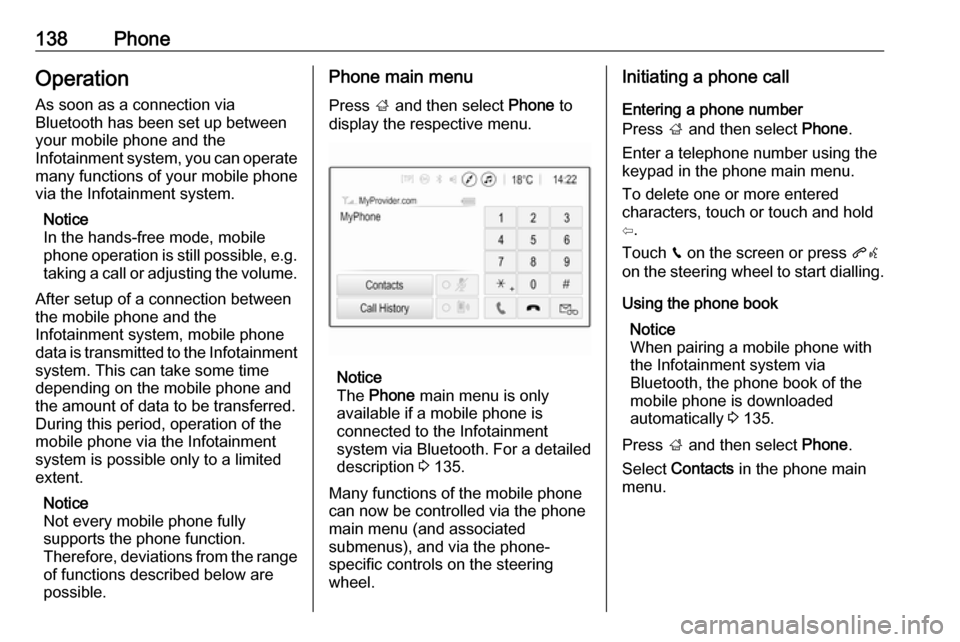
possible.Phone main menu
Press ; and then select Phone to
display the respective menu.
Notice
The Phone main menu is only
available if a mobile phone is connected to the Infotainment
system via Bluetooth. For a detailed
description 3 135.
Many functions of the mobile phone can now be controlled via the phone
main menu (and associated
submenus), and via the phone-
specific controls on the steering
wheel.
Initiating a phone call
Entering a phone number
Press ; and then select Phone.
Enter a telephone number using the
keypad in the phone main menu.
To delete one or more entered
characters, touch or touch and hold
⇦.
Touch v on the screen or press qw
on the steering wheel to start dialling.
Using the phone book Notice
When pairing a mobile phone with
the Infotainment system via
Bluetooth, the phone book of the
mobile phone is downloaded
automatically 3 135.
Press ; and then select Phone.
Select Contacts in the phone main
menu.
Page 140 of 183
140PhoneContacts settings
The contacts list can be sorted by last name or first name.
Press ; and then select Settings to
display the respective menu.
Select Bluetooth and then Sort
Order . Activate the desired option.
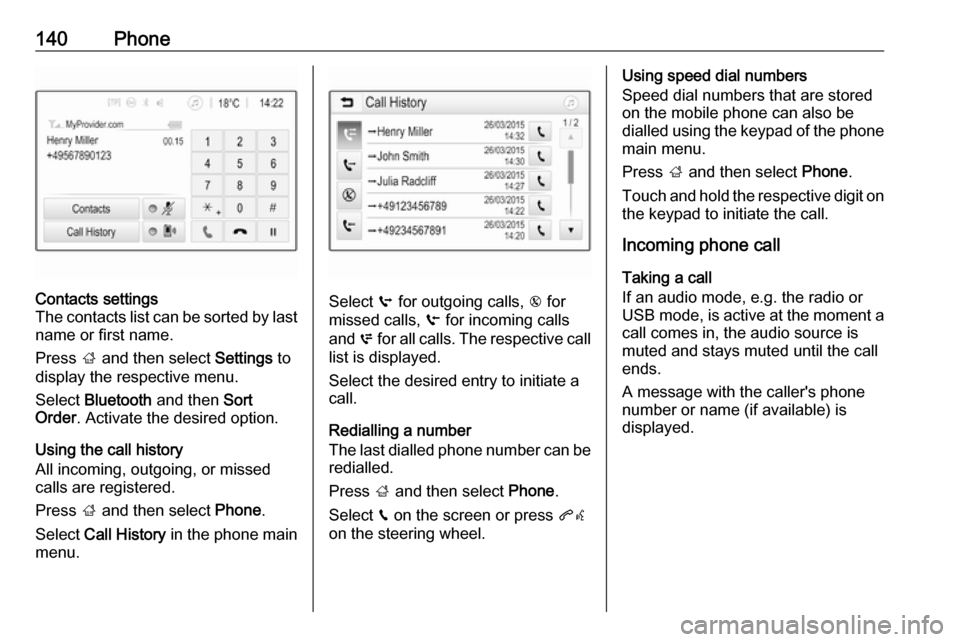
Using the call history
All incoming, outgoing, or missed calls are registered.
Press ; and then select Phone.
Select Call History in the phone main
menu.
Select q for outgoing calls, r for
missed calls, s for incoming calls
and p for all calls. The respective call
list is displayed.
Select the desired entry to initiate a
call.
Redialling a number
The last dialled phone number can be
redialled.
Press ; and then select Phone.
Select v on the screen or press qw
on the steering wheel.
Using speed dial numbers
Speed dial numbers that are stored
on the mobile phone can also be
dialled using the keypad of the phone
main menu.
Press ; and then select Phone.
Touch and hold the respective digit on the keypad to initiate the call.
Incoming phone call
Taking a call
If an audio mode, e.g. the radio or
USB mode, is active at the moment a
call comes in, the audio source is
muted and stays muted until the call
ends.
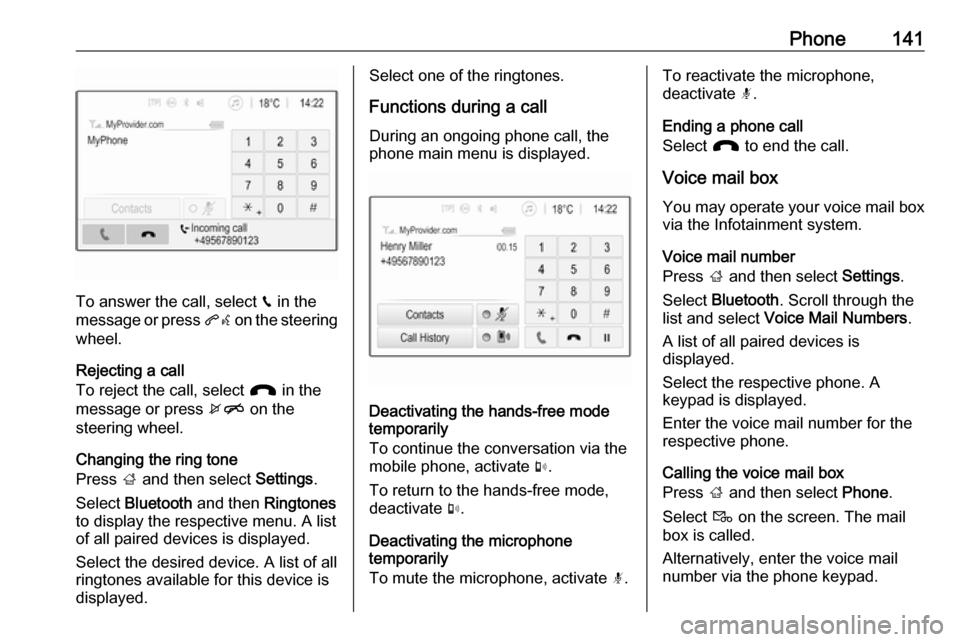
A message with the caller's phone
number or name (if available) is
displayed.
Page 141 of 183
Phone141
To answer the call, select v in the
message or press qw on the steering
wheel.
Rejecting a call
To reject the call, select J in the
message or press xn on the
steering wheel.
Changing the ring tone
Press ; and then select Settings.
Select Bluetooth and then Ringtones
to display the respective menu. A list
of all paired devices is displayed.
Select the desired device. A list of all
ringtones available for this device is
displayed.
Select one of the ringtones.
Functions during a call
During an ongoing phone call, the
phone main menu is displayed.
Deactivating the hands-free mode
temporarily
To continue the conversation via the mobile phone, activate m.
To return to the hands-free mode,
deactivate m.
Deactivating the microphone
temporarily
To mute the microphone, activate n.
To reactivate the microphone,
deactivate n.
Ending a phone call
Select J to end the call.
Voice mail box You may operate your voice mail box
via the Infotainment system.
Voice mail number
Press ; and then select Settings.
Select Bluetooth . Scroll through the
list and select Voice Mail Numbers .
A list of all paired devices is
displayed.
Select the respective phone. A
keypad is displayed.
Enter the voice mail number for the
respective phone.
Calling the voice mail box
Press ; and then select Phone.
Select t on the screen. The mail
box is called.
Alternatively, enter the voice mail
number via the phone keypad.
Page 151 of 183

Introduction1511X......................................... 152
If switched off: short press:
switch power on
If switched on: short press: mute system; long press:
switch power off
Turn: adjust volume
2 RADIO
Activate radio or change
waveband ........................... 158
3 MEDIA
Activate media or change
media source ...................... 164
4 t v
Radio: short press: skip to
previous or next station;
press and hold: seek down or up .................................... 158
External devices: short
press: skip to previous or
next track; press and hold:
rewind or fast forward .........1645PHONE
Short press: open phone
menu ................................... 167
Long press: activate
speech recognition ..............166
6 BACK
Menu: one level back ..........154
Input: delete last character
or entire entry ......................154
7 MENU ................................. 154
Turn: mark screen buttons or menu items; set
numeric values
Press: select/activate a
marked screen button or
menu item; confirm set
value; switch to different
setting option; open
application-specific menu
(if available)8 Softkeys
Favourites: press: select
favourites; press and hold:
save radio stations as
favourites ............................ 159
Menu: press: select
corresponding screen
button .................................. 154
9 FAV
Press: display favourites
bar ....................................... 159
Page 154 of 183

154Basic operationBasic operationBasic operation.......................... 154
Tone settings ............................. 154
Volume settings .........................155
System settings ......................... 155Basic operation
Control panel
MENU knob
The MENU knob is one of the central
control elements for menu operation.Turn: ● to select a screen button or menu
item
● to scroll through a list of menu items
● to change a settings valuePress: ● to activate a selected screen button or menu item
● to confirm a changed settings value
● to switch to a different settings option
● to display the application-specific
submenuNotice
In subsequent chapters, the
operating steps for selecting and
activating a screen button or menu
item will be described as "...select
Page 156 of 183

156Basic operationSelect Time and Date .
Set Time
Select Set Time to enter the
respective submenu.
Select Auto Set at the bottom of the
screen. Activate either On - RDS or
Off (Manual) .
If Off (Manual) is selected, adjust
hours and minutes.
Repeatedly select 12-24 HR at the
bottom of the screen to choose a time mode.
If the 12-hour mode is selected, a
third column for AM and PM selection
is displayed. Select the desired
option.
Set Date
Select Set Date to enter the
respective submenu.
Select Auto Set at the bottom of the
screen. Activate either On - RDS or
Off (Manual) .
If Off (Manual) is selected, adjust the
date settings.Language
Press MENU to open the respective
audio menu.
Select Settings , scroll through the list
and select Vehicle Settings .
Select Languages .
Scroll through the list and select the
desired language.
Restore Factory Settings
Press MENU to open the respective
audio menu.
Select Settings , scroll through the list
and select Vehicle Settings .
Select Restore Factory Settings to
enter the respective submenu.
Select the desired option and confirm the message.
Software Information The Software Information menu
contains specific information on the
software.
Press MENU to open the respective
audio menu.Select Settings , scroll through the list
and select Vehicle Settings .
Select Software Information .
Valet mode
If valet mode is activated, all vehicle
displays are locked and no changes
may be performed within the system.
Notice
Vehicle-related messages remain
enabled.
Locking the system
Press MENU to open the respective
audio menu.
Select Settings , scroll through the list
and select Vehicle Settings .
Select Valet Mode . A keypad is
displayed.
Enter a four-digit code and select
Enter . The keypad is redisplayed.
To confirm the first input, reenter the
four-digit code and select Lock. The
system is locked.
Unlocking the system
Turn the Infotainment system on. A
keypad is displayed.