tailgate VAUXHALL ASTRA J 2018.5 Owner's Guide
[x] Cancel search | Manufacturer: VAUXHALL, Model Year: 2018.5, Model line: ASTRA J, Model: VAUXHALL ASTRA J 2018.5Pages: 317, PDF Size: 9.66 MB
Page 244 of 317

242Vehicle care6.Press the three retaining lugs and
remove the bulb carrier from the
light assembly.
7. Remove and replace the bulbs:
Turn signal light ( 1)
Tail light/brake light ( 2)
On version with LED tail lights and
LED brake lights, only turn signal
light bulb ( 1) can be removed and
replaced.
8. Attach the bulb carrier to the light assembly.
9. Attach the cable to the retainer.
10. Attach the light assembly to the vehicle body and tighten the
securing nut from the inside of the load compartment. Attach cover.
Depending on the version, tail lights
and brake lights are designed as
LEDs. In case of failure, have LEDs replaced by a workshop.
Light assembly in the tailgate
1. Release the cover in the tailgate and remove it.
2. Unscrew the plastic securing nutby hand.
Page 246 of 317

244Vehicle care
On version with LED tail lights
only reverse light bulb ( 1) can be
removed and replaced.
7. Insert the bulb carrier into the tail light assembly. Attach plug to the
light assembly. Fit light assembly
on the tailgate and tighten the
screw from the inside. Attach
cover.
Depending on the version, tail lights are designed as LEDs. In case of failure, have LEDs replaced by aworkshop.
Sports Tourer
1. Release and open the cover on the respective side.
2. Unscrew both plastic securingnuts from the inside by hand.
3. Carefully withdraw tail light assembly from recess and
remove.
4. Detach the cable from the retainer.
Page 247 of 317

Vehicle care2455. Standard tail lights:
Release the retaining lugs and
remove the bulb carrier from the
light assembly.
6. Remove and replace the bulbs:
Tail light/brake light ( 1)
Turn signal light ( 2)
7. Insert the bulb carrier into the light
assembly.
8. LED tail lights:
On version with LED tail lights and
LED brake lights, only turn signal
light bulb can be replaced:
remove bulb holder in the light
assembly by turning. Replace
bulb in the bulb holder.
9. Attach the cable to the retainer.
10. Attach the light assembly to the vehicle body and tighten the
securing nuts from the inside of
the load compartment. Attach
cover.
Depending on the version, tail lights
and brake lights are designed as
LEDs. In case of failure, have LEDs
replaced by a workshop.
Light assembly in the tailgate
1. Release the cover in the tailgate and remove it.
Page 248 of 317

246Vehicle care
2. Unscrew the plastic securing nutby hand.
3. Carefully withdraw the lightassembly from the recesses and
remove.
4. Press the three retaining lugs and
remove the bulb carrier from the
light assembly.
5. Remove and replace the bulb:
Reverse light ( 1)
Tail light ( 2)
Rear fog light ( 3) (left side)
6. Insert the bulb carrier into the tail light assembly.
7. On version with LED tail lightsonly reverse light bulb can be
replaced: remove bulb holder in
the light assembly by turning.
Replace bulb in the bulb holder.
8. Fit light assembly on the tailgate and tighten the securing nut from
the inside. Attach cover.
Page 252 of 317

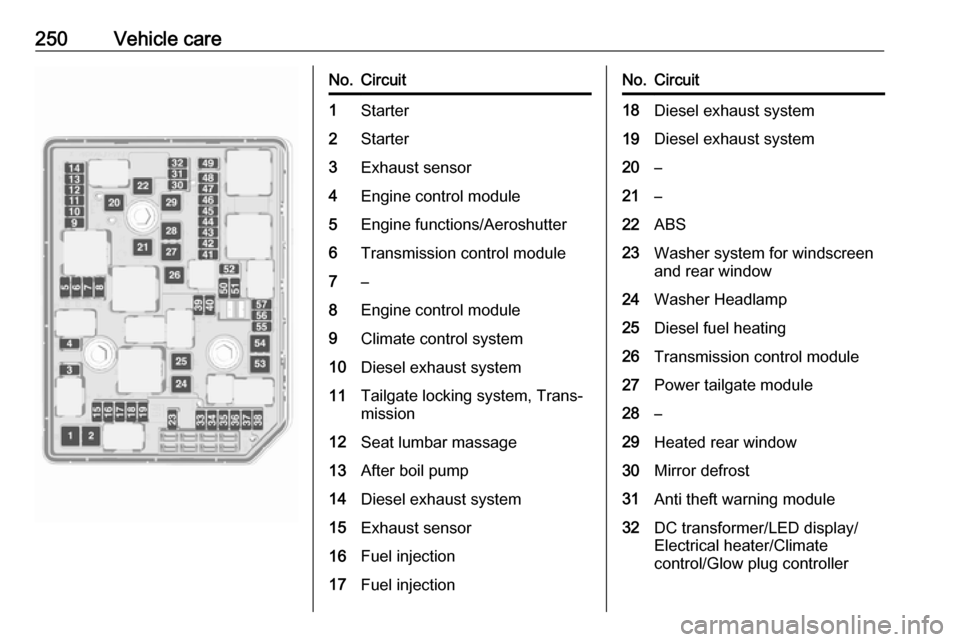
250Vehicle careNo.Circuit1Starter2Starter3Exhaust sensor4Engine control module5Engine functions/Aeroshutter6Transmission control module7–8Engine control module9Climate control system10Diesel exhaust system11Tailgate locking system, Trans‐
mission12Seat lumbar massage13After boil pump14Diesel exhaust system15Exhaust sensor16Fuel injection17Fuel injectionNo.Circuit18Diesel exhaust system19Diesel exhaust system20–21–22ABS23Washer system for windscreen
and rear window24Washer Headlamp25Diesel fuel heating26Transmission control module27Power tailgate module28–29Heated rear window30Mirror defrost31Anti theft warning module32DC transformer/LED display/
Electrical heater/Climate
control/Glow plug controller
Page 255 of 317

Vehicle care253No.Circuit17Body control module 618Body control module 319Data link connector20Airbag system21Climate control system22Central locking system, tailgate23Electronic key system24Power seat memory function25Airbag system steering wheel26Ignition switch/Steering column
lock27Body control module 228USB socket29–30Selector lever31Rear window wiper32Transmission control moduleNo.Circuit33Anti-theft alarm system/Power
sounder34Parking assist/Side blind spot
alert/Infotainment system/USB
socket35OnStar36Info display/Instrument cluster/ CD player37Infotainment system, radio
After having changed defective fuses,
close the fuse box cover and press
until it engages.
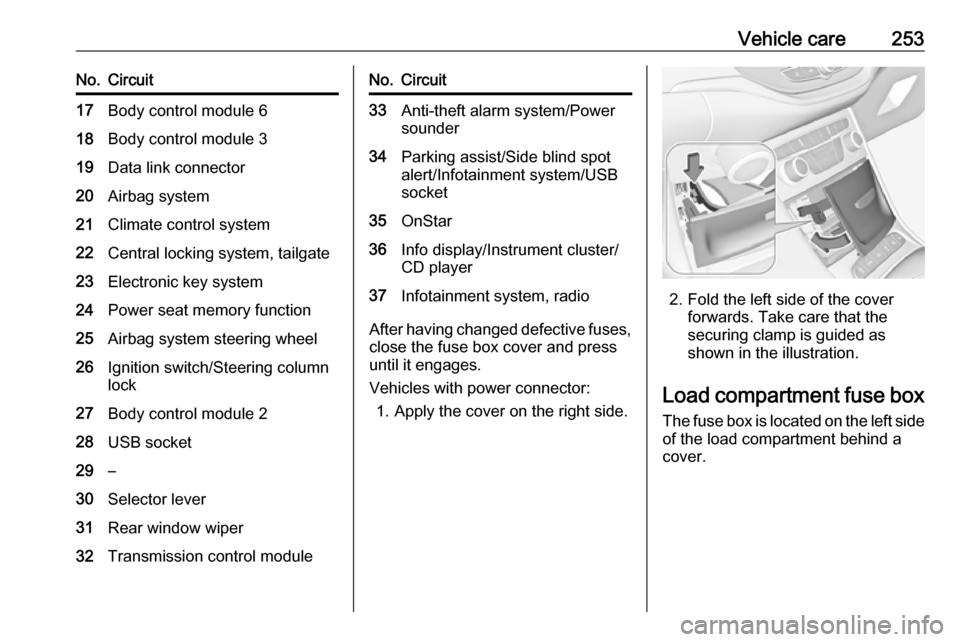
Vehicles with power connector: 1. Apply the cover on the right side.
2. Fold the left side of the cover forwards. Take care that the
securing clamp is guided as
shown in the illustration.
Load compartment fuse box
The fuse box is located on the left side
of the load compartment behind a
cover.