display VAUXHALL ASTRA J 2018.5 Workshop Manual
[x] Cancel search | Manufacturer: VAUXHALL, Model Year: 2018.5, Model line: ASTRA J, Model: VAUXHALL ASTRA J 2018.5Pages: 317, PDF Size: 9.66 MB
Page 156 of 317
154Climate controlBasic settingsSome settings can be changed in the
Settings menu in the Info-Display.
Vehicle personalisation 3 124.
Auxiliary heater Air heater Quickheat is an electric auxiliary air
heater which automatically warms up
the passenger compartment more
quickly.Air vents
Adjustable air vents At least one air vent must be open
while cooling is on.
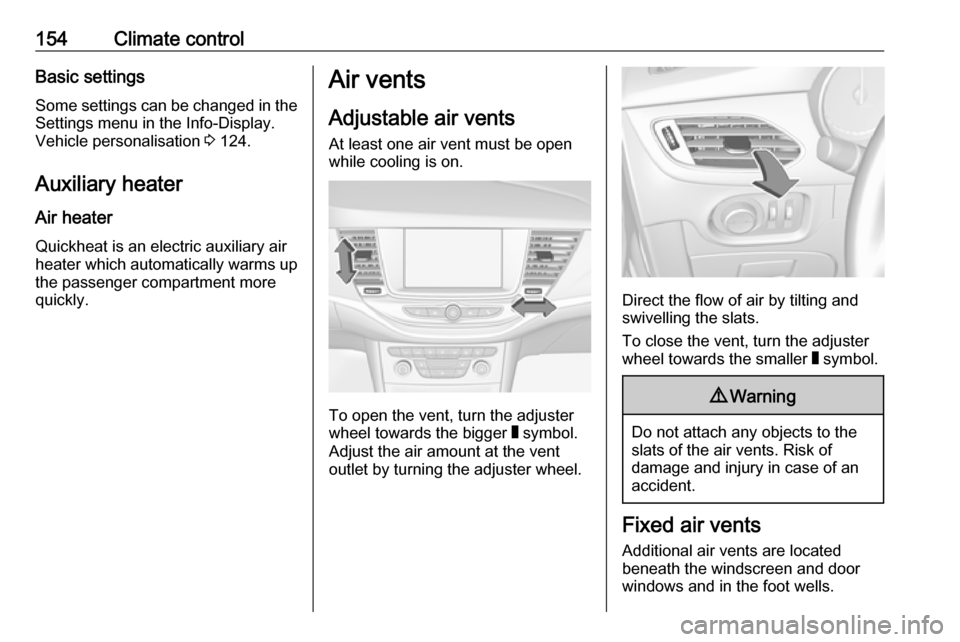
To open the vent, turn the adjuster
wheel towards the bigger W symbol.
Adjust the air amount at the vent
outlet by turning the adjuster wheel.
Direct the flow of air by tilting and
swivelling the slats.
To close the vent, turn the adjuster
wheel towards the smaller W symbol.
9 Warning
Do not attach any objects to the
slats of the air vents. Risk of
damage and injury in case of an
accident.
Fixed air vents
Additional air vents are located
beneath the windscreen and door windows and in the foot wells.
Page 158 of 317

156Driving and operatingDriving and
operatingDriving hints ............................... 157
Control of the vehicle ...............157
Steering ................................... 157
Starting and operating ...............157
New vehicle running-in ............157
Ignition switch positions ...........157
Power button ........................... 158
Retained power off ..................159
Starting the engine ..................160
Overrun cut-off ........................ 162
Stop-start system ....................162
Parking .................................... 165
Engine exhaust .......................... 167
Diesel particle filter ..................167
Catalytic converter ...................168
AdBlue ..................................... 168
Automatic transmission ..............171
Transmission display ...............171
Selector lever .......................... 172
Manual mode ........................... 173
Electronic driving programmes 173
Fault ........................................ 173
Interruption of power supply ....174Manual transmission ..................175
Manual transmission automa‐ ted .............................................. 175
Transmission display ...............176
Selector lever .......................... 176
Manual mode ........................... 177
Electronic driving programmes 178
Fault ........................................ 178
Brakes ........................................ 178
Antilock brake system .............178
Parking brake .......................... 179
Brake assist ............................. 181
Hill start assist ......................... 181
Ride control systems .................181
Traction Control system ..........181
Electronic Stability Control ......182
Sport mode .............................. 184
Driver assistance systems .........184
Cruise control .......................... 184
Speed limiter ........................... 186
Adaptive cruise control ............188
Forward collision alert .............195
Following distance indication ...198
Active emergency braking .......199
Parking assist .......................... 202
Side blind spot alert .................210
Rear view camera ...................211
Traffic sign assistant ................213
Lane keep assist .....................217Fuel............................................ 220
Fuel for petrol engines .............220
Fuel for diesel engines ............221
Fuel for natural gas operation . 222
Refuelling ................................ 222
Trailer hitch ................................ 225
General information .................225
Driving characteristics and towing tips .............................. 225
Trailer towing ........................... 225
Towing equipment ...................226
Trailer stability assist ...............229
Page 161 of 317

Driving and operating159functions remain active until driver's
door is opened, provided the ignition
was on previously.Emergency shut off during driving
Press Engine Start/Stop for longer
than two seconds or press twice
briefly within five seconds 3 160.
Steering wheel lock
The steering wheel lock activates
automatically when:
● The vehicle is stationary.
● The ignition has been switched off.
● The driver's door is opened.
To release steering wheel lock, open
and close driver's door and switch on accessory mode or start the engine
directly.
9 Warning
If the vehicle battery is discharged,
the vehicle must not be towed,
tow-started or jump-started as the
steering wheel lock cannot be
disengaged.
Operation on vehicles with
electronic key system in case of
failure
If either the electronic key fails or the
battery of the electronic key is weak,
the Driver Information Centre may
display No Remote Detected or
Replace Battery in Remote Key when
you try to start the vehicle.
Place the electronic key solely
centred in the transmitter area in
longitudinal direction flat with buttons
upside as shown in the illustration.
Other objects, e.g. other keys,
transponder, tags, coins etc. must be removed from the centre console.
Depress the clutch pedal (manual
transmission) or the brake pedal
(automatic transmission or manual
transmission automated) and press
Engine Start/Stop .
To switch off the engine, press
Engine Start/Stop again. Remove the
electronic key from the centre
console.
This option is intended for
emergencies only. Replace the
electronic key battery as soon as
possible 3 21.
For unlocking or locking the doors,
see fault in radio remote control unit
or electronic key system 3 23.
Retained power off
The following electronic systems can
work until the driver's door is opened
or for ten minutes after the ignition is
switched off:
● power windows
● sunroof
● power outlets
Page 166 of 317

164Driving and operatingdisabled or switched to a power
saving mode. The fan speed of the
climate control system is reduced to
save power.
Restart of the engine by the driverVehicles with manual transmission
Depending on the engine, two
versions of a restart are available.
See engine data to identify the engine
identifier code for your vehicle
3 288.
Conventional restart
Depress the clutch pedal to restart the
engine. For engines with late restart,
this is only possible without
depressing the brake pedal.
Late restart
All petrol engines and the diesel
engines B16DTU and B16DTR have
late restart in addition to conventional
restart. Late restart is only active on
inclines up to 5%.
● Depress the brake pedal.
● Depress the clutch pedal.● Select first gear.
● Release the brake pedal to restart the engine.Vehicles with automatic transmission
or manual transmission automated:
Release the brake pedal or move
selector lever out of D into N or P to
restart the engine.
Restart of the engine by the stop-
start system
On vehicles with manual transmission
which are in a conventional Autostop,
the selector lever must be in neutral
to enable an automatic restart.
On vehicles with manual transmission
which are in an early Autostop, an
automatic restart is possible, when
not in neutral if the brake pedal and
the clutch pedal are depressed.
On vehicles with automatic
transmission or manual transmission
automated, the selector lever must be
in D to enable an automatic restart.
The engine will be restarted
automatically by the stop-start
system, if one of the following
conditions occurs during an Autostop:
● The stop-start system is manually deactivated.
● The bonnet is opened.
● The driver's seat belt is unfastened and / or the driver'sdoor is opened.
● The engine temperature is too low.
● The charging level of the vehicle battery is below a defined level.
● The brake vacuum is not sufficient.
● The vehicle is driven at least at walking speed.
● The climate control system requests an engine start.
● The desired compartment temperature does not match the
actual temperature.
● The air conditioning is manually switched on.
If the bonnet is not fully closed, a
warning message is displayed in the
Driver Information Centre.
Page 171 of 317

Driving and operating169Caution
Avoid contact of the paintwork withAdBlue.
In case of contact, rinse off with water.
AdBlue freezes at a temperature of
approx. -11 °C. As the vehicle is
equipped with an AdBlue pre-heater,
the emissions reduction at low
temperatures is ensured. The AdBlue
pre-heater works automatically.
The typical AdBlue consumption is
approx. two litres per 600 miles, but
can also be higher depending on
driving behaviour (e.g. high load or
towing).
AdBlue tank
At a remaining volume of approx.
five litres, there is a liquid level switch. Warning messages are displayed
only below that threshold. Tank
volume 3 295.
Level warnings
Depending on the calculated range of
AdBlue, different messages are
displayed in the Driver Information
Centre. The messages and the
restrictions are a legal requirement.
The first possible warning is AdBlue
Range: 1500 mi .
This warning will show up once briefly with the calculated range. Driving is
possible without any restrictions.
The next warning level is entered with
a range below 1090 miles. The
message with the current range will
always be displayed when ignition is
switched on and needs to be
confirmed 3 115 . Refill AdBlue before
entering the next warning level.
At an AdBlue range below 560 miles,
the following warning messages are
alternately displayed and cannot be
dismissed:
● AdBlue Low Refill Now
● Engine Restart Prevented in 560
miles .
Additionally, control indicator Y
flashes continuously.Notice
In case of high AdBlue consumption,
the Driver Information Centre may
display this warning without the
previous warning stages.
The last warning level is entered
when the AdBlue tank is empty.
Restart of the engine is not possible.
The following warning messages are
alternately displayed and cannot be
dismissed:
● AdBlue Empty Refill Now
● Engine Will Not Restart .
Additionally, control indicator Y
flashes continuously.
With active prevention of an engine
start, the following message will be
displayed:
Refill AdBlue To Start Vehicle .
The tank must be refilled completely
with AdBlue, otherwise restarting of
the engine is not possible.
3 295
Page 172 of 317

170Driving and operatingHigh emission warnings
If the exhaust emission rises above a certain value, warnings similar to the
range warnings will be displayed in
the Driver Information Centre.
Requests to have the exhaust system checked and finally the
announcement of the prevention of
an engine restart are displayed.
These restrictions are a legal
requirement.
Consult a workshop for assistance.
Refilling AdBlueCaution
Only use AdBlue that complies
with European standards
DIN 70 070 and ISO 22241-1.
Do not use additives.
Do not dilute AdBlue.
Otherwise the selective catalytic
reduction system could be
damaged.
Notice
Whenever a filling pump with a
nozzle for passenger cars is not
available at a filling station, use only
AdBlue bottles or canisters with a
sealed refill adapter for refilling, to
prevent splashback and overspill,
and in order to ensure that the fumes
from the tank are captured and do
not emerge. AdBlue in bottles or
canisters is available in many filling
stations and can be purchased e.g. at Vauxhall dealers and other retail
outlets.
Since AdBlue has a limited
durability, check the date of expiry
before refilling.
Notice
The refilling of AdBlue is only
detected by the system when the
above mentioned liquid level switch
in the tank is activated.
In case AdBlue refill is not
successfully detected:1. Continuously drive the vehicle for 10 minutes making sure that
vehicle speed is always higher
than 12 mph.
2. If AdBlue refill is detected successfully, AdBlue supply-
driven limitations will disappear.
If AdBlue refill is still not detected,
seek the assistance of a workshop.
If AdBlue must be refilled at
temperatures below -11 °C, the
refilling of AdBlue may not be
detected by the system. In this
event, park the vehicle in a space
with a higher ambient temperature
until AdBlue is liquefied.
Notice
When unscrewing the protective cap from the filler neck, ammonia fumes
may emerge. Do not inhale as the
fumes have a pungent smell. The
fumes are not harmful by inhalation.
The AdBlue tank should be filled
completely. This must be done if the
warning message regarding
prevention of an engine restart is
already displayed.
Page 173 of 317
Driving and operating171The vehicle must be parked on a level
surface.
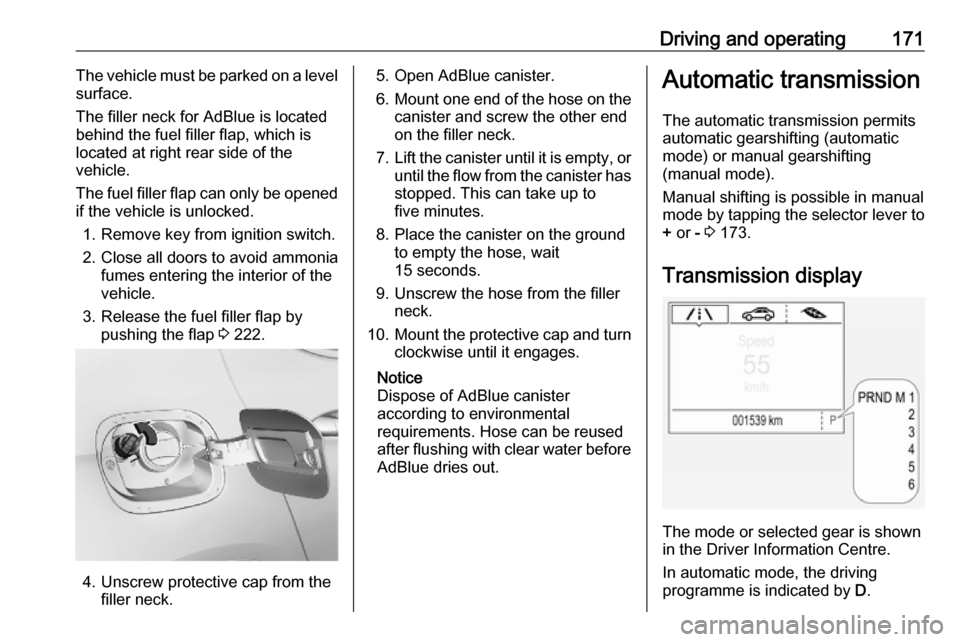
The filler neck for AdBlue is located
behind the fuel filler flap, which is located at right rear side of the
vehicle.
The fuel filler flap can only be opened if the vehicle is unlocked.
1. Remove key from ignition switch.2. Close all doors to avoid ammonia fumes entering the interior of the
vehicle.
3. Release the fuel filler flap by pushing the flap 3 222.
4. Unscrew protective cap from the
filler neck.
5. Open AdBlue canister.
6. Mount one end of the hose on the
canister and screw the other end
on the filler neck.
7. Lift the canister until it is empty, or
until the flow from the canister has stopped. This can take up to
five minutes.
8. Place the canister on the ground to empty the hose, wait
15 seconds.
9. Unscrew the hose from the filler neck.
10. Mount the protective cap and turn
clockwise until it engages.
Notice
Dispose of AdBlue canister
according to environmental
requirements. Hose can be reused
after flushing with clear water before
AdBlue dries out.Automatic transmission
The automatic transmission permits
automatic gearshifting (automatic
mode) or manual gearshifting
(manual mode).
Manual shifting is possible in manual
mode by tapping the selector lever to + or - 3 173.
Transmission display
The mode or selected gear is shown
in the Driver Information Centre.
In automatic mode, the driving
programme is indicated by D.
Page 175 of 317
Driving and operating173ParkingApply the parking brake and engage
P .
The ignition key can only be removed
when the selector lever is in position
P .
Manual mode
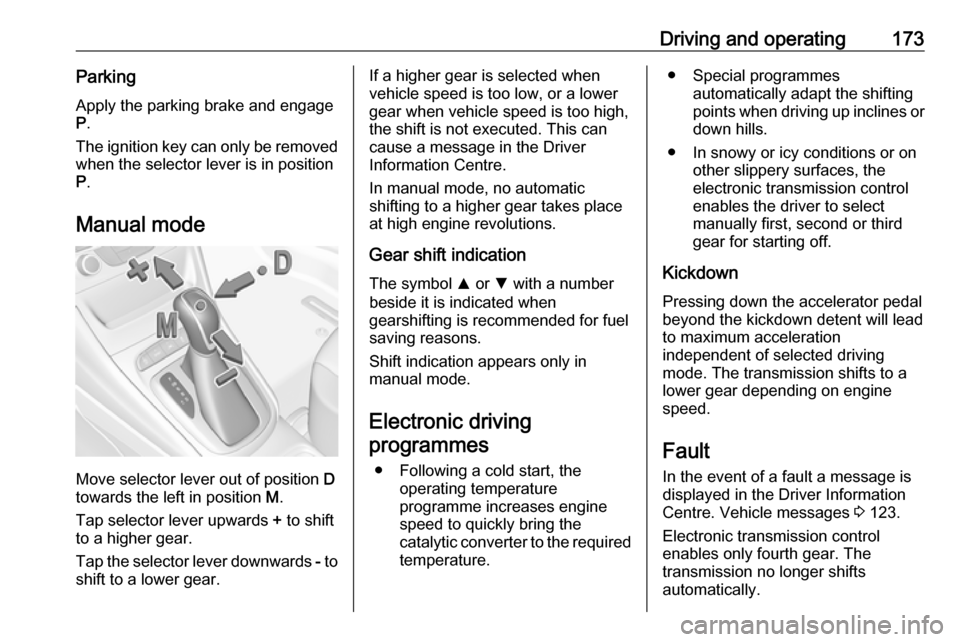
Move selector lever out of position D
towards the left in position M.
Tap selector lever upwards + to shift
to a higher gear.
Tap the selector lever downwards - to
shift to a lower gear.
If a higher gear is selected when
vehicle speed is too low, or a lower
gear when vehicle speed is too high,
the shift is not executed. This can
cause a message in the Driver
Information Centre.
In manual mode, no automatic
shifting to a higher gear takes place
at high engine revolutions.
Gear shift indication
The symbol R or S with a number
beside it is indicated when
gearshifting is recommended for fuel
saving reasons.
Shift indication appears only in
manual mode.
Electronic driving programmes
● Following a cold start, the operating temperature
programme increases engine
speed to quickly bring the
catalytic converter to the required
temperature.● Special programmes automatically adapt the shifting
points when driving up inclines or
down hills.
● In snowy or icy conditions or on other slippery surfaces, the
electronic transmission control
enables the driver to select
manually first, second or third
gear for starting off.
Kickdown Pressing down the accelerator pedal
beyond the kickdown detent will lead
to maximum acceleration
independent of selected driving
mode. The transmission shifts to a
lower gear depending on engine
speed.
Fault
In the event of a fault a message is
displayed in the Driver Information
Centre. Vehicle messages 3 123.
Electronic transmission control
enables only fourth gear. The
transmission no longer shifts
automatically.
Page 177 of 317
Driving and operating175Manual transmission
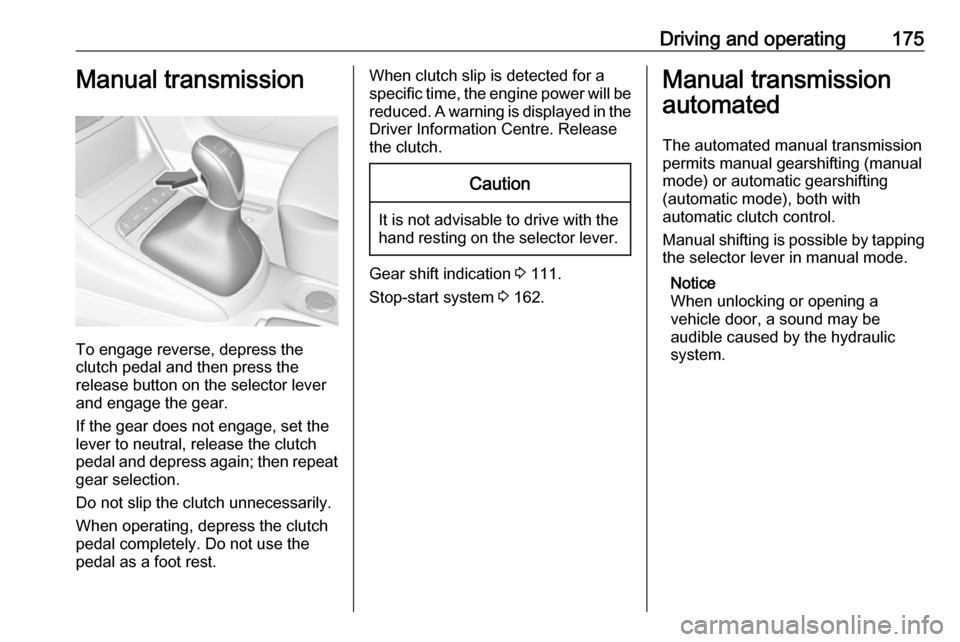
To engage reverse, depress the
clutch pedal and then press the
release button on the selector lever
and engage the gear.
If the gear does not engage, set the
lever to neutral, release the clutch
pedal and depress again; then repeat
gear selection.
Do not slip the clutch unnecessarily.
When operating, depress the clutch
pedal completely. Do not use the
pedal as a foot rest.
When clutch slip is detected for a specific time, the engine power will be reduced. A warning is displayed in the
Driver Information Centre. Release
the clutch.Caution
It is not advisable to drive with the hand resting on the selector lever.
Gear shift indication 3 111.
Stop-start system 3 162.
Manual transmission
automated
The automated manual transmission permits manual gearshifting (manual
mode) or automatic gearshifting
(automatic mode), both with
automatic clutch control.
Manual shifting is possible by tapping the selector lever in manual mode.
Notice
When unlocking or opening a
vehicle door, a sound may be
audible caused by the hydraulic
system.
Page 178 of 317
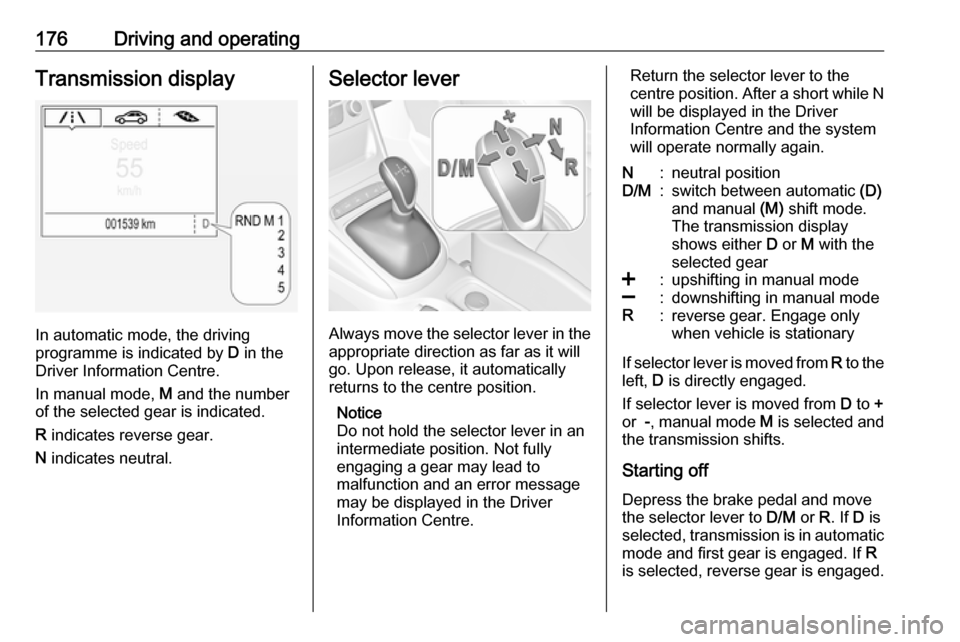
176Driving and operatingTransmission display
In automatic mode, the driving
programme is indicated by D in the
Driver Information Centre.
In manual mode, M and the number
of the selected gear is indicated.
R indicates reverse gear.
N indicates neutral.
Selector lever
Always move the selector lever in the
appropriate direction as far as it will
go. Upon release, it automatically
returns to the centre position.
Notice
Do not hold the selector lever in an
intermediate position. Not fully
engaging a gear may lead to
malfunction and an error message may be displayed in the Driver
Information Centre.
Return the selector lever to the
centre position. After a short while N
will be displayed in the Driver
Information Centre and the system
will operate normally again.N:neutral positionD/M:switch between automatic (D)
and manual (M) shift mode.
The transmission display
shows either D or M with the
selected gear<:upshifting in manual mode]:downshifting in manual modeR:reverse gear. Engage only
when vehicle is stationary
If selector lever is moved from R to the
left, D is directly engaged.
If selector lever is moved from D to +
or -, manual mode M is selected and
the transmission shifts.
Starting off Depress the brake pedal and move
the selector lever to D/M or R. If D is
selected, transmission is in automatic
mode and first gear is engaged. If R
is selected, reverse gear is engaged.