lock VAUXHALL ASTRA J GTC 2018.5 Owner's Guide
[x] Cancel search | Manufacturer: VAUXHALL, Model Year: 2018.5, Model line: ASTRA J GTC, Model: VAUXHALL ASTRA J GTC 2018.5Pages: 293, PDF Size: 8.28 MB
Page 61 of 293

Storage59StorageStorage compartments................59
Glovebox ................................... 59
Cupholders ................................ 59
Front storage ............................. 60
Underseat storage .....................61
Armrest storage .........................61
Centre console storage .............62
Load compartment .......................63
Rear storage .............................. 65
Load compartment cover ...........65
Rear floor storage cover ............66
Lashing eyes ............................. 67
Warning triangle ........................68
First aid kit ................................. 68
Roof rack system .........................69
Roof rack ................................... 69
Loading information .....................69Storage compartments9Warning
Do not store heavy or sharp
objects in the storage
compartments. Otherwise, the
storage compartment lid could
open and vehicle occupants could be injured by objects being thrown
around in the event of hard
braking, a sudden change in
direction or an accident.
Glovebox
The glovebox features a pen holder,
a credit card holder, a coin holder and
an adapter for the locking wheel nuts.
The glovebox should be closed whilst
driving.
Cupholders
Cupholders are located in the centre
console.
Page 65 of 293
Storage63Load compartment
The rear seat backrest is divided into
two parts. Both parts can be folded
down.
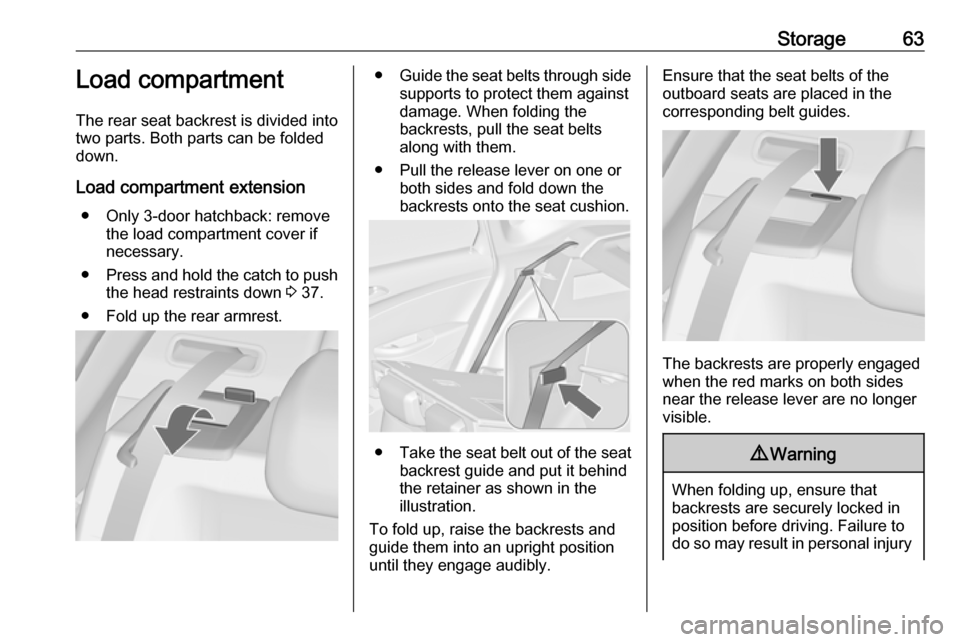
Load compartment extension ● Only 3-door hatchback: remove the load compartment cover ifnecessary.
● Press and hold the catch to push
the head restraints down 3 37.
● Fold up the rear armrest.● Guide the seat belts through side
supports to protect them against
damage. When folding the
backrests, pull the seat belts along with them.
● Pull the release lever on one or both sides and fold down the
backrests onto the seat cushion.
● Take the seat belt out of the seat
backrest guide and put it behind
the retainer as shown in the
illustration.
To fold up, raise the backrests and
guide them into an upright position until they engage audibly.
Ensure that the seat belts of the
outboard seats are placed in the corresponding belt guides.
The backrests are properly engaged
when the red marks on both sides near the release lever are no longer
visible.
9 Warning
When folding up, ensure that
backrests are securely locked in
position before driving. Failure to
do so may result in personal injury
Page 66 of 293
64Storageor damage to the load or vehicle inthe event of hard braking or a
collision.
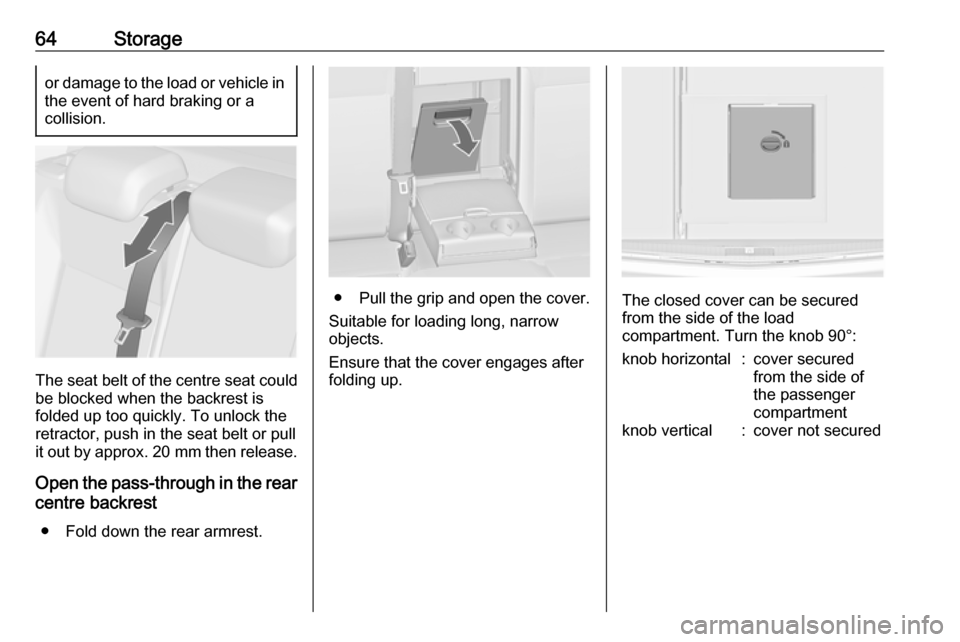
The seat belt of the centre seat could
be blocked when the backrest is
folded up too quickly. To unlock the
retractor, push in the seat belt or pull it out by approx. 20 mm then release.
Open the pass-through in the rear centre backrest
● Fold down the rear armrest.
● Pull the grip and open the cover.
Suitable for loading long, narrow
objects.
Ensure that the cover engages after
folding up.The closed cover can be secured from the side of the load
compartment. Turn the knob 90°:
knob horizontal:cover secured
from the side of
the passenger
compartmentknob vertical:cover not secured
Page 73 of 293

Instruments and controls71Instruments and
controlsControls ....................................... 72
Steering wheel adjustment ........72
Steering wheel controls .............72
Heated steering wheel ...............72
Horn ........................................... 73
Windscreen wiper and washer ..73
Rear window wiper and washer ...................................... 75
Outside temperature ..................75
Clock ......................................... 76
Power outlets ............................. 77
Cigarette lighter ......................... 78
Ashtrays .................................... 78
Warning lights, gauges and indi‐ cators ........................................... 79
Instrument cluster ......................79
Speedometer ............................. 79
Odometer .................................. 79
Trip odometer ............................ 79
Tachometer ............................... 79
Fuel gauge ................................ 80
Fuel selector .............................. 80
Engine coolant temperature gauge ....................................... 82Service display.......................... 82
Control indicators ......................83
Turn lights .................................. 86
Seat belt reminder .....................86
Airbag and belt tensioners .........86
Airbag deactivation ....................86
Charging system .......................87
Malfunction indicator light ..........87
Service vehicle soon .................87
Brake and clutch system ...........87
Operate pedal ............................ 87
Electric parking brake ................87
Electric parking brake fault ........88
Antilock brake system (ABS) .....88
Upshift ....................................... 88
Power steering .......................... 88
Lane departure warning ............88
Ultrasonic parking assist ...........89
Electronic Stability Control off ...89
Electronic Stability Control and Traction Control system ...........89
Traction Control system off .......89
Preheating ................................. 89
Exhaust filter .............................. 89
Tyre pressure monitoring system ...................................... 90
Engine oil pressure ....................90
Low fuel ..................................... 90
Immobiliser ................................ 91
Reduced engine power .............91Exterior light .............................. 91
High beam ................................. 91
High beam assist .......................91
Adaptive forward lighting ...........91
Fog light ..................................... 91
Rear fog light ............................. 91
Low washer fluid ........................91
Cruise control ............................ 91
Adaptive cruise control ..............91
Vehicle detected ahead .............92
Door open .................................. 92
Displays ....................................... 92
Driver Information Centre ..........92
Info Display ................................ 96
Smartphone controller ...............98
Vehicle messages ........................98
Warning chimes .......................101
Battery voltage ........................ 101
Trip computer ............................. 102
Vehicle personalisation ..............104
Telematics service .....................109
OnStar ..................................... 109
ERA GLONASS .......................112
Page 74 of 293
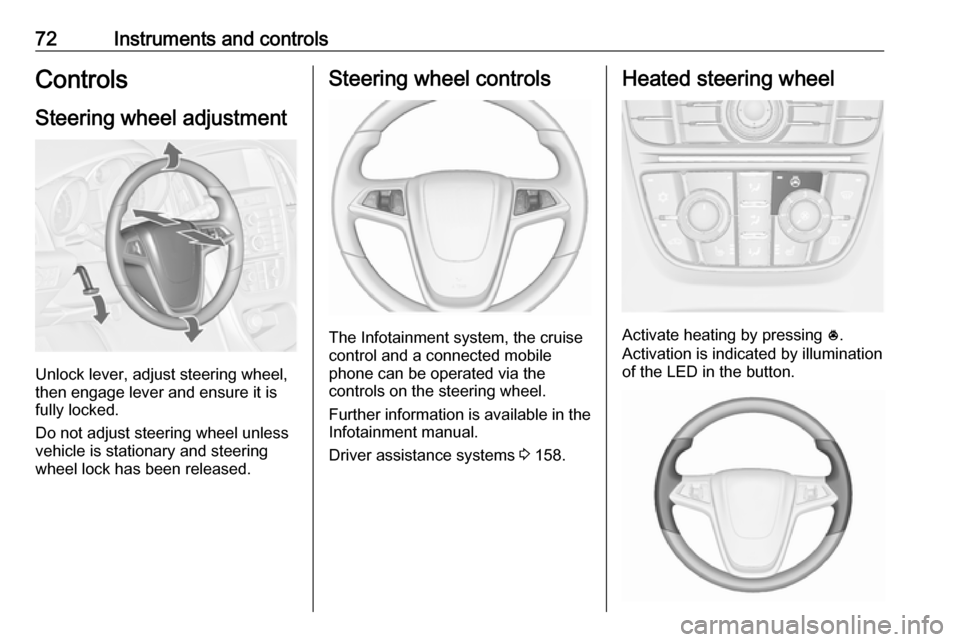
72Instruments and controlsControlsSteering wheel adjustment
Unlock lever, adjust steering wheel,
then engage lever and ensure it is
fully locked.
Do not adjust steering wheel unless
vehicle is stationary and steering
wheel lock has been released.
Steering wheel controls
The Infotainment system, the cruise
control and a connected mobile
phone can be operated via the
controls on the steering wheel.
Further information is available in the
Infotainment manual.
Driver assistance systems 3 158.
Heated steering wheel
Activate heating by pressing *.
Activation is indicated by illumination
of the LED in the button.
Page 78 of 293

76Instruments and controlsA drop in temperature is indicated
immediately and a rise in temperature
after a time delay.
If outside temperature drops to 3 °C,
a warning message is displayed in the Driver Information Centre with
Uplevel-Combi-Display.
9 Warning
The road surface may already be
icy even though the display
indicates a few degrees above 0
°C.
Clock
Date and time are shown in the
Info-Display.
Time and date settings
CD 400plus/CD 400/CD 300
Press CONFIG . The menu Settings is
displayed.
Select Time Date .
Selectable setting options:
● Set time: Changes the time
shown on the display.
● Set date: Changes the date
shown on the display.
● Set time format : Changes
indication of hours between 12 h
and 24 h.
● Set date format : Changes
indication of date between MM/
DD/YYYY and DD.MM.YYYY .
● Display clock : Switches on/off
indication of time on the display.
● RDS clock synchronization : The
RDS signal of most VHF
transmitters automatically sets
the time. RDS time
synchronisation can take a few
minutes. Some transmitters do
not send a correct time signal. In
such cases, it is recommended to
switch off automatic time
synchronisation.
Vehicle personalisation 3 104.
Time and date settings
Navi 950/Navi 650/CD 600
Press CONFIG and then select the
Time and Date menu item to display
the respective submenu.
Page 83 of 293
Instruments and controls81When petrol fuel tank is empty, the
engine will not start.
Every six months, run the petrol tank
down until control indicator i
illuminates, then refuel. This helps
maintain fuel quality and system
function for petrol operation.
Fill the tank completely at regular intervals to prevent corrosion in the
tank.
Fuel for liquid gas operation 3 189.
Faults and remedies
If gas mode is not possible, check the following:
● Is there enough liquid gas present?
● Is there enough petrol present for
starting?
Due to extreme temperatures in
combination with the gas
composition, it may take slightly
longer before the system switches
from petrol to gas mode.
In extreme situations, the system may
also switch back to petrol mode if the
minimum requirements are notfulfilled. If conditions allow, it might be possible to manually switch back to
liquid gas operation.
Seek the assistance of a workshop in
the event of all other faults.Caution
Repairs and adjustments may only be made by trained specialists in
order to maintain the safety and
warranty on the LPG system.
Liquid gas is given a particular odour
(odorised) so that any leaks can be
detected easily.
9 Warning
If you smell gas in the vehicle or in
the immediate vicinity, switch to petrol mode immediately. No
smoking. No naked flames or
ignition sources.
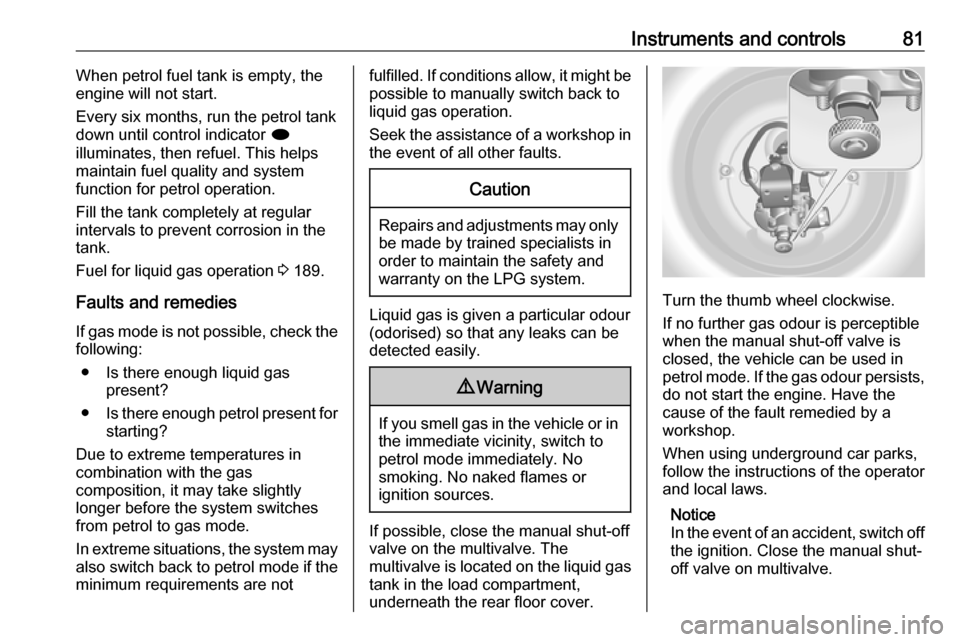
If possible, close the manual shut-off
valve on the multivalve. The
multivalve is located on the liquid gas
tank in the load compartment,
underneath the rear floor cover.
Turn the thumb wheel clockwise.
If no further gas odour is perceptible
when the manual shut-off valve is
closed, the vehicle can be used in
petrol mode. If the gas odour persists, do not start the engine. Have the
cause of the fault remedied by a
workshop.
When using underground car parks,
follow the instructions of the operator
and local laws.
Notice
In the event of an accident, switch off
the ignition. Close the manual shut-
off valve on multivalve.
Page 87 of 293
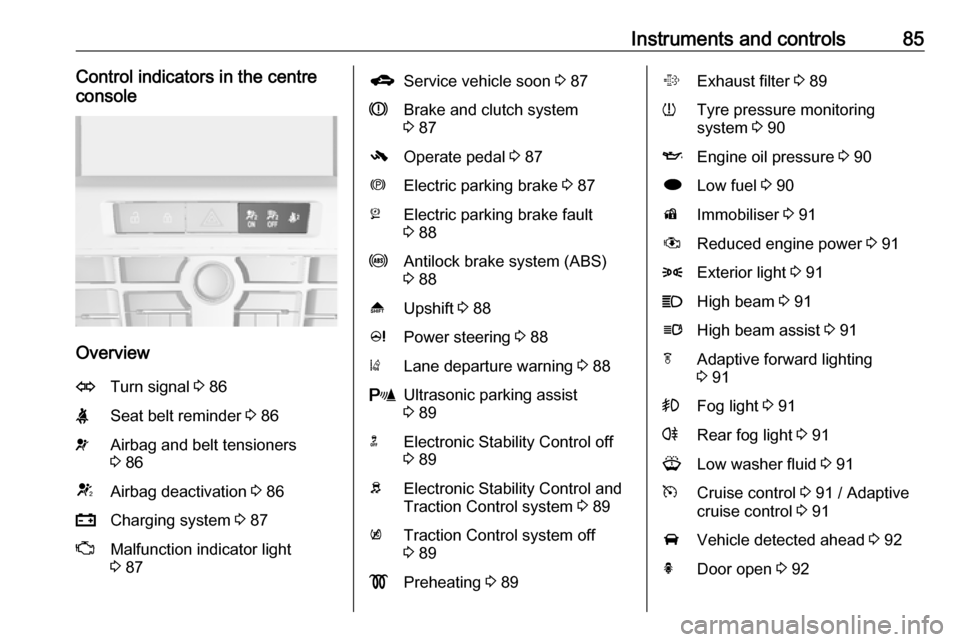
Instruments and controls85Control indicators in the centre
console
Overview
OTurn signal 3 86XSeat belt reminder 3 86vAirbag and belt tensioners
3 86VAirbag deactivation 3 86pCharging system 3 87ZMalfunction indicator light
3 87gService vehicle soon 3 87RBrake and clutch system
3 87-Operate pedal 3 87mElectric parking brake 3 87jElectric parking brake fault
3 88uAntilock brake system (ABS)
3 88[Upshift 3 88cPower steering 3 88)Lane departure warning 3 88rUltrasonic parking assist
3 89nElectronic Stability Control off
3 89bElectronic Stability Control and
Traction Control system 3 89kTraction Control system off
3 89!Preheating 3 89%Exhaust filter 3 89wTyre pressure monitoring
system 3 90IEngine oil pressure 3 90iLow fuel 3 90dImmobiliser 3 91#Reduced engine power 3 918Exterior light 3 91CHigh beam 3 91lHigh beam assist 3 91fAdaptive forward lighting
3 91>Fog light 3 91rRear fog light 3 91GLow washer fluid 3 91mCruise control 3 91 / Adaptive
cruise control 3 91AVehicle detected ahead 3 92hDoor open 3 92
Page 90 of 293

88Instruments and controlsIlluminates
Electric parking brake is applied
3 152.
Flashes
Electric parking brake is not fully
applied or released. Switch on
ignition, depress brake pedal and
attempt to reset the system by first
releasing and then applying the
electric parking brake. If m remains
flashing, do not drive and seek the
assistance of a workshop.
Electric parking brake fault
j illuminates or flashes yellow.
Illuminates Electric parking brake is operating
with reduced performance 3 152.
Flashes
Electric parking brake is in service
mode. Stop vehicle, apply and
release the electric parking brake to
reset.9 Warning
Have the cause of the fault
remedied immediately by a
workshop.
Antilock brake system
(ABS)
u illuminates yellow.
Illuminates for a few seconds after the ignition is switched on. The system is
ready for operation when the control
indicator extinguishes.
If the control indicator does not go out after a few seconds, or if it illuminates while driving, there is a fault in the
ABS. The brake system remains
operational but without ABS
regulation.
Antilock brake system 3 151.
Upshift [ illuminates green as a control
indicator, or is shown as a symbol R
with the number of a higher gear in the
Driver Information Centre, when
upshifting is recommended for fuel
saving reasons.
On some versions, gearshift
indication is popped-up as full page in the Driver Information Centre.
Driver Information Centre 3 92.
Power steering
c illuminates yellow.
Illuminates with power steering
reduced
Power steering is reduced due to
overheating of the system. Control
indicator extinguishes when the
system has cooled down.
Stop-start system 3 141.
Illuminates with power steering
disabled
Failure in the power steering system.
Consult a workshop.
Lane departure warning
) illuminates green or flashes yellow.
Page 92 of 293
90Instruments and controlsFlashes
The maximum filling level of the filter is reached. Start cleaning process
immediately to avoid damage to the
engine.
Exhaust filter 3 144, Stop-start
system 3 141.
Tyre pressure monitoring
system
w illuminates or flashes yellow.
Illuminates
Tyre pressure loss. Stop immediately
and check tyre pressure.
Flashes
Fault in system or tyre without
pressure sensor mounted ( e.g. spare
wheel). After 60-90 seconds the control indicator illuminates
continuously. Consult a workshop.
Engine oil pressure
I illuminates red.Illuminates when the ignition is
switched on and extinguishes shortly
after the engine starts.
Illuminates when the engine is
runningCaution
Engine lubrication may be
interrupted. This may result in
damage to the engine and/or
locking of the drive wheels.
1. Depress clutch.
2. Select neutral gear, set selector lever to N.
3. Move out of the flow of traffic as quickly as possible without
impeding other vehicles.
4. Switch off ignition.
9 Warning
When the engine is off,
considerably more force is needed
to brake and steer. During an
Autostop the brake servo unit will still be operational.
Do not remove key until vehicle is stationary, otherwise the steeringwheel lock could engage
unexpectedly.
Check oil level before seeking the
assistance of a workshop 3 201.
Low fuel
i illuminates or flashes yellow.
Illuminates
Level in fuel tank is too low.
Flashes
Fuel used up. Refuel immediately.
Never run the tank dry.
Catalytic converter 3 146.
Bleeding the diesel fuel system
3 206.