Wheels VAUXHALL ASTRA K 2019.5 Owner's Manual
[x] Cancel search | Manufacturer: VAUXHALL, Model Year: 2019.5, Model line: ASTRA K, Model: VAUXHALL ASTRA K 2019.5Pages: 311, PDF Size: 9.6 MB
Page 20 of 311

18In briefParking9Warning
● Do not park the vehicle on an
easily ignitable surface. The
high temperature of the
exhaust system could ignite the
surface.
● Always apply the parking brake. Activate the manual
parking brake without pressing the release button. Apply as
firmly as possible on a downhill slope or uphill slope. Depress
brake pedal at the same time to
reduce operating force.
For vehicles with electric
parking brake, pull switch m for
a minimum of 1 second until
control indicator m illuminates
constantly and electric parking
brake is applied 3 108.
● Switch off the engine. ● If the vehicle is on a level surface or uphill slope, engage
first gear or set the selector
lever to position P before
removing the ignition key or
switching off ignition on
vehicles with power button. On
an uphill slope, turn the front
wheels away from the kerb.
If the vehicle is on a downhill
slope, engage reverse gear or
set the selector lever to position
P before removing the ignition
key or switching off ignition on
vehicles with power button.
Turn the front wheels towards
the kerb.
● Close the windows and the sunroof.
● Remove the ignition key from the ignition switch or switch off
ignition on vehicles with power
button. Turn the steering wheel until the steering wheel lock is
felt to engage.
For vehicles with automatic
transmission, the key can only
be removed when the selector
lever is in position P.●
Lock the vehicle with e on the
radio remote control.
Activate the anti-theft alarm
system 3 35.
● The engine cooling fans may run
after the engine has been
switched off 3 228.Caution
After running at high engine
speeds or with high engine loads,
operate the engine briefly at a low load or run in neutral for
approx. 30 seconds before
switching off, in order to protect
the turbocharger.
Keys, locks 3 19.
Laying-up the vehicle for a long
period of time 3 227.
Page 22 of 311
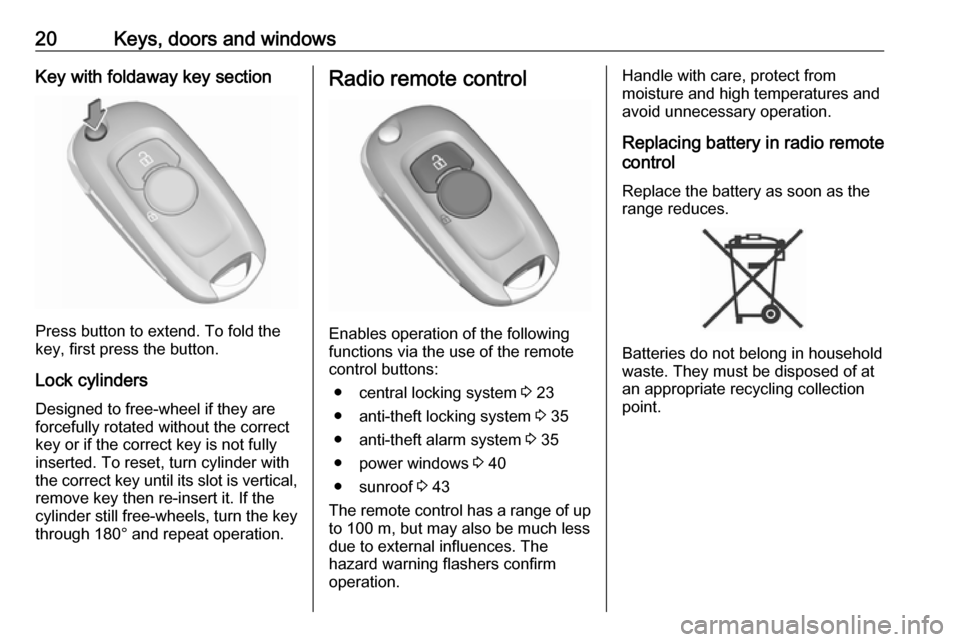
20Keys, doors and windowsKey with foldaway key section
Press button to extend. To fold the
key, first press the button.
Lock cylinders
Designed to free-wheel if they are forcefully rotated without the correct
key or if the correct key is not fully
inserted. To reset, turn cylinder with
the correct key until its slot is vertical, remove key then re-insert it. If the
cylinder still free-wheels, turn the key
through 180° and repeat operation.
Radio remote control
Enables operation of the following
functions via the use of the remote control buttons:
● central locking system 3 23
● anti-theft locking system 3 35
● anti-theft alarm system 3 35
● power windows 3 40
● sunroof 3 43
The remote control has a range of up
to 100 m, but may also be much less
due to external influences. The
hazard warning flashers confirm
operation.
Handle with care, protect from
moisture and high temperatures and
avoid unnecessary operation.
Replacing battery in radio remote
control
Replace the battery as soon as the
range reduces.
Batteries do not belong in household
waste. They must be disposed of at
an appropriate recycling collection
point.
Page 112 of 311

110Instruments and controlsIlluminates
A fault in the system is present.
Continued driving is possible. Driving
stability, however, may deteriorate depending on road surface
conditions.
Have the cause of the fault remedied by a workshop.
Flashes
The system is actively engaged.
Engine output may be reduced and
the vehicle may be braked
automatically to a small degree.
Electronic Stability Control 3 178.
Traction Control system 3 177.
Traction Control system off
k illuminates yellow.
The system is deactivated.
Preheating
! illuminates yellow.Preheating of Diesel engine is
activated. Only activates when
outside temperature is low. Start the
engine when control indicator
extinguishes.
AdBlue
Y flashes yellow.
AdBlue level is low. Refill AdBlue soon to avoid prevention of the
engine start.
AdBlue 3 168.
Tyre pressure monitoring system
w illuminates or flashes yellow.
Illuminates
Tyre pressure loss. Stop immediately
and check tyre pressure.
Flashes
Fault in system or tyre without pressure sensor mounted (e.g. spare wheel). After 60 to 90 seconds the
control indicator illuminates
continuously. Consult a workshop.Engine oil pressure
I illuminates red.
Illuminates when the ignition is
switched on and extinguishes shortly
after the engine starts.
Illuminates when the engine is
runningCaution
Engine lubrication may be
interrupted. This may result in
damage to the engine and/or
locking of the drive wheels.
1. Depress clutch.
2. Select neutral gear.
3. Move out of the flow of traffic as quickly as possible without
impeding other vehicles.
4. Switch off ignition.
Page 118 of 311
116Instruments and controlsWhen the fuel level is low, a message
appears on the display and the
control indicator Y in the fuel gauge
illuminates.
When the fuel tank must be refuelled immediately, a warning message
appears and remains on the display.
Additionally, control indicator Y in the
fuel gauge flashes 3 111.
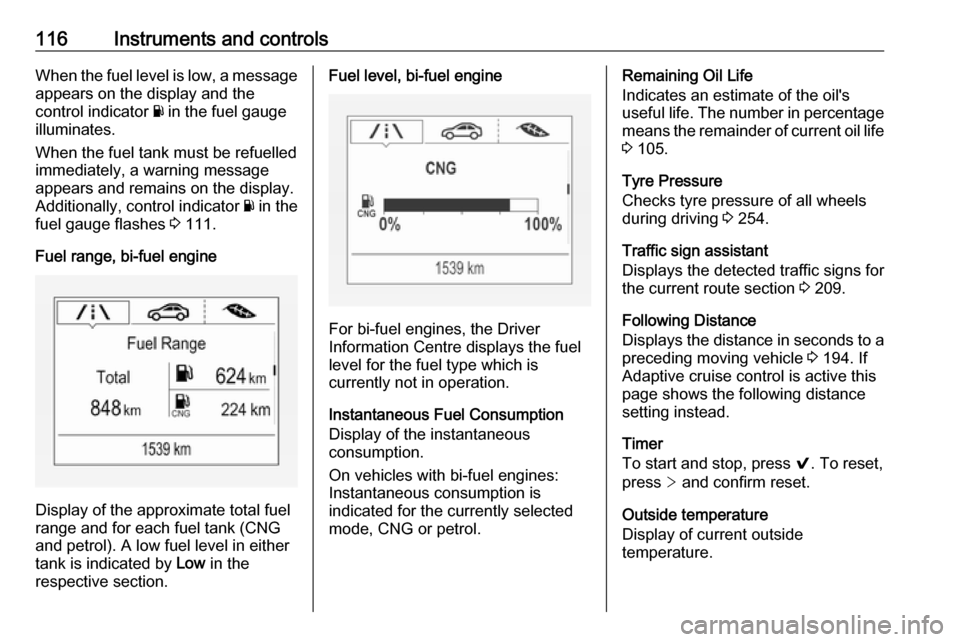
Fuel range, bi-fuel engine
Display of the approximate total fuel
range and for each fuel tank (CNG
and petrol). A low fuel level in either
tank is indicated by Low in the
respective section.
Fuel level, bi-fuel engine
For bi-fuel engines, the Driver
Information Centre displays the fuel level for the fuel type which is
currently not in operation.
Instantaneous Fuel Consumption
Display of the instantaneous
consumption.
On vehicles with bi-fuel engines:
Instantaneous consumption is
indicated for the currently selected
mode, CNG or petrol.
Remaining Oil Life
Indicates an estimate of the oil's
useful life. The number in percentage means the remainder of current oil life 3 105.
Tyre Pressure
Checks tyre pressure of all wheels
during driving 3 254.
Traffic sign assistant
Displays the detected traffic signs for
the current route section 3 209.
Following Distance
Displays the distance in seconds to a
preceding moving vehicle 3 194. If
Adaptive cruise control is active this
page shows the following distance
setting instead.
Timer
To start and stop, press 9. To reset,
press > and confirm reset.
Outside temperature
Display of current outside
temperature.
Page 167 of 311

Driving and operating165● The driver's seat belt isunfastened and / or the driver'sdoor is opened.
● The engine temperature is too low.
● The charging level of the vehicle battery is below a defined level.
● The brake vacuum is not sufficient.
● The vehicle is driven at least at walking speed.
● The climate control system requests an engine start.
● The desired compartment temperature does not match the
actual temperature.
● The air conditioning is manually switched on.
If the bonnet is not fully closed, a warning message is displayed in the
Driver Information Centre.
If an electrical accessory, e.g. a
portable CD player, is connected to
the power outlet, a brief power drop
during the restart might be noticeable.Notice
If a trailer or a bike carrier is
attached, early Autostop and late
restart is deactivated.
Parking9 Warning
● Do not park the vehicle on an
easily ignitable surface. The
high temperature of the
exhaust system could ignite the
surface.
● Always apply the parking brake. Activate the manual
parking brake without pressing the release button. Apply as
firmly as possible on a downhill slope or uphill slope. Depress
brake pedal at the same time to
reduce operating force.
For vehicles with electric
parking brake, pull switch m for
a minimum of 1 second until
control indicator m illuminates
constantly and electric parking
brake is applied 3 108.
● Switch off the engine.
● If the vehicle is on a level surface or uphill slope, engage
first gear or set the selector
lever to position P before
removing the ignition key or
switching off ignition on
vehicles with power button. On
an uphill slope, turn the front
wheels away from the kerb.
If the vehicle is on a downhill
slope, engage reverse gear or
set the selector lever to position
P before removing the ignition
key or switching off ignition on
vehicles with power button.
Turn the front wheels towards
the kerb.
● Close the windows and the sunroof.
● Remove the ignition key from the ignition switch or switch off
ignition on vehicles with power
button. Turn the steering wheel until the steering wheel lock is
felt to engage.
Page 173 of 311
Driving and operating171Automatic transmission
The automatic transmission permits
automatic gearshifting (automatic
mode) or manual gearshifting
(manual mode).
Manual shifting is possible in manual mode by tapping the selector lever to + or - 3 172.
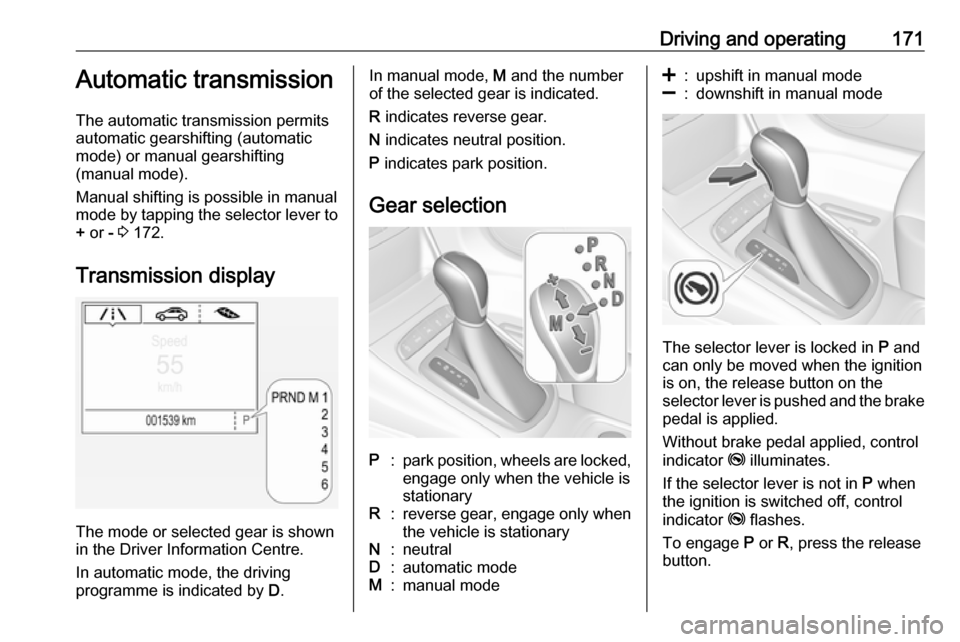
Transmission display
The mode or selected gear is shown
in the Driver Information Centre.
In automatic mode, the driving
programme is indicated by D.
In manual mode, M and the number
of the selected gear is indicated.
R indicates reverse gear.
N indicates neutral position.
P indicates park position.
Gear selectionP:park position, wheels are locked, engage only when the vehicle is
stationaryR:reverse gear, engage only when
the vehicle is stationaryN:neutralD:automatic modeM:manual mode<:upshift in manual mode]:downshift in manual mode
The selector lever is locked in P and
can only be moved when the ignition
is on, the release button on the
selector lever is pushed and the brake
pedal is applied.
Without brake pedal applied, control
indicator j illuminates.
If the selector lever is not in P when
the ignition is switched off, control
indicator j flashes.
To engage P or R, press the release
button.
Page 176 of 311
174Driving and operatingManual transmission
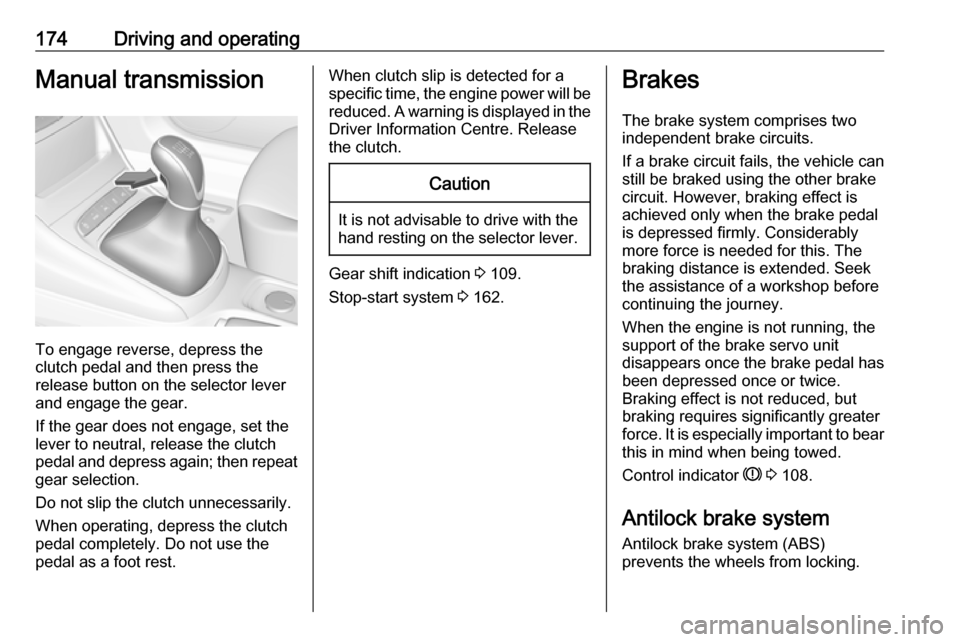
To engage reverse, depress the
clutch pedal and then press the
release button on the selector lever
and engage the gear.
If the gear does not engage, set the
lever to neutral, release the clutch
pedal and depress again; then repeat
gear selection.
Do not slip the clutch unnecessarily.
When operating, depress the clutch
pedal completely. Do not use the
pedal as a foot rest.
When clutch slip is detected for a specific time, the engine power will be reduced. A warning is displayed in the
Driver Information Centre. Release
the clutch.Caution
It is not advisable to drive with the hand resting on the selector lever.
Gear shift indication 3 109.
Stop-start system 3 162.
Brakes
The brake system comprises two
independent brake circuits.
If a brake circuit fails, the vehicle can
still be braked using the other brake
circuit. However, braking effect is
achieved only when the brake pedal
is depressed firmly. Considerably
more force is needed for this. The
braking distance is extended. Seek
the assistance of a workshop before
continuing the journey.
When the engine is not running, the
support of the brake servo unit
disappears once the brake pedal has been depressed once or twice.
Braking effect is not reduced, but
braking requires significantly greater
force. It is especially important to bear this in mind when being towed.
Control indicator R 3 108.
Antilock brake system
Antilock brake system (ABS)
prevents the wheels from locking.
Page 177 of 311

Driving and operating175ABS starts to regulate brake pressure
as soon as a wheel shows a tendency to lock. The vehicle remains
steerable, even during hard braking.
ABS control is made apparent
through a pulse in the brake pedal
and the noise of the regulation
process.
For optimum braking, keep the brake
pedal fully depressed throughout the
braking process, despite the fact that
the pedal is pulsating. Do not reduce
the pressure on the pedal.
After starting off, the system performs a self-test which may be audible.
Control indicator u 3 109.
Adaptive brake light During full braking, all three brake
lights flash for the duration of ABS
control.
Fault9 Warning
If there is a fault in the ABS, the
wheels may be liable to lock due
to braking that is heavier than
normal. The advantages of ABS are no longer available. During
hard braking, the vehicle can no longer be steered and may
swerve.
Have the cause of the fault remedied
by a workshop.
Parking brake
9 Warning
Before leaving the vehicle, check
parking brake status. Control
indicator R (manual parking
brake) or m (electrical parking
brake) must illuminate constantly.
Manual parking brake9 Warning
Always apply parking brake firmly
without operating the release
button, and apply as firmly as
possible on a downhill or uphill
slope.
To release the parking brake, pull
the lever up slightly, press the
release button and fully lower the
lever.
Page 179 of 311

Driving and operating177Functionality check
When the vehicle is not moving, the
electric parking brake might be
applied automatically. This is done to
check the system.
Fault
Failure mode of electric parking brake
is indicated by a control indicator j
and by a vehicle message which is
displayed in the Driver Information Centre.
Vehicle messages 3 121.
Apply electric parking brake: pull and hold the switch m for more than
5 seconds. If control indicator m
illuminates, electric parking brake is
applied.
Release electric parking brake: push and hold the switch m for more than
2 seconds. If control indicator m
extinguishes, electric parking brake is
released.
Control indicator m flashes: electric
parking brake is not fully applied or released. When continuously
flashing, release electric parking
brake and retry applying.Brake assist
If brake pedal is depressed quickly
and forcefully, maximum brake force
is automatically applied.
Operation of brake assist might
become apparent by a pulse in the
brake pedal and a greater resistance
when depressing the brake pedal.
Maintain steady pressure on the
brake pedal as long as full braking is
required. Maximum brake force is
automatically reduced when brake
pedal is released.
Hill start assist The system helps prevent unintendedmovement when driving away on
inclines.
When releasing the brake pedal after
stopping on an incline, brakes remain
on for further two seconds. The
brakes release automatically as soon
as the vehicle begins to accelerate.Ride control systems
Traction Control systemThe Traction Control system (TC) is a
component of the Electronic Stability
Control (ESC).
TC improves driving stability when
necessary, regardless of the type of
road surface or tyre grip, by
preventing the drive wheels from
spinning.
As soon as the drive wheels starts to spin, engine output is reduced and
the wheel spinning the most is braked
individually. This considerably
improves the driving stability of the
vehicle on slippery road surfaces.
TC is operational after each engine
start as soon as the control indicator
b extinguishes.
When TC operates b flashes.
Page 180 of 311
178Driving and operating9Warning
Do not let this special safety
feature tempt you into taking risks
when driving.
Adapt speed to the road
conditions.
Control indicator b 3 109.
Deactivation
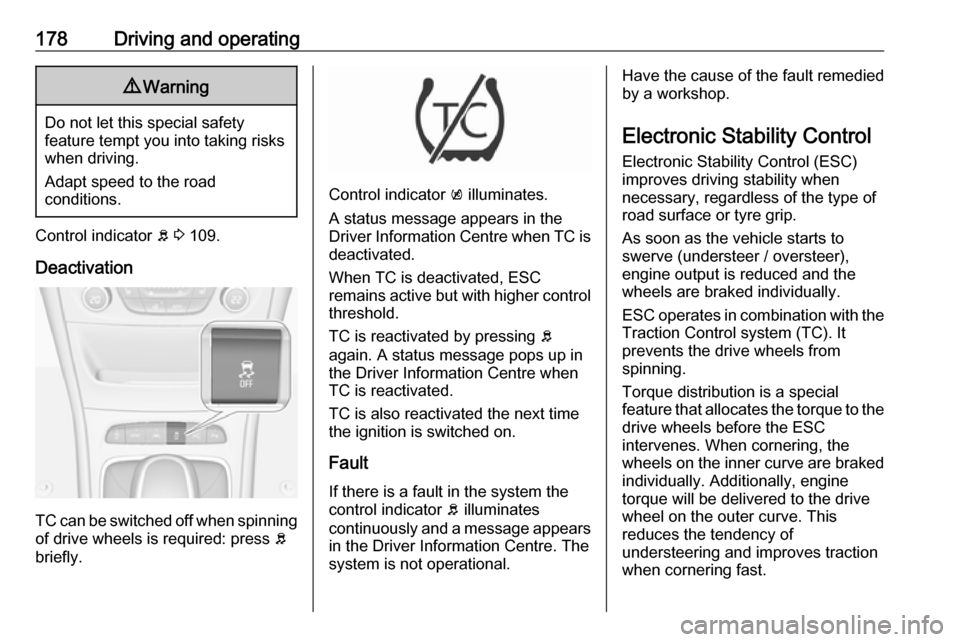
TC can be switched off when spinning of drive wheels is required: press b
briefly.
Control indicator k illuminates.
A status message appears in the
Driver Information Centre when TC is
deactivated.
When TC is deactivated, ESC
remains active but with higher control threshold.
TC is reactivated by pressing b
again. A status message pops up in the Driver Information Centre when
TC is reactivated.
TC is also reactivated the next time
the ignition is switched on.
Fault
If there is a fault in the system the
control indicator b illuminates
continuously and a message appears in the Driver Information Centre. The
system is not operational.
Have the cause of the fault remedied
by a workshop.
Electronic Stability Control
Electronic Stability Control (ESC)
improves driving stability when
necessary, regardless of the type of
road surface or tyre grip.
As soon as the vehicle starts to
swerve (understeer / oversteer),
engine output is reduced and the wheels are braked individually.
ESC operates in combination with the Traction Control system (TC). It
prevents the drive wheels from
spinning.
Torque distribution is a special
feature that allocates the torque to the drive wheels before the ESC
intervenes. When cornering, the
wheels on the inner curve are braked
individually. Additionally, engine
torque will be delivered to the drive wheel on the outer curve. This
reduces the tendency of
understeering and improves traction
when cornering fast.