ignition VAUXHALL ASTRA K 2020 Manual PDF
[x] Cancel search | Manufacturer: VAUXHALL, Model Year: 2020, Model line: ASTRA K, Model: VAUXHALL ASTRA K 2020Pages: 303, PDF Size: 27.35 MB
Page 229 of 303

Vehicle care227Vehicle battery
The vehicle battery is located in the
load compartment.
There are connecting points for jump
starting 3 262.
The vehicle battery is maintenance-
free provided that the driving profile
allows sufficient charging of the
battery. Short-distance-driving and
frequent engine starts can discharge
the battery. Avoid the use of
unnecessary electrical consumers.
Batteries do not belong in household
waste. They must be disposed of at
an appropriate recycling collection
point.
Laying up the vehicle for more than
four weeks can lead to battery
discharge. Disconnect the clamp from the negative terminal of the vehicle
battery.
Ensure the ignition is switched off
before connecting or disconnecting
the vehicle battery.
Battery discharge protection 3 139.
Disconnecting the battery
If the vehicle's battery is to be
disconnected (e.g. for maintenance
work), the alarm siren must be
deactivated as follows: Switch the ignition on then off, then disconnect
the vehicle's battery within
15 seconds.
Replacing the vehicle battery
Notice
Any deviation from the instructions
given in this section may lead to
temporary deactivation or
disturbance of the stop-start system.
When the vehicle battery is being
replaced, please ensure that there
are no open ventilation holes in the
vicinity of the positive terminal. If a
ventilation hole is open in this area, it
must be closed off with a dummy cap, and the ventilation in the vicinity of the
negative terminal must be opened.
Ensure that the battery is always replaced by the same type of battery.
The vehicle battery has to be
replaced by a workshop.
Stop-start system 3 156.
Charging the vehicle battery9 Warning
On vehicles with stop-start
system, ensure that the charging potential does not exceed 14.6 V
Page 230 of 303

228Vehicle carewhen using a battery charger.
Otherwise the vehicle battery may be damaged.
Jump starting 3 262.
Discharge protection
Battery voltage
When the vehicle battery voltage is running low, a warning message will
appear in the Driver Information
Centre.
When the vehicle is being driven, the
load reduction function temporarily
deactivates certain functions, e.g. the heated rear window.
The deactivated functions are
reactivated automatically as soon as
conditions permit.
Idle boost
If charging of the vehicle battery is
required due to battery condition, the
power output of the generator must be increased. This will be achieved by
an idle boost which may be audible.
A message appears in the Driver
Information Centre.
Power outlet
The power outlets are deactivated in
the event of low vehicle battery
voltage.
Warning label
Meaning of symbols: ● No sparks, naked flames or smoking.
● Always shield eyes. Explosive gases can cause blindness or
injury.
● Keep the vehicle battery out of reach of children.
● The vehicle battery containssulphuric acid which could cause
blindness or serious burn
injuries.
● See the Owner's Manual for further information.
● Explosive gas may be present in the vicinity of the vehicle battery.
Diesel fuel system bleeding If the tank has been run dry, the diesel
fuel system must be bled. Switch on
the ignition three times for
15 seconds at a time. Then crank the
engine for a maximum of 40 seconds. Repeat this process after
no less than 5 seconds. If the engine fails to start, seek the assistance of a
workshop.
Page 231 of 303
Vehicle care229Wiper blade replacement
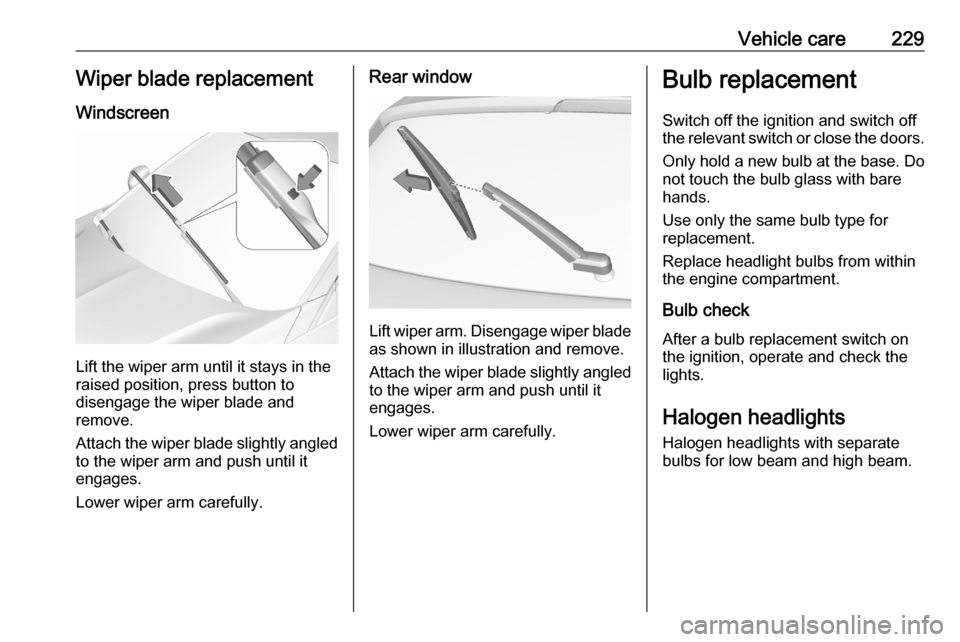
Windscreen
Lift the wiper arm until it stays in the
raised position, press button to
disengage the wiper blade and
remove.
Attach the wiper blade slightly angled
to the wiper arm and push until it
engages.
Lower wiper arm carefully.
Rear window
Lift wiper arm. Disengage wiper blade as shown in illustration and remove.
Attach the wiper blade slightly angled
to the wiper arm and push until it
engages.
Lower wiper arm carefully.
Bulb replacement
Switch off the ignition and switch off
the relevant switch or close the doors.
Only hold a new bulb at the base. Do not touch the bulb glass with bare
hands.
Use only the same bulb type for
replacement.
Replace headlight bulbs from within
the engine compartment.
Bulb check
After a bulb replacement switch on
the ignition, operate and check the
lights.
Halogen headlights Halogen headlights with separate
bulbs for low beam and high beam.
Page 242 of 303
240Vehicle careElectrical systemFuses
Data on the replacement fuse must
match the data on the defective fuse.
There are three fuse boxes in the
vehicle:
● engine compartment● instrument panel
● load compartment
Before replacing a fuse, turn off the
respective switch and the ignition.
A blown fuse can be recognized by its
melted wire.Caution
Do not replace the fuse until the
cause of the fault has been
remedied.
Some functions are protected by
several fuses.
Fuses may also be inserted without
existence of a function.
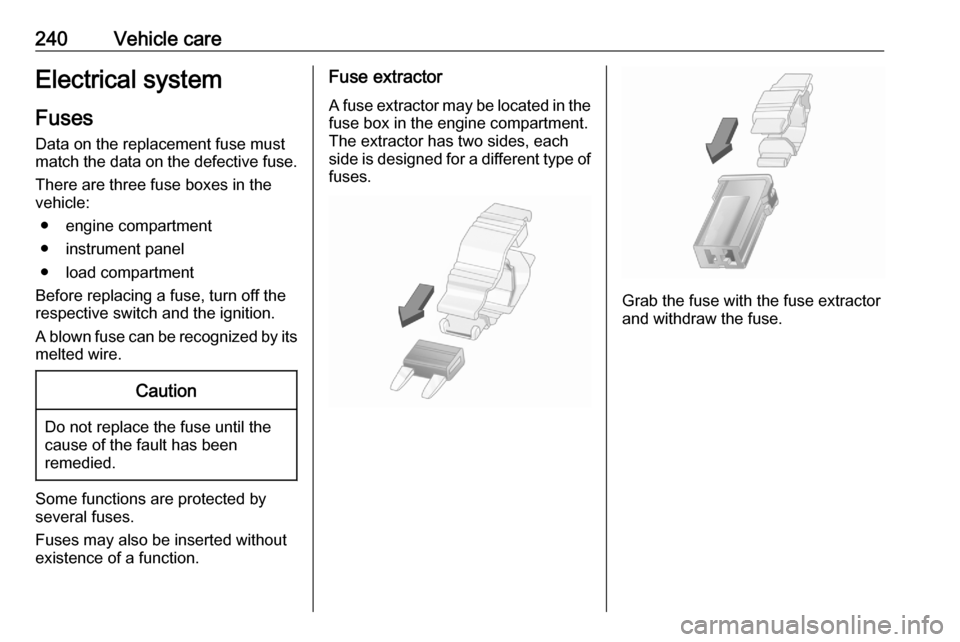
Fuse extractor
A fuse extractor may be located in the
fuse box in the engine compartment.
The extractor has two sides, each
side is designed for a different type of fuses.
Grab the fuse with the fuse extractor
and withdraw the fuse.
Page 246 of 303
244Vehicle careNo.Circuit17Body control module 418Body control module 319Data link connector20Airbag system21Climate control system22Central locking system / tailgate23Electronic key system24Power seat memory function25Airbag system steering wheel26Ignition switch / Steering
column lock27Body control module 228USB socket29Cigarette lighter / Power outlet
front30Selector lever31Rear window wiper32Transmission control moduleNo.Circuit33Anti-theft alarm system / Power
sounder34Parking assist / Side blind spot
alert / Infotainment system /
USB socket35SOS36Info Display / Instrument cluster37Infotainment system / radio
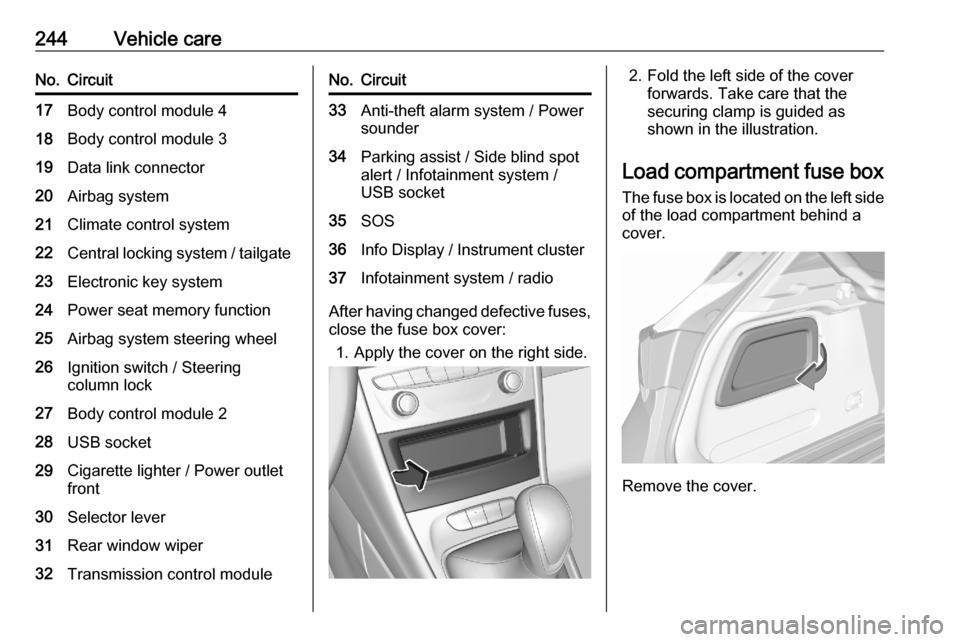
After having changed defective fuses,
close the fuse box cover:
1. Apply the cover on the right side.
2. Fold the left side of the cover forwards. Take care that thesecuring clamp is guided as
shown in the illustration.
Load compartment fuse box The fuse box is located on the left side
of the load compartment behind a
cover.
Remove the cover.
Page 247 of 303
Vehicle care245
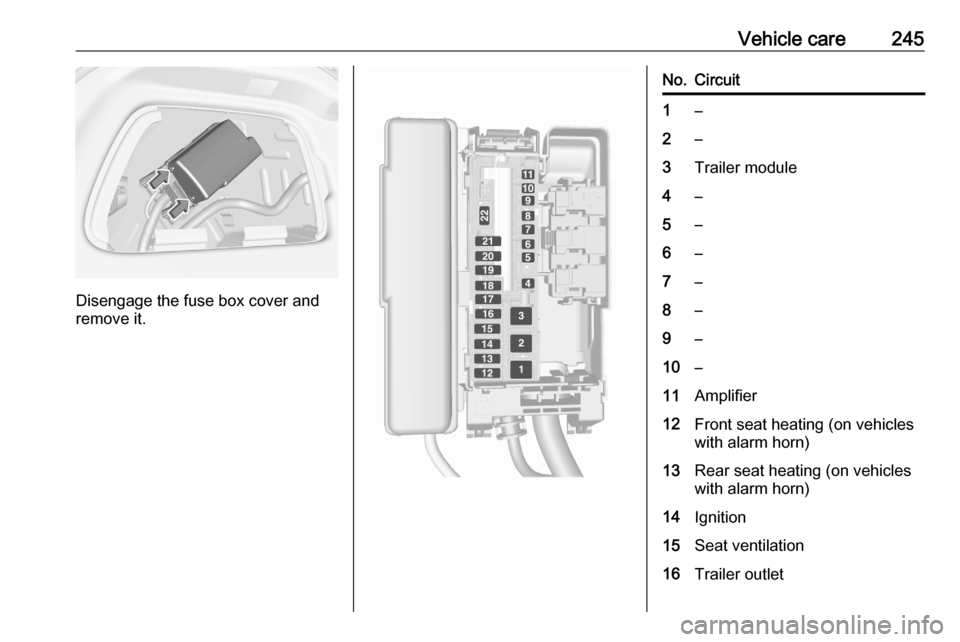
Disengage the fuse box cover and
remove it.
No.Circuit1–2–3Trailer module4–5–6–7–8–9–10–11Amplifier12Front seat heating (on vehicles
with alarm horn)13Rear seat heating (on vehicles
with alarm horn)14Ignition15Seat ventilation16Trailer outlet
Page 251 of 303
Vehicle care249The tyre pressure information label
on the left door frame indicates the
original equipment tyres and the
correspondent tyre pressures.
The tyre pressure data refers to cold
tyres. It applies to summer and winter
tyres.
Always inflate the spare tyre to the
pressure specified for full load.
The ECO tyre pressure serves to
achieve the smallest amount of fuel
consumption possible.
Make sure tyre loading setting
matches the current tyre pressure.
Tyre loading 3 250.
Incorrect tyre pressures will impair
safety, vehicle handling, comfort and
fuel economy and will increase tyre
wear.
Tyre pressures differ depending on
various options.
For the correct tyre pressure value,
follow the procedure below:
● Identify the engine identifier code.Engine data 3 278.
● Identify the respective tyre. ● The tyre pressure tables show all
possible tyre combinations
3 283.
For the tyres approved for your
vehicle, refer to the EEC Certificate of Conformity provided with your vehicle
or other national registration
documents.
The driver is responsible for correct
adjustment of tyre pressure.9 Warning
If the pressure is too low, this can
result in considerable tyre warm-
up and internal damage, leading to tread separation and even to tyre
blow-out at high speeds.
9 Warning
For specific tyres the
recommended tyre pressure as
shown in the tyre pressure table may exceed the maximum tyre
pressure as indicated on the tyre.
Never exceed the maximum tyre
pressure as indicated on the tyre.
If the tyre pressure must be reduced
or increased on a vehicle with tyre
pressure monitoring system, switch
off ignition.
Temperature dependency
The tyre pressure depends on the
temperature of the tyre. During
driving, tyre temperature and
pressure increase. Tyre pressure
values provided on the tyre
information label and tyre pressure
chart are valid for cold tyres, which means at 20 °C.
The pressure increases by nearly
1.5 psi for a 10 °C temperature
increase. This must be considered
when warm tyres are checked.
The tyre pressure value displayed in
the Driver Information Centre shows
the real tyre pressure. A cooled down tyre will show a decreased value,
which does not indicate an air leak.
Page 253 of 303

Vehicle care251After inflating, some driving may be
required to update the tyre pressure
values in the Driver Information
Centre. During this time w may
illuminate.
If w illuminates at lower temperatures
and extinguishes after driving, this
could be an indicator for approaching
a low tyre pressure condition. Check
tyre pressure.
Vehicle messages 3 121.
If the tyre pressure must be reduced
or increased, switch off ignition.
Only mount wheels with pressure
sensors, otherwise the tyre pressure
will not be displayed and w
illuminates continuously.
A spare wheel or temporary spare
wheel is not equipped with pressure
sensors. The tyre pressure
monitoring system is not operational
for these tyres. Control indicator w
illuminates. For the further three
tyres, the system remains
operational.The use of commercially-available
liquid tyre repair kits can impair the
function of the system. Factory-
approved repair kits can be used.
Operating electronic devices or being close to facilities using similar wave
frequencies could disrupt the tyre
pressure monitoring system.
Each time the tyres are replaced, tyre pressure monitoring system sensors
must be dismounted and serviced.
For the screwed sensor, replace
valve core and sealing ring. For the
clipped sensor, replace complete
valve stem.
Use only original plastic valve caps to
protect valve on any damage.Caution
Do not use metal valve caps as
they lead to valve oxidation and
damage.
Vehicle loading status
Adjust tyre pressure to load condition
according to the tyre information label or tyre pressure chart 3 283, and
select the appropriate setting in Tyre
Load within the Vehicle Information
Menu 3 114. This setting determines
the reference pressures for the tyre
pressure warnings.
The Tyre Load menu only appears
when the vehicle is at a standstill and the parking brake is applied. On
vehicles with automatic transmission
the selector lever must be in P.
Midlevel display:
Select the Tyre load page under the
Vehicle Information Menu ? in the
Driver Information Centre 3 114.
Page 266 of 303

264Vehicle careRoute the leads so that they cannot
catch on rotating parts in the engine
compartment.
To start the engine: 1. Start the engine of the vehicle providing the jump.
2. After 5 minutes, start the other engine. Start attempts should be
made for no longer than
15 seconds at an interval of one
minute.
3. Allow both engines to idle for approx. 3 minutes with the leads
connected.
4. Switch on electrical consumers (e.g. headlights, heated rear
window) of the vehicle receiving
the jump start.
5. Reverse above sequence exactly when removing leads.Towing
Towing the vehicle
Wrap a cloth around the tip of a flat
screwdriver to prevent paint damage. Insert the screwdriver in the slot at the
edge of the cap. Release the cap by
levering it out carefully.
The towing eye is stowed with the
vehicle tools 3 246.
Screw in the towing eye as far as it will
go until it stops in a horizontal
position.
Attach a tow rope – or better still a tow
rod – to the towing eye.
The towing eye must only be used for
towing and not for recovering the
vehicle.
Switch on ignition to release steering wheel lock and to permit operation of
brake lights, horn and windscreen
wiper.
Page 300 of 303

298Headlights when driving abroad 132
Head restraint adjustment .............8
Head restraints ............................ 47
Heated mirrors ............................. 40
Heated rear window ..................... 44
Heated steering wheel .................92
Heated windscreen .......................44
Heating .................................. 55, 57
High beam ......................... 112, 132
High beam assist ................112, 130
Hill start assist ........................... 172
Horn ....................................... 13, 93
I Identification plate .....................274
Ignition switch positions .............151
Immobiliser .......................... 39, 112
Indicators .................................... 103
Inductive charging ........................99
Info Display ................................. 120
Information displays.................... 114
Instrument cluster ......................100
Instrument panel fuse box .........243
Instrument panel illumination control .................................... 136
Instrument panel overview ........... 10
Interior care ............................... 268
Interior lighting ............................ 136
Interior lights ...................... 137, 239
Interior mirrors .............................. 41Interruption of power supply ......168
Introduction .................................... 3
J
Jump starting ............................. 262
K Key, memorised settings ..............24
Keys ............................................. 20
Keys, locks ................................... 20
L
Lane keep assist ................110, 209
Lashing eyes ............................... 82
LED headlights ...................112, 133
Lighting features .........................138
Light switch ................................ 129
Load compartment ................31, 74
Load compartment cover .............80
Load compartment fuse box ......244
Loading information .....................89
Low fuel ..................................... 112
M Malfunction indicator light ..........109
Manual anti-dazzle ......................41
Manual mode ............................. 167
Manual seat adjustment ...............49
Manual transmission .................. 169
Manual windows ..........................42
Massage ....................................... 56Maximum speed......................... 248
Memorised settings ......................24
Mirror adjustment ........................... 9
Misted light covers .....................136
N
New vehicle running-in ..............151
Number plate light .....................239
O Object detection systems ...........194
Odometer ................................... 104
Oil, engine .......................... 271, 275
Outside temperature ....................96
Overrun cut-off ........................... 156
P Parking ................................ 18, 159
Parking assist ............................ 194
Parking brake ............................ 170
Parking lights ............................. 136
Particulate filter ........................... 161
Pedestrian detection ...................113
Performance .............................. 279
Performing work ........................223
Power button .............................. 152
Power outlets ............................... 98
Power seat adjustment ................51
Power windows ............................ 42
Preheating ................................. 111
Puncture ..................................... 258