light VAUXHALL CASCADA 2017.5 User Guide
[x] Cancel search | Manufacturer: VAUXHALL, Model Year: 2017.5, Model line: CASCADA, Model: VAUXHALL CASCADA 2017.5Pages: 263, PDF Size: 7.71 MB
Page 48 of 263
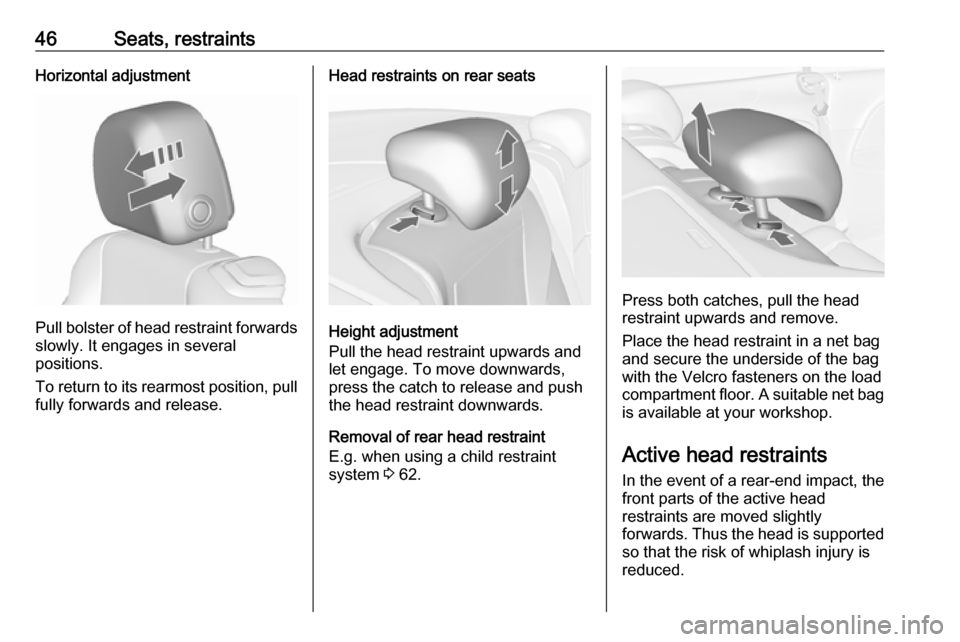
46Seats, restraintsHorizontal adjustment
Pull bolster of head restraint forwardsslowly. It engages in several
positions.
To return to its rearmost position, pull
fully forwards and release.
Head restraints on rear seats
Height adjustment
Pull the head restraint upwards and
let engage. To move downwards, press the catch to release and push
the head restraint downwards.
Removal of rear head restraint
E.g. when using a child restraint
system 3 62.
Press both catches, pull the head
restraint upwards and remove.
Place the head restraint in a net bag
and secure the underside of the bag
with the Velcro fasteners on the load
compartment floor. A suitable net bag
is available at your workshop.
Active head restraints
In the event of a rear-end impact, the front parts of the active head
restraints are moved slightly
forwards. Thus the head is supported
so that the risk of whiplash injury is
reduced.
Page 49 of 263
Seats, restraints47Notice
Approved accessories may only be
attached if the seat is not in use.Front seats
Seat position9 Warning
Only drive with the seat correctly
adjusted.
9 Danger
Do not sit nearer than 25 cm from
the steering wheel, to permit safe
airbag deployment.
9 Warning
Never adjust seats while driving as
they could move uncontrollably.
9 Warning
Never store any objects under the
seats.
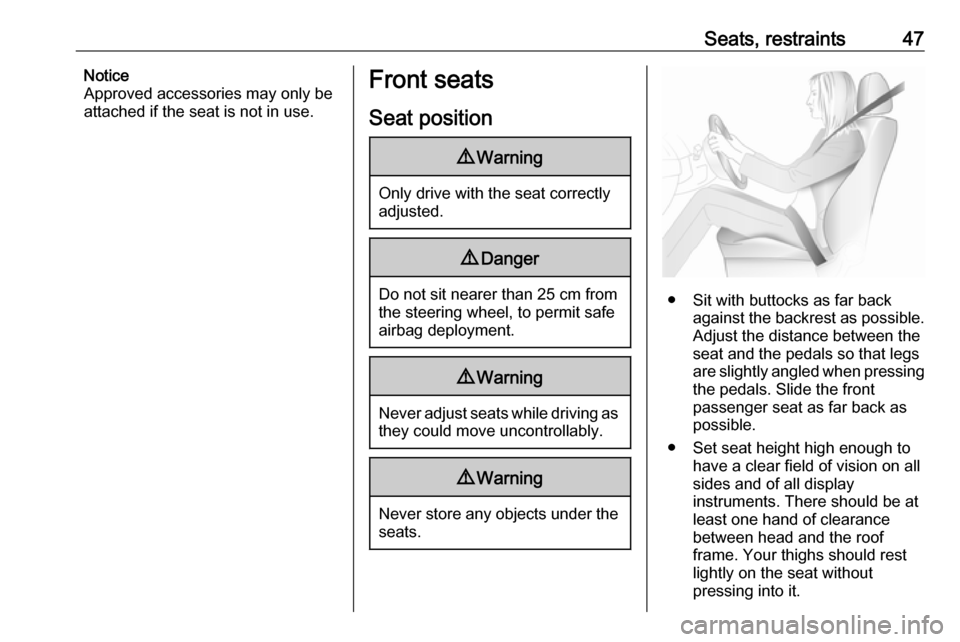
● Sit with buttocks as far back against the backrest as possible.
Adjust the distance between the
seat and the pedals so that legs
are slightly angled when pressing the pedals. Slide the front
passenger seat as far back as
possible.
● Set seat height high enough to have a clear field of vision on allsides and of all display
instruments. There should be at
least one hand of clearance
between head and the roof
frame. Your thighs should rest
lightly on the seat without
pressing into it.
Page 50 of 263
48Seats, restraints● Sit with shoulders as far backagainst the backrest as possible.
Set the backrest rake so that it is possible to easily reach the
steering wheel with arms slightly
bent. Maintain contact between
shoulders and the backrest when turning the steering wheel. Do
not angle the backrest too far
back. We recommend a
maximum rake of approx. 25°.
● Adjust seat and steering wheel in
a way that the wrist rests on top
of the steering wheel while the
arm is fully extended and
shoulders on the backrest.
● Adjust the steering wheel 3 77.
● Adjust the head restraint 3 45.
● Adjust the thigh support so that there is a space approx. two
fingers wide between the edge of the seat and the hollow of the
knee.
● Adjust the lumbar support so that
it supports the natural shape ofthe spine.Manual seat adjustment
Drive only with engaged seats and
backrests.
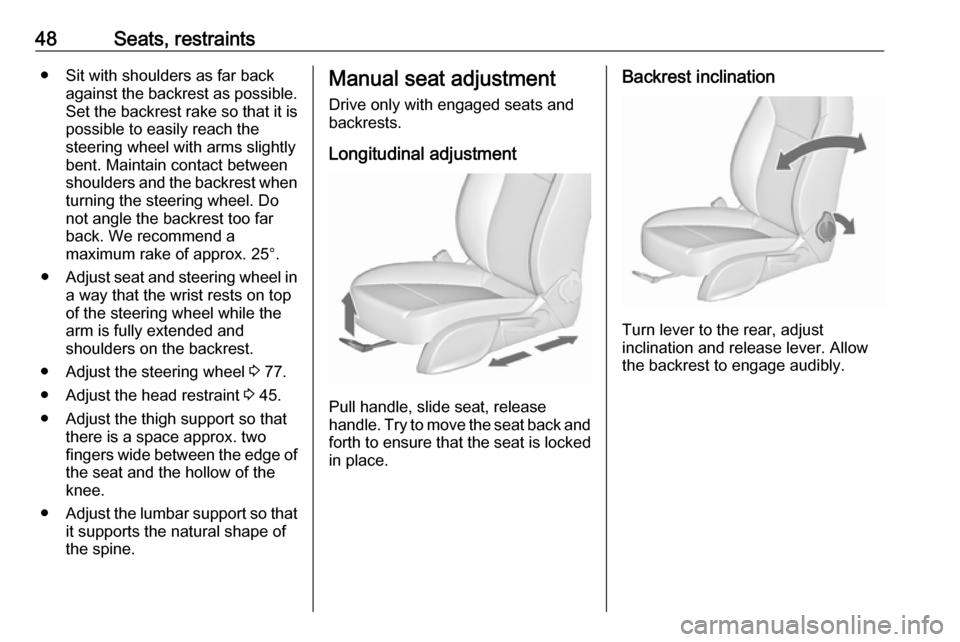
Longitudinal adjustment
Pull handle, slide seat, release
handle. Try to move the seat back and forth to ensure that the seat is locked
in place.
Backrest inclination
Turn lever to the rear, adjust
inclination and release lever. Allow
the backrest to engage audibly.
Page 53 of 263
Seats, restraints51Lift release lever and fold backrest
forwards. The seat slides
automatically forwards to the stop.
To restore, lift backrest to upright
position and engage. The seat slides
automatically backwards to the
original position.
In case the head restraint of the
folded backrest is blocked by the
upper windscreen frame, allow the
seat to move backwards or
downwards slightly 3 51, or set
head restraint to lowest position
3 45.
Safety function
If the power seat encounters
resistance while sliding forwards or
rearwards, it is immediately stopped
and moved in the opposite direction.
Notice
Do not sit on the seat while seat is
moving.
Power disconnection
If seat remains in forward position
with opened door for more than
10 minutes, power adjustment isdisconnected. In this event, close and
open the door or switch on ignition and operate power adjustment again.
Overload
If the folding function is electrically
overloaded, the power supply is
automatically cut-off for a short time.
Power seat adjustment9 Warning
Care must be taken when
operating the power seats. There
is a risk of injury, particularly for
children. Objects could become
trapped.
Keep a close watch on the seats
when adjusting them. Vehicle
passengers should be informed
accordingly.
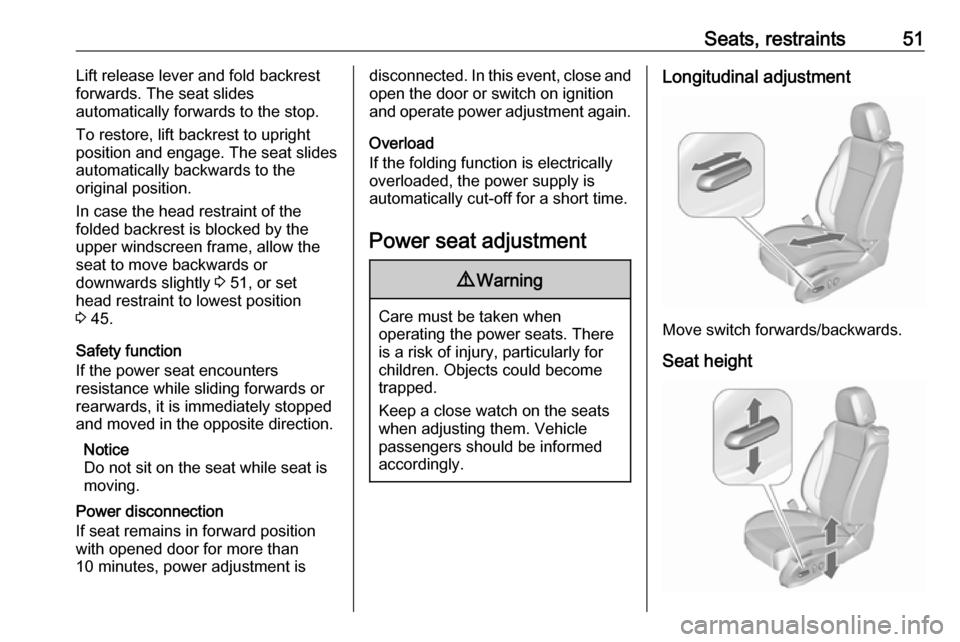
Longitudinal adjustment
Move switch forwards/backwards.
Seat height
Page 55 of 263

Seats, restraints53Armrest
The armrest can be slid forwards by
10 cm. Under the armrest there is a
storage compartment.
Armrest storage 3 70.
Heating
Adjust heating to the desired setting
by pressing ß for the respective seat
one or more times. The lighting LEDs in the button indicate the setting.
Prolonged use of the highest setting
for people with sensitive skin is not
recommended.
Seat heating is operational when engine is running.
Seat heating is also operational
during an Autostop.
Stop-start system 3 136.
Ventilating
Adjust ventilation to the desired
setting by pressing A for the
respective seat one or more times.
The lighting LEDs in the button
indicate the setting.
Ventilated seats are operational with
ignition on.
Seat ventilation is also operational
during an Autostop.
Stop-start system 3 136.
Page 57 of 263

Seats, restraints55●A timeout of 45 seconds elapsed.
● The vehicle is driven longer than 15 seconds with a speed of more
than 3 mph.
If the seat belt presenter does not
retract automatically, push it back
slightly.
Seat belt reminder
Front seats are equipped with a seat
belt reminder, indicated for the driver
seat as control indicator X in the
tachometer 3 87 and for the
passenger seat in the centre console
3 86.
Seat belt force limiters On all seats, stress on the body is
reduced by the gradual release of the belt during a collision.
Seat belt pretensioners In the event of a head-on or rear-endcollision of a certain severity, all seat
belts are tightened.9 Warning
Incorrect handling (e.g. removal or
fitting of belts) can trigger the belt
pretensioners.
Deployment of the belt pretensioners
is indicated by continuous illumination
of control indicator v 3 87.
Triggered belt pretensioners must be replaced by a workshop. Belt
pretensioners can only be triggered
once.
Notice
Do not affix or install accessories or
other objects that may interfere with
the operation of the belt
pretensioners. Do not make any
modifications to belt pretensioner components as this will invalidate
the vehicle type approval.
Three-point seat belt
Fasten
Withdraw the belt from the retractor,
guide it untwisted across the body
and insert the latch plate into the
buckle. Tighten the lap belt regularly
whilst driving by pulling the shoulder
belt.
Page 78 of 263

76Instruments and controlsInstruments and
controlsControls ....................................... 77
Steering wheel adjustment ........77
Steering wheel controls .............77
Heated steering wheel ...............77
Horn ........................................... 78
Windscreen wiper/washer .........78
Outside temperature ..................79
Clock ......................................... 80
Power outlets ............................. 81
Cigarette lighter ......................... 82
Ashtrays .................................... 82
Warning lights, gauges and indi‐ cators ........................................... 83
Instrument cluster ......................83
Speedometer ............................. 83
Odometer .................................. 83
Trip odometer ............................ 83
Tachometer ............................... 84
Fuel gauge ................................ 84
Engine coolant temperature gauge ....................................... 84
Service display .......................... 85
Control indicators ......................86
Turn signal ................................. 87Seat belt reminder.....................87
Airbag, belt tensioners and roll bars .......................................... 87
Airbag deactivation ....................88
Charging system .......................88
Malfunction indicator light ..........88
Brake and clutch system ...........88
Operate pedal ............................ 88
Electric parking brake ................89
Electric parking brake fault ........89
Antilock brake system (ABS) .....89
Upshift ....................................... 89
Power steering .......................... 90
Lane departure warning ............90
Electronic Stability Control off ...90
Electronic Stability Control and Traction Control system ...........90
Traction Control system off .......90
Preheating ................................. 90
Diesel particle filter ....................90
AdBlue ....................................... 91
Tyre pressure monitoring system ...................................... 91
Engine oil pressure ....................91
Low fuel ..................................... 92
Immobiliser ................................ 92
Exterior light .............................. 92
High beam ................................. 92
High beam assist .......................92
Adaptive forward lighting ...........92Fog light ..................................... 92
Rear fog light ............................. 92
Cruise control ............................ 92
Vehicle detected ahead .............93
Door open .................................. 93
Information displays .....................93
Driver Information Centre ..........93
Graphic-Info-Display, Colour- Info-Display .............................. 97
Vehicle messages ........................99
Warning chimes .......................100
Battery voltage ........................ 100
Vehicle personalisation ..............101
Telematics service .....................105
OnStar ..................................... 105
Page 80 of 263

78Instruments and controlsThe highlighted grip areas of the
steering wheel are heated quicker
and to a higher temperature than the
other areas.
Heating is operational when the
engine is running and during an
Autostop.
Stop-start system 3 136.
Horn
Press j.
Windscreen wiper/washer
Windscreen wiperHI:fastLO:slowINT:interval wiping
or
automatic wiping with rain
sensorOFF:off
For a single wipe when the
windscreen wiper is off, press the
lever down to position 1x.
Do not use if the windscreen is frozen.
Switch off in car washes.
Adjustable wiper interval
Wiper lever in position INT.
Turn the adjuster wheel to adjust the
wiping frequency.
Page 81 of 263
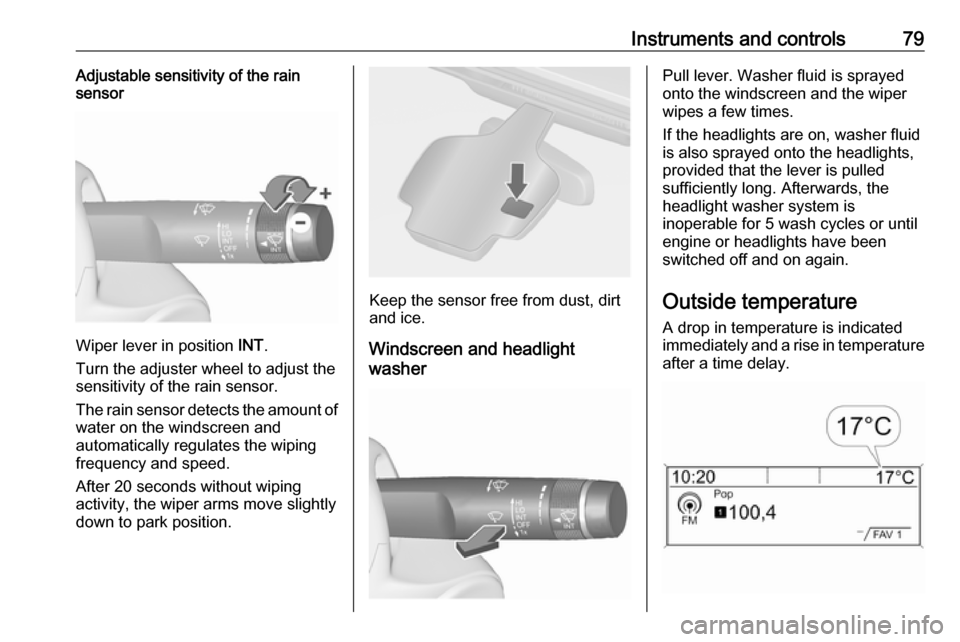
Instruments and controls79Adjustable sensitivity of the rain
sensor
Wiper lever in position INT.
Turn the adjuster wheel to adjust the
sensitivity of the rain sensor.
The rain sensor detects the amount of water on the windscreen and
automatically regulates the wiping
frequency and speed.
After 20 seconds without wiping
activity, the wiper arms move slightly
down to park position.
Keep the sensor free from dust, dirt
and ice.
Windscreen and headlight
washer
Pull lever. Washer fluid is sprayed
onto the windscreen and the wiper
wipes a few times.
If the headlights are on, washer fluid is also sprayed onto the headlights,
provided that the lever is pulled
sufficiently long. Afterwards, the
headlight washer system is
inoperable for 5 wash cycles or until
engine or headlights have been
switched off and on again.
Outside temperature A drop in temperature is indicatedimmediately and a rise in temperature
after a time delay.
Page 84 of 263

82Instruments and controls
A further 12 Volt power outlet is
located in the rear console. Fold the
cover downwards.
Do not exceed the maximum power
consumption of 120 watts.
With ignition off, the power outlets are
deactivated. Additionally the power
outlets are deactivated in the event of
low vehicle battery voltage.
Electrical accessories that are
connected must comply with the
electromagnetic compatibility
requirements laid down in
DIN VDE 40 839.
Do not connect any current-delivering
accessories, e.g. electrical charging
devices or batteries.
Do not damage the outlet by using
unsuitable plugs.
Stop-start system 3 136.
Cigarette lighter
The cigarette lighter is located in the
front console.
Press in cigarette lighter. It switches off automatically once the element is
glowing. Pull out lighter.
AshtraysCaution
To be used only for ash and not for combustible rubbish.
The portable ashtray can be placed in
the cupholders.