seat VAUXHALL CASCADA 2017.5 Owner's Manual
[x] Cancel search | Manufacturer: VAUXHALL, Model Year: 2017.5, Model line: CASCADA, Model: VAUXHALL CASCADA 2017.5Pages: 263, PDF Size: 7.71 MB
Page 3 of 263

Introduction.................................... 2
In brief ............................................ 6
Keys, doors and windows ............19
Seats, restraints ........................... 45
Storage ........................................ 68
Instruments and controls .............76
Lighting ...................................... 110
Climate control ........................... 123
Driving and operating .................133
Vehicle care ............................... 186
Service and maintenance ..........232
Technical data ........................... 235
Customer information ................248
Index .......................................... 256Contents
Page 9 of 263
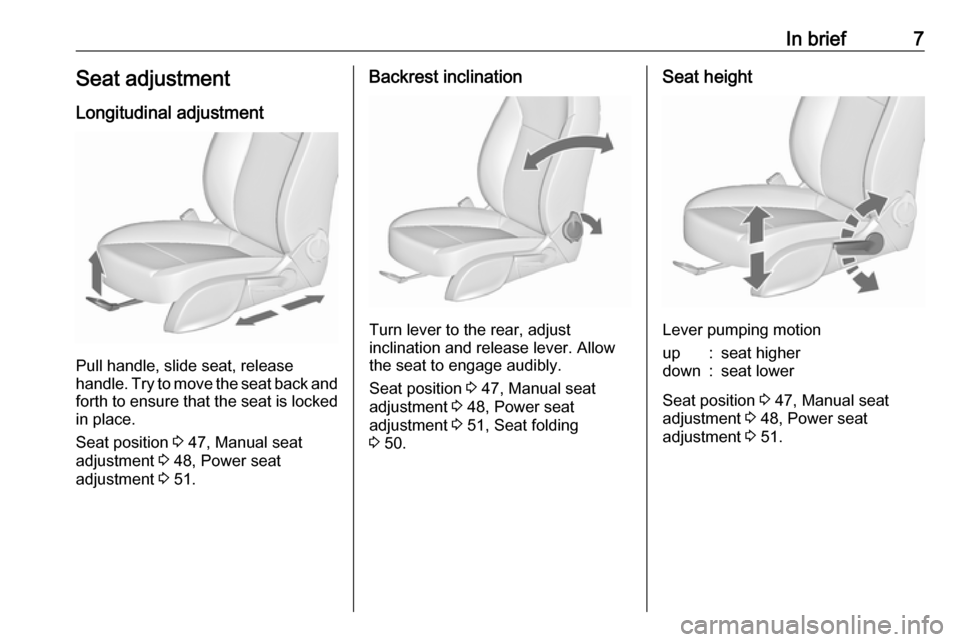
In brief7Seat adjustmentLongitudinal adjustment
Pull handle, slide seat, release
handle. Try to move the seat back and forth to ensure that the seat is locked
in place.
Seat position 3 47, Manual seat
adjustment 3 48, Power seat
adjustment 3 51.
Backrest inclination
Turn lever to the rear, adjust
inclination and release lever. Allow
the seat to engage audibly.
Seat position 3 47, Manual seat
adjustment 3 48, Power seat
adjustment 3 51, Seat folding
3 50.
Seat height
Lever pumping motion
up:seat higherdown:seat lower
Seat position 3 47, Manual seat
adjustment 3 48, Power seat
adjustment 3 51.
Page 10 of 263
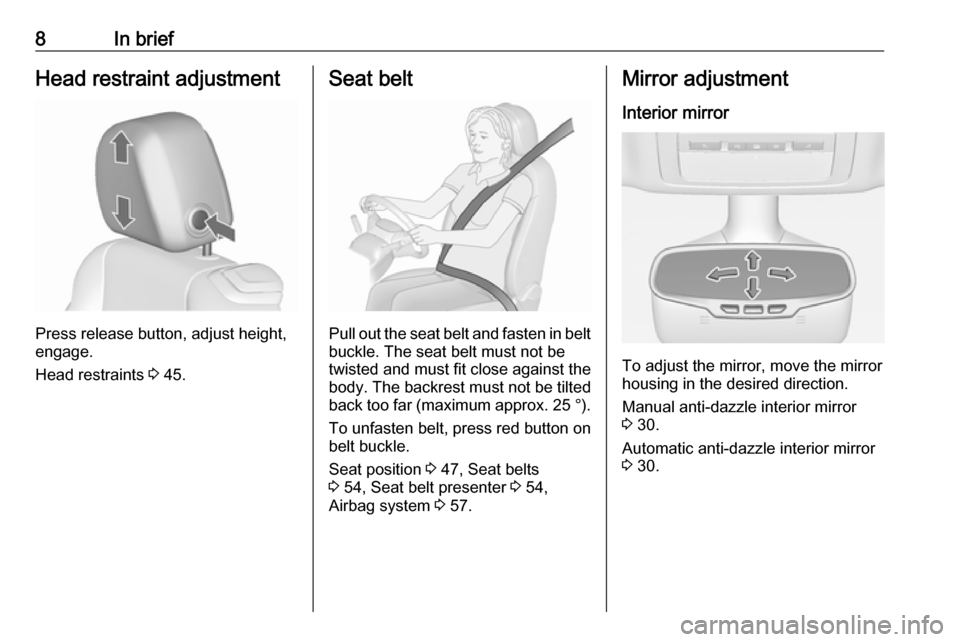
8In briefHead restraint adjustment
Press release button, adjust height,
engage.
Head restraints 3 45.
Seat belt
Pull out the seat belt and fasten in belt
buckle. The seat belt must not be
twisted and must fit close against the
body. The backrest must not be tilted back too far (maximum approx. 25 °).
To unfasten belt, press red button on belt buckle.
Seat position 3 47, Seat belts
3 54, Seat belt presenter 3 54,
Airbag system 3 57.
Mirror adjustment
Interior mirror
To adjust the mirror, move the mirror
housing in the desired direction.
Manual anti-dazzle interior mirror
3 30.
Automatic anti-dazzle interior mirror 3 30.
Page 13 of 263

In brief111Power windows .....................31
2 Exterior mirrors .....................29
3 Cruise control .....................155
Speed limiter ....................... 157
Forward collision alert .........158
4 Side air vents ...................... 131
5 Turn and lane-change
signals, headlight flash,
low beam and high beam,
high beam assist .................118
Exit lighting ......................... 121
Parking lights ...................... 119
Buttons for Driver
Information Centre ................93
6 Instruments .......................... 83
7 Steering wheel controls .......77
8 Driver Information Centre ...... 93
9 Windscreen wiper,
windscreen washer
system, headlight washer
system ................................... 78
10 Sport mode ........................ 153
Central locking system ..........22Hazard warning flashers ....117
Control indicator for airbag deactivation .......................... 88
Control indicator for front
passenger seat belt .............87
Tour mode .......................... 153
11 Info-Display .......................... 97
12 Anti-theft alarm system
status LED ........................... 26
13 Centre air vents .................. 131
14 Glovebox, lockable ...............68
Fuse box ............................. 205
15 Traction Control system
(TC) ..................................... 151
Electronic Stability Control (ESC) .................................. 152
Parking assist systems .......161
Lane departure warning .....175
Eco button for stop-start
system ................................. 136
16 Climate control system ........ 123
17 AUX input, USB input ..........10
18 Power outlet .......................... 8119Soft top operation switch .....34
Central window switch .........31
20 Selector lever, transmission
21 Parking brake, manual or
electric operation ................149
22 Ignition switch with
steering wheel lock ............135
23 Horn ..................................... 78
Driver airbag ........................ 60
24 Bonnet release lever ..........188
25 Storage compartment ..........69
Fuse box ............................ 205
26 Steering wheel adjustment ..77
27 Light switch ........................ 110
Rear fog light ...................... 118
Instrument illumination .......119
Headlight range
adjustment ......................... 113
Front fog lights ...................118
Page 18 of 263
![VAUXHALL CASCADA 2017.5 Owners Manual 16In briefAutomatic transmissionP:parkR:reverseN:neutralD:automatic modeM:manual mode: move selector
lever from D to the left.<:manual mode upshifting]:manual mode downshifting
The selector lever can](/img/38/19385/w960_19385-17.png "VAUXHALL CASCADA 2017.5 Owners Manual 16In briefAutomatic transmissionP:parkR:reverseN:neutralD:automatic modeM:manual mode: move selector
lever from D to the left.<:manual mode upshifting]:manual mode downshifting
The selector lever can")
16In briefAutomatic transmissionP:parkR:reverseN:neutralD:automatic modeM:manual mode: move selector
lever from D to the left.<:manual mode upshifting]:manual mode downshifting
The selector lever can only be moved
out of P when the ignition is on and
the brake pedal is applied. To engage
P or R, press the release button.
Automatic transmission 3 144.
Starting off
Check before starting off ● Tyre pressure and condition 3 213, 3 246.
● Engine oil level and fluid levels 3 189.
● All windows, mirrors, exterior lighting and number plates are
free from dirt, snow and ice and
are operational.
● Proper position of mirrors, seats and seat belts 3 29, 3 47,
3 55.
● Soft top must be completely opened or closed 3 34.
● Brake function at low speed, particularly if the brakes are wet.Starting the engine
● Turn key to position 1.
● Move the steering wheel slightly to release the steering wheel
lock.
● Manual transmission: operate clutch and brake pedal.
Automatic transmission: operate
brake pedal and move selector to
P or N.
● Do not operate accelerator pedal.
Page 28 of 263
26Keys, doors and windowsVehicle security
Anti-theft locking system9 Warning
Do not use the system if there are
people in the vehicle! The doorscannot be unlocked from the
inside.
The system deadlocks the doors. The doors must be closed otherwise the
system cannot be activated.
Unlocking the vehicle disables the
mechanical anti-theft locking system.
This is not possible with the central
locking button.
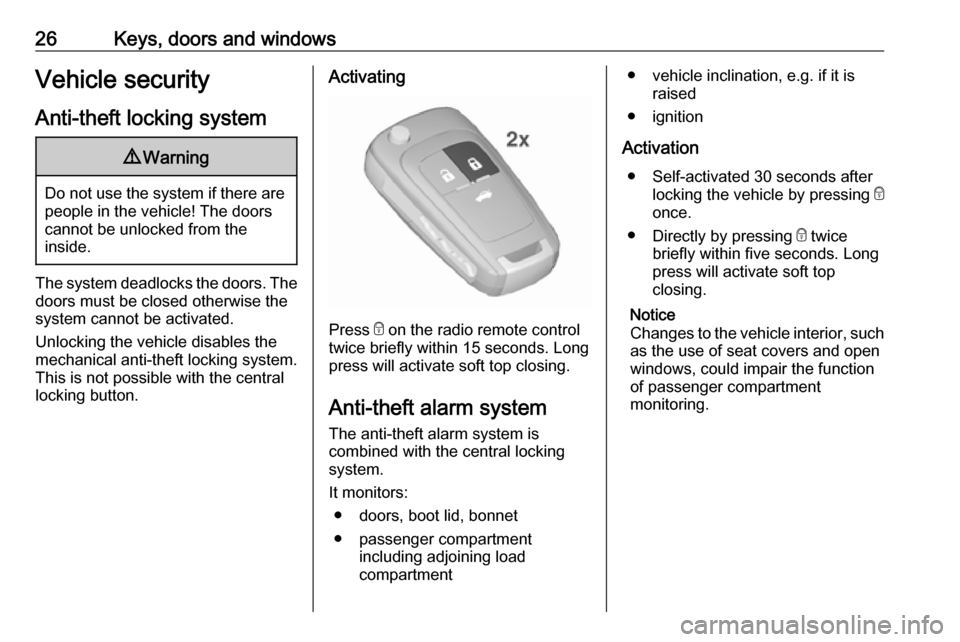
Activating
Press e on the radio remote control
twice briefly within 15 seconds. Long press will activate soft top closing.
Anti-theft alarm system The anti-theft alarm system is
combined with the central locking
system.
It monitors: ● doors, boot lid, bonnet
● passenger compartment including adjoining load
compartment
● vehicle inclination, e.g. if it is raised
● ignition
Activation ● Self-activated 30 seconds after locking the vehicle by pressing e
once.
● Directly by pressing e twice
briefly within five seconds. Long
press will activate soft top
closing.
Notice
Changes to the vehicle interior, such as the use of seat covers and open
windows, could impair the function
of passenger compartment
monitoring.
Page 43 of 263
Keys, doors and windows41
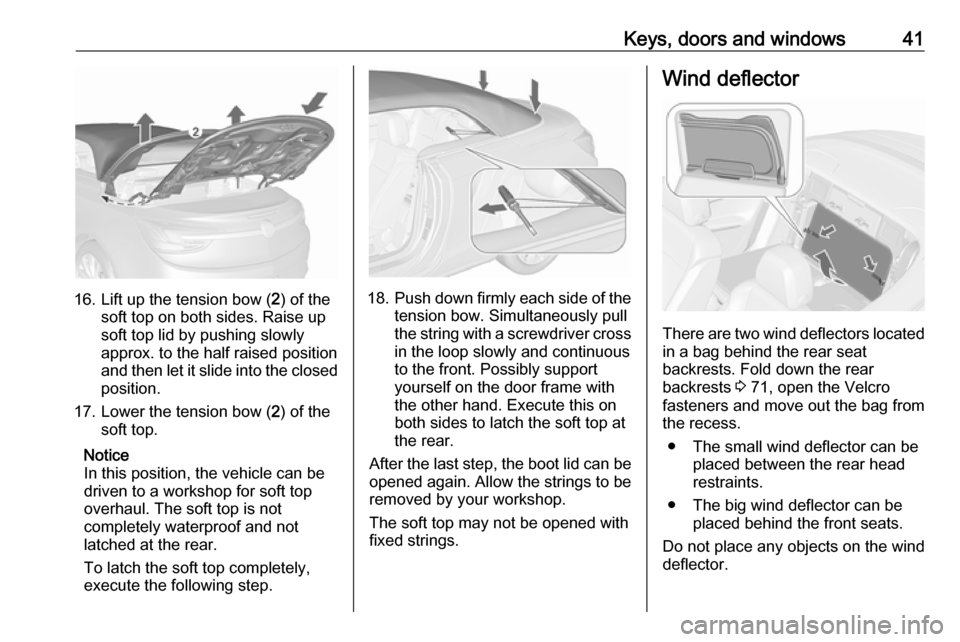
16. Lift up the tension bow (2) of the
soft top on both sides. Raise up
soft top lid by pushing slowly
approx. to the half raised position and then let it slide into the closed
position.
17. Lower the tension bow ( 2) of the
soft top.
Notice
In this position, the vehicle can be
driven to a workshop for soft top overhaul. The soft top is not
completely waterproof and not
latched at the rear.
To latch the soft top completely,
execute the following step.18. Push down firmly each side of the
tension bow. Simultaneously pull
the string with a screwdriver cross in the loop slowly and continuous
to the front. Possibly support
yourself on the door frame with
the other hand. Execute this on
both sides to latch the soft top at
the rear.
After the last step, the boot lid can be opened again. Allow the strings to beremoved by your workshop.
The soft top may not be opened with
fixed strings.
Wind deflector
There are two wind deflectors located in a bag behind the rear seat
backrests. Fold down the rear
backrests 3 71, open the Velcro
fasteners and move out the bag from
the recess.
● The small wind deflector can be placed between the rear head
restraints.
● The big wind deflector can be placed behind the front seats.
Do not place any objects on the wind
deflector.
Page 45 of 263
Keys, doors and windows43
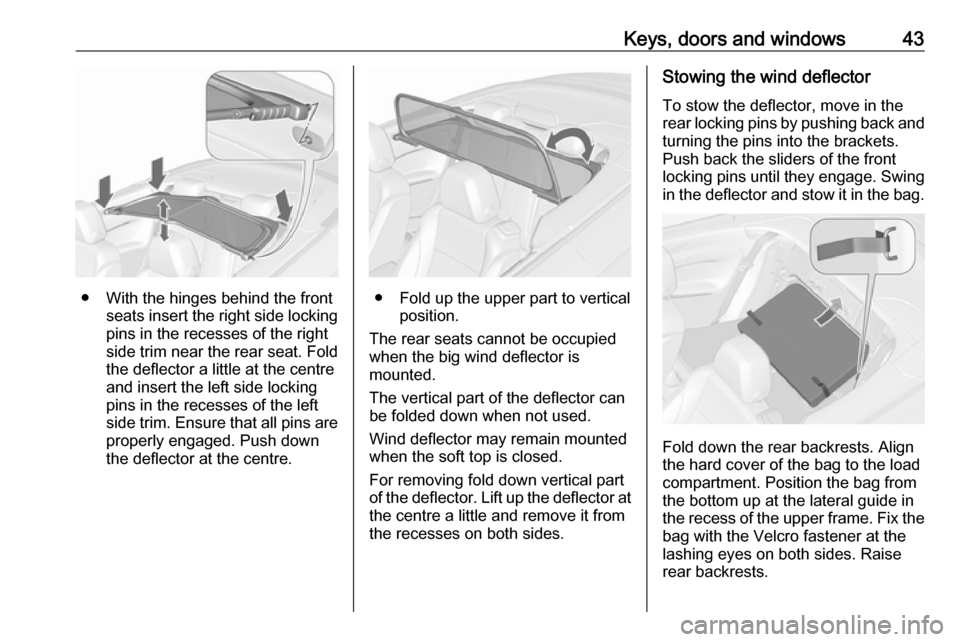
● With the hinges behind the frontseats insert the right side locking
pins in the recesses of the right
side trim near the rear seat. Fold
the deflector a little at the centre and insert the left side locking
pins in the recesses of the left
side trim. Ensure that all pins are properly engaged. Push down
the deflector at the centre.● Fold up the upper part to vertical position.
The rear seats cannot be occupied
when the big wind deflector is
mounted.
The vertical part of the deflector can
be folded down when not used.
Wind deflector may remain mounted
when the soft top is closed.
For removing fold down vertical part
of the deflector. Lift up the deflector at
the centre a little and remove it from
the recesses on both sides.
Stowing the wind deflector
To stow the deflector, move in the
rear locking pins by pushing back and
turning the pins into the brackets.
Push back the sliders of the front
locking pins until they engage. Swing in the deflector and stow it in the bag.
Fold down the rear backrests. Align
the hard cover of the bag to the load
compartment. Position the bag from
the bottom up at the lateral guide in
the recess of the upper frame. Fix the
bag with the Velcro fastener at the
lashing eyes on both sides. Raise
rear backrests.
Page 47 of 263
Seats, restraints45Seats, restraintsHead restraints............................ 45
Active head restraints ................46
Front seats ................................... 47
Seat position .............................. 47
Manual seat adjustment ............48
Seat folding ............................... 50
Power seat adjustment ..............51
Armrest ...................................... 53
Heating ...................................... 53
Ventilating .................................. 53
Seat belts ..................................... 54
Three-point seat belt .................55
Airbag system .............................. 57
Front airbag system ...................60
Side airbag system ....................61
Airbag deactivation ....................61
Child restraints ............................. 62
Child restraint systems ..............62
Child restraint installation locations ................................... 64
ISOFIX child restraint systems ..67
Top-tether fastening eyes ..........67Head restraints
Position9 Warning
Only drive with the head restraint
set to the proper position.
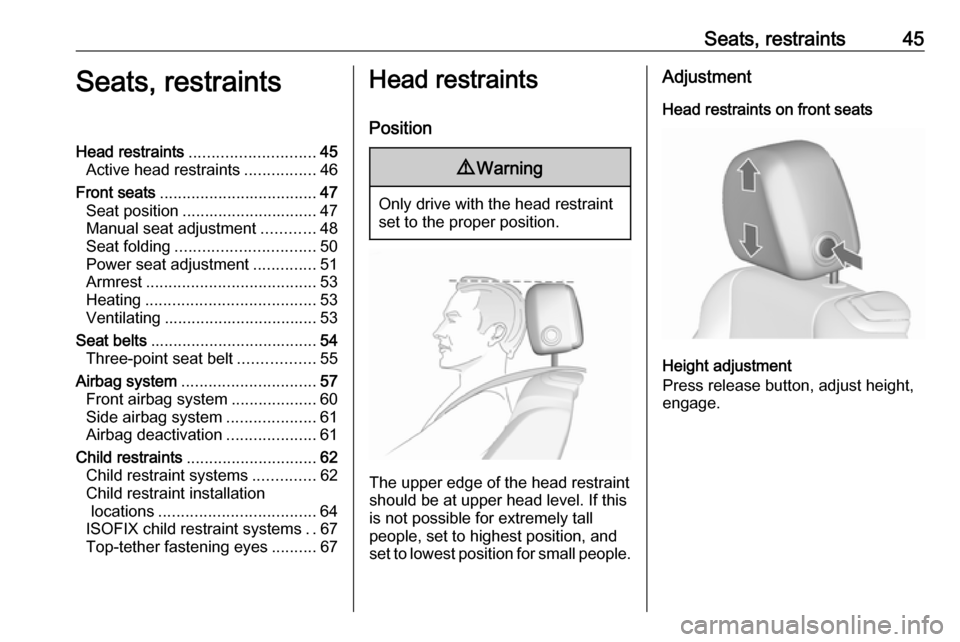
The upper edge of the head restraint
should be at upper head level. If this
is not possible for extremely tall
people, set to highest position, and
set to lowest position for small people.
Adjustment
Head restraints on front seats
Height adjustment
Press release button, adjust height,
engage.
Page 48 of 263
46Seats, restraintsHorizontal adjustment
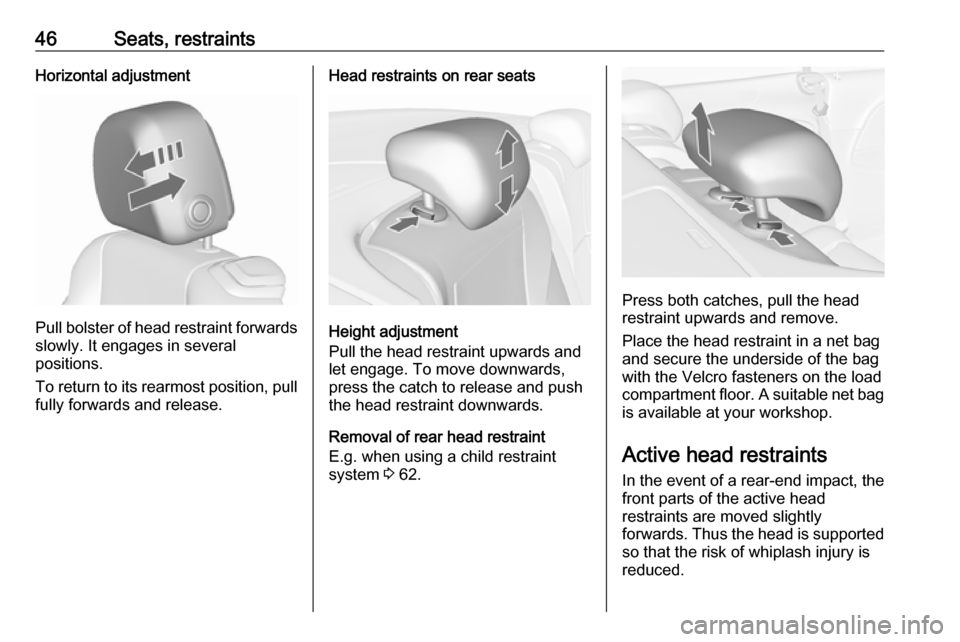
Pull bolster of head restraint forwardsslowly. It engages in several
positions.
To return to its rearmost position, pull
fully forwards and release.
Head restraints on rear seats
Height adjustment
Pull the head restraint upwards and
let engage. To move downwards, press the catch to release and push
the head restraint downwards.
Removal of rear head restraint
E.g. when using a child restraint
system 3 62.
Press both catches, pull the head
restraint upwards and remove.
Place the head restraint in a net bag
and secure the underside of the bag
with the Velcro fasteners on the load
compartment floor. A suitable net bag
is available at your workshop.
Active head restraints
In the event of a rear-end impact, the front parts of the active head
restraints are moved slightly
forwards. Thus the head is supported
so that the risk of whiplash injury is
reduced.