light VAUXHALL COMBO 2014 Service Manual
[x] Cancel search | Manufacturer: VAUXHALL, Model Year: 2014, Model line: COMBO, Model: VAUXHALL COMBO 2014Pages: 187, PDF Size: 4.15 MB
Page 137 of 187
Vehicle care135
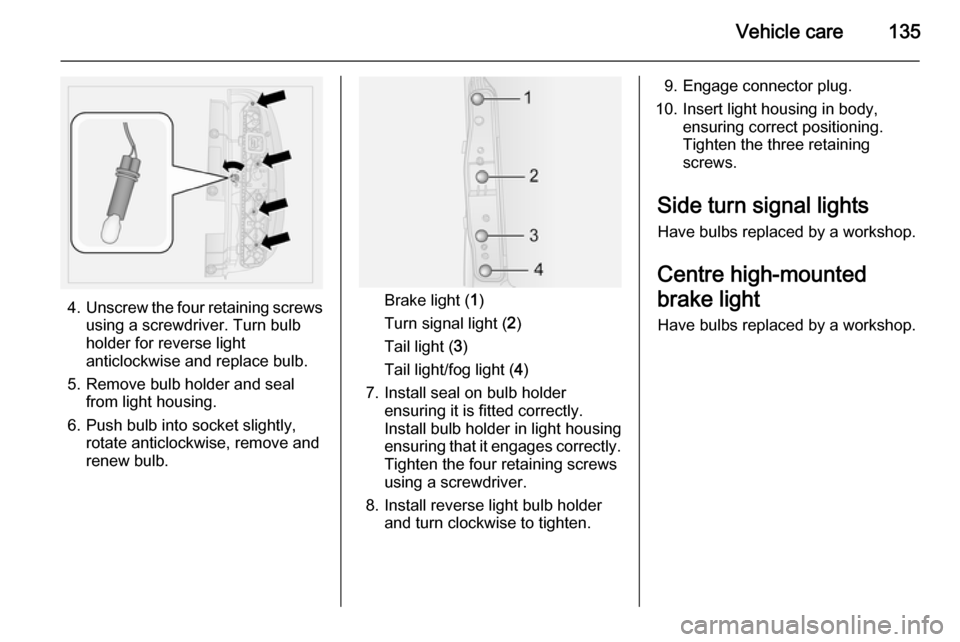
4.Unscrew the four retaining screws
using a screwdriver. Turn bulb
holder for reverse light
anticlockwise and replace bulb.
5. Remove bulb holder and seal from light housing.
6. Push bulb into socket slightly, rotate anticlockwise, remove and
renew bulb.Brake light ( 1)
Turn signal light ( 2)
Tail light ( 3)
Tail light/fog light ( 4)
7. Install seal on bulb holder ensuring it is fitted correctly.
Install bulb holder in light housing
ensuring that it engages correctly.
Tighten the four retaining screws
using a screwdriver.
8. Install reverse light bulb holder and turn clockwise to tighten.
9. Engage connector plug.
10. Insert light housing in body, ensuring correct positioning.
Tighten the three retaining
screws.
Side turn signal lights
Have bulbs replaced by a workshop.
Centre high-mounted
brake light Have bulbs replaced by a workshop.
Page 138 of 187
136Vehicle careNumber plate lightTailgate
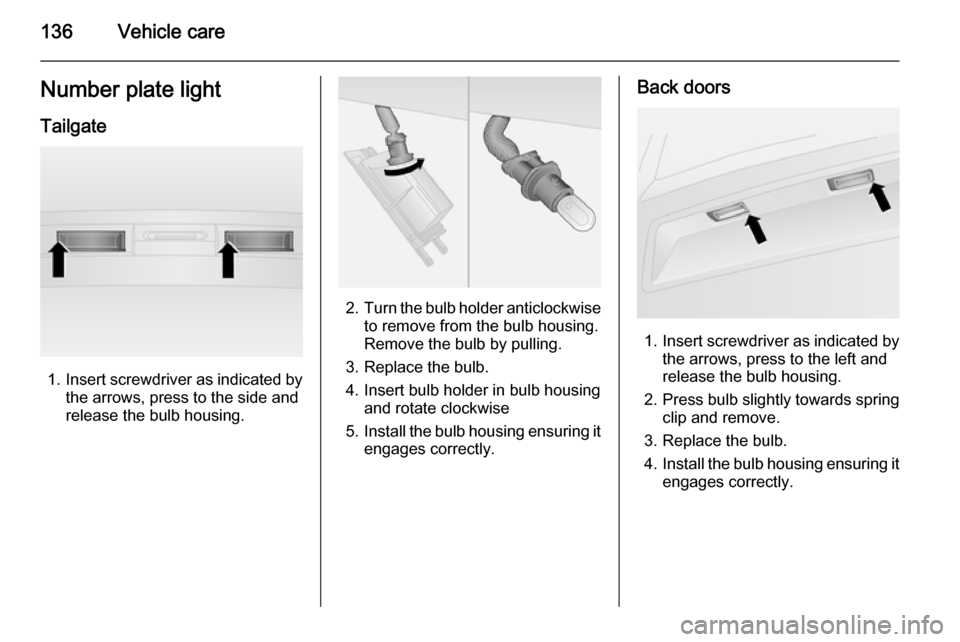
1. Insert screwdriver as indicated by
the arrows, press to the side and
release the bulb housing.
2. Turn the bulb holder anticlockwise
to remove from the bulb housing.
Remove the bulb by pulling.
3. Replace the bulb.
4. Insert bulb holder in bulb housing and rotate clockwise
5. Install the bulb housing ensuring it
engages correctly.
Back doors
1. Insert screwdriver as indicated by
the arrows, press to the left and
release the bulb housing.
2. Press bulb slightly towards spring
clip and remove.
3. Replace the bulb.
4. Install the bulb housing ensuring it
engages correctly.
Page 139 of 187
Vehicle care137Interior lightsFront and rear courtesy light
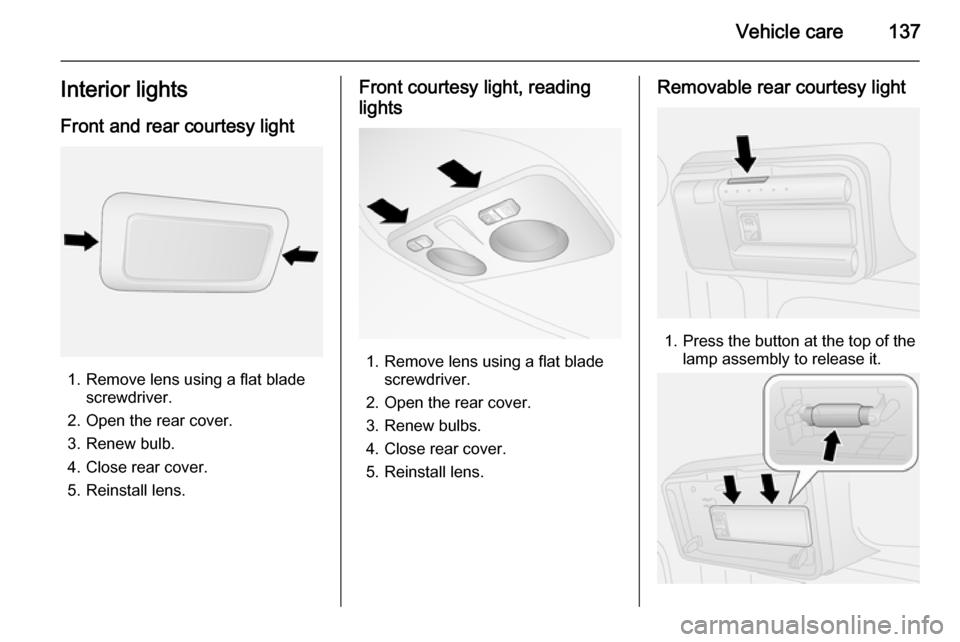
1. Remove lens using a flat blade screwdriver.
2. Open the rear cover. 3. Renew bulb.
4. Close rear cover.
5. Reinstall lens.
Front courtesy light, reading
lights
1. Remove lens using a flat blade screwdriver.
2. Open the rear cover. 3. Renew bulbs.
4. Close rear cover.
5. Reinstall lens.
Removable rear courtesy light
1. Press the button at the top of the lamp assembly to release it.
Page 142 of 187
140Vehicle care
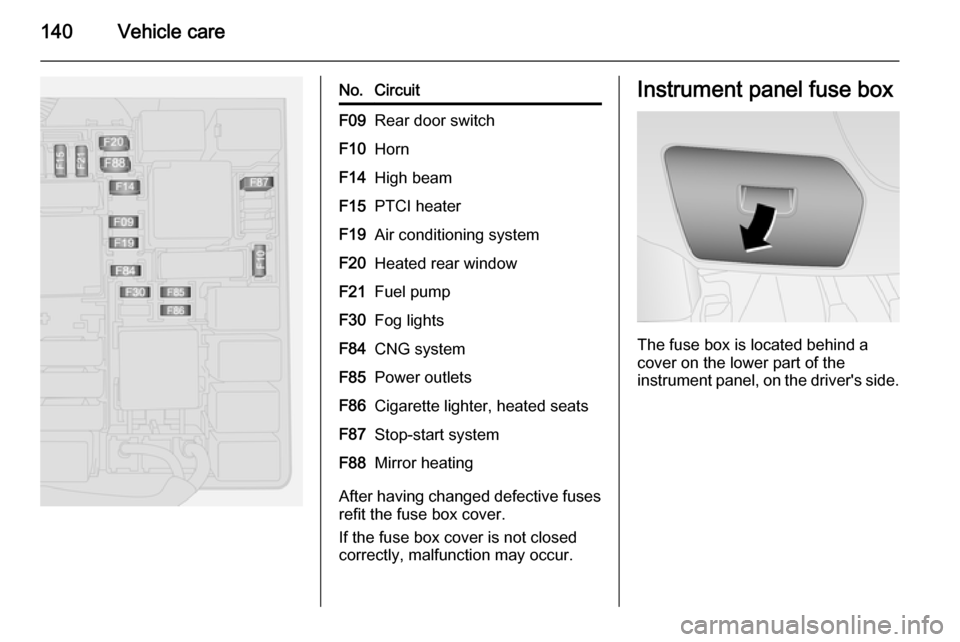
No.CircuitF09Rear door switchF10HornF14High beamF15PTCI heaterF19Air conditioning systemF20Heated rear windowF21Fuel pumpF30Fog lightsF84CNG systemF85Power outletsF86Cigarette lighter, heated seatsF87Stop-start systemF88Mirror heating
After having changed defective fuses
refit the fuse box cover.
If the fuse box cover is not closed
correctly, malfunction may occur.
Instrument panel fuse box
The fuse box is located behind a
cover on the lower part of the
instrument panel, on the driver's side.
Page 143 of 187
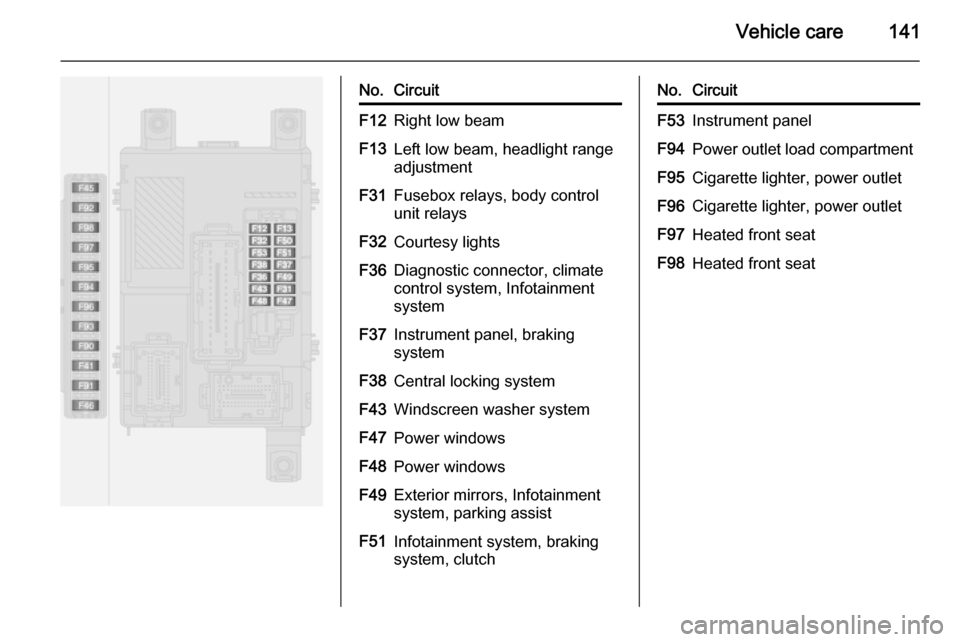
Vehicle care141
No.CircuitF12Right low beamF13Left low beam, headlight rangeadjustmentF31Fusebox relays, body control
unit relaysF32Courtesy lightsF36Diagnostic connector, climate
control system, Infotainment
systemF37Instrument panel, braking
systemF38Central locking systemF43Windscreen washer systemF47Power windowsF48Power windowsF49Exterior mirrors, Infotainment
system, parking assistF51Infotainment system, braking
system, clutchNo.CircuitF53Instrument panelF94Power outlet load compartmentF95Cigarette lighter, power outletF96Cigarette lighter, power outletF97Heated front seatF98Heated front seat
Page 147 of 187

Vehicle care145Tyre repair kit
Minor damage to the tyre tread can be
repaired with the tyre repair kit.
Do not remove foreign bodies from
the tyres.
Tyre damage exceeding 4 mm or that is at tyre's sidewall cannot be repairedwith the tyre repair kit.9 Warning
Do not drive faster than 50 mph.
Do not use for a lengthy period.
Steering and handling may be
affected.
If you have a flat tyre:
Apply the parking brake and engage
first or reverse gear.
The tyre repair kit may be located
under the front seat, in the glovebox,
or on the right side of the load
compartment behind a cover.
1. Take the tyre repair kit from the vehicle.
2. Remove the compressor.
3. Set the compressor upright near the tyre.
4. Unscrew valve cap from defective
tyre.5. Screw the flexible filler hose onto the tyre valve.
6. The switch on the compressor must be set to J.
7. Connect the compressor plug to the power outlet or cigarette
lighter socket.
To avoid discharging the battery,
we recommend running the
engine.
Page 155 of 187

Vehicle care153
3. Connect the black lead to thenegative terminal of the booster
battery.
4. Connect the other end of the black
lead to a vehicle grounding point,
such as the engine block or an
engine mounting bolt. Connect as far away from the discharged
battery as possible, however at
least 60 cm.
Route the leads so that they cannot
catch on rotating parts in the engine
compartment.
To start the engine: 1. Start the engine of the vehicle providing the jump.
2. After 5 minutes, start the other engine. Start attempts should be
made for no longer than
15 seconds at an interval of
1 minute.
3. Allow both engines to idle for approx. 3 minutes with the leads
connected.4. Switch on electrical consumers (e.g. headlights, heated rear
window) of the vehicle receiving
the jump start.
5. Reverse above sequence exactly when removing leads.Towing
Towing the vehicle
Release the cap by carefully lifting
with a screwdriver. To prevent
damage, it is recommended to place
a cloth between the screwdriver and
the frame.
The towing eye is stowed with the vehicle tools 3 142.
Screw in the towing eye as far as it will
go until it stops in a horizontal
position.
Attach a tow rope – or better still a tow
rod – to the towing eye.
Page 156 of 187

154Vehicle careCaution
The towing eye must only be usedfor towing and not for recovering
the vehicle.
Switch on ignition to release steering
wheel lock and to permit operation of
brake lights, horn and windscreen
wiper.
Transmission in neutral.
Notice
If neutral cannot be selected on
vehicles with manual transmission
automated (MTA), the vehicle must
only be towed with the drive wheels
raised off the ground.
Caution
Drive slowly. Do not drive jerkily.
Excessive tractive force can
damage the vehicle.
When the engine is not running,
considerably more force is needed to
brake and steer.
To prevent the entry of exhaust gases from the towing vehicle, switch on the
air recirculation and close the
windows.
Seek the assistance of a workshop.
After towing, unscrew the towing eye
and replace the cap.
Towing another vehicle
Insert a screwdriver in the slot at the
side of the cap. Release the cap by
carefully levering the screwdriver. To
prevent damage it is recommended to place a cloth between the screwdriver
and the frame.
The towing eye is stowed with the vehicle tools 3 142.
Screw in the towing eye as far as it will
go until it stops in a horizontal
position.
Attach a tow rope – or even better a tow bar – to the towing eye.
The towing eye must only be used for
towing and not for recovering a
vehicle.Caution
Drive slowly. Do not drive jerkily.
Excessive tractive force can
damage the vehicle.
After towing, unscrew the towing eye.
Insert cap.
Page 157 of 187

Vehicle care155Appearance care
Exterior care
Locks The locks are lubricated at the factoryusing a high quality lock cylinder
grease. Use de-icing agent only when
absolutely necessary, as this has a
degreasing effect and impairs lock function. After using de-icing agent,
have the locks regreased by a
workshop.
Washing The paintwork of your vehicle is
exposed to environmental influences.
Wash and wax your vehicle regularly.
When using automatic vehicle
washes, select a programme that
includes waxing.
Bird droppings, dead insects, resin,
pollen and the like should be cleaned off immediately, as they contain
aggressive constituents which can
cause paint damage.If using a vehicle wash, comply with
the vehicle wash manufacturer's
instructions. The windscreen wiper
and rear window wiper must be
switched off. Remove antenna and
external accessories such as roof
racks etc.
If you wash your vehicle by hand,
make sure that the insides of the
wheel housings are also thoroughly
rinsed out.
Clean edges and folds on opened
doors and the bonnet as well as the
areas they cover.Caution
Always use a cleaning agent with
a pH value of 4 to 9.
Do not use cleaning agents on hot surfaces.
Have the door hinges of all doors
greased by a workshop.
Do not clean the engine compartment with a steam-jet or high-pressure jet
cleaner.
Thoroughly rinse and leather-off the vehicle. Rinse leather frequently. Use
separate leathers for painted and
glass surfaces: remnants of wax on
the windows will impair vision.
Exterior lights
Headlight and other light covers are
made of plastic. Do not use any
abrasive or caustic agents, do not use an ice scraper, and do not clean them
dry.
Polishing and waxing Wax the vehicle regularly (at the
latest when water no longer beads).
Otherwise, the paintwork will dry out.
Polishing is necessary only if the paint
has become dull or if solid deposits
have become attached to it.
Paintwork polish with silicone forms a
protective film, making waxing
unnecessary.
Plastic body parts must not be treated with wax or polishing agents.
Page 159 of 187

Vehicle care157
Clean the leather upholstery with
clear water and a soft cloth. In case of
heavy soiling, use leather care.
The instrument cluster and the
displays should only be cleaned using a soft damp cloth. If necessary, use a
weak soap solution.
Clean fabric upholstery with a
vacuum cleaner and brush. Remove
stains with an upholstery cleaner.
Clothing fabrics may not be
colourfast. This could cause visible
discolourations, especially on light-
coloured upholstery. Removable
stains and discolourations should be
cleaned as soon as possible.
Clean seat belts with lukewarm water
or interior cleaner.Caution
Close Velcro fasteners as open
Velcro fasteners on clothing could damage seat upholstery.
The same applies to clothing with
sharp-edged objects, like zips or
belts or studded jeans.
Plastic and rubber parts
Plastic and rubber parts can be
cleaned with the same cleaner as
used to clean the body. Use interior cleaner if necessary. Do not use any
other agent. Avoid solvents and petrol in particular. Do not use high-
pressure jet cleaners.