seat adjustment VAUXHALL COMBO 2016 Owner's Manual
[x] Cancel search | Manufacturer: VAUXHALL, Model Year: 2016, Model line: COMBO, Model: VAUXHALL COMBO 2016Pages: 189, PDF Size: 4.47 MB
Page 9 of 189
In brief7Seat adjustmentSeat positioning
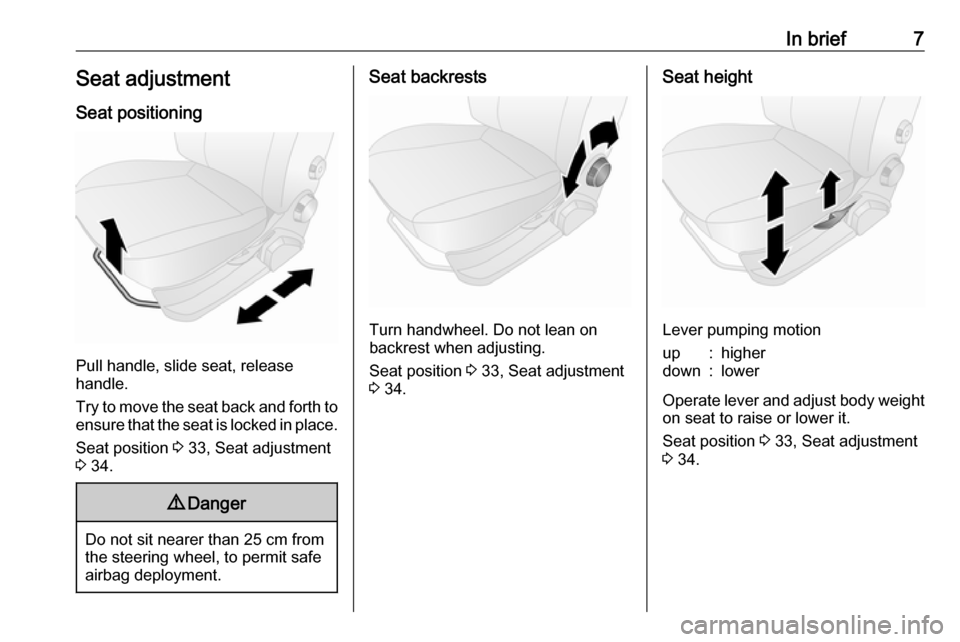
Pull handle, slide seat, release
handle.
Try to move the seat back and forth to ensure that the seat is locked in place.
Seat position 3 33, Seat adjustment
3 34.
9 Danger
Do not sit nearer than 25 cm from
the steering wheel, to permit safe
airbag deployment.
Seat backrests
Turn handwheel. Do not lean on
backrest when adjusting.
Seat position 3 33, Seat adjustment
3 34.
Seat height
Lever pumping motion
up:higherdown:lower
Operate lever and adjust body weight
on seat to raise or lower it.
Seat position 3 33, Seat adjustment
3 34.
Page 10 of 189
8In briefHead restraint adjustment
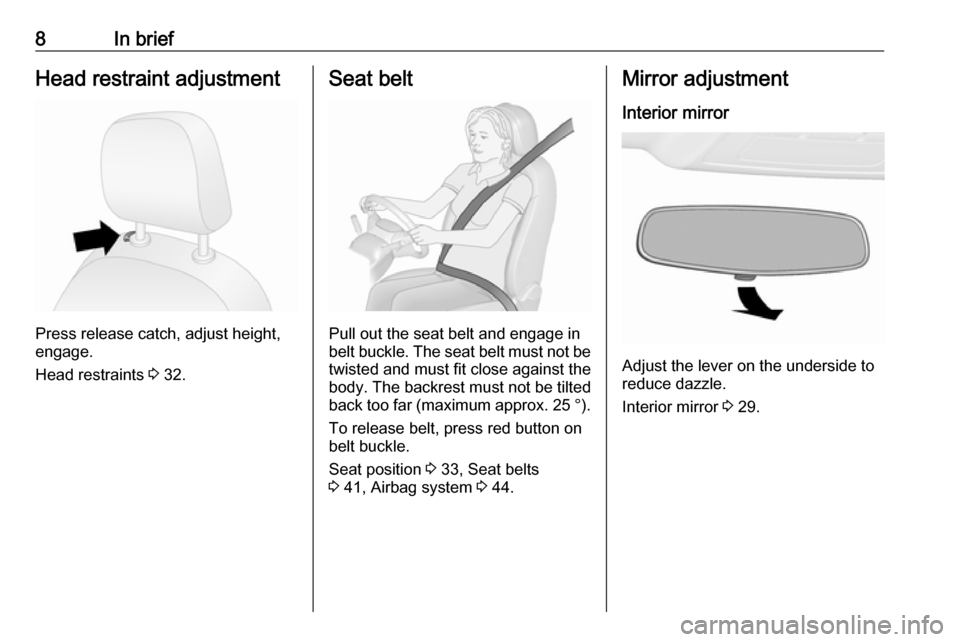
Press release catch, adjust height,
engage.
Head restraints 3 32.
Seat belt
Pull out the seat belt and engage in
belt buckle. The seat belt must not be twisted and must fit close against the
body. The backrest must not be tilted
back too far (maximum approx. 25 ° ).
To release belt, press red button on belt buckle.
Seat position 3 33, Seat belts
3 41, Airbag system 3 44.
Mirror adjustment
Interior mirror
Adjust the lever on the underside to
reduce dazzle.
Interior mirror 3 29.
Page 34 of 189
32Seats, restraintsSeats, restraintsHead restraints............................ 32
Front seats ................................... 33
Seat position .............................. 33
Seat adjustment ........................34
Seat folding ............................... 35
Armrest ...................................... 36
Heating ...................................... 37
Rear seats ................................... 37
Second row seats ......................37
Third row seats .......................... 39
Seat belts ..................................... 41
Three-point seat belt .................42
Airbag system .............................. 44
Front airbag system ...................48
Side airbag system ....................49
Airbag deactivation ....................49
Child restraints ............................. 51
Child restraint systems ..............51
Child restraint installation locations ................................... 52
ISOFIX child restraint systems ..55
Top-tether fastening eyes ..........55Head restraints
Position9 Warning
Only drive with the head restraint
set to the proper position.
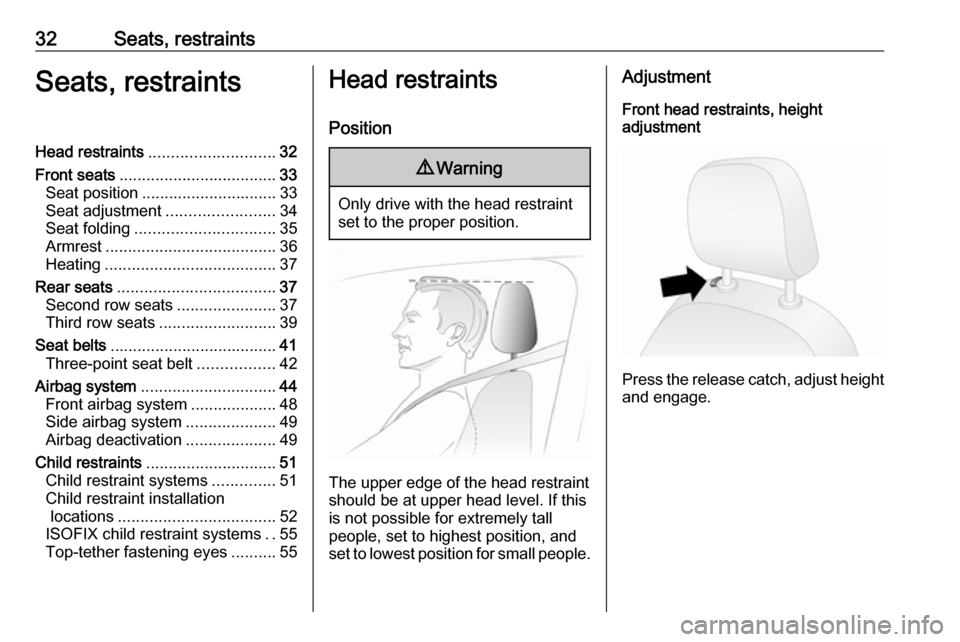
The upper edge of the head restraint
should be at upper head level. If this
is not possible for extremely tall
people, set to highest position, and
set to lowest position for small people.
Adjustment
Front head restraints, height
adjustment
Press the release catch, adjust height
and engage.
Page 35 of 189
Seats, restraints33Rear head restraints, height
adjustment
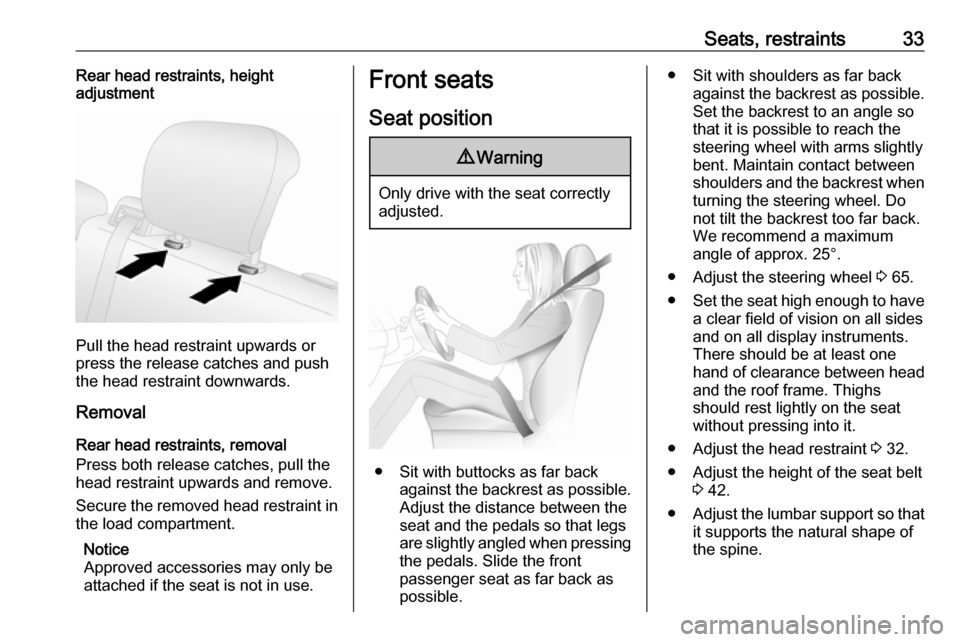
Pull the head restraint upwards or
press the release catches and push the head restraint downwards.
Removal
Rear head restraints, removal
Press both release catches, pull the
head restraint upwards and remove.
Secure the removed head restraint in the load compartment.
Notice
Approved accessories may only be
attached if the seat is not in use.
Front seats
Seat position9 Warning
Only drive with the seat correctly
adjusted.
● Sit with buttocks as far back
against the backrest as possible.
Adjust the distance between the
seat and the pedals so that legs
are slightly angled when pressing
the pedals. Slide the front
passenger seat as far back as
possible.
● Sit with shoulders as far back against the backrest as possible.Set the backrest to an angle sothat it is possible to reach the
steering wheel with arms slightly bent. Maintain contact between
shoulders and the backrest when
turning the steering wheel. Do
not tilt the backrest too far back.
We recommend a maximum
angle of approx. 25°.
● Adjust the steering wheel 3 65.
● Set the seat high enough to have
a clear field of vision on all sides
and on all display instruments.
There should be at least one
hand of clearance between head
and the roof frame. Thighs
should rest lightly on the seat
without pressing into it.
● Adjust the head restraint 3 32.
● Adjust the height of the seat belt 3 42.
● Adjust the lumbar support so that
it supports the natural shape of
the spine.
Page 36 of 189
34Seats, restraintsSeat adjustment
Drive only with seats and backrests
properly engaged.9 Danger
Do not sit nearer than 25 cm from
the steering wheel, to permit safe
airbag deployment.
9 Warning
Never adjust seats while driving as
they could move uncontrollably.
9 Warning
Never store any objects under the
seats except in the underseat
storage compartment 3 57.
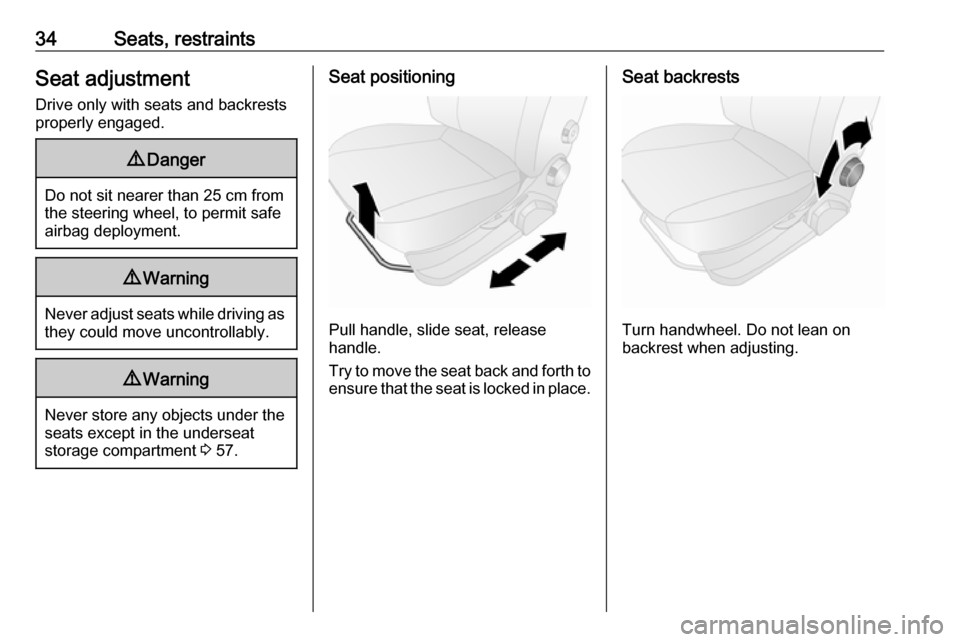
Seat positioning
Pull handle, slide seat, release
handle.
Try to move the seat back and forth to ensure that the seat is locked in place.
Seat backrests
Turn handwheel. Do not lean on
backrest when adjusting.
Page 45 of 189

Seats, restraints43
Loose or bulky clothing prevents the
belt from fitting snugly. Do not place
objects such as handbags or mobile
phones between the belt and your body.
9 Warning
The belt must not rest against hard
or fragile objects in the pockets of
your clothing.
Height adjustment
1. Pull belt out slightly.
2. Shift the height adjustment upwards or press button down to
disengage and push the height
adjustment downwards.
Adjust the height so that the belt lies across the shoulder. It must not lie
across the throat or upper arm.
Do not adjust while driving.
Page 54 of 189

52Seats, restraintsChild restraint installation locations
Permissible options for fitting a child restraint system
Weight and age class
Front passenger seatSecond rowThird rowactivated airbagdeactivated airbagoutboard seatcentre seatGroup 0: up to 10 kg
or approx. 10 monthsXU 1U,
or approx. 6 to 12 yearsXXUUX1:When securing with a three-point seat belt, move seat height adjustment to uppermost position and ensure that the
seat belt runs forwards from the upper anchorage point. Adjust seat backrest inclination as far as necessary to a
vertical position to ensure that the belt is tight on the buckle side.<:Vehicle seat available with ISOFIX attachments. When attaching using ISOFIX, only the ISOFIX child restraint
systems permitted for the vehicle may be used.U:Universal suitability in conjunction with three-point seat belt.X:No child restraint system permitted in this weight class.
Page 66 of 189

64Instruments and controlsInstruments and
controlsControls ....................................... 65
Steering wheel adjustment ........65
Steering wheel controls .............65
Horn ........................................... 65
Windscreen wiper/washer .........66
Rear window wiper/washer .......66
Headlamp washer .....................67
Outside temperature ..................67
Clock ......................................... 67
Power outlets ............................. 68
Cigarette lighter ......................... 69
Ashtrays .................................... 70
Warning lights, gauges and indi‐ cators ........................................... 70
Instrument cluster ......................70
Speedometer ............................. 70
Odometer .................................. 70
Trip odometer ............................ 70
Tachometer ............................... 71
Fuel gauge ................................ 71
Fuel selector .............................. 72
Engine coolant temperature gauge ....................................... 72
Service display .......................... 73Transmission display .................73
Control indicators ......................73
Generic warning ........................76
Turn signal ................................. 77
Seat belt reminder .....................77
Airbag and belt tensioners .........77
Airbag deactivation ....................78
Charging system .......................78
Malfunction indicator light ..........78
Brake system ............................. 79
Brake pad wear ......................... 79
Antilock brake system (ABS) .....79
Transmission ............................. 79
Upshift ....................................... 80
Hill start assist ........................... 80
Ultrasonic parking assist ...........80
Electronic Stability Control ........80
Engine coolant temperature ......81
Preheating ................................. 81
Diesel particle filter ....................81
Tyre pressure monitoring system ...................................... 82
Engine oil pressure ....................82
Change engine oil .....................82
Low engine oil level ...................83
Low fuel ..................................... 83
Drain fuel filter ........................... 83
Immobiliser ................................ 83
Stop-start system ......................84
Exterior light .............................. 84High beam................................. 84
Fog light ..................................... 84
Rear fog light ............................. 84
Cruise control ............................ 84
Door open .................................. 84
Information displays .....................85
Driver Information Centre ..........85
Vehicle messages ........................90
Warning chimes .........................90
Fuel system messages ..............91
Trip computer ............................... 91
Page 97 of 189
Lighting95Headlight range adjustment
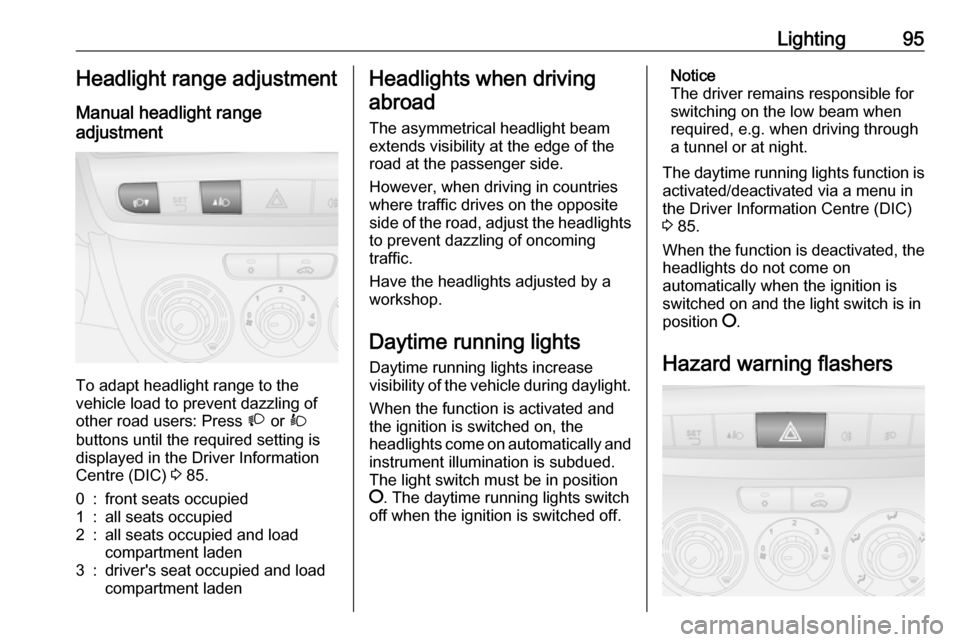
Manual headlight range
adjustment
To adapt headlight range to the
vehicle load to prevent dazzling of
other road users: Press À or Á
buttons until the required setting is displayed in the Driver Information
Centre (DIC) 3 85.
0:front seats occupied1:all seats occupied2:all seats occupied and load
compartment laden3:driver's seat occupied and load
compartment ladenHeadlights when driving
abroad
The asymmetrical headlight beam
extends visibility at the edge of the
road at the passenger side.
However, when driving in countries
where traffic drives on the opposite
side of the road, adjust the headlights to prevent dazzling of oncoming
traffic.
Have the headlights adjusted by a
workshop.
Daytime running lights Daytime running lights increase
visibility of the vehicle during daylight.
When the function is activated and the ignition is switched on, the
headlights come on automatically and instrument illumination is subdued.
The light switch must be in position
§ . The daytime running lights switch
off when the ignition is switched off.Notice
The driver remains responsible for
switching on the low beam when
required, e.g. when driving through
a tunnel or at night.
The daytime running lights function is activated/deactivated via a menu in
the Driver Information Centre (DIC)
3 85.
When the function is deactivated, the
headlights do not come on
automatically when the ignition is
switched on and the light switch is in
position §.
Hazard warning flashers
Page 151 of 189

Vehicle care149No.CircuitF12Right low beamF13Left low beam / headlight range
adjustmentF31Fusebox relays / body control
unit relaysF32Courtesy lightsF36Diagnostic connector / climate
control system / Infotainment
system / tyre pressure moni‐
toring system / alarm sirenF37Instrument panel / braking
systemF38Central locking systemF43Windscreen washer systemF47Power windowsF48Power windowsF49Exterior mirrors / Infotainment
system / parking assist / tyre
pressure monitoring system /
instrument illumination / rain
sensorNo.CircuitF51Infotainment system / braking
system / clutch / interior heaterF53Instrument panelF94Power outlet load compartmentF95Cigarette lighter / power outletF96Cigarette lighter / power outletF97Heated front seatF98Heated front seatVehicle tools
Tools
Van
The tools and the vehicle jacking
equipment are in the storage area behind the front seat. Pull front handle
and slide seat forwards to access
3 34.