engine VAUXHALL COMBO 2016 Workshop Manual
[x] Cancel search | Manufacturer: VAUXHALL, Model Year: 2016, Model line: COMBO, Model: VAUXHALL COMBO 2016Pages: 189, PDF Size: 4.47 MB
Page 136 of 189
134Vehicle careVehicle checks
Performing work9 Warning
Only perform engine compartment
checks when the ignition is off.
The cooling fan may start
operating even if the ignition is off.
9 Danger
The ignition system use extremely
high voltage. Do not touch.
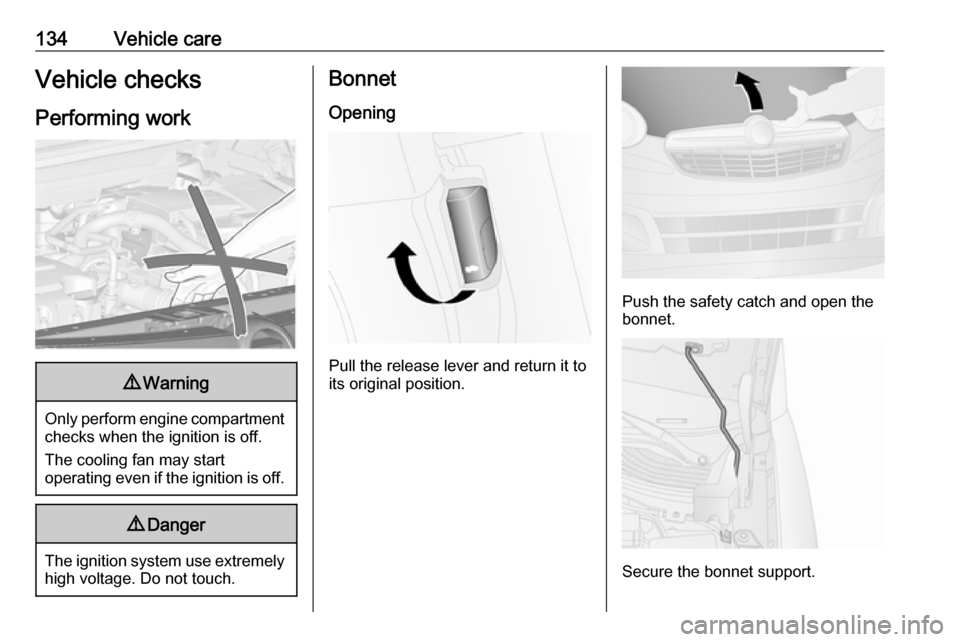
Bonnet
Opening
Pull the release lever and return it to
its original position.
Push the safety catch and open the
bonnet.
Secure the bonnet support.
Page 137 of 189

Vehicle care135If the bonnet is opened during an
Autostop , the engine will be restarted
automatically for safety reasons.
Stop-start system 3 110.
Closing Lower the bonnet and allow it to fall
into the latch from a low height
(approx. 20 cm). Check that the
bonnet is engaged.
Engine oil Check the engine oil level manuallyon a regular basis to prevent damage
to the engine. Ensure that the correct specification of oil is used.
Recommended fluids and lubricants
3 168.
Low engine oil level control indicator
S 3 83.
Check with the vehicle on a level
surface. The engine must be at
operating temperature and switched
off for at least 5 minutes.
Pull out the dipstick, wipe it clean,
insert it to the stop on the handle, pull
out and read the engine oil level.Caution
It is the owner's responsibility to
maintain the proper level of an
appropriate quality oil in the
engine.
Insert dipstick to the stop on the
handle and make half a turn.
When the engine oil level has
dropped to the MIN mark, top up
engine oil.
We recommend the use of the same
grade of engine oil that was used at
last change.
The engine oil level must not exceed
the MAX mark on the dipstick.
Caution
Overfilled engine oil must be
drained or suctioned out.
Capacities 3 178.
Fit the cap on straight and tighten it.
Page 138 of 189
136Vehicle careEngine coolantThe coolant provides freeze
protection down to approx. -28 °C. In
northern countries with very low
temperatures, the factory filled
coolant provides frost protection
down to approx. -37 °C.Caution
Only use approved antifreeze.
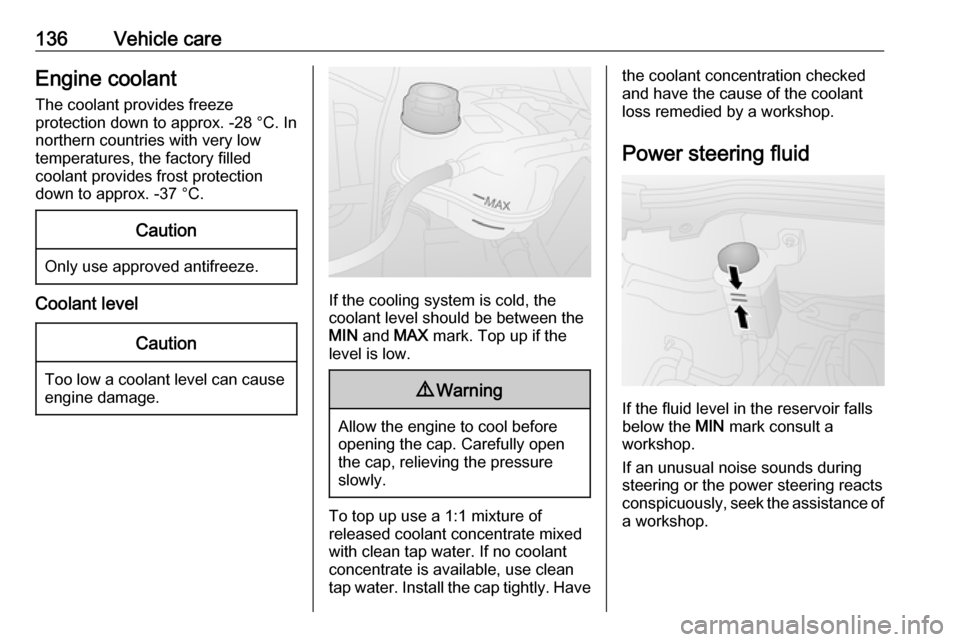
Coolant level
Caution
Too low a coolant level can cause engine damage.
If the cooling system is cold, the
coolant level should be between the
MIN and MAX mark. Top up if the
level is low.
9 Warning
Allow the engine to cool before
opening the cap. Carefully open
the cap, relieving the pressure
slowly.
To top up use a 1:1 mixture of
released coolant concentrate mixed
with clean tap water. If no coolant
concentrate is available, use clean
tap water. Install the cap tightly. Have
the coolant concentration checked
and have the cause of the coolant
loss remedied by a workshop.
Power steering fluid
If the fluid level in the reservoir falls
below the MIN mark consult a
workshop.
If an unusual noise sounds during
steering or the power steering reacts
conspicuously, seek the assistance of
a workshop.
Page 140 of 189
138Vehicle carebattery. Short-distance-driving and
frequent engine starts can discharge
the battery. Avoid the use of
unnecessary electrical consumers.
Batteries do not belong in household
waste. They must be disposed of at
an appropriate recycling collection
point.
Laying up the vehicle for more than
4 weeks can lead to battery
discharge. Disconnect the clamp from the negative terminal of the vehicle
battery.
Ensure the ignition is switched off
before connecting or disconnecting
the vehicle battery.
The anti-theft alarm siren must be
deactivated as follows: Switch the ignition on then off, disconnect the
vehicle's battery within 15 seconds.
Vehicle battery discharge protection
3 100.
Replacing the vehicle battery
Notice
Any deviation from the instructions
given in this paragraph may lead to
a temporary deactivation of the stop-
start system.
In vehicles with stop-start system,
ensure the correct battery is used
when replacing the battery. We
recommend that you have the battery
replaced by a workshop.
Stop-start system 3 110.
Charging the vehicle battery9 Warning
On vehicles with stop-start
system, ensure that the charging potential does not exceed 14.6
volts when using a battery
charger. Otherwise the battery
might be damaged.
Jump starting 3 161.
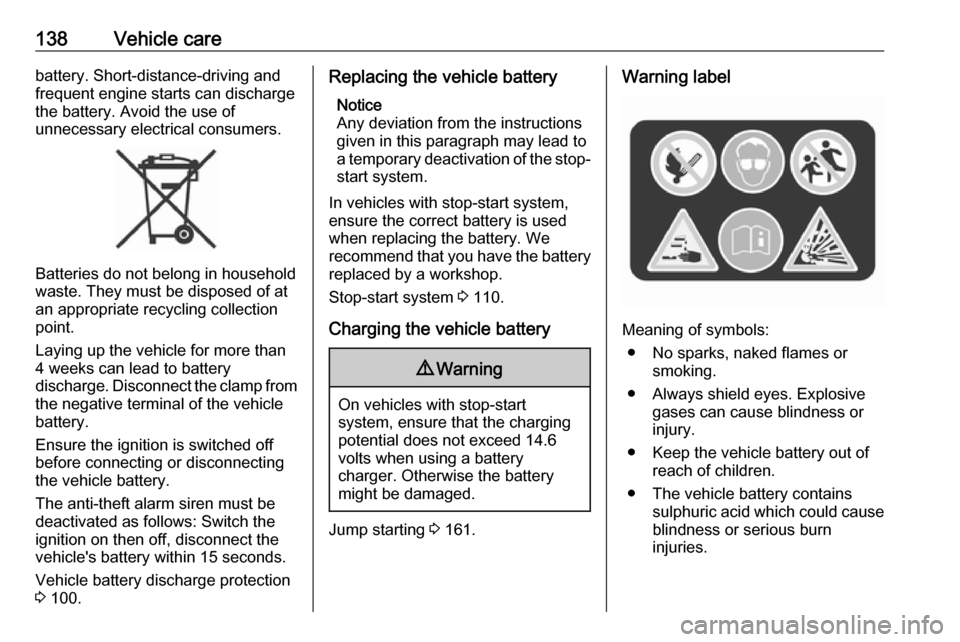
Warning label
Meaning of symbols:
● No sparks, naked flames or smoking.
● Always shield eyes. Explosive gases can cause blindness or
injury.
● Keep the vehicle battery out of reach of children.
● The vehicle battery contains sulphuric acid which could cause
blindness or serious burn
injuries.
Page 142 of 189
140Vehicle careBulb replacement
Switch off the ignition and switch off
the relevant switch or close the doors.
Only hold a new bulb at the base! Do not touch the bulb glass with bare
hands.
Use only the same bulb type for
replacement.
Replace headlight bulbs from within
the engine compartment.
Bulb check After a bulb replacement, switch on
the ignition, operate and check the
lights.Halogen headlights
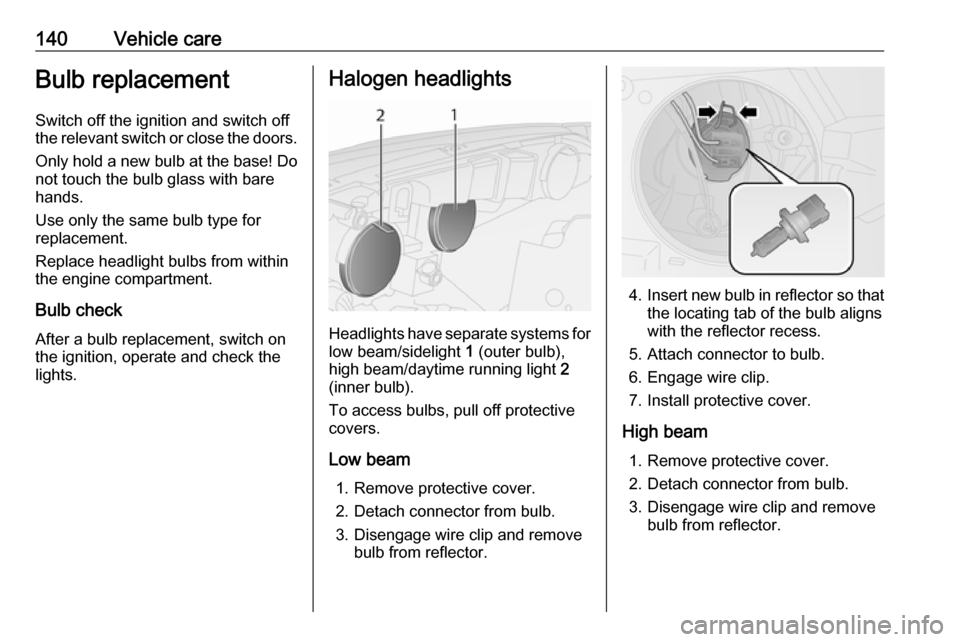
Headlights have separate systems for low beam/sidelight 1 (outer bulb),
high beam/daytime running light 2
(inner bulb).
To access bulbs, pull off protective
covers.
Low beam 1. Remove protective cover.
2. Detach connector from bulb.
3. Disengage wire clip and remove bulb from reflector.
4.Insert new bulb in reflector so that
the locating tab of the bulb aligns
with the reflector recess.
5. Attach connector to bulb.
6. Engage wire clip.
7. Install protective cover.
High beam 1. Remove protective cover.
2. Detach connector from bulb.
3. Disengage wire clip and remove bulb from reflector.
Page 148 of 189
146Vehicle careElectrical systemFuses
Data on the replacement fuse must
match the data on the defective fuse.
There are two fuse boxes in the
vehicle:
● on the right of the engine compartment, next to the battery
● behind a cover on the lower part of the instrument panel, on the
driver's side
Before replacing a fuse, turn off the
respective switch and the ignition.
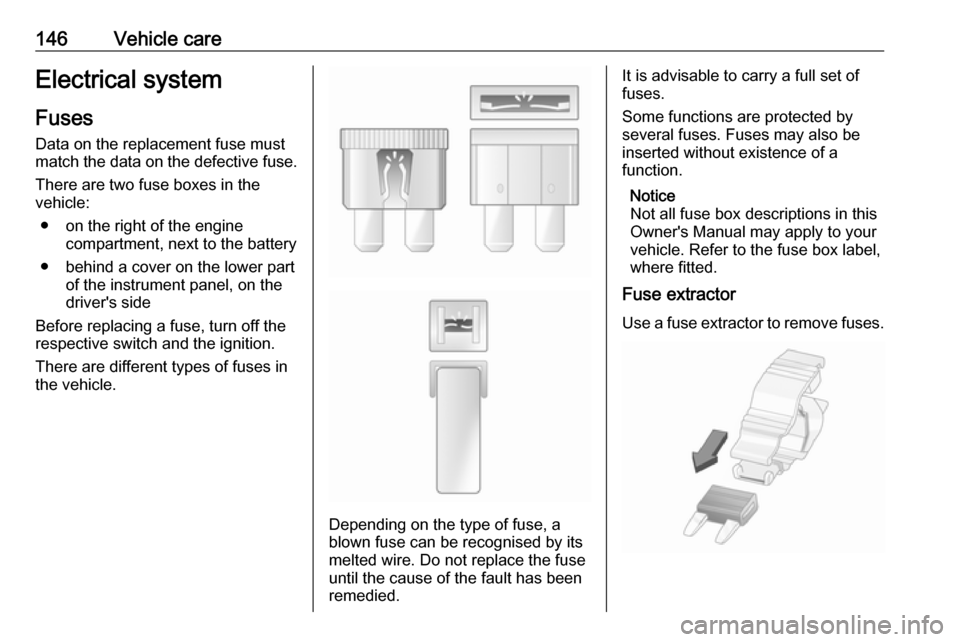
There are different types of fuses in
the vehicle.
Depending on the type of fuse, a
blown fuse can be recognised by its
melted wire. Do not replace the fuse until the cause of the fault has been
remedied.
It is advisable to carry a full set of
fuses.
Some functions are protected by
several fuses. Fuses may also be
inserted without existence of a
function.
Notice
Not all fuse box descriptions in this
Owner's Manual may apply to your
vehicle. Refer to the fuse box label,
where fitted.
Fuse extractor
Use a fuse extractor to remove fuses.
Page 149 of 189
Vehicle care147
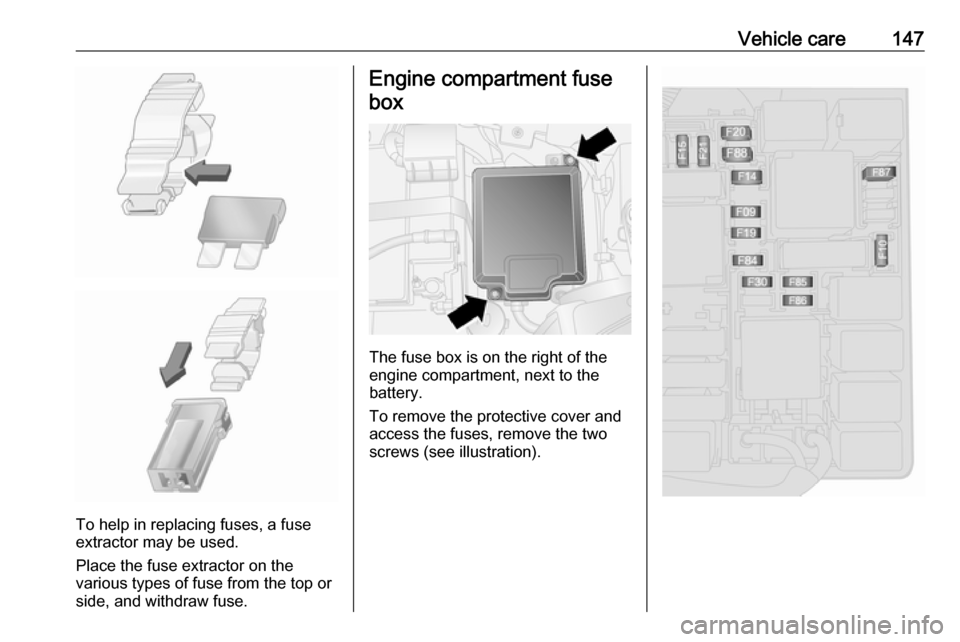
To help in replacing fuses, a fuse
extractor may be used.
Place the fuse extractor on the
various types of fuse from the top or
side, and withdraw fuse.
Engine compartment fuse
box
The fuse box is on the right of the
engine compartment, next to the
battery.
To remove the protective cover and
access the fuses, remove the two
screws (see illustration).
Page 153 of 189
Vehicle care151Tyre pressure
Check the pressure of cold tyres at least every 14 days and before any
long journey. Do not forget the spare
wheel. This also applies to vehicles
with tyre pressure monitoring system.
Unscrew the valve cap.
Tyre pressure 3 179.
The tyre pressure information label
on the door frame (if fitted) indicates the original equipment tyres and the
correspondent tyre pressures.
The tyre pressure data refers to cold
tyres. It applies to summer and winter tyres.
Always inflate the spare tyre to the
pressure specified for full load.
Incorrect tyre pressures will impair
safety, vehicle handling, comfort and
fuel economy and will increase tyre
wear.Tyre pressures differ depending on
various options. For the correct tyre
pressure value, follow the procedure
below:
1. Identify the engine identifier code.
Engine data 3 173.
2. Identify the respective tyre.
The tyre pressure tables show all
possible tyre combinations 3 179.
For the tyres approved for your
vehicle, refer to the EEC Certificate of Conformity provided with your vehicle
or other national registration
documents.
The driver is responsible for correct
adjustment of tyre pressures.9 Warning
If the pressure is too low, this can
result in considerable tyre warm-
up and internal damage, leading to tread separation and even to tyre
blow-out at high speeds.
Tyre pressure monitoring
system
The Tyre Pressure Monitoring
System (TPMS) uses radio and
sensor technology to check tyre
pressure levels.Caution
Tyre pressure monitoring system
warns only about low tyre pressure condition and does not replace
regular tyre maintenance by the
driver.
The TPMS sensors monitor the air pressure in the tyres and transmit tyre
pressure readings to a receiver
located in the vehicle.
All wheels must be equipped with
pressure sensors and the tyres must
have the prescribed pressure.
Tyre pressure chart 3 179.
Page 157 of 189
Vehicle care155
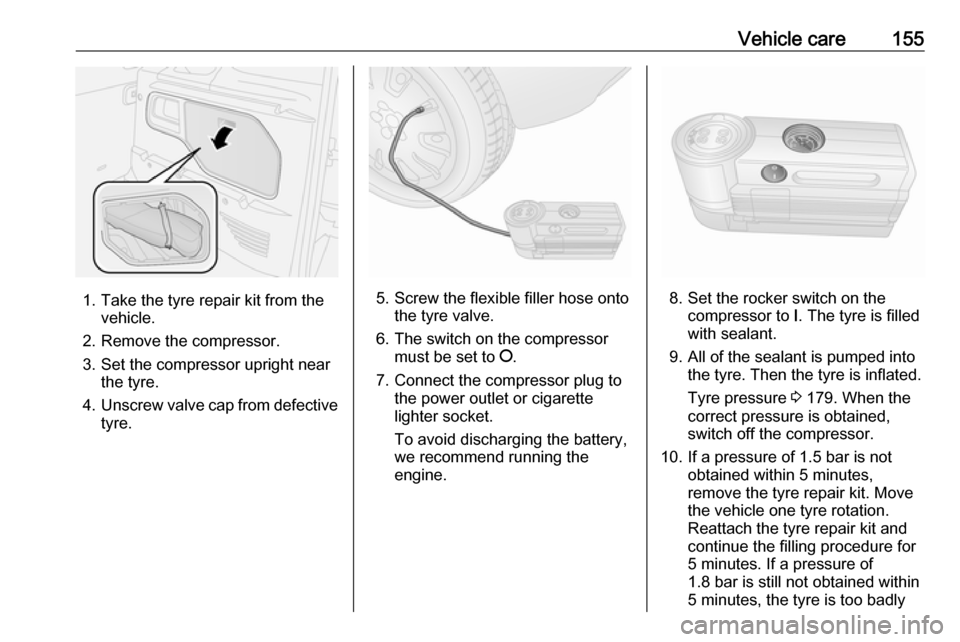
1. Take the tyre repair kit from thevehicle.
2. Remove the compressor.
3. Set the compressor upright near the tyre.
4. Unscrew valve cap from defective
tyre.5. Screw the flexible filler hose onto the tyre valve.
6. The switch on the compressor must be set to J.
7. Connect the compressor plug to the power outlet or cigarette
lighter socket.
To avoid discharging the battery,
we recommend running the
engine.8. Set the rocker switch on the compressor to I. The tyre is filled
with sealant.
9. All of the sealant is pumped into the tyre. Then the tyre is inflated.
Tyre pressure 3 179. When the
correct pressure is obtained,
switch off the compressor.
10. If a pressure of 1.5 bar is not obtained within 5 minutes,
remove the tyre repair kit. Move
the vehicle one tyre rotation.
Reattach the tyre repair kit and
continue the filling procedure for 5 minutes. If a pressure of
1.8 bar is still not obtained within
5 minutes, the tyre is too badly
Page 163 of 189
Vehicle care161Jump starting
Do not start with quick charger.
A vehicle with a discharged battery
can be started using jump leads and
the battery of another vehicle.9 Warning
Be extremely careful when starting
with jump leads. Any deviation
from the following instructions can
lead to injuries or damage caused
by battery explosion or damage to the electrical systems of both
vehicles.
9 Warning
Avoid contact of the battery with
eyes, skin, fabrics and painted
surfaces. The fluid contains
sulphuric acid which can cause
injuries and damage in the event
of direct contact.
● Never expose the battery to naked flames or sparks.
●A discharged battery can already
freeze at a temperature of 0 °C.
Defrost the frozen battery before
connecting jump leads.
● Wear eye protection and protective clothing when
handling a battery.
● Use a booster battery with the same voltage (12 Volts). Its
capacity (Ah) must not be much less than that of the discharged
battery.
● Use jump leads with insulated terminals and a cross section of
at least 16 mm 2
(25 mm 2
for
diesel engines).
● Do not disconnect the discharged
battery from the vehicle.
● Switch off all unnecessary electrical consumers.
● Do not lean over the battery during jump starting.
● Do not allow the terminals of one
lead to touch those of the other
lead.● The vehicles must not come into contact with each other during
the jump starting process.
● Apply the parking brake, transmission in neutral.
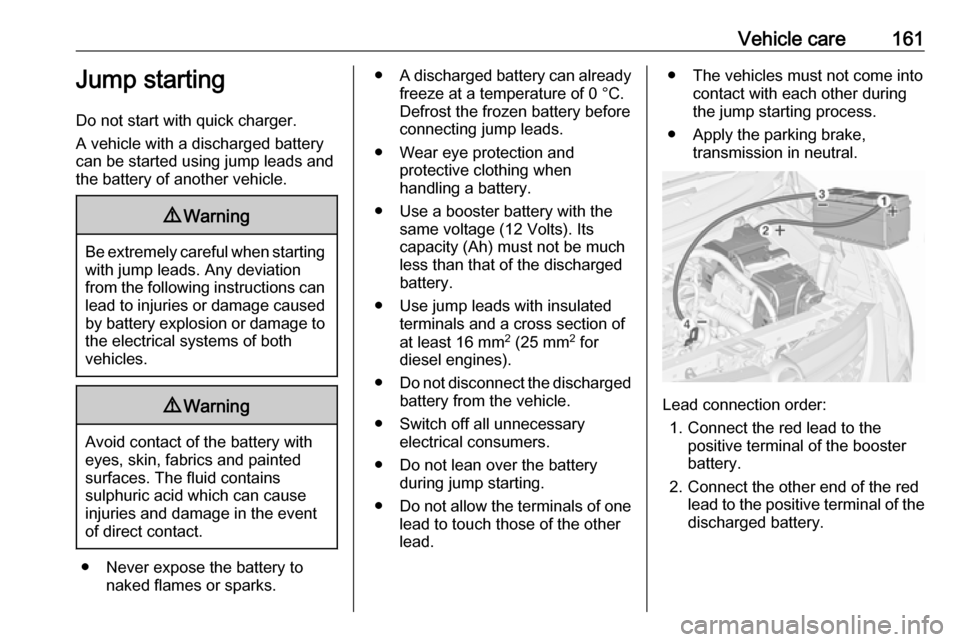
Lead connection order:
1. Connect the red lead to the positive terminal of the booster
battery.
2. Connect the other end of the red lead to the positive terminal of the
discharged battery.