VAUXHALL COMBO 2016 Repair Manual
Manufacturer: VAUXHALL, Model Year: 2016, Model line: COMBO, Model: VAUXHALL COMBO 2016Pages: 189, PDF Size: 4.47 MB
Page 61 of 189

Storage59Closing
Pull the cover towards the rear using
the handle and engage it in the
retainers at the sides.
Opening
Remove load compartment cover
from the retainers at the sides. Hold
the cover and guide it until it is fully
rolled up.
Removing
Open the load compartment cover.
Pull the release lever and lift cover
from retainers.
Installing
Insert either side of the load
compartment cover in the recess, pull
the release lever. Insert the load
compartment cover and engage.
Page 62 of 189

60StorageRear parcel shelf
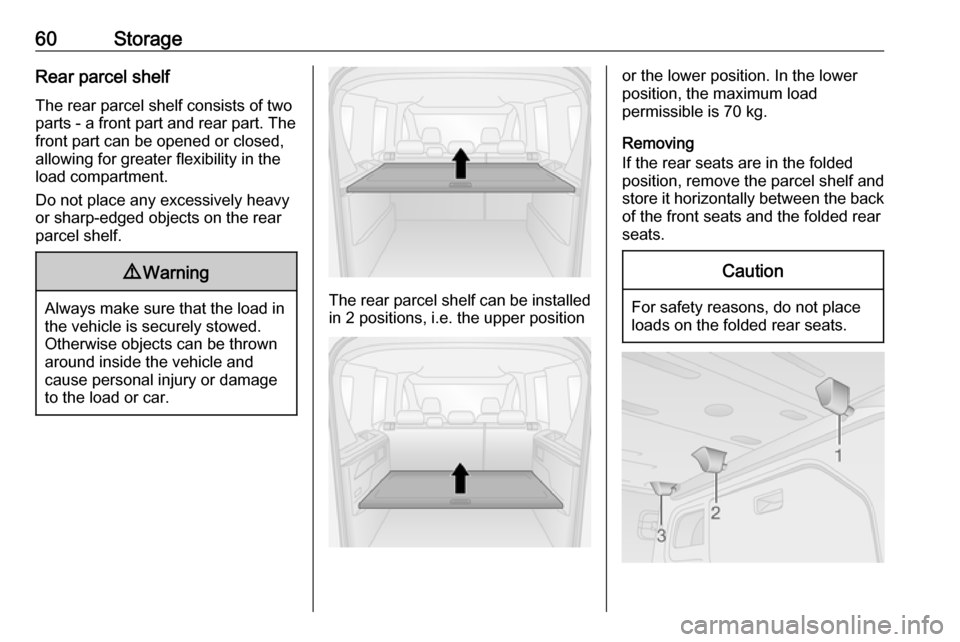
The rear parcel shelf consists of two
parts - a front part and rear part. The front part can be opened or closed,
allowing for greater flexibility in the
load compartment.
Do not place any excessively heavy
or sharp-edged objects on the rear
parcel shelf.9 Warning
Always make sure that the load in
the vehicle is securely stowed.
Otherwise objects can be thrown
around inside the vehicle and
cause personal injury or damage
to the load or car.The rear parcel shelf can be installed
in 2 positions, i.e. the upper position
or the lower position. In the lower
position, the maximum load
permissible is 70 kg.
Removing
If the rear seats are in the folded
position, remove the parcel shelf and
store it horizontally between the back of the front seats and the folded rearseats.Caution
For safety reasons, do not place
loads on the folded rear seats.
Page 63 of 189

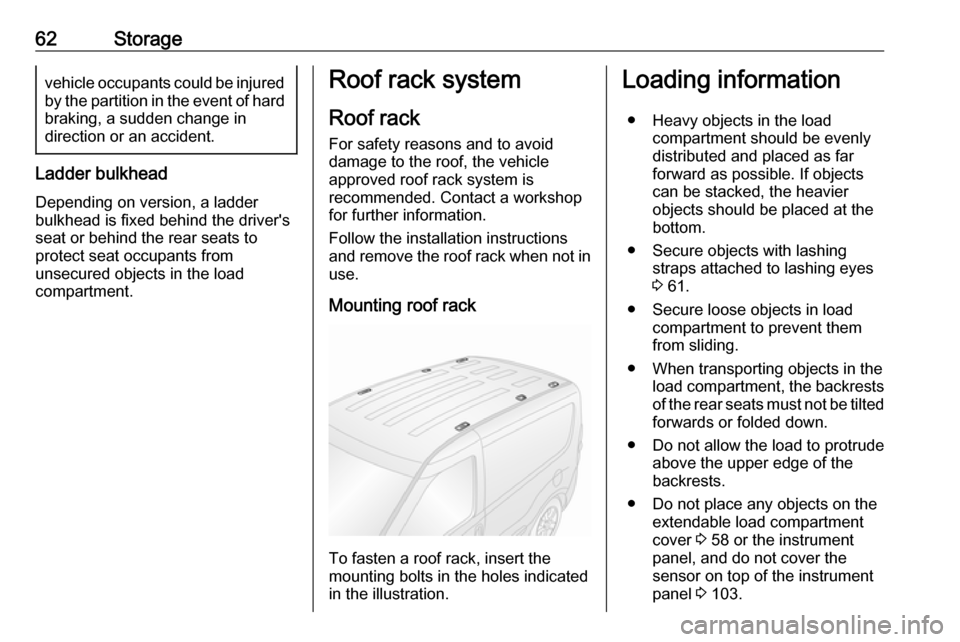
Storage61To remove, lift the front part of the
parcel shelf by releasing it from the
front retainers ( 1) on both sides.
Lift the rear part of the parcel shelf by
releasing it from the rear retainers ( 2
and 3) on both sides.
Installing
Refit the parcel shelf by engaging in
front and rear retainers on both sides.
Lashing eyes VanThe lashing eyes are designed to
secure items against slippage, e.g.
using lashing straps or a luggage net.
Combo Tour
Load compartment grille Depending on version, the load
compartment area can be increased
by opening the load compartment
partition on the front passenger side
(where fitted).
● Fold down the front passenger seat. Refer to "Seat folding"
3 35.
● From inside the load
compartment, release the pin (1)
on the rear of the partition to
unlock, then swing open the
partition door over the folded
front passenger seat.
● Insert the pin in the slot (2) on the
backrest of the folded front
passenger seat to lock in
position.
9 Warning
The load compartment partition
must always be locked in either
position during driving. Otherwise
Page 64 of 189

62Storagevehicle occupants could be injuredby the partition in the event of hardbraking, a sudden change in
direction or an accident.
Ladder bulkhead
Depending on version, a ladder
bulkhead is fixed behind the driver's
seat or behind the rear seats to
protect seat occupants from
unsecured objects in the load
compartment.
Roof rack system
Roof rack
For safety reasons and to avoid damage to the roof, the vehicle
approved roof rack system is
recommended. Contact a workshop
for further information.
Follow the installation instructions
and remove the roof rack when not in
use.
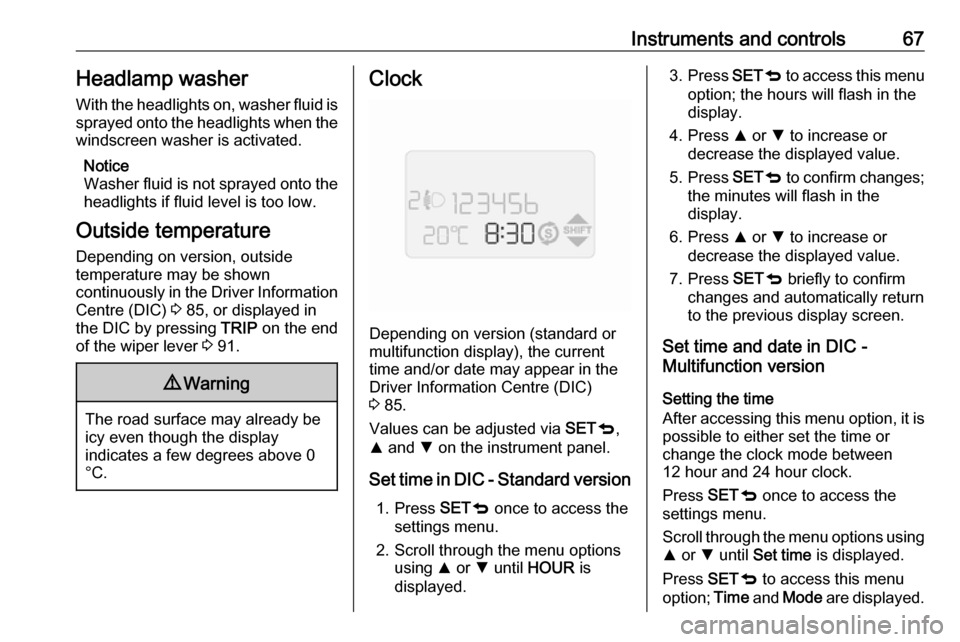
Mounting roof rack
To fasten a roof rack, insert the
mounting bolts in the holes indicated
in the illustration.
Loading information
● Heavy objects in the load compartment should be evenly
distributed and placed as far
forward as possible. If objects
can be stacked, the heavier
objects should be placed at the
bottom.
● Secure objects with lashing straps attached to lashing eyes
3 61.
● Secure loose objects in load compartment to prevent themfrom sliding.
● When transporting objects in the load compartment, the backrestsof the rear seats must not be tiltedforwards or folded down.
● Do not allow the load to protrude above the upper edge of the
backrests.
● Do not place any objects on the extendable load compartment
cover 3 58 or the instrument
panel, and do not cover the
sensor on top of the instrument panel 3 103.
Page 65 of 189

Storage63● The load must not obstruct theoperation of the pedals, parking
brake and gear selector, or
hinder the freedom of movement of the driver. Do not place any
unsecured objects in the interior.
● Do not drive with an open load compartment.9Warning
Always make sure that the load in
the vehicle is securely stowed.
Otherwise objects can be thrown
around inside the vehicle and
cause personal injury or damage
to the load or vehicle.
● The payload is the difference between the permitted gross
vehicle weight (see identification
plate 3 170) and the EC kerb
weight.
To calculate the payload, enter
the data for your vehicle in the
Weights table at the front of this
manual.
The EC kerb weight includes
weights for the driver (68 kg),
luggage (7 kg) and all fluids (tank 90% full).
Optional equipment and
accessories increase the kerb
weight.
● Driving with a roof load increases
the sensitivity of the vehicle to
cross-winds and has a
detrimental effect on vehicle
handling due to the vehicle's
higher centre of gravity.
Distribute the load evenly and secure it properly with retaining
straps. Adjust the tyre pressure
and vehicle speed according to
the load conditions. Check and
retighten the straps frequently.
Do not drive faster than 75 mph.
The permissible roof load (which includes the weight of the roof
rack) is 100 kg. The roof load is
the combined weight of the roof
rack and the load.
Page 66 of 189

64Instruments and controlsInstruments and
controlsControls ....................................... 65
Steering wheel adjustment ........65
Steering wheel controls .............65
Horn ........................................... 65
Windscreen wiper/washer .........66
Rear window wiper/washer .......66
Headlamp washer .....................67
Outside temperature ..................67
Clock ......................................... 67
Power outlets ............................. 68
Cigarette lighter ......................... 69
Ashtrays .................................... 70
Warning lights, gauges and indi‐ cators ........................................... 70
Instrument cluster ......................70
Speedometer ............................. 70
Odometer .................................. 70
Trip odometer ............................ 70
Tachometer ............................... 71
Fuel gauge ................................ 71
Fuel selector .............................. 72
Engine coolant temperature gauge ....................................... 72
Service display .......................... 73Transmission display .................73
Control indicators ......................73
Generic warning ........................76
Turn signal ................................. 77
Seat belt reminder .....................77
Airbag and belt tensioners .........77
Airbag deactivation ....................78
Charging system .......................78
Malfunction indicator light ..........78
Brake system ............................. 79
Brake pad wear ......................... 79
Antilock brake system (ABS) .....79
Transmission ............................. 79
Upshift ....................................... 80
Hill start assist ........................... 80
Ultrasonic parking assist ...........80
Electronic Stability Control ........80
Engine coolant temperature ......81
Preheating ................................. 81
Diesel particle filter ....................81
Tyre pressure monitoring system ...................................... 82
Engine oil pressure ....................82
Change engine oil .....................82
Low engine oil level ...................83
Low fuel ..................................... 83
Drain fuel filter ........................... 83
Immobiliser ................................ 83
Stop-start system ......................84
Exterior light .............................. 84High beam................................. 84
Fog light ..................................... 84
Rear fog light ............................. 84
Cruise control ............................ 84
Door open .................................. 84
Information displays .....................85
Driver Information Centre ..........85
Vehicle messages ........................90
Warning chimes .........................90
Fuel system messages ..............91
Trip computer ............................... 91
Page 67 of 189

Instruments and controls65Controls
Steering wheel adjustment
Unlock lever, adjust steering wheel,
then engage lever and ensure it is
fully locked.
Do not adjust steering wheel unless
vehicle is stationary and steering
wheel lock has been released.
Steering wheel controls
The Infotainment system and a
connected mobile phone can be
operated via the controls on the
steering wheel.
Further information is available in the
Infotainment system manual.
Horn
Press j.
Page 68 of 189

66Instruments and controlsWindscreen wiper/washerWindscreen wiper
Twist lever:
§:offÇ:intermittent wipingÈ:slowÉ:fast
For a single wipe when the
windscreen wiper is off, move the
lever up.
Do not use if the windscreen is frozen.
Switch off in car washes.
Adjustable wiper interval
Wiper lever in position Ç.
The windscreen wiper will
automatically adapt to the speed of
the vehicle.
Windscreen washer
Pull lever briefly, washer fluid is
sprayed onto the windscreen and the wiper wipes a few times.
Pull lever and hold, washer fluid is
sprayed onto the windscreen and wiper wipes until the lever is released.
Washer fluid 3 137, Wiper blade
replacement 3 139.
Rear window wiper/washer
Twist to activate the rear window
wiper.
Push lever. Washer fluid is sprayed
onto the rear window and the wiper
wipes a few times.
Do not use if the rear window is
frozen.
Switch off in car washes.
The rear window wiper comes on
automatically when the windscreen
wiper is switched on and reverse gear
is engaged.
Page 69 of 189

Instruments and controls67Headlamp washer
With the headlights on, washer fluid is sprayed onto the headlights when the
windscreen washer is activated.
Notice
Washer fluid is not sprayed onto the
headlights if fluid level is too low.
Outside temperature Depending on version, outside
temperature may be shown
continuously in the Driver Information Centre (DIC) 3 85, or displayed in
the DIC by pressing TRIP on the end
of the wiper lever 3 91.9 Warning
The road surface may already be
icy even though the display
indicates a few degrees above 0
°C.
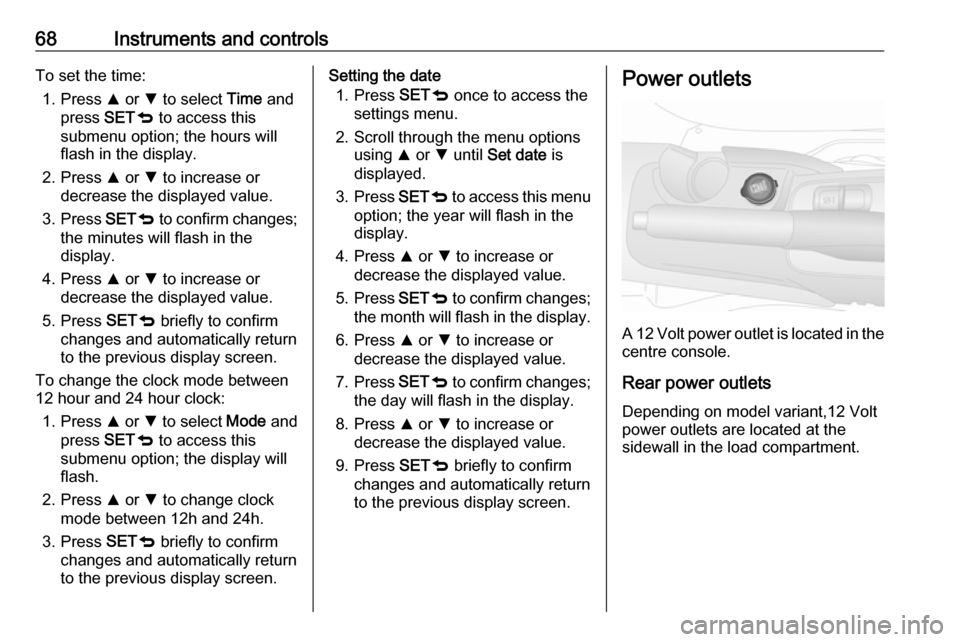
Clock
Depending on version (standard or
multifunction display), the current
time and/or date may appear in the
Driver Information Centre (DIC)
3 85.
Values can be adjusted via SETq,
R and S on the instrument panel.
Set time in DIC - Standard version 1. Press SETq once to access the
settings menu.
2. Scroll through the menu options using R or S until HOUR is
displayed.
3. Press SETq to access this menu
option; the hours will flash in the
display.
4. Press R or S to increase or
decrease the displayed value.
5. Press SETq to confirm changes;
the minutes will flash in the display.
6. Press R or S to increase or
decrease the displayed value.
7. Press SETq briefly to confirm
changes and automatically return to the previous display screen.
Set time and date in DIC -
Multifunction version
Setting the time
After accessing this menu option, it is possible to either set the time or
change the clock mode between
12 hour and 24 hour clock.
Press SETq once to access the
settings menu.
Scroll through the menu options using
R or S until Set time is displayed.
Press SETq to access this menu
option; Time and Mode are displayed.
Page 70 of 189

68Instruments and controlsTo set the time:1. Press R or S to select Time and
press SETq to access this
submenu option; the hours will flash in the display.
2. Press R or S to increase or
decrease the displayed value.
3. Press SETq to confirm changes;
the minutes will flash in the
display.
4. Press R or S to increase or
decrease the displayed value.
5. Press SETq briefly to confirm
changes and automatically return
to the previous display screen.
To change the clock mode between 12 hour and 24 hour clock:
1. Press R or S to select Mode and
press SETq to access this
submenu option; the display will
flash.
2. Press R or S to change clock
mode between 12h and 24h.
3. Press SETq briefly to confirm
changes and automatically return
to the previous display screen.Setting the date
1. Press SETq once to access the
settings menu.
2. Scroll through the menu options using R or S until Set date is
displayed.
3. Press SETq to access this menu
option; the year will flash in the
display.
4. Press R or S to increase or
decrease the displayed value.
5. Press SETq to confirm changes;
the month will flash in the display.
6. Press R or S to increase or
decrease the displayed value.
7. Press SETq to confirm changes;
the day will flash in the display.
8. Press R or S to increase or
decrease the displayed value.
9. Press SETq briefly to confirm
changes and automatically return
to the previous display screen.Power outlets
A 12 Volt power outlet is located in the
centre console.
Rear power outlets Depending on model variant,12 Volt
power outlets are located at the
sidewall in the load compartment.