Temp VAUXHALL COMBO D 2018 Owner's Guide
[x] Cancel search | Manufacturer: VAUXHALL, Model Year: 2018, Model line: COMBO D, Model: VAUXHALL COMBO D 2018Pages: 203, PDF Size: 4.76 MB
Page 130 of 203

128Driving and operatingbe displayed in the Driver Information
Centre 3 90. Seek the assistance of
a workshop to have the fault remedied.
The Hill start assist is not active
during an Autostop.
Stop-start system 3 116.Ride control systems
Traction Control system The Anti-Slip Regulator (ASR) is a
component of the Electronic Stability
Control (ESC).
ASR improves driving stability when
necessary, regardless of the type of
road surface or tyre grip, by
preventing the drive wheels from
spinning.
As soon as the drive wheels starts to spin, engine output is reduced and
the wheel spinning the most is braked
individually. This considerably
improves the driving stability of the
vehicle on slippery road surfaces.
ASR is operational after each engine
start as soon as the control indicator
R extinguishes.
When ASR operates, R flashes.
9 Warning
Do not let this special safety
feature tempt you into taking risks
when driving.
Adapt speed to the road
conditions.
Page 131 of 203

Driving and operating129Deactivation
ASR can be switched off when
spinning of drive wheels is required:
press ASR OFF briefly.
LED in button illuminates and,
depending on version, a
corresponding message, e.g. ASR
disconnect , may also be displayed in
the Driver Information Centre 3 90.
ASR is reactivated by pressing
ASR OFF again.
ASR is also reactivated the next time
the ignition is switched on.
Fault
ASR will switch off automatically in the event of a fault. Control indicator
R will illuminate in the instrument
cluster. Depending on version, a
corresponding message, e.g. ESP
unavailable , may also appear in the
Driver Information Centre 3 90.
Have the cause of the fault remedied by a workshop.
Control indicator R 3 85.
Electronic Stability Control
Electronic Stability Control (ESC)
improves driving stability when
necessary, regardless of the type of
road surface or tyre grip. It also
prevents the drive wheels from
spinning.
As soon as the vehicle starts to
swerve (understeer/oversteer),
engine output is reduced and the wheels are braked individually. This
considerably improves the driving
stability of the vehicle on slippery road
surfaces.
ESC is operational after each engine
start as soon as control indicator R
extinguishes.
When ESC operates, R flashes.
The ESC system is automatically
activated when the vehicle is started
and cannot be deactivated.
9 Warning
Do not let this special safety
feature tempt you into taking risks
when driving.
Adapt speed to the road
conditions.
Page 137 of 203

Driving and operating135Low temperature operationAt temperatures below 0° C, some
diesel products with biodiesel blends
may clog, freeze or gel, which may
affect the fuel supply system. Starting
and engine operation may not work
properly. Make sure to fill winter
grade diesel fuel at ambient
temperatures below 0°C.
Arctic grade diesel fuel can be used
in extreme cold temperatures below
-20° C. Using this fuel grade in warm
or hot climates is not recommended
and may cause engine stalling, poor
starting or damage on the fuel
injection system.
Fuel for natural gas
operation
Use natural gas with a methane
content of approx. 78 - 99%. L-gas
(low) has approx. 78 - 87% and H-gas (high) has approx. 87 - 99%. Biogas
with the same methane content can
also be used if it has been chemically
prepared and desulphurised.
Only use natural gas or biogas that complies with DIN 51624.Liquid gas or LPG must not be used.
Refuelling Fuel filler flap is located at left rearside of vehicle.9 Danger
Before refuelling, switch off engine
and any external heaters with
combustion chambers. Switch off
any mobile phones.
Follow the operating and safety
instructions of the filling station
when refuelling.
9 Danger
Fuel is flammable and explosive.
No smoking. No naked flames or
sparks.
If you can smell fuel in your
vehicle, have the cause of this
remedied immediately by a
workshop.
Caution
In case of misfuelling, do not
switch on ignition.
Release the fuel filler flap by pulling
the flap by hand.
Insert ignition key into fuel filler cap
and turn anticlockwise to unlock.
To remove fuel filler cap, rotate
anticlockwise.
Caution
To avoid damage, do not attempt
to operate the sliding side door
when the fuel filler flap is open.
Notice
Depending on model, the sliding
side door may be fitted with a safety system that prevents the door from
being opened fully when the fuel
filler flap is open.
Sliding side door 3 25.
Page 138 of 203

136Driving and operating
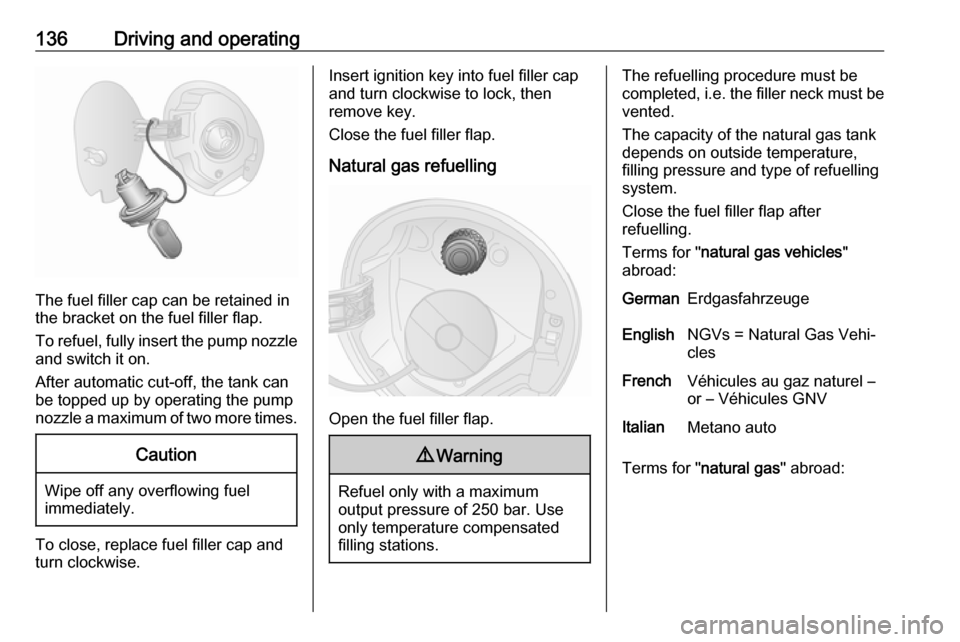
The fuel filler cap can be retained in
the bracket on the fuel filler flap.
To refuel, fully insert the pump nozzle
and switch it on.
After automatic cut-off, the tank can be topped up by operating the pump
nozzle a maximum of two more times.
Caution
Wipe off any overflowing fuel
immediately.
To close, replace fuel filler cap and
turn clockwise.
Insert ignition key into fuel filler cap
and turn clockwise to lock, then
remove key.
Close the fuel filler flap.
Natural gas refuelling
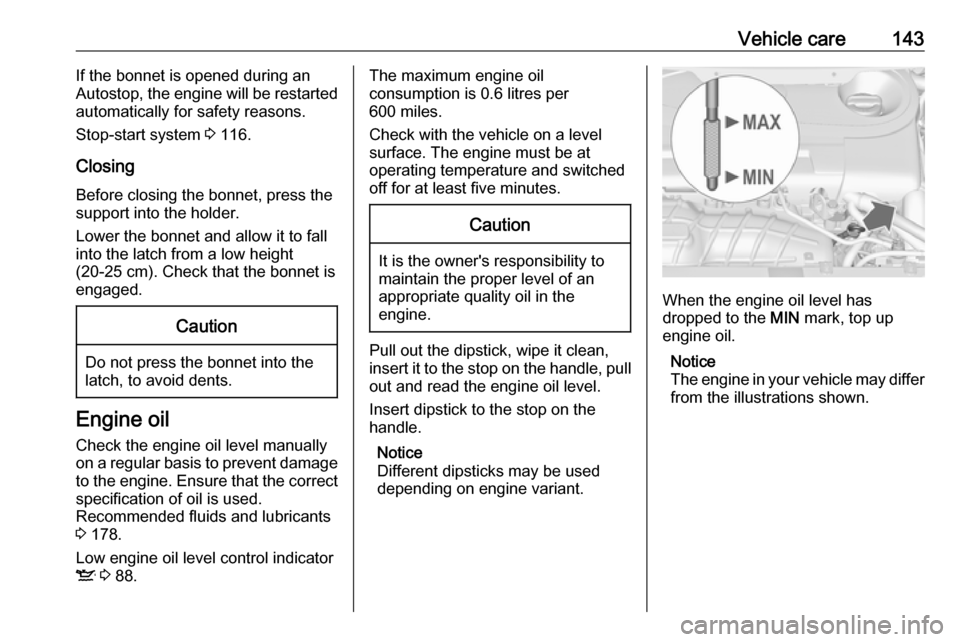
Open the fuel filler flap.
9 Warning
Refuel only with a maximum
output pressure of 250 bar. Use
only temperature compensated
filling stations.
The refuelling procedure must be
completed, i.e. the filler neck must be vented.
The capacity of the natural gas tank
depends on outside temperature,
filling pressure and type of refuelling
system.
Close the fuel filler flap after
refuelling.
Terms for " natural gas vehicles "
abroad:GermanErdgasfahrzeugeEnglishNGVs = Natural Gas Vehi‐
clesFrenchVéhicules au gaz naturel –
or – Véhicules GNVItalianMetano auto
Terms for " natural gas " abroad:
Page 140 of 203

138Driving and operatingTrailer hitch
General information
Only use towing equipment that has
been approved for your vehicle.
Vehicles with natural gas engine may
require special towing equipment.
Entrust retrofitting of towing
equipment to a workshop. It may be
necessary to make changes that
affect the cooling system, heat
shields or other equipment.
Fitting of towing equipment could
cover the opening of the towing eye.
If this is the case use the coupling ball bar for towing. Always keep the
coupling ball bar in the vehicle.
Driving characteristics and towing tips
Before attaching a trailer, lubricate the coupling ball. However, do not do so if a stabiliser, which acts on the
coupling ball, is being used to reduce
snaking movements.For trailers with low driving stability
and caravan trailers with a permitted
gross vehicle weight of more than
1300 kg the use of a stabiliser is
strongly recommended when driving
above 50 mph.
If the trailer starts snaking, drive more slowly, do not attempt to correct the
steering and brake sharply if
necessary.
When driving downhill, drive in the
same gear as if driving uphill and
drive at a similar speed.
Adjust tyre pressure to the value
specified for full load 3 191.
Trailer towing
Trailer loads The permissible trailer loads are
vehicle and engine-dependent
maximum values which must not be
exceeded. The actual trailer load is the difference between the actual
gross weight of the trailer and the
actual coupling socket load with the
trailer coupled.The permissible trailer loads are
specified in the vehicle documents. In general, they are valid for gradients
up to max. 12%.
The permitted trailer load applies up to the specified incline and up to an
altitude of 1000 metres above sea
level. Since engine power decreases
as altitude increases due to the air
becoming thinner, therefore reducing
climbing ability, the permissible gross
train weight also decreases by 10%
for every 1000 metres of additional
altitude. The gross train weight does
not have to be reduced when driving
on roads with slight inclines (less than
8%, e.g. motorways).
The permissible gross train weight
must not be exceeded. This weight is specified on the identification plate
3 181.
Vertical coupling load
The vertical coupling load is the load
exerted by the trailer on the coupling
ball. It can be varied by changing the
weight distribution when loading the
trailer.
Page 145 of 203

Vehicle care143If the bonnet is opened during an
Autostop, the engine will be restarted
automatically for safety reasons.
Stop-start system 3 116.
Closing Before closing the bonnet, press the
support into the holder.
Lower the bonnet and allow it to fall
into the latch from a low height
(20-25 cm). Check that the bonnet is
engaged.Caution
Do not press the bonnet into the
latch, to avoid dents.
Engine oil
Check the engine oil level manually
on a regular basis to prevent damage
to the engine. Ensure that the correct specification of oil is used.
Recommended fluids and lubricants
3 178.
Low engine oil level control indicator
S 3 88.
The maximum engine oil
consumption is 0.6 litres per
600 miles.
Check with the vehicle on a level
surface. The engine must be at
operating temperature and switched
off for at least five minutes.Caution
It is the owner's responsibility to
maintain the proper level of an
appropriate quality oil in the
engine.
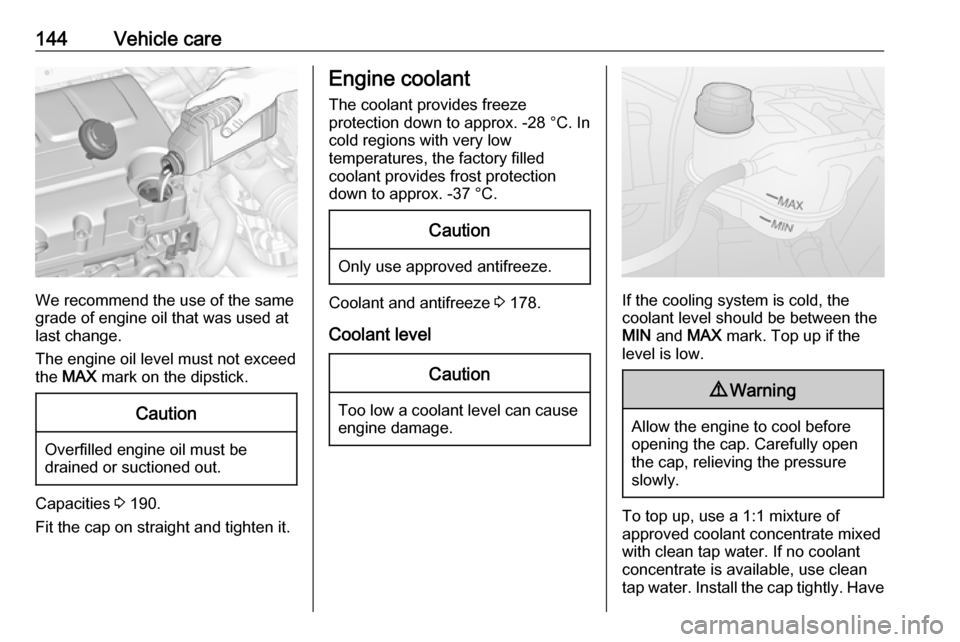
Pull out the dipstick, wipe it clean,
insert it to the stop on the handle, pull
out and read the engine oil level.
Insert dipstick to the stop on the
handle.
Notice
Different dipsticks may be used
depending on engine variant.
When the engine oil level has
dropped to the MIN mark, top up
engine oil.
Notice
The engine in your vehicle may differ from the illustrations shown.
Page 146 of 203

144Vehicle care
We recommend the use of the same
grade of engine oil that was used at
last change.
The engine oil level must not exceed
the MAX mark on the dipstick.
Caution
Overfilled engine oil must be
drained or suctioned out.
Capacities 3 190.
Fit the cap on straight and tighten it.
Engine coolant
The coolant provides freeze
protection down to approx. -28 °C. In
cold regions with very low
temperatures, the factory filled
coolant provides frost protection
down to approx. -37 °C.Caution
Only use approved antifreeze.
Coolant and antifreeze 3 178.
Coolant level
Caution
Too low a coolant level can cause engine damage.
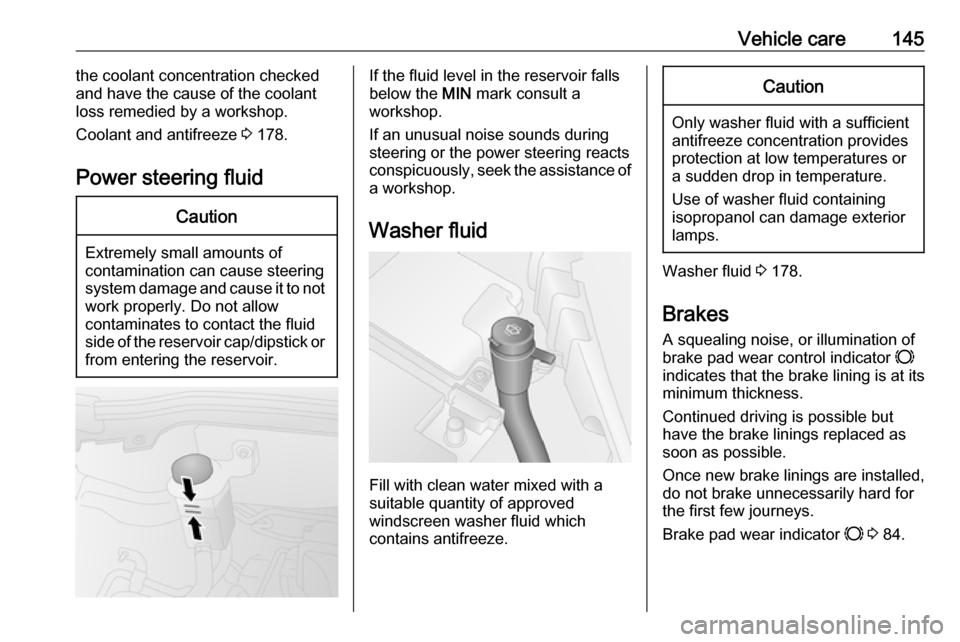
If the cooling system is cold, the
coolant level should be between the
MIN and MAX mark. Top up if the
level is low.
9 Warning
Allow the engine to cool before
opening the cap. Carefully open
the cap, relieving the pressure
slowly.
To top up, use a 1:1 mixture of
approved coolant concentrate mixed
with clean tap water. If no coolant
concentrate is available, use clean
tap water. Install the cap tightly. Have
Page 147 of 203

Vehicle care145the coolant concentration checked
and have the cause of the coolant
loss remedied by a workshop.
Coolant and antifreeze 3 178.
Power steering fluidCaution
Extremely small amounts of
contamination can cause steering
system damage and cause it to not
work properly. Do not allow
contaminates to contact the fluid
side of the reservoir cap/dipstick or
from entering the reservoir.
If the fluid level in the reservoir falls
below the MIN mark consult a
workshop.
If an unusual noise sounds during
steering or the power steering reacts
conspicuously, seek the assistance of
a workshop.
Washer fluid
Fill with clean water mixed with a
suitable quantity of approved
windscreen washer fluid which
contains antifreeze.
Caution
Only washer fluid with a sufficient
antifreeze concentration provides
protection at low temperatures or
a sudden drop in temperature.
Use of washer fluid containing
isopropanol can damage exterior
lamps.
Washer fluid 3 178.
Brakes A squealing noise, or illumination of
brake pad wear control indicator F
indicates that the brake lining is at its
minimum thickness.
Continued driving is possible but
have the brake linings replaced as
soon as possible.
Once new brake linings are installed,
do not brake unnecessarily hard for
the first few journeys.
Brake pad wear indicator F 3 84.
Page 149 of 203

Vehicle care147Replacing the vehicle batteryNotice
Any deviation from the instructions
given in this section may lead to
temporary deactivation or
disturbance of the stop-start system.
In vehicles with stop-start system,
ensure the correct battery is used
when replacing the vehicle battery.
We recommend that you have the
vehicle battery replaced by a
workshop.
Stop-start system 3 116.
Charging the vehicle battery9 Warning
On vehicles with stop-start
system, ensure that the charging potential does not exceed 14.6 V
when using a battery charger.
Otherwise the vehicle battery may be damaged.
9 Danger
Ensure adequate ventilation when
charging the battery. There is a
risk of explosion if gases
generated during charging are
allowed to accumulate!
Jump starting 3 170.
Warning label
Meaning of symbols: ● No sparks, naked flames or smoking.
● Always shield eyes. Explosive gases can cause blindness or
injury.
● Keep the vehicle battery out of reach of children.
● The vehicle battery contains sulphuric acid which could cause
blindness or serious burn
injuries.
● See the Owner's Manual for further information.
● Explosive gas may be present in the vicinity of the vehicle battery.
Page 161 of 203

Vehicle care159Vehicle tools
Tools
Van
The tools and the vehicle jacking
equipment are in the storage area behind the front seat. Pull front handle
and slide seat forwards to access
3 36.
Combi, Combo Tour
The tools and the vehicle jacking
equipment are stored in the load
compartment behind a panel on the
right-hand side.
Wheel changing 3 166.
Spare wheel 3 168.
Wheels and tyres
Tyre condition, wheel condition
Drive over edges slowly and at right
angles if possible. Driving over sharp
edges can cause tyre and wheel
damage. Do not trap tyres on the kerb when parking.
Regularly check the wheels for
damage. Seek the assistance of a
workshop in the event of damage or
unusual wear.
Winter tyres Winter tyres improve driving safety at
temperatures below 7 °C and should
therefore be fitted on all wheels.
Tyres of size 185/65 R15,
195/65 R15 and 195/60 R16 C are
permitted as winter tyres.
In accordance with country-specific
regulations, affix the speed sticker in
the driver's field of view.