automatic transmission VAUXHALL COMBO E 2020 Owner's Guide
[x] Cancel search | Manufacturer: VAUXHALL, Model Year: 2020, Model line: COMBO E, Model: VAUXHALL COMBO E 2020Pages: 279, PDF Size: 28.6 MB
Page 176 of 279

174Driving and operatingResuming stored speed
Move the thumb wheel to RES/+ at a
speed above 19 mph. The adaptive cruise control is activated with the
stored set speed.
Taking over the speed limit from
the traffic sign assistant
The intelligent speed adaptation
informs the driver when a speed limit
is detected by the traffic sign
assistant. The detected speed limit
can be taken over as new set speed
for the adaptive cruise control.
With the camera at the top of the
windscreen, this system detects and
reads speed limit and end of speed
limit signs. The system also takes
account of information on speed limits from the navigation map data.
The function can be activated or
deactivated in the personalisation
menu 3 115.
If the adaptive cruise control is active, the recognised speed limit will be
displayed in the Driver Information
Centre and MEM illuminates.In the Driver Information Centre,
speed limit sign is shown in the
display and MEM illuminates for a few
seconds.
Press MEM on the steering wheel to
request saving of the suggested
speed.
Press MEM on the steering wheel
once more to confirm and save the
new speed setting.
This speed limit is now the new set
speed of the adaptive cruise control.
Adaptive cruise control on
vehicles with automatic
transmission
For vehicles with automatic
transmission, adaptive cruise control
allows to maintain the selected
distance behind a stopping vehicle until a complete stop is reached.
If the system has stopped your
vehicle behind another vehicle, then
the set speed is replaced by a green
control indicator .. This symbol
notifies, that the vehicle is hold
automatically in stop position.If the stopped vehicle ahead was stopped for a longer time and then
begins to move forward, the green
illuminated vehicle ahead control
indicator . will flash and a warning
chime will sound as a reminder to check traffic before resuming.
When the vehicle ahead drives away,
press the accelerator pedal until
19 mph and then move the thumb
wheel to SET- or RES+ to resume
adaptive cruise control. If the vehicle
stays stopped for more than five
minutes or if the driver's door is
opened and the driver's seat belt is
unfastened, then the electric parking
brake is applied automatically to hold
the vehicle. Control indicator m will
illuminate. To release electric parking
brake, press the accelerator pedal.
Electric parking brake 3 160.9 Warning
When the system is deactivated or
cancelled, the vehicle will no
longer be held at a stop and can
Page 178 of 279
176Driving and operating● The electric parking brake isapplied.
● The Traction Control system or Electronic Stability Control is
deactivated or operating.
● The selector lever of automatic transmissions is neither in D nor
in M.
● A fault is detected in the Electronic Stability Control.
Switching off the system
Press C, the adaptive cruise control
mode is disabled and the adaptive
cruise control indication extinguishes
in the Driver Information Centre.
Pressing ß to activate the speed
limiter deactivates adaptive cruise
control.
Switching off the ignition deletes the
stored set speed.
Driver's attention ● Use the adaptive cruise control carefully on bends or mountain
roads, as it can lose the vehicle
ahead and needs time to detect it
again.● Do not use the system on slippery roads as it can create
rapid changes in tyre traction
(wheel spinning), so that you
could lose control of the vehicle.
● Do not use the system when the spare wheel is in use.
System limits9 Warning
The system's automatic brake
force does not permit hard braking and the braking level may not be
sufficient to avoid a collision.
● After a sudden lane change, the system needs a certain time to
detect the next preceding
vehicle. So if a new vehicle is
detected, the system may
accelerate instead of braking.
● The adaptive cruise control does ignore the oncoming traffic.
● The adaptive cruise control does not consider pedestrians and
animals for braking and driving
off.
● The adaptive cruise control considers stopped vehicles only
at low speed.
● Do not use the adaptive cruise control when towing a trailer.
● Do not use the adaptive cruise control on roads with an incline ofmore than 10%.
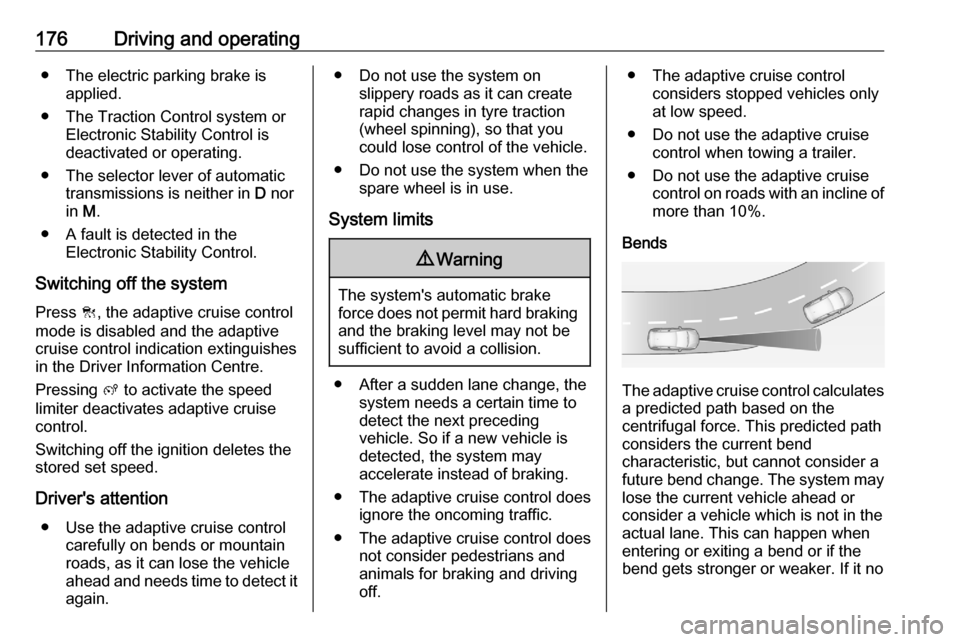
Bends
The adaptive cruise control calculates
a predicted path based on the
centrifugal force. This predicted path
considers the current bend
characteristic, but cannot consider a
future bend change. The system may lose the current vehicle ahead or
consider a vehicle which is not in the
actual lane. This can happen when
entering or exiting a bend or if the
bend gets stronger or weaker. If it no
Page 183 of 279

Driving and operating181Emergency automatic braking may
slow the vehicle to a complete stop to
try to avoid a potential crash.
● Automatic transmission: If the vehicle comes to a complete
stop, automatic braking is
maintained for up to two
seconds. Keep the brake pedal
depressed to prevent the vehicle
from starting off again.
● Manual transmission: If the vehicle comes to a complete
stop, the engine may stall.
Operation of the function may be felt
by a slight vibration in the brake
pedal.9 Warning
Emergency automatic braking is
an emergency crash preparation
feature and is not designed to
avoid crashes. Do not rely on the
system to brake the vehicle.
Emergency automatic braking will
not brake outside of its operating speed range and only responds to
detected vehicles and
pedestrians.
System limitations
In some cases, the active emergencybraking system may provide an
automatic braking in situations that
seem to be unnecessary, for instance
in parking garages, due to traffic signs
in a curve or due to vehicles in
another lane. This is normal
operation, the vehicle does not need
service. Firmly apply the accelerator
pedal to override the automatic
braking if the situation and the
surroundings permit.
In the following cases, active
emergency braking performance is
limited:
● driving on winding or hilly roads
● detecting all vehicles, especially vehicles with a trailer, tractors,
muddy vehicles, etc.
● detecting a vehicle when weather
limits visibility, such as in fog,
rain, or snow
● driving during nighttime
● windscreen damaged or stickeredComplete attention is always requiredwhile driving, and you should be
ready to take action and apply the
brakes and / or steer the vehicle to
avoid crashes.
We recommend to deactivate the
system in the vehicle personalisation
in the following cases:
● when towing a trailer or caravan
● when carrying long objects on roof bars or a roof rack
● when the vehicle is being towed with the engine running
● when a spare wheel is fitted that is smaller than the other wheels
● before using an automatic car wash with the engine running
● before placing the vehicle on a rolling road in a workshop
● if the windscreen has been damaged close to the camera
● if the front bumper has been damaged
● if the brake lights are not working
Page 187 of 279
Driving and operating185
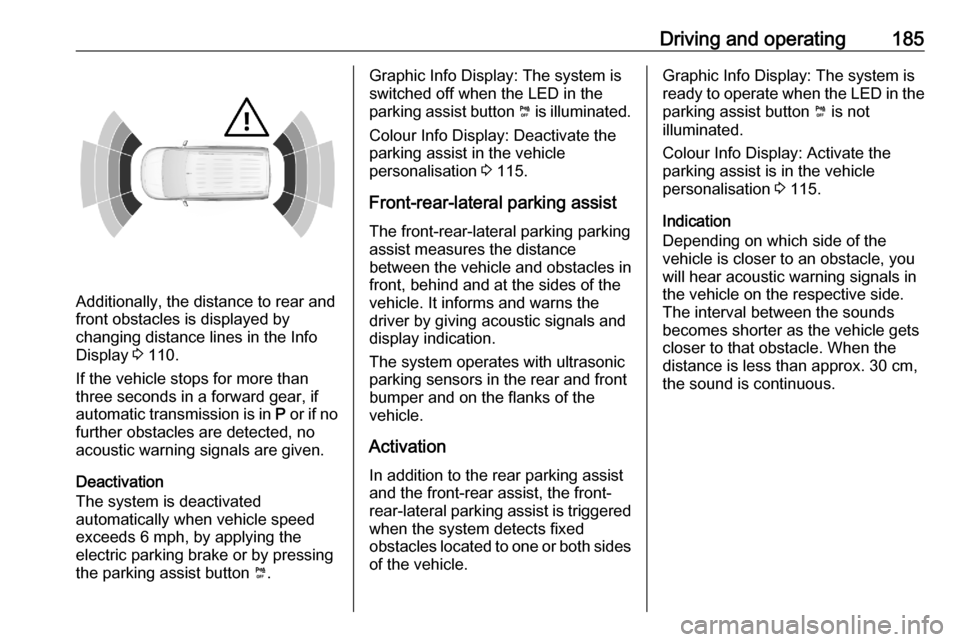
Additionally, the distance to rear and
front obstacles is displayed by
changing distance lines in the Info Display 3 110.
If the vehicle stops for more than
three seconds in a forward gear, if
automatic transmission is in P or if no
further obstacles are detected, no
acoustic warning signals are given.
Deactivation
The system is deactivated
automatically when vehicle speed
exceeds 6 mph, by applying the
electric parking brake or by pressing
the parking assist button ¼.
Graphic Info Display: The system is
switched off when the LED in the
parking assist button ¼ is illuminated.
Colour Info Display: Deactivate the
parking assist in the vehicle
personalisation 3 115.
Front-rear-lateral parking assist The front-rear-lateral parking parking
assist measures the distance
between the vehicle and obstacles in
front, behind and at the sides of the
vehicle. It informs and warns the
driver by giving acoustic signals and
display indication.
The system operates with ultrasonic parking sensors in the rear and front
bumper and on the flanks of the
vehicle.
Activation
In addition to the rear parking assist
and the front-rear assist, the front-
rear-lateral parking assist is triggered
when the system detects fixed
obstacles located to one or both sides
of the vehicle.Graphic Info Display: The system is
ready to operate when the LED in the parking assist button ¼ is not
illuminated.
Colour Info Display: Activate the
parking assist is in the vehicle
personalisation 3 115.
Indication
Depending on which side of the
vehicle is closer to an obstacle, you
will hear acoustic warning signals in
the vehicle on the respective side.
The interval between the sounds
becomes shorter as the vehicle gets closer to that obstacle. When the
distance is less than approx. 30 cm,
the sound is continuous.
Page 231 of 279
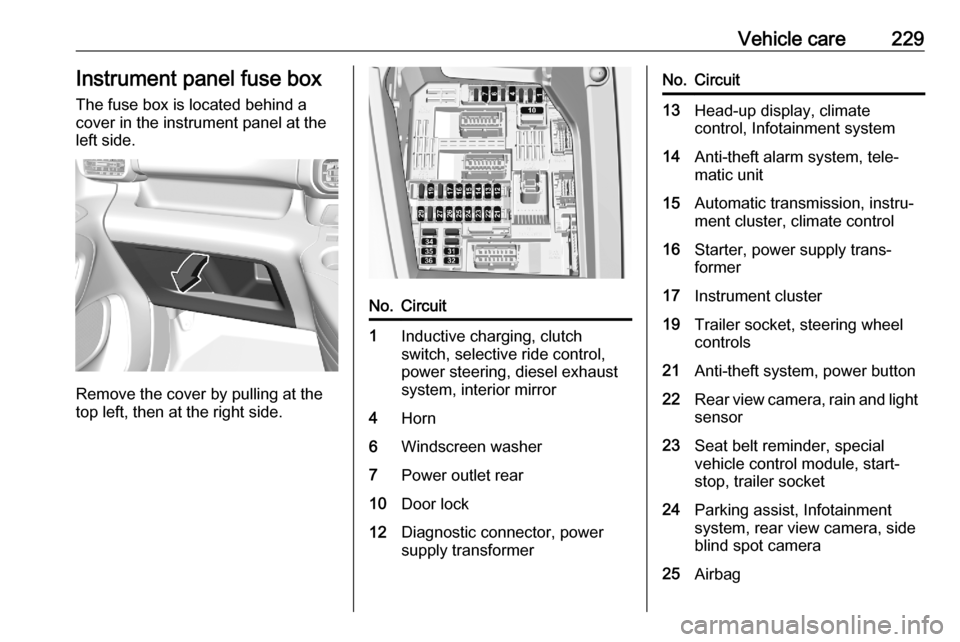
Vehicle care229Instrument panel fuse boxThe fuse box is located behind a
cover in the instrument panel at the
left side.
Remove the cover by pulling at the
top left, then at the right side.
No.Circuit1Inductive charging, clutch
switch, selective ride control,
power steering, diesel exhaust
system, interior mirror4Horn6Windscreen washer7Power outlet rear10Door lock12Diagnostic connector, power
supply transformerNo.Circuit13Head-up display, climate
control, Infotainment system14Anti-theft alarm system, tele‐
matic unit15Automatic transmission, instru‐
ment cluster, climate control16Starter, power supply trans‐
former17Instrument cluster19Trailer socket, steering wheel
controls21Anti-theft system, power button22Rear view camera, rain and light sensor23Seat belt reminder, special
vehicle control module, start-
stop, trailer socket24Parking assist, Infotainment
system, rear view camera, side
blind spot camera25Airbag
Page 246 of 279
244Vehicle care● A discharged vehicle battery canalready freeze at a temperature
of 0 °C. Defrost the frozen battery before connecting jump leads.
● Wear eye protection and protective clothing when
handling a battery.
● Use a booster battery with the same voltage (12 V). Its capacity
(Ah) must not be much less than
that of the discharged vehicle
battery.
● Use jump leads with insulated terminals and a cross section of
at least 16 mm 2
(25 mm 2
for
diesel engines).
● Do not disconnect the discharged
vehicle battery from the vehicle.
● Switch off all unnecessary electrical consumers.
● Do not lean over the vehicle battery during jump starting.
● Do not allow the terminals of one
lead to touch those of the other
lead.● The vehicles must not come into contact with each other during
the jump starting process.
● Apply the parking brake, transmission in neutral,
automatic transmission in P.
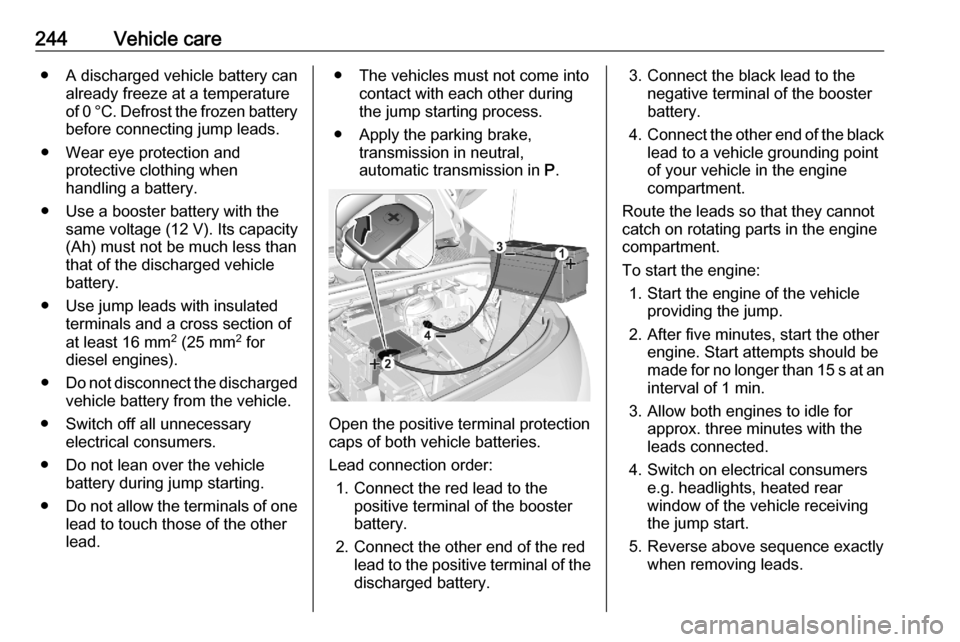
Open the positive terminal protection
caps of both vehicle batteries.
Lead connection order: 1. Connect the red lead to the positive terminal of the booster
battery.
2. Connect the other end of the red lead to the positive terminal of the
discharged battery.
3. Connect the black lead to the negative terminal of the boosterbattery.
4. Connect the other end of the black
lead to a vehicle grounding point
of your vehicle in the engine
compartment.
Route the leads so that they cannot
catch on rotating parts in the engine
compartment.
To start the engine: 1. Start the engine of the vehicle providing the jump.
2. After five minutes, start the other engine. Start attempts should be
made for no longer than 15 s at an interval of 1 min.
3. Allow both engines to idle for approx. three minutes with the
leads connected.
4. Switch on electrical consumers e.g. headlights, heated rear
window of the vehicle receiving
the jump start.
5. Reverse above sequence exactly when removing leads.
Page 248 of 279
246Vehicle careCaution
Drive slowly. Do not drive jerkily.
Excessive tractive force can
damage the vehicle.
When the engine is not running,
considerably more force is needed to
brake and steer.
To prevent the entry of exhaust gases from the towing vehicle, switch on the
air recirculation and close the
windows.
Vehicles with automatic transmission: The vehicle must be towed facing
forwards, not faster than 50 mph nor further than 60 miles. In all other
cases and when the transmission is
defective, the front axle must be
raised off the ground.
Seek the assistance of a workshop. After towing, unscrew the towing eye.
Insert cap with the flange into the
recess and fix cap by pushing.
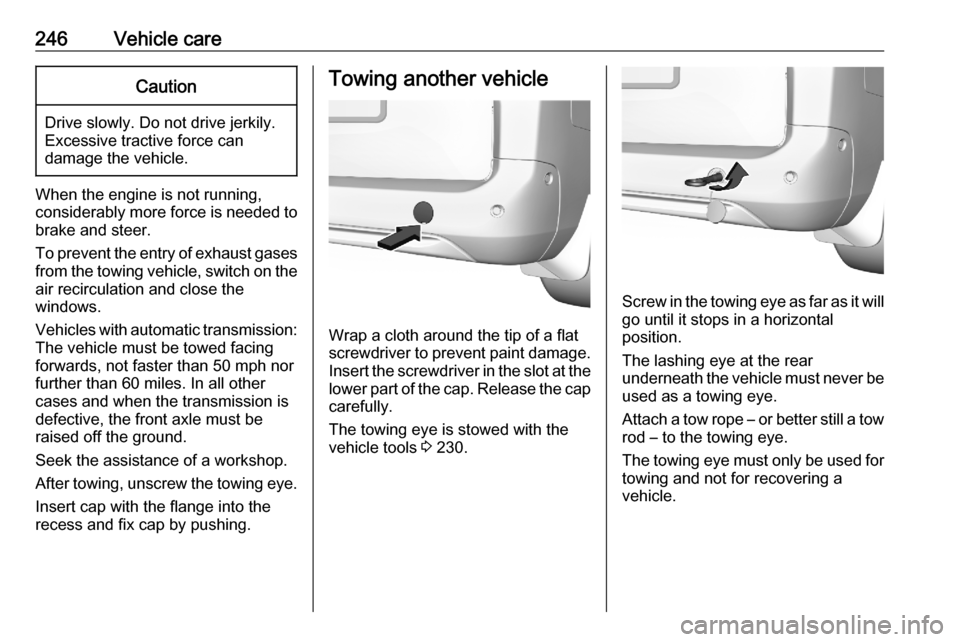
Towing another vehicle
Wrap a cloth around the tip of a flat
screwdriver to prevent paint damage. Insert the screwdriver in the slot at the
lower part of the cap. Release the cap carefully.
The towing eye is stowed with the
vehicle tools 3 230.
Screw in the towing eye as far as it will
go until it stops in a horizontal
position.
The lashing eye at the rear
underneath the vehicle must never be used as a towing eye.
Attach a tow rope – or better still a tow
rod – to the towing eye.
The towing eye must only be used for
towing and not for recovering a
vehicle.
Page 274 of 279

272IndexAAccessories and vehicle modifications .......................... 211
Active emergency braking ..107, 179
Adaptive cruise control .......107, 171
AdBlue ................................ 105, 152
Adjustable air vents ...................140
Advanced parking assist ............187
Airbag and belt tensioners .........101
Airbag deactivation ..............62, 102
Airbag label................................... 57 Airbag system .............................. 57
Air conditioning regular operation ................................ 141
Air conditioning system .............. 131
Air intake .................................... 141
Air vents...................................... 140
Antilock brake system ................ 159
Antilock brake system (ABS) .....104
Anti-theft alarm system ................34
Anti-theft locking system .............. 34 Appearance care ........................247
Armrest ......................................... 49
Ashtrays ....................................... 96
Automatic anti-dazzle ..................39
Automatic crash notification (ACN) ...................................... 119
Automatic light control ...............122
Automatic locking ........................27Automatic transmission .............155
Autostop ............................. 106, 147
B Battery discharge protection ......129
BlueInjection ............................... 152
Bonnet ....................................... 213
Brake and clutch system ...........103
Brake assist ............................... 162
Brake fluid .......................... 216, 254
Brakes ............................... 159, 216
Breakdown.................................. 245
Bulb replacement ....................... 220
C Capacities .................................. 263
Cargo management system ........78
Catalytic converter .....................151
Central locking system ................24
Centre console lighting ..............128
Centre console storage ...............73
Changing tyre and wheel size ...234
Charging system ........................ 102
Child locks ................................... 27
Child restraint installation locations ................................... 66
Child restraints.............................. 63
Child restraint systems ................63
Child surveillance mirror ...............39
Cigarette lighter ........................... 95
Climate control ............................. 15