air con VAUXHALL COMBO E 2020 Service Manual
[x] Cancel search | Manufacturer: VAUXHALL, Model Year: 2020, Model line: COMBO E, Model: VAUXHALL COMBO E 2020Pages: 279, PDF Size: 28.6 MB
Page 238 of 279

236Vehicle care
The tyre repair kit is located in the
storage compartment underneath the passenger front seat.
1. Remove the sealant bottle and the
compressor.
2. Pull speed limit label from sealant
bottle and place it in driver's
visible area.3. Remove the electrical connection cable and air hose from the
storage compartments on the
underside of the compressor.
4. Screw the compressor air hose to
the connection on the sealant
bottle.
5. Fit the sealant bottle into the bracket on the compressor.
Set the compressor near the tyre
in such a way that the sealant
bottle is upright.
6. Unscrew valve cap from defective
tyre.
7. Screw the filler hose to the tyre valve.
8. The switch on the compressor must be set to J.
Page 239 of 279

Vehicle care2379. Connect the compressor plug tothe power outlet or cigarette
lighter socket.
The tyre repair kit may only be
plugged in to the front 12 V power outlet, in order to work properly.
To avoid discharging the battery,
we recommend running the
engine.
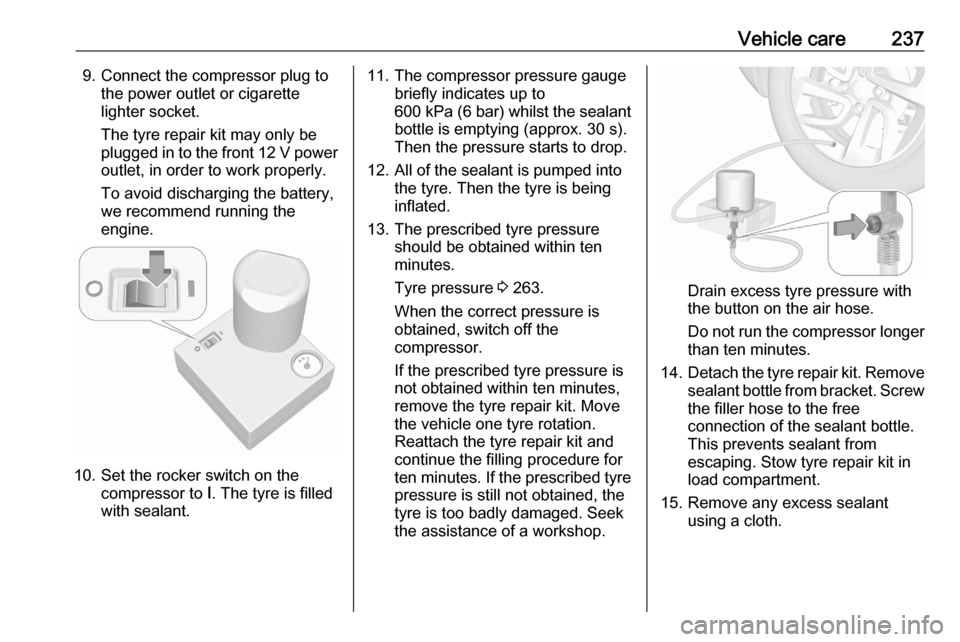
10. Set the rocker switch on the compressor to I. The tyre is filled
with sealant.
11. The compressor pressure gauge briefly indicates up to
600 kPa (6 bar) whilst the sealant
bottle is emptying (approx. 30 s).
Then the pressure starts to drop.
12. All of the sealant is pumped into the tyre. Then the tyre is being
inflated.
13. The prescribed tyre pressure should be obtained within ten
minutes.
Tyre pressure 3 263.
When the correct pressure is
obtained, switch off the
compressor.
If the prescribed tyre pressure is
not obtained within ten minutes,
remove the tyre repair kit. Move
the vehicle one tyre rotation.
Reattach the tyre repair kit and
continue the filling procedure for ten minutes. If the prescribed tyre
pressure is still not obtained, the
tyre is too badly damaged. Seek
the assistance of a workshop.
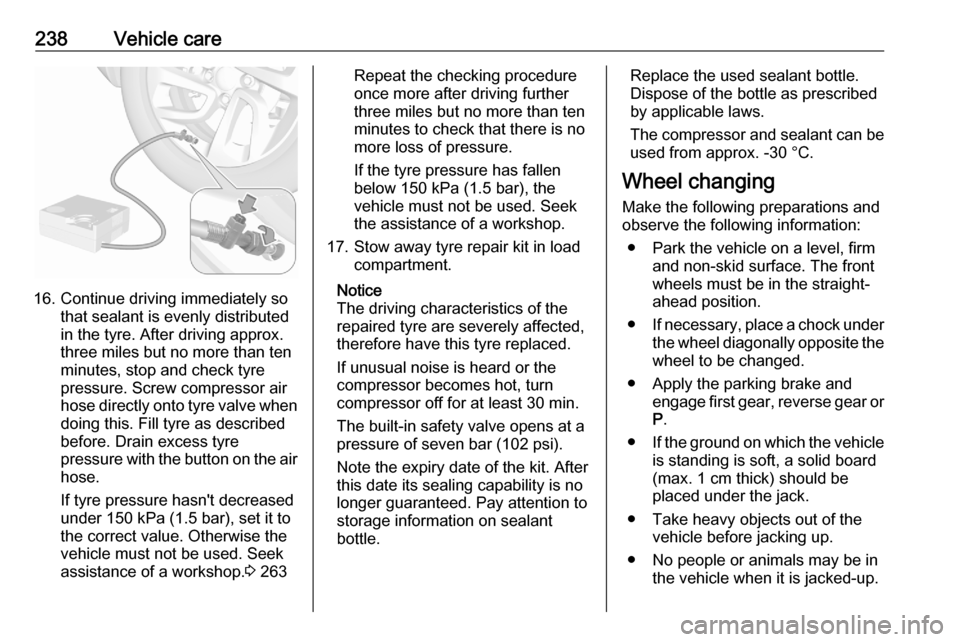
Drain excess tyre pressure with
the button on the air hose.
Do not run the compressor longer than ten minutes.
14. Detach the tyre repair kit. Remove
sealant bottle from bracket. Screw the filler hose to the free
connection of the sealant bottle.
This prevents sealant from
escaping. Stow tyre repair kit in
load compartment.
15. Remove any excess sealant using a cloth.
Page 240 of 279

238Vehicle care
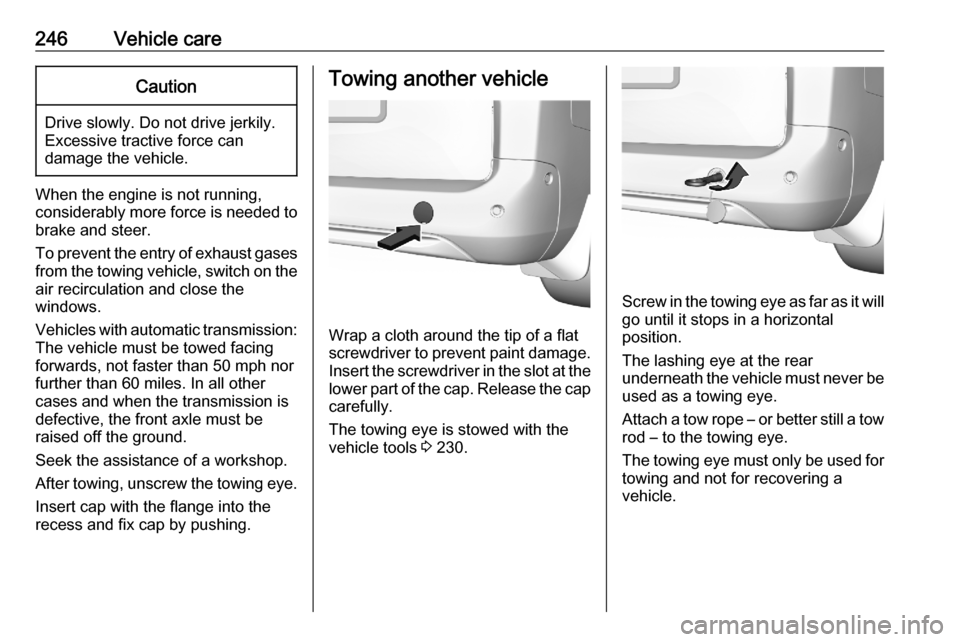
16. Continue driving immediately sothat sealant is evenly distributed
in the tyre. After driving approx.
three miles but no more than ten
minutes, stop and check tyre
pressure. Screw compressor air
hose directly onto tyre valve when
doing this. Fill tyre as described
before. Drain excess tyre
pressure with the button on the air
hose.
If tyre pressure hasn't decreased
under 150 kPa (1.5 bar), set it to
the correct value. Otherwise the
vehicle must not be used. Seek
assistance of a workshop. 3 263
Repeat the checking procedure
once more after driving further
three miles but no more than ten
minutes to check that there is no
more loss of pressure.
If the tyre pressure has fallen
below 150 kPa (1.5 bar), the
vehicle must not be used. Seek
the assistance of a workshop.
17. Stow away tyre repair kit in load compartment.
Notice
The driving characteristics of the repaired tyre are severely affected,
therefore have this tyre replaced.
If unusual noise is heard or the
compressor becomes hot, turn
compressor off for at least 30 min.
The built-in safety valve opens at a
pressure of seven bar (102 psi).
Note the expiry date of the kit. After
this date its sealing capability is no
longer guaranteed. Pay attention to
storage information on sealant
bottle.Replace the used sealant bottle. Dispose of the bottle as prescribed
by applicable laws.
The compressor and sealant can be used from approx. -30 °C.
Wheel changing
Make the following preparations and
observe the following information:
● Park the vehicle on a level, firm and non-skid surface. The front
wheels must be in the straight- ahead position.
● If necessary, place a chock under
the wheel diagonally opposite the
wheel to be changed.
● Apply the parking brake and engage first gear, reverse gear orP .
● If the ground on which the vehicle
is standing is soft, a solid board
(max. 1 cm thick) should be
placed under the jack.
● Take heavy objects out of the vehicle before jacking up.
● No people or animals may be in the vehicle when it is jacked-up.
Page 248 of 279

246Vehicle careCaution
Drive slowly. Do not drive jerkily.
Excessive tractive force can
damage the vehicle.
When the engine is not running,
considerably more force is needed to
brake and steer.
To prevent the entry of exhaust gases from the towing vehicle, switch on the
air recirculation and close the
windows.
Vehicles with automatic transmission: The vehicle must be towed facing
forwards, not faster than 50 mph nor further than 60 miles. In all other
cases and when the transmission is
defective, the front axle must be
raised off the ground.
Seek the assistance of a workshop. After towing, unscrew the towing eye.
Insert cap with the flange into the
recess and fix cap by pushing.
Towing another vehicle
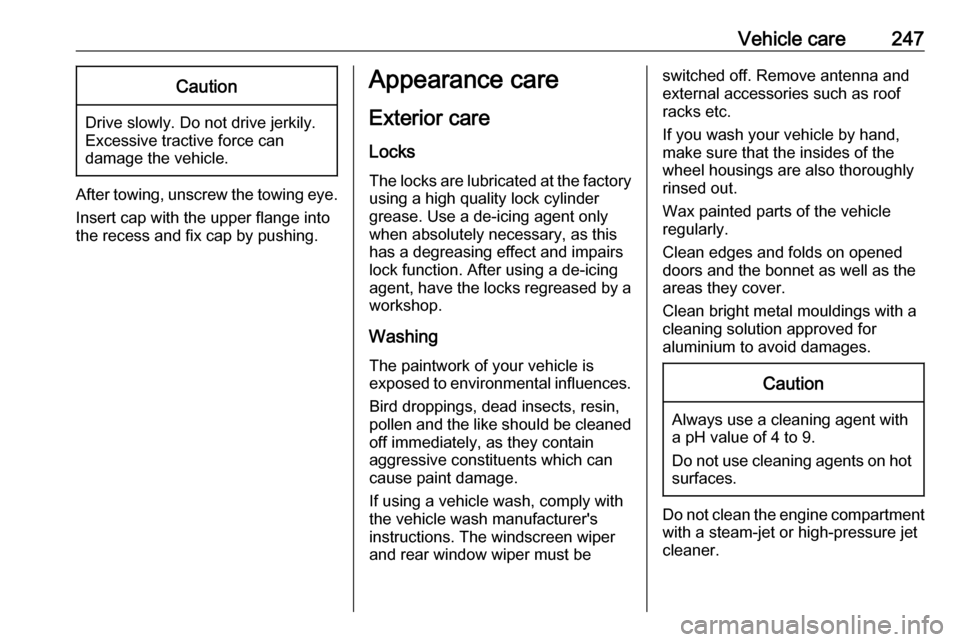
Wrap a cloth around the tip of a flat
screwdriver to prevent paint damage. Insert the screwdriver in the slot at the
lower part of the cap. Release the cap carefully.
The towing eye is stowed with the
vehicle tools 3 230.
Screw in the towing eye as far as it will
go until it stops in a horizontal
position.
The lashing eye at the rear
underneath the vehicle must never be used as a towing eye.
Attach a tow rope – or better still a tow
rod – to the towing eye.
The towing eye must only be used for
towing and not for recovering a
vehicle.
Page 249 of 279

Vehicle care247Caution
Drive slowly. Do not drive jerkily.
Excessive tractive force can
damage the vehicle.
After towing, unscrew the towing eye.
Insert cap with the upper flange into
the recess and fix cap by pushing.
Appearance care
Exterior care LocksThe locks are lubricated at the factoryusing a high quality lock cylinder
grease. Use a de-icing agent only
when absolutely necessary, as this
has a degreasing effect and impairs
lock function. After using a de-icing
agent, have the locks regreased by a
workshop.
WashingThe paintwork of your vehicle is
exposed to environmental influences.
Bird droppings, dead insects, resin,
pollen and the like should be cleaned
off immediately, as they contain
aggressive constituents which can
cause paint damage.
If using a vehicle wash, comply with
the vehicle wash manufacturer's
instructions. The windscreen wiper and rear window wiper must beswitched off. Remove antenna and
external accessories such as roof
racks etc.
If you wash your vehicle by hand,
make sure that the insides of the
wheel housings are also thoroughly
rinsed out.
Wax painted parts of the vehicle regularly.
Clean edges and folds on opened
doors and the bonnet as well as the
areas they cover.
Clean bright metal mouldings with a
cleaning solution approved for
aluminium to avoid damages.Caution
Always use a cleaning agent with
a pH value of 4 to 9.
Do not use cleaning agents on hot surfaces.
Do not clean the engine compartment
with a steam-jet or high-pressure jet
cleaner.
Page 250 of 279

248Vehicle careThoroughly rinse and leather-off the
vehicle. Rinse leather frequently. Use
separate leathers for painted and
glass surfaces: remnants of wax on
the windows will impair vision.
Have the door hinges of all doors
greased by a workshop.
Exterior lights
Headlight and other light covers are
made of plastic. Do not use any
abrasive or caustic agents, do not use
an ice scraper, and do not clean them
dry.
Polishing and waxing
Polishing is necessary only if the paint
has become dull or if solid deposits
have become attached to it.
Plastic body parts must not be treated with wax or polishing agents.
Windows and wiper blades
Switch off wipers before handling in
their areas.
Use a soft lint-free cloth or chamois leather together with window cleaner
and insect remover.When cleaning the rear window from
inside, always wipe in parallel to the
heating element to prevent damage.
For mechanical removal of ice, use a
sharp-edged ice scraper. Press the
scraper firmly against the glass so
that no dirt can get under it and
scratch the glass.
Clean smearing wiper blades with a
soft cloth and window cleaner. Also
make sure to remove any residues
such as wax, insect residues and
similar from the window.
Ice residues, pollution and continuous wiping on dry windows will damage or
even destroy the wiper blades.
Glass panel
Use a soft lint-free cloth or chamois
leather together with window cleaner
to clean the glass panel.
Wheels and tyres
Do not use high-pressure jet
cleaners.
Clean rims with a pH-neutral wheel
cleaner.Rims are painted and can be treated
with the same agents as the body.
Paintwork damageRectify minor paintwork damage witha touch-up pen before rust forms.
Have more extensive damage or rust
areas repaired by a workshop.
Underbody Some areas of the vehicle underbody
have a PVC undercoating while other
critical areas have a durable
protective wax coating.
After the underbody is washed, check the underbody and have it waxed if
necessary.
Bitumen / rubber materials could
damage the PVC coating. Have
underbody work carried out by a
workshop.
Before and after winter, wash the
underbody and have the protective
wax coating checked.
Page 253 of 279

Service and maintenance251Service and
maintenanceGeneral information ...................251
Service information ..................251
Recommended fluids, lubricants and parts .................................... 254
Recommended fluids and lubricants ................................ 254General information
Service information In order to ensure economical and
safe vehicle operation and to
maintain the value of your vehicle, it
is of vital importance that all
maintenance work is carried out at the proper intervals as specified.
The detailed, up-to-date service
schedule for your vehicle is available
at the workshop.
Severe operating conditions exist if one or more of the following
circumstances occur frequently: Cold
starting, stop and go operation, e.g.
for taxis and police vehicles, trailer
operation, mountain driving, driving
on poor and sandy road surfaces,
increased air pollution, presence of
airborne sand and high dust content,
driving at high altitude and large
variations of temperature.
Under these severe operating
conditions, certain service work may
be required more frequently than the
regular service interval indicated inthe service display. Contact a
workshop for customised service
schedules.
Service display 3 99.
Page 271 of 279

Customer information269Depending on technical equipment
level, the data stored is as follows:
● system component operating states (e.g. fill level, tyre
pressure, battery status)
● faults and defects in important system components (e.g. lights,
brakes)
● system reactions in special driving situations (e.g. triggeringof an airbag, actuation of the
stability control systems)
● information on events damaging the vehicle
● for electric vehicles the amount of
charge in the high-voltage
battery, estimated range
In special cases (e.g. if the vehicle
has detected a malfunction), it may be
necessary to save data that would
otherwise just be volatile.
When you use services (e.g. repairs,
maintenance), the operating data
saved can be read together with the
vehicle identification number and
used when necessary. Staff working
for the service network ( e.g. garages,
manufacturers) or third parties (e.g.breakdown services) can read the
data from the vehicle. The same
applies to warranty work and quality
assurance measures.
Data is generally read via the OBD
(On-Board Diagnostics) port
prescribed by law in the vehicle. The operating data which is read out,
documents the technical condition of
the vehicle or individual components
and assists with fault diagnosis,
compliance with warranty obligations
and quality improvement. This data,
in particular information on
component stress, technical events,
operator errors and other faults, is
transmitted to the manufacturer
where appropriate, together with the
vehicle identification number. The
manufacturer is also subject to
product liability. The manufacturer
potentially also uses operating data
from vehicles for product recalls. This
data can also be used to check
customer warranty and guarantee
claims.
Fault memories in the vehicle can be
reset by a service company when
carrying out servicing or repairs or at
your request.Comfort and infotainment
functions
Comfort settings and custom settings can be stored in the vehicle and
changed or reset at any time.
Depending on the equipment level in
question, these include
● seat and steering wheel position settings
● chassis and air conditioning settings
● custom settings such as interior lighting
You can input your own data in the
infotainment functions for your
vehicle as part of the selected
features.
Depending on the equipment level in
question, these include
● multimedia data such as music, videos or photos for playback in
an integrated multimedia system
● address book data for use with an
integrated hands-free system or an integrated navigation system
Page 274 of 279

272IndexAAccessories and vehicle modifications .......................... 211
Active emergency braking ..107, 179
Adaptive cruise control .......107, 171
AdBlue ................................ 105, 152
Adjustable air vents ...................140
Advanced parking assist ............187
Airbag and belt tensioners .........101
Airbag deactivation ..............62, 102
Airbag label................................... 57 Airbag system .............................. 57
Air conditioning regular operation ................................ 141
Air conditioning system .............. 131
Air intake .................................... 141
Air vents...................................... 140
Antilock brake system ................ 159
Antilock brake system (ABS) .....104
Anti-theft alarm system ................34
Anti-theft locking system .............. 34 Appearance care ........................247
Armrest ......................................... 49
Ashtrays ....................................... 96
Automatic anti-dazzle ..................39
Automatic crash notification (ACN) ...................................... 119
Automatic light control ...............122
Automatic locking ........................27Automatic transmission .............155
Autostop ............................. 106, 147
B Battery discharge protection ......129
BlueInjection ............................... 152
Bonnet ....................................... 213
Brake and clutch system ...........103
Brake assist ............................... 162
Brake fluid .......................... 216, 254
Brakes ............................... 159, 216
Breakdown.................................. 245
Bulb replacement ....................... 220
C Capacities .................................. 263
Cargo management system ........78
Catalytic converter .....................151
Central locking system ................24
Centre console lighting ..............128
Centre console storage ...............73
Changing tyre and wheel size ...234
Charging system ........................ 102
Child locks ................................... 27
Child restraint installation locations ................................... 66
Child restraints.............................. 63
Child restraint systems ................63
Child surveillance mirror ...............39
Cigarette lighter ........................... 95
Climate control ............................. 15
Page 275 of 279

273Climate control systems.............130
Clock............................................. 93
Colour Info Display .....................115
Control indicators........................ 100
Control of the vehicle .................143
Controls ........................................ 89
Convex shape .............................. 37
Coolant and antifreeze ...............254
Cruise control ....................107, 167
Cupholders .................................. 69
Curtain airbag system .................. 61
D Danger, Warnings and Cautions ...4
Daytime running lights ...............124
Declaration of conformity ............266
DEF ............................................ 152
Deflation detection system .........105
Descent control system .....104, 164
Diesel exhaust fluid ....................152
Diesel fuel system bleeding .......219
Door open .................................. 107
Doors ................................ 29, 30, 31
Driver alert .................................. 201
Driver assistance systems ..........167
Driver Information Centre ...........108
Driving characteristics and towing tips .............................. 206
Driving hints ................................ 143E
Eco mode ................................... 157
Electric adjustment ......................37
Electrical system......................... 227
Electric parking brake. 103, 159, 160
Electric parking brake fault .........103
Electronic climate control system 134
Electronic driving programmes ..157
Electronic key system ...................22
Electronic Stability Control and Traction Control system ..104, 163
Emergency call ........................... 119
End-of-life vehicle recovery .......213
Engine compartment fuse box ...228
Engine coolant ........................... 215
Engine coolant temperature ......104
Engine coolant temperature gauge ....................................... 99
Engine data ............................... 260
Engine exhaust .......................... 151
Engine identification ...................257
Engine oil ................... 214, 254, 258
Engine oil level monitor ................99
Engine oil pressure ....................105
Entry lighting .............................. 128
Event data recorders ..................268
Exhaust filter ....................... 105, 151
Exit lighting ................................ 128
Exterior care .............................. 247
Exterior light ............................... 106Exterior lighting ....................12, 121
Exterior mirrors ............................. 37
F
Fault ........................................... 157 First aid ......................................... 84
First aid kit ................................... 84
Fixed air vents ........................... 141
Floor mats................................... 249
Folding front passenger seat ........47
Folding mirrors ............................. 37
Folding seats .......................... 50, 51
Footwell storage ........................... 73
Forward collision alert................. 178
Front airbag system .....................60
Front fog lights ...........106, 125, 222
Front passenger seat Table position ............................ 47
Front pedestrian protection ........182
Front seats.................................... 45
Front storage ................................ 70
Front turn lights .......................... 223
Fuel............................................. 202
Fuel for diesel engines ..............203
Fuel for petrol engines ...............202
Fuel gauge ................................... 98 Fuses ......................................... 227
G
Gauges ......................................... 97
Gear selection ........................... 155