run flat VAUXHALL COMBO E 2020 Owner's Manual
[x] Cancel search | Manufacturer: VAUXHALL, Model Year: 2020, Model line: COMBO E, Model: VAUXHALL COMBO E 2020Pages: 279, PDF Size: 28.6 MB
Page 107 of 279

Instruments and controls105Illuminates when the engine is
running
Stop, switch off engine.Caution
Coolant temperature too high.
Check coolant level immediately
3 215.
If there is sufficient coolant, consult a workshop.
Preheating
! illuminates yellow.
Preheating of diesel engine is
activated. Only activates when
outside temperature is low. Start the
engine when control indicator
extinguishes.
Exhaust filter
% or C illuminates yellow,
accompanied by a message in the
Driver Information Centre.
The exhaust filter requires cleaning.
Continue driving until the control
indicator extinguishes.
Illuminates temporarily Start of saturation of the exhaust filter.
Start cleaning process as soon as
possible by driving at a vehicle speed of at least 40 mph.
Illuminates constantly Indication of a low additive level. Seek
the assistance of a workshop.
Exhaust filter 3 151.
AdBlue Y flashes or illuminates yellow.
Illuminates yellow
The remaining driving range is
between 500 miles and 1500 miles.
Flashes yellow The remaining driving range is
between 0 miles and 500 miles.
AdBlue level is low. Refill AdBlue
soon to avoid prevention of the
engine start.AdBlue 3 152.
Deflation detection system w illuminates or flashes yellow.
Illuminates
Tyre pressure loss in one or more
wheels. Stop immediately and check
tyre pressure.
Flashes
Fault in system. Consult a workshop.
Deflation detection system 3 233.
Engine oil pressure I illuminates red.
Illuminates when the ignition is
switched on and extinguishes shortly after the engine starts.
Page 224 of 279

222Vehicle careSidelight / daytime running light
with bulbs
1. Rotate the bulb socket anticlockwise to disengage and
withdraw from the reflector.
2. Remove the bulb from the bulb socket by pulling.
3. Replace and insert the new bulb into the bulb socket.
4. Insert the bulb socket into the light
assembly and turn clockwise.
Sidelight / daytime running light
with LEDs
In case of defective LEDs, have them replaced by a workshop.
LED headlights Daytime running lights are designed
as LEDs and can not be changed.
Have lights repaired by a workshop in case of failure.
Front fog lights
1. Wrap a cloth around the tip of a flat
screwdriver to prevent paint
damage. Insert the screwdriver in
the recess at the edge of the
cover. Release the cover by
levering it out carefully.
Page 233 of 279

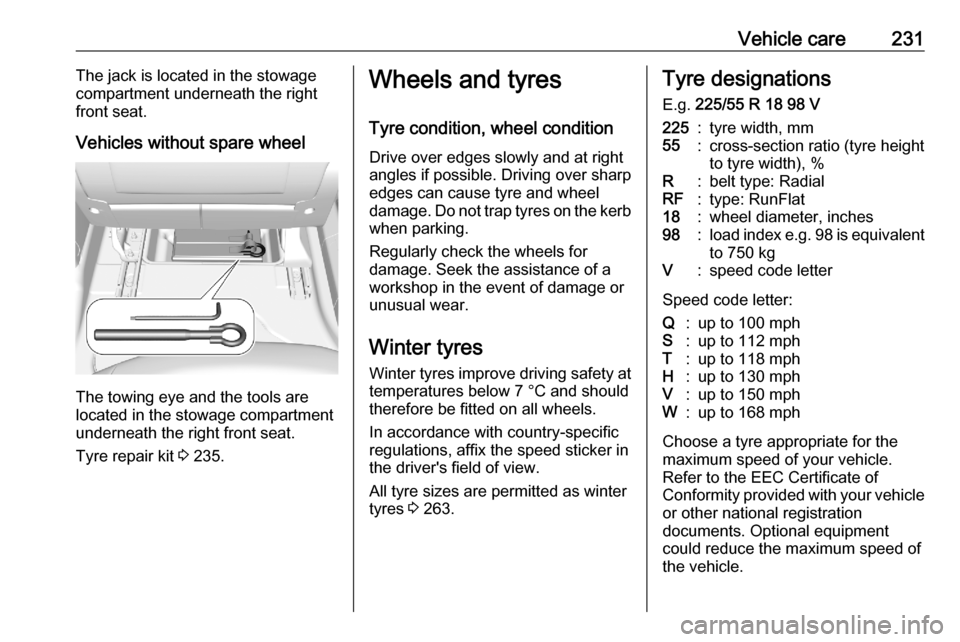
Vehicle care231The jack is located in the stowage
compartment underneath the right
front seat.
Vehicles without spare wheel
The towing eye and the tools are
located in the stowage compartment
underneath the right front seat.
Tyre repair kit 3 235.
Wheels and tyres
Tyre condition, wheel condition Drive over edges slowly and at right
angles if possible. Driving over sharp
edges can cause tyre and wheel
damage. Do not trap tyres on the kerb when parking.
Regularly check the wheels for
damage. Seek the assistance of a
workshop in the event of damage or
unusual wear.
Winter tyres
Winter tyres improve driving safety at temperatures below 7 °C and shouldtherefore be fitted on all wheels.
In accordance with country-specific
regulations, affix the speed sticker in
the driver's field of view.
All tyre sizes are permitted as winter
tyres 3 263.Tyre designations
E.g. 225/55 R 18 98 V225:tyre width, mm55:cross-section ratio (tyre height
to tyre width), %R:belt type: RadialRF:type: RunFlat18:wheel diameter, inches98:load index e.g. 98 is equivalent
to 750 kgV:speed code letter
Speed code letter:
Q:up to 100 mphS:up to 112 mphT:up to 118 mphH:up to 130 mphV:up to 150 mphW:up to 168 mph
Choose a tyre appropriate for the
maximum speed of your vehicle. Refer to the EEC Certificate of
Conformity provided with your vehicle
or other national registration
documents. Optional equipment
could reduce the maximum speed of
the vehicle.
Page 239 of 279

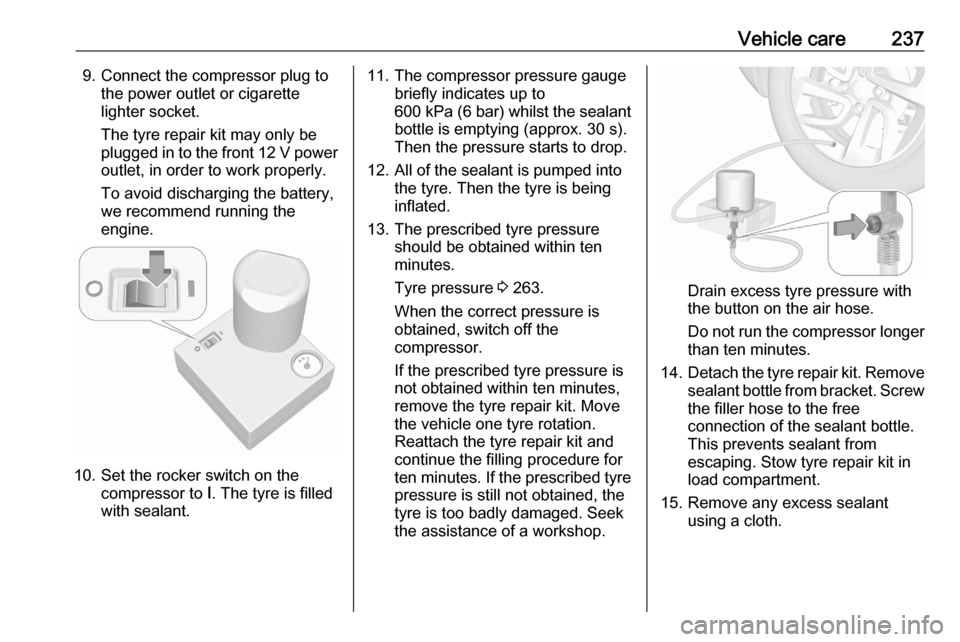
Vehicle care2379. Connect the compressor plug tothe power outlet or cigarette
lighter socket.
The tyre repair kit may only be
plugged in to the front 12 V power outlet, in order to work properly.
To avoid discharging the battery,
we recommend running the
engine.
10. Set the rocker switch on the compressor to I. The tyre is filled
with sealant.
11. The compressor pressure gauge briefly indicates up to
600 kPa (6 bar) whilst the sealant
bottle is emptying (approx. 30 s).
Then the pressure starts to drop.
12. All of the sealant is pumped into the tyre. Then the tyre is being
inflated.
13. The prescribed tyre pressure should be obtained within ten
minutes.
Tyre pressure 3 263.
When the correct pressure is
obtained, switch off the
compressor.
If the prescribed tyre pressure is
not obtained within ten minutes,
remove the tyre repair kit. Move
the vehicle one tyre rotation.
Reattach the tyre repair kit and
continue the filling procedure for ten minutes. If the prescribed tyre
pressure is still not obtained, the
tyre is too badly damaged. Seek
the assistance of a workshop.
Drain excess tyre pressure with
the button on the air hose.
Do not run the compressor longer than ten minutes.
14. Detach the tyre repair kit. Remove
sealant bottle from bracket. Screw the filler hose to the free
connection of the sealant bottle.
This prevents sealant from
escaping. Stow tyre repair kit in
load compartment.
15. Remove any excess sealant using a cloth.
Page 248 of 279

246Vehicle careCaution
Drive slowly. Do not drive jerkily.
Excessive tractive force can
damage the vehicle.
When the engine is not running,
considerably more force is needed to
brake and steer.
To prevent the entry of exhaust gases from the towing vehicle, switch on the
air recirculation and close the
windows.
Vehicles with automatic transmission: The vehicle must be towed facing
forwards, not faster than 50 mph nor further than 60 miles. In all other
cases and when the transmission is
defective, the front axle must be
raised off the ground.
Seek the assistance of a workshop. After towing, unscrew the towing eye.
Insert cap with the flange into the
recess and fix cap by pushing.
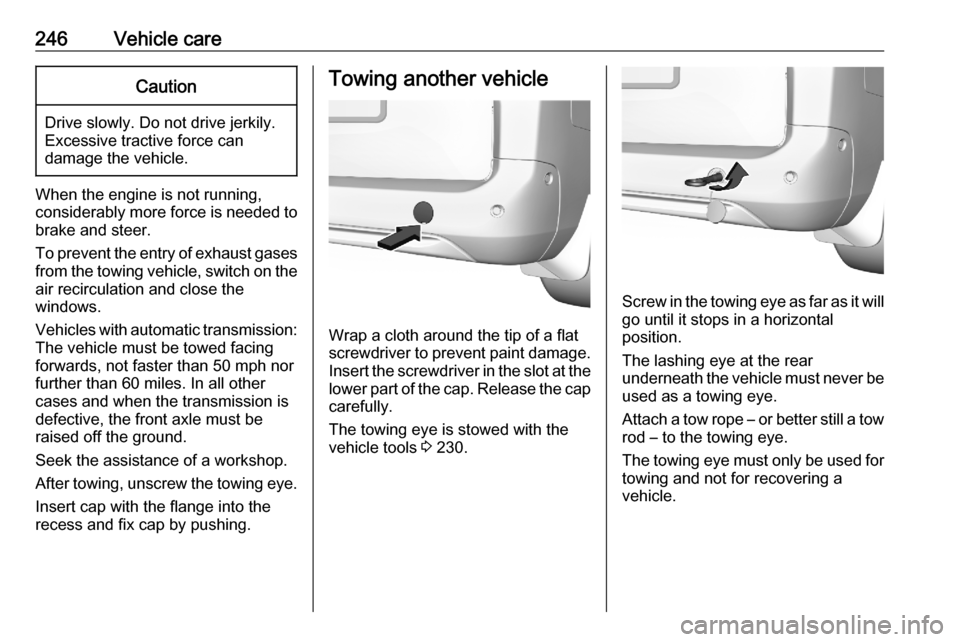
Towing another vehicle
Wrap a cloth around the tip of a flat
screwdriver to prevent paint damage. Insert the screwdriver in the slot at the
lower part of the cap. Release the cap carefully.
The towing eye is stowed with the
vehicle tools 3 230.
Screw in the towing eye as far as it will
go until it stops in a horizontal
position.
The lashing eye at the rear
underneath the vehicle must never be used as a towing eye.
Attach a tow rope – or better still a tow
rod – to the towing eye.
The towing eye must only be used for
towing and not for recovering a
vehicle.
Page 275 of 279

273Climate control systems.............130
Clock............................................. 93
Colour Info Display .....................115
Control indicators........................ 100
Control of the vehicle .................143
Controls ........................................ 89
Convex shape .............................. 37
Coolant and antifreeze ...............254
Cruise control ....................107, 167
Cupholders .................................. 69
Curtain airbag system .................. 61
D Danger, Warnings and Cautions ...4
Daytime running lights ...............124
Declaration of conformity ............266
DEF ............................................ 152
Deflation detection system .........105
Descent control system .....104, 164
Diesel exhaust fluid ....................152
Diesel fuel system bleeding .......219
Door open .................................. 107
Doors ................................ 29, 30, 31
Driver alert .................................. 201
Driver assistance systems ..........167
Driver Information Centre ...........108
Driving characteristics and towing tips .............................. 206
Driving hints ................................ 143E
Eco mode ................................... 157
Electric adjustment ......................37
Electrical system......................... 227
Electric parking brake. 103, 159, 160
Electric parking brake fault .........103
Electronic climate control system 134
Electronic driving programmes ..157
Electronic key system ...................22
Electronic Stability Control and Traction Control system ..104, 163
Emergency call ........................... 119
End-of-life vehicle recovery .......213
Engine compartment fuse box ...228
Engine coolant ........................... 215
Engine coolant temperature ......104
Engine coolant temperature gauge ....................................... 99
Engine data ............................... 260
Engine exhaust .......................... 151
Engine identification ...................257
Engine oil ................... 214, 254, 258
Engine oil level monitor ................99
Engine oil pressure ....................105
Entry lighting .............................. 128
Event data recorders ..................268
Exhaust filter ....................... 105, 151
Exit lighting ................................ 128
Exterior care .............................. 247
Exterior light ............................... 106Exterior lighting ....................12, 121
Exterior mirrors ............................. 37
F
Fault ........................................... 157 First aid ......................................... 84
First aid kit ................................... 84
Fixed air vents ........................... 141
Floor mats................................... 249
Folding front passenger seat ........47
Folding mirrors ............................. 37
Folding seats .......................... 50, 51
Footwell storage ........................... 73
Forward collision alert................. 178
Front airbag system .....................60
Front fog lights ...........106, 125, 222
Front passenger seat Table position ............................ 47
Front pedestrian protection ........182
Front seats.................................... 45
Front storage ................................ 70
Front turn lights .......................... 223
Fuel............................................. 202
Fuel for diesel engines ..............203
Fuel for petrol engines ...............202
Fuel gauge ................................... 98 Fuses ......................................... 227
G
Gauges ......................................... 97
Gear selection ........................... 155