seat adjustment VAUXHALL COMBO E 2020 Owner's Manual
[x] Cancel search | Manufacturer: VAUXHALL, Model Year: 2020, Model line: COMBO E, Model: VAUXHALL COMBO E 2020Pages: 279, PDF Size: 28.6 MB
Page 9 of 279
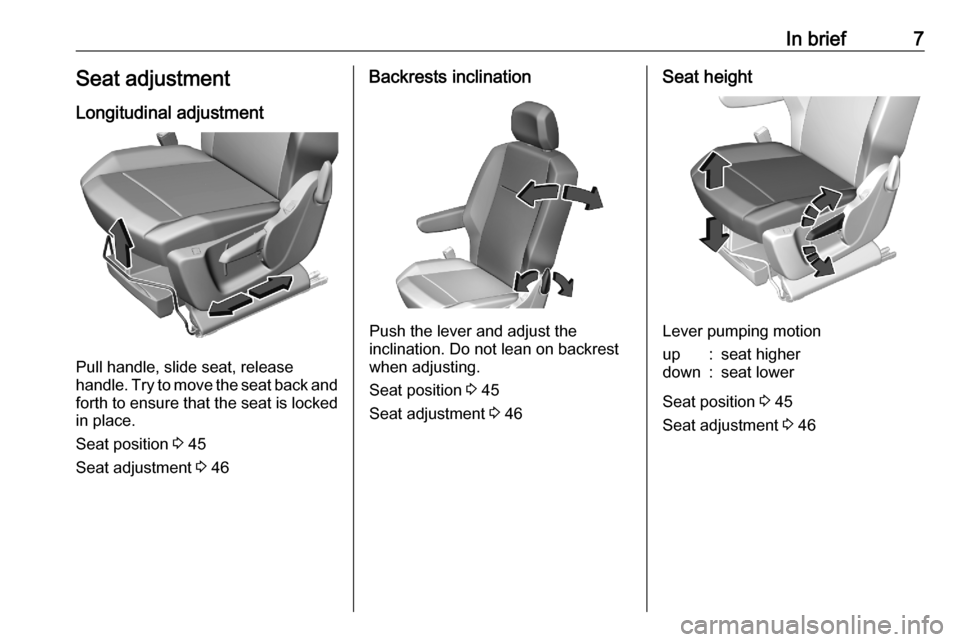
In brief7Seat adjustmentLongitudinal adjustment
Pull handle, slide seat, release
handle. Try to move the seat back and forth to ensure that the seat is locked
in place.
Seat position 3 45
Seat adjustment 3 46
Backrests inclination
Push the lever and adjust the
inclination. Do not lean on backrest
when adjusting.
Seat position 3 45
Seat adjustment 3 46
Seat height
Lever pumping motion
up:seat higherdown:seat lower
Seat position 3 45
Seat adjustment 3 46
Page 10 of 279
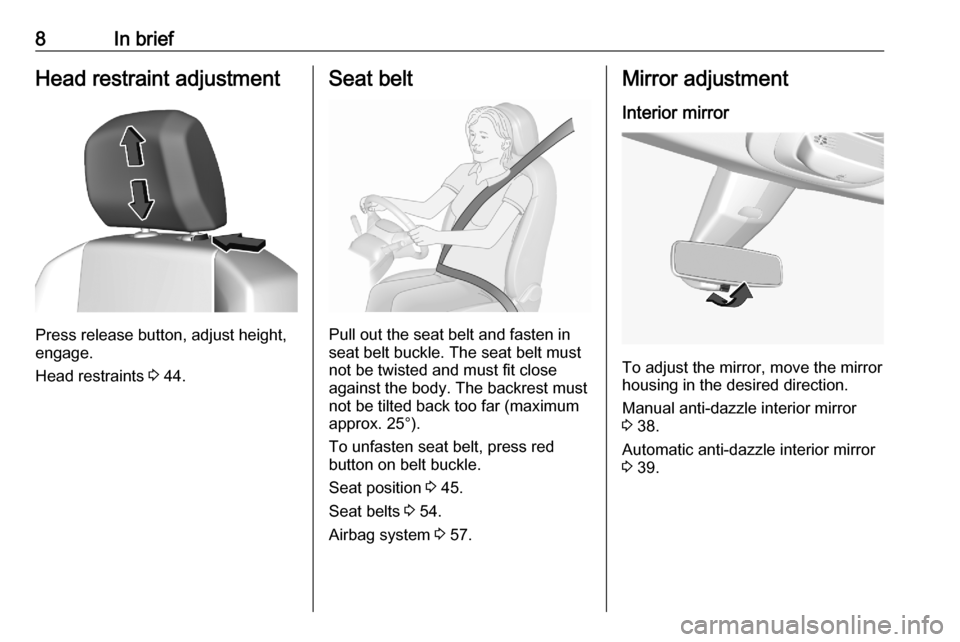
8In briefHead restraint adjustment
Press release button, adjust height,
engage.
Head restraints 3 44.
Seat belt
Pull out the seat belt and fasten in
seat belt buckle. The seat belt must not be twisted and must fit close
against the body. The backrest must
not be tilted back too far (maximum
approx. 25°).
To unfasten seat belt, press red
button on belt buckle.
Seat position 3 45.
Seat belts 3 54.
Airbag system 3 57.
Mirror adjustment
Interior mirror
To adjust the mirror, move the mirror
housing in the desired direction.
Manual anti-dazzle interior mirror
3 38.
Automatic anti-dazzle interior mirror 3 39.
Page 11 of 279
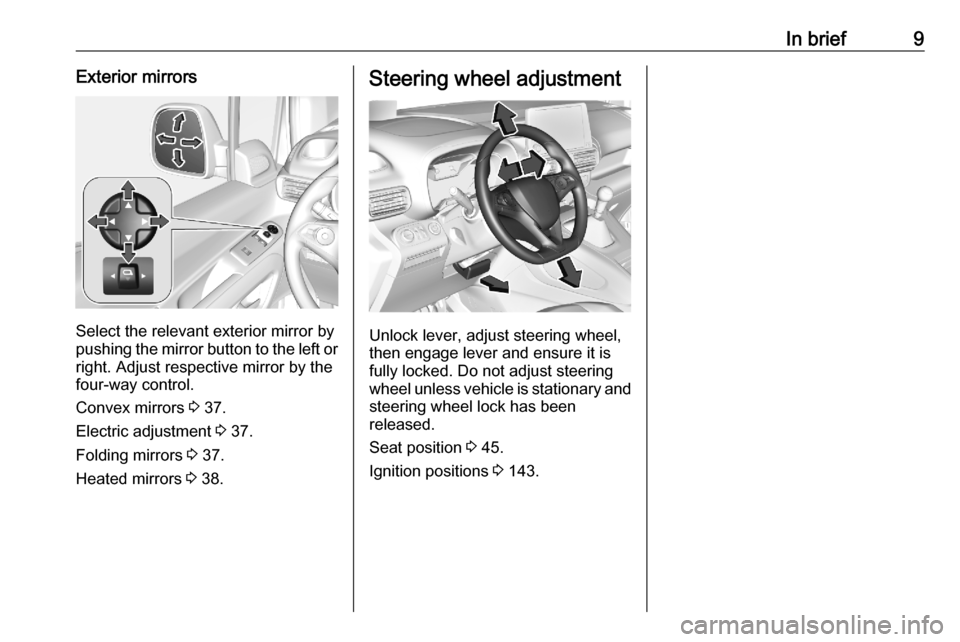
In brief9Exterior mirrors
Select the relevant exterior mirror by
pushing the mirror button to the left or right. Adjust respective mirror by the
four-way control.
Convex mirrors 3 37.
Electric adjustment 3 37.
Folding mirrors 3 37.
Heated mirrors 3 38.
Steering wheel adjustment
Unlock lever, adjust steering wheel,
then engage lever and ensure it is fully locked. Do not adjust steering
wheel unless vehicle is stationary and steering wheel lock has been
released.
Seat position 3 45.
Ignition positions 3 143.
Page 46 of 279
44Seats, restraintsSeats, restraintsHead restraints............................ 44
Front seats ................................... 45
Seat position .............................. 45
Seat adjustment ........................46
Seat folding ............................... 47
Armrest ...................................... 49
Heating ...................................... 49
Rear seats ................................... 50
Second row seats ......................50
Third row seats .......................... 51
Seat belts ..................................... 54
Three-point seat belt .................55
Airbag system .............................. 57
Front airbag system ...................60
Side airbag system ....................60
Curtain airbag system ...............61
Airbag deactivation ....................62
Child restraints ............................. 63
Child restraint systems ..............63
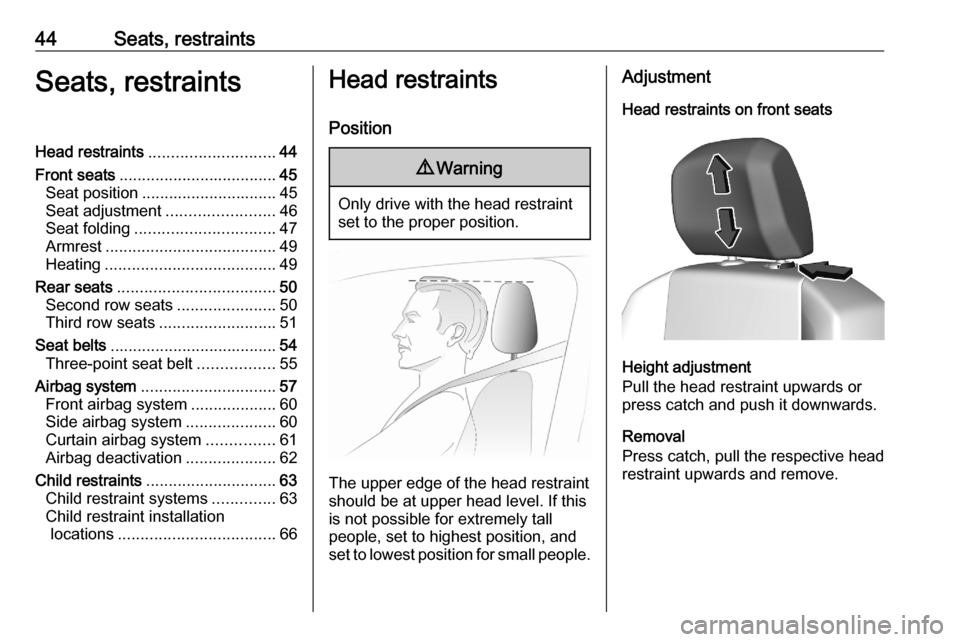
Child restraint installation locations ................................... 66Head restraints
Position9 Warning
Only drive with the head restraint
set to the proper position.
The upper edge of the head restraint
should be at upper head level. If this
is not possible for extremely tall
people, set to highest position, and
set to lowest position for small people.
Adjustment
Head restraints on front seats
Height adjustment
Pull the head restraint upwards or
press catch and push it downwards.
Removal
Press catch, pull the respective head
restraint upwards and remove.
Page 47 of 279
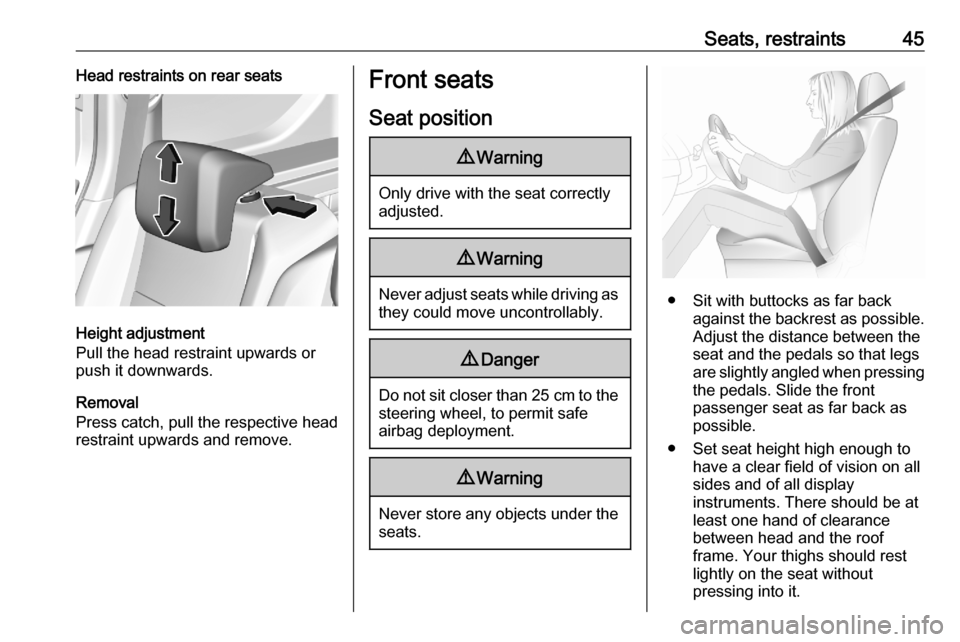
Seats, restraints45Head restraints on rear seats
Height adjustment
Pull the head restraint upwards or
push it downwards.
Removal
Press catch, pull the respective head
restraint upwards and remove.
Front seats
Seat position9 Warning
Only drive with the seat correctly
adjusted.
9 Warning
Never adjust seats while driving as
they could move uncontrollably.
9 Danger
Do not sit closer than 25 cm to the
steering wheel, to permit safe
airbag deployment.
9 Warning
Never store any objects under the
seats.
● Sit with buttocks as far back against the backrest as possible.
Adjust the distance between the
seat and the pedals so that legs
are slightly angled when pressing the pedals. Slide the front
passenger seat as far back as
possible.
● Set seat height high enough to have a clear field of vision on allsides and of all display
instruments. There should be at
least one hand of clearance
between head and the roof
frame. Your thighs should rest
lightly on the seat without
pressing into it.
Page 48 of 279
46Seats, restraints● Sit with shoulders as far backagainst the backrest as possible.
Set the backrest rake so that it is possible to easily reach the
steering wheel with arms slightly
bent. Maintain contact between
shoulders and the backrest when turning the steering wheel. Do
not angle the backrest too far
back. We recommend a
maximum rake of approx. 25°.
● Adjust seat and steering wheel in
a way that the wrist rests on top
of the steering wheel while the
arm is fully extended and
shoulders are on the backrest.
● Adjust the steering wheel 3 89.
● Adjust the head restraint 3 44.
● Adjust the lumbar support so that
it supports the natural shape of
the spine.
Seat adjustment
Drive only with engaged seats and
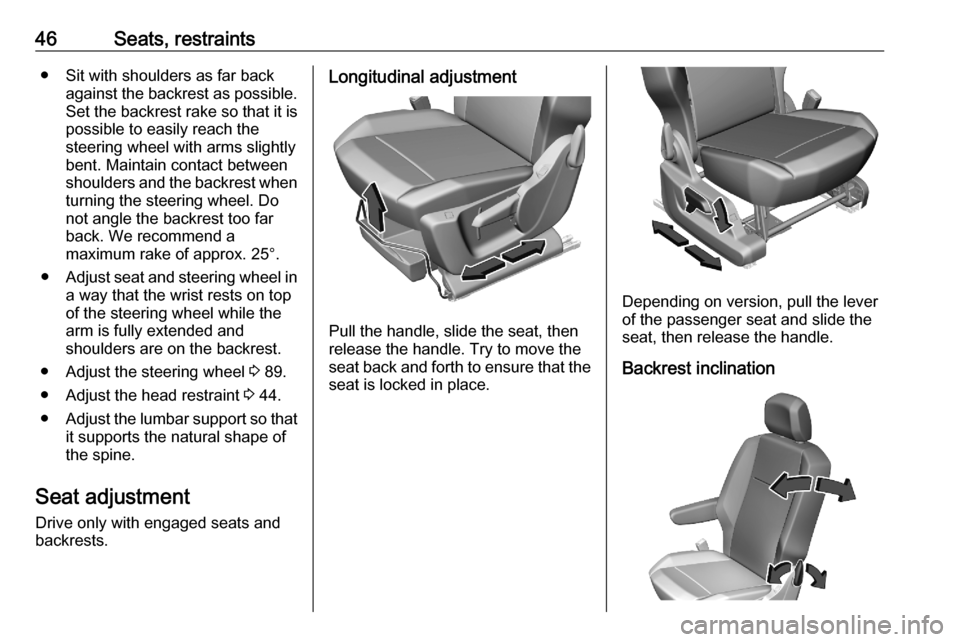
backrests.Longitudinal adjustment
Pull the handle, slide the seat, then
release the handle. Try to move the seat back and forth to ensure that the
seat is locked in place.
Depending on version, pull the lever
of the passenger seat and slide the seat, then release the handle.
Backrest inclination
Page 55 of 279
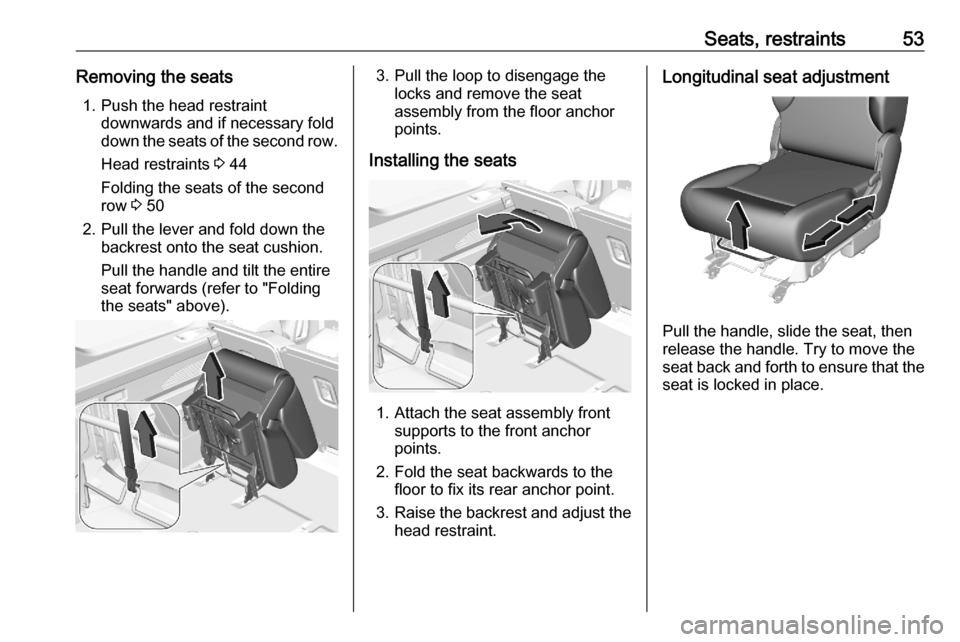
Seats, restraints53Removing the seats1. Push the head restraint downwards and if necessary fold
down the seats of the second row.
Head restraints 3 44
Folding the seats of the second
row 3 50
2. Pull the lever and fold down the backrest onto the seat cushion.
Pull the handle and tilt the entire
seat forwards (refer to "Folding
the seats" above).3. Pull the loop to disengage the locks and remove the seat
assembly from the floor anchor
points.
Installing the seats
1. Attach the seat assembly front supports to the front anchor
points.
2. Fold the seat backwards to the floor to fix its rear anchor point.
3. Raise the backrest and adjust the
head restraint.
Longitudinal seat adjustment
Pull the handle, slide the seat, then
release the handle. Try to move the seat back and forth to ensure that the
seat is locked in place.
Page 90 of 279

88Instruments and controlsInstruments and
controlsControls ....................................... 89
Steering wheel adjustment ........89
Steering wheel controls .............89
Heated steering wheel ...............89
Horn ........................................... 90
Windscreen wiper and washer ..90
Rear window wiper and washer ...................................... 92
Outside temperature ..................92
Clock ......................................... 93
Power outlets ............................. 93
Inductive charging .....................94
Cigarette lighter ......................... 95
Ashtrays .................................... 96
Warning lights, gauges and indi‐ cators ........................................... 96
Instrument cluster ......................96
Speedometer ............................. 97
Odometer .................................. 97
Trip odometer ............................ 97
Tachometer ............................... 98
Fuel gauge ................................ 98
Engine coolant temperature gauge ....................................... 99Engine oil level monitor.............99
Service display .......................... 99
Control indicators ....................100
Turn lights ................................ 100
Seat belt reminder ...................101
Airbag and belt tensioners .......101
Airbag deactivation ..................102
Charging system .....................102
Malfunction indicator light ........102
Service vehicle soon ...............102
Stop engine ............................. 102
System check .......................... 103
Brake and clutch system .........103
Parking brake .......................... 103
Electric parking brake ..............103
Electric parking brake fault ......103
Antilock brake system (ABS) ...104
Gear shifting ............................ 104
Overload indicator ...................104
Descent control system ...........104
Lane keep assist .....................104
Electronic Stability Control and Traction Control system .........104
Engine coolant temperature ....104
Preheating ............................... 105
Exhaust filter ............................ 105
AdBlue ..................................... 105
Deflation detection system ......105
Engine oil pressure ..................105
Low fuel ................................... 106Autostop.................................. 106
Exterior light ............................ 106
High beam ............................... 106
Low beam ................................ 106
High beam assist .....................106
LED headlights ........................ 106
Front fog lights ......................... 106
Rear fog light ........................... 107
Rain sensor ............................. 107
Cruise control .......................... 107
Adaptive cruise control ............107
Side blind spot alert .................107
Active emergency braking .......107
Speed limiter ........................... 107
Door open ................................ 107
Displays ..................................... 108
Driver Information Centre ........108
Info Display .............................. 110
Head-up display ......................112
Rear view display ....................113
Vehicle messages ......................114
Warning chimes .......................114
Vehicle personalisation ..............115
Telematics services ...................119
Vauxhall Connect ....................119
Page 126 of 279
124LightingHeadlight range adjustment
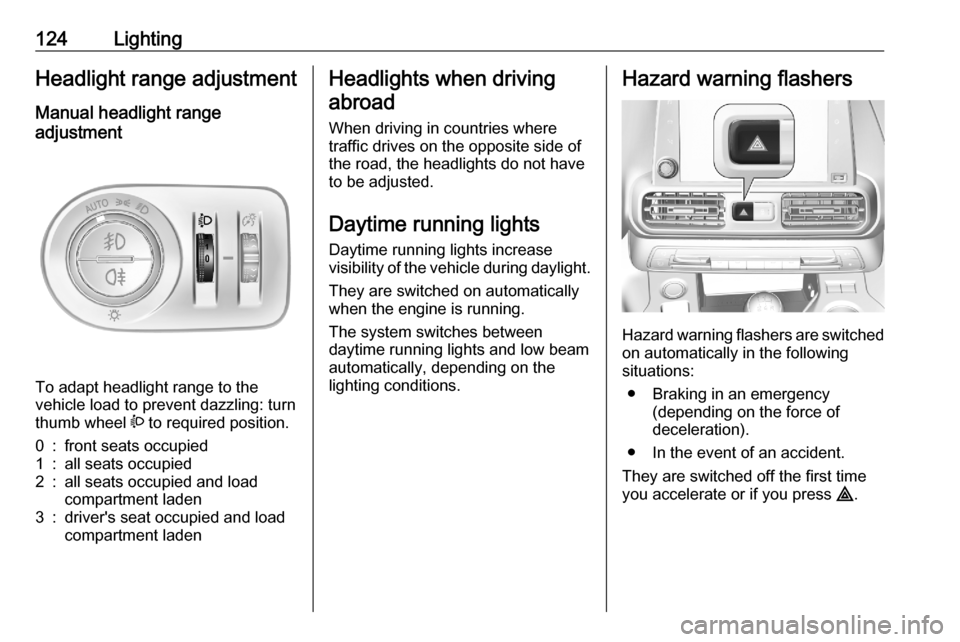
Manual headlight range
adjustment
To adapt headlight range to the
vehicle load to prevent dazzling: turn
thumb wheel ? to required position.
0:front seats occupied1:all seats occupied2:all seats occupied and load
compartment laden3:driver's seat occupied and load
compartment ladenHeadlights when driving
abroad
When driving in countries where
traffic drives on the opposite side of
the road, the headlights do not have
to be adjusted.
Daytime running lights Daytime running lights increase
visibility of the vehicle during daylight.
They are switched on automatically
when the engine is running.
The system switches between
daytime running lights and low beam automatically, depending on the
lighting conditions.Hazard warning flashers
Hazard warning flashers are switched
on automatically in the following
situations:
● Braking in an emergency (depending on the force of
deceleration).
● In the event of an accident.
They are switched off the first time
you accelerate or if you press ¨.
Page 232 of 279
230Vehicle careNo.Circuit26Steering angle sensor27Parking heater29Infotainment system31-32Power outlet34Parking assist, interior mirror35Diagnostic connector, headlight
range adjustment, heated wind‐ screen, climate control36Interior lights, USB portVehicle tools
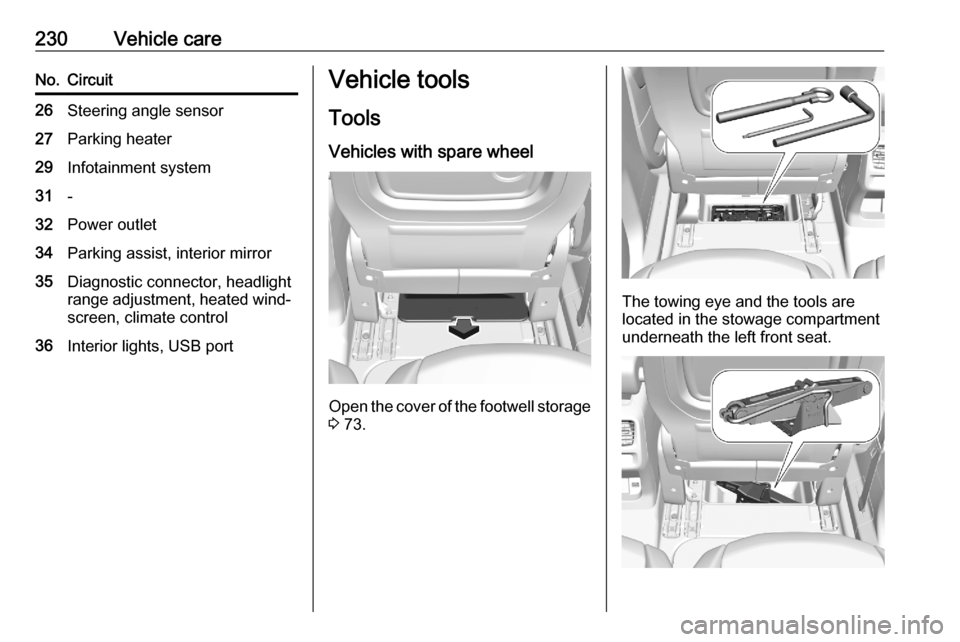
Tools
Vehicles with spare wheel
Open the cover of the footwell storage
3 73.
The towing eye and the tools are
located in the stowage compartment
underneath the left front seat.