start stop button VAUXHALL CORSA 2015.75 User Guide
[x] Cancel search | Manufacturer: VAUXHALL, Model Year: 2015.75, Model line: CORSA, Model: VAUXHALL CORSA 2015.75Pages: 261, PDF Size: 7.61 MB
Page 152 of 261

150Driving and operating
Stop-start system 3 133.
Deactivation
Press B; LED in the button
extinguishes and a message pops-up in the Driver Information Centre.
Each time the engine is started, City
mode is deactivated.
Overload If the steering in City mode is heavily
loaded, e.g. in long parking
manoeuvres or heavy city traffic, the
system is deactivated for overheating
protection. Steering operates in
normal mode until City mode
activates automatically.
FaultIn the event of a fault in the system,
control indicator c illuminates and a
message is displayed in the Driver
Information Centre.
Vehicle messages 3 103.
System calibration If control indicators c and b
illuminate simultaneously, a
calibration of the power steering
system is necessary. This can occur
e.g. when turning the steering wheel
for one rotation with ignition switched
off. In this case, switch on ignition and turn steering wheel once from lock to
lock.
If control indicators c and b do not
extinguish after calibration, seek the
assistance of a workshop.Driver assistance
systems9 Warning
Driver assistance systems are
developed to support the driver
and not to replace the driver's
attention.
The driver accepts full
responsibility when driving the
vehicle.
When using driver assistance
systems, always take care
regarding the current traffic
situation.
Cruise control
The cruise control can store and
maintain speeds of approx. 20 to
120 mph. Deviations from the stored
speeds may occur when driving uphill or downhill.
Page 220 of 261

218Vehicle care
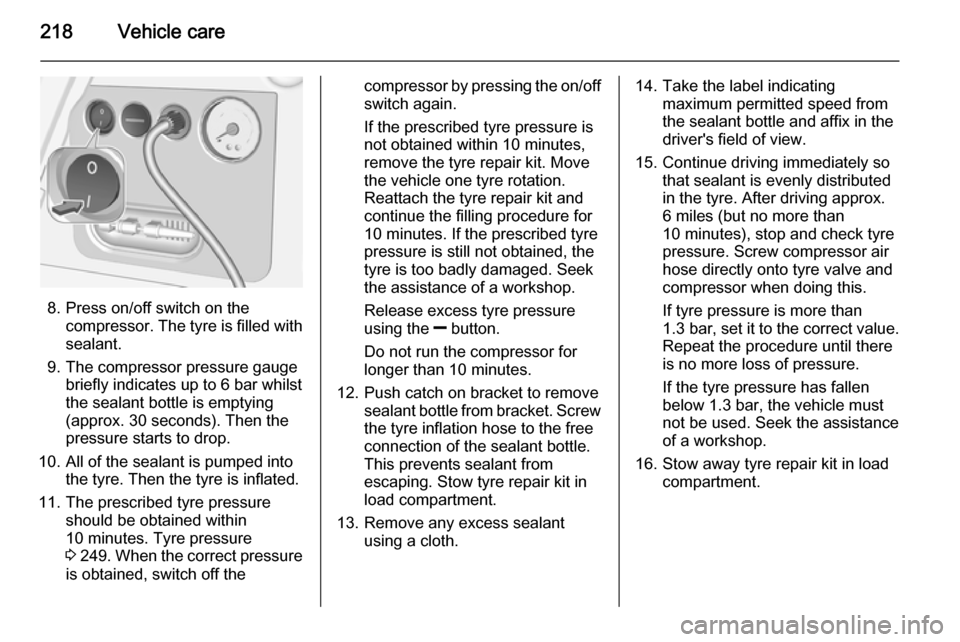
8. Press on/off switch on thecompressor. The tyre is filled withsealant.
9. The compressor pressure gauge briefly indicates up to 6 bar whilst
the sealant bottle is emptying
(approx. 30 seconds). Then the
pressure starts to drop.
10. All of the sealant is pumped into the tyre. Then the tyre is inflated.
11. The prescribed tyre pressure should be obtained within
10 minutes. Tyre pressure
3 249 . When the correct pressure
is obtained, switch off the
compressor by pressing the on/off switch again.
If the prescribed tyre pressure is
not obtained within 10 minutes,
remove the tyre repair kit. Move
the vehicle one tyre rotation.
Reattach the tyre repair kit and
continue the filling procedure for
10 minutes. If the prescribed tyre pressure is still not obtained, the
tyre is too badly damaged. Seek
the assistance of a workshop.
Release excess tyre pressure
using the ] button.
Do not run the compressor for
longer than 10 minutes.
12. Push catch on bracket to remove sealant bottle from bracket. Screwthe tyre inflation hose to the freeconnection of the sealant bottle.
This prevents sealant from
escaping. Stow tyre repair kit in
load compartment.
13. Remove any excess sealant using a cloth.14. Take the label indicatingmaximum permitted speed from
the sealant bottle and affix in the
driver's field of view.
15. Continue driving immediately so that sealant is evenly distributedin the tyre. After driving approx.
6 miles (but no more than
10 minutes), stop and check tyre
pressure. Screw compressor air
hose directly onto tyre valve and
compressor when doing this.
If tyre pressure is more than
1.3 bar , set it to the correct value.
Repeat the procedure until there
is no more loss of pressure.
If the tyre pressure has fallen
below 1.3 bar, the vehicle must
not be used. Seek the assistance
of a workshop.
16. Stow away tyre repair kit in load compartment.