low beam VAUXHALL CORSA 2015.75 Owner's Manual
[x] Cancel search | Manufacturer: VAUXHALL, Model Year: 2015.75, Model line: CORSA, Model: VAUXHALL CORSA 2015.75Pages: 261, PDF Size: 7.61 MB
Page 13 of 261

In brief11
1Power windows .....................30
2 Exterior mirrors .....................28
3 Cruise control .....................150
Speed limiter ...................... 152
Forward collision alert ........153
4 Turn and lane-change
signals, headlight flash,
low beam and high beam ....114
Exit lighting ......................... 118
Parking lights ...................... 115
Buttons for Driver
Information Centre ................95
5 Instruments .......................... 83
6 Forward collision alert
indicator ............................. 153
7 Driver Information Centre ...... 95
8 Infotainment controls ...........75
9 Windscreen wiper,
windscreen washer
system, rear window
wiper, rear window washer
system ................................... 7710 Central locking system ..........22
City mode ............................ 149
Fuel selector ......................... 85
Eco button for stop-start
system ................................. 133
Traction Control system .....147
Electronic Stability Control . 148
Parking assist ..................... 156
Seat heating .......................... 39
Heated steering wheel ..........76
11 Anti-theft alarm system
status LED ........................... 26
12 Hazard warning flashers ....114
Control indicator for airbag deactivation .......................... 90
Control indicator for front
passenger seat belt .............89
13 Colour-Info-Display ............101
Graphic-Info-Display ...........102
14 Centre air vents .................. 128
15 Side air vents, passenger
side ..................................... 12816Airbag deactivation switch
(behind glovebox cover) ......47
17 Glovebox .............................. 56
Fuse box ............................ 203
18 Climate control system ........ 120
19 Power outlet .......................... 82
20 AUX input, USB input ...........10
21 Selector lever,
transmission ....................... 141
22 Parking brake ......................146
23 Ignition switch with
steering wheel lock ............131
24 Horn ..................................... 76
Driver airbag ........................ 45
25 Bonnet release lever ..........185
26 Steering wheel adjustment ..75
27 Light switch ........................ 110
Headlight range
adjustment ......................... 112
Rear fog light ...................... 115
Page 15 of 261
In brief13
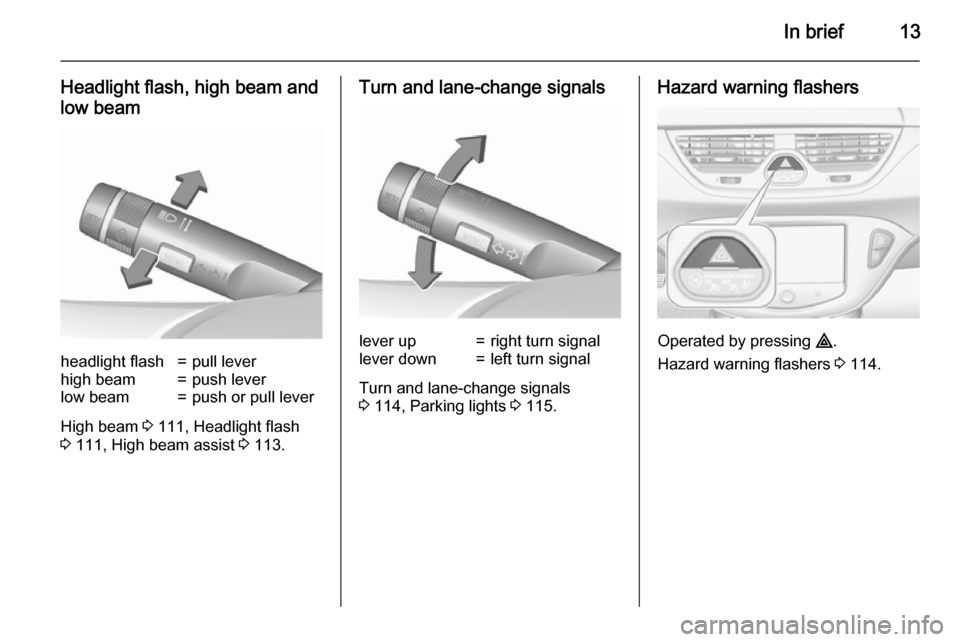
Headlight flash, high beam and
low beamheadlight flash=pull leverhigh beam=push leverlow beam=push or pull lever
High beam 3 111, Headlight flash
3 111, High beam assist 3 113.
Turn and lane-change signalslever up=right turn signallever down=left turn signal
Turn and lane-change signals
3 114, Parking lights 3 115.
Hazard warning flashers
Operated by pressing ¨.
Hazard warning flashers 3 114.
Page 96 of 261

94Instruments and controls9Warning
When the engine is off,
considerably more force is needed
to brake and steer.
During an Autostop the brake
servo unit will still be operational.
Do not remove key until vehicle is stationary, otherwise the steeringwheel lock could engage
unexpectedly.
Check oil level before seeking the
assistance of a workshop 3 185.
Low fuel
Y illuminates or flashes yellow.
Illuminates
Level in fuel tank is too low.
Flashes Fuel used up. Refuel immediately.
Never run the tank dry.
Catalytic converter 3 137.
Bleeding the diesel fuel system
3 191.
Immobiliser
d flashes yellow.
Fault in the immobiliser system. The
engine cannot be started.
Reduced engine power
# illuminates yellow.
The engine power is limited. Consult
a workshop.
Autostop
Autostop active
D illuminates red or white.
Engine is in an Autostop.
Stop-start system 3 133.
Exterior light 8 illuminates green.
The exterior lights are on 3 110.
High beam
C illuminates blue.Illuminated when high beam is on or
during headlight flash 3 111.
High beam assist
l illuminates green.
The high beam assist is activated
3 113.
Fog light
> illuminates green.
The front fog lights are on 3 115.
Rear fog light
r illuminates yellow.
The rear fog light is on 3 115.
Cruise control
m illuminates white or green.
Illuminates white
The system is on.
Illuminates green Cruise control is active.
Page 105 of 261
Instruments and controls103Vehicle messages
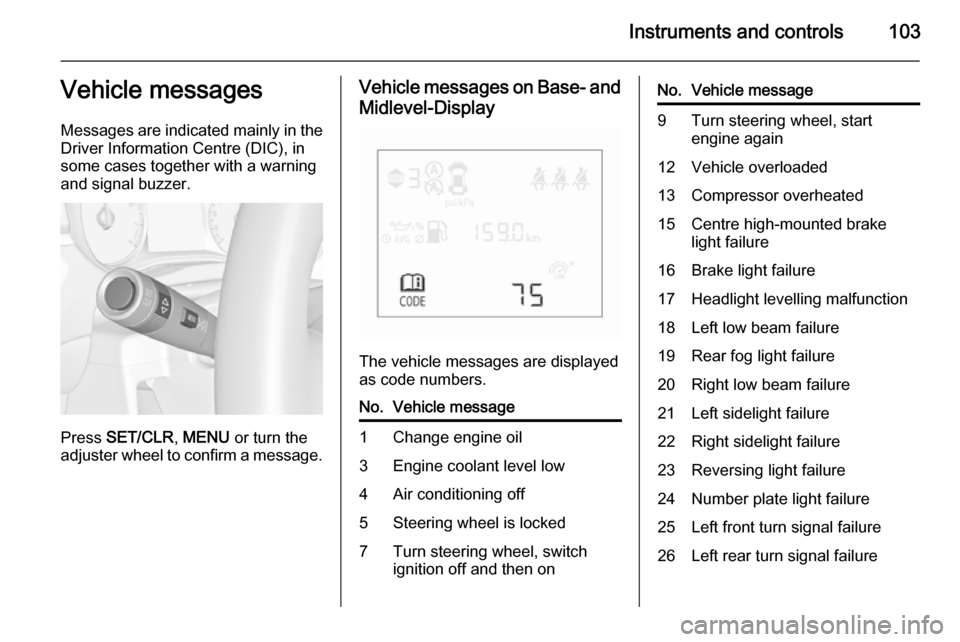
Messages are indicated mainly in the
Driver Information Centre (DIC), in
some cases together with a warning and signal buzzer.
Press SET/CLR , MENU or turn the
adjuster wheel to confirm a message.
Vehicle messages on Base- and
Midlevel-Display
The vehicle messages are displayed
as code numbers.
No.Vehicle message1Change engine oil3Engine coolant level low4Air conditioning off5Steering wheel is locked7Turn steering wheel, switch
ignition off and then onNo.Vehicle message9Turn steering wheel, start
engine again12Vehicle overloaded13Compressor overheated15Centre high-mounted brake
light failure16Brake light failure17Headlight levelling malfunction18Left low beam failure19Rear fog light failure20Right low beam failure21Left sidelight failure22Right sidelight failure23Reversing light failure24Number plate light failure25Left front turn signal failure26Left rear turn signal failure
Page 113 of 261

Lighting111
The current status of the automatic
light control is displayed in the Driver
Information Centre (DIC).
When switching on the ignition,
automatic light control is active.
When headlights are on, 8
illuminates. Control indicator 8
3 94.
Tail lights
Tail lights are illuminated together
with headlights and sidelights.
Automatic light controlWhen the automatic light control
function is switched on and the
engine is running, the system
switches between daytime running
light and headlights automatically
depending on the lighting conditions
and information given by the rain
sensor system.
Daytime running light 3 112.
Automatic headlight activation
During poor lighting conditions the
headlights are switched on.
Furthermore the headlights are
switched on if the windscreen wipers
have been activated for several
wipes.
Tunnel detection When a tunnel is entered, the
headlights are switched on
immediately.High beam
To switch from low to high beam,
push lever.
To switch to low beam, push lever
again or pull.
High beam assist 3 113.
Headlight flash To activate the headlight flash, pull
lever.
Page 115 of 261
Lighting113Xenon lighting systemXenon lighting system includes ■ xenon headlights for low and high beam
■ high beam assist
■ corner lighting
■ reversing function
Xenon headlights Xenon headlights for low and high
beam ensure better visibility under all
conditions.
Operation is the same as for halogen headlights.
Light switch 3 110 , high beam 3 111,
headlight flash 3 111 , headlight range
adjustment 3 112, headlights when
driving abroad 3 112.
Automatic light control 3 111.
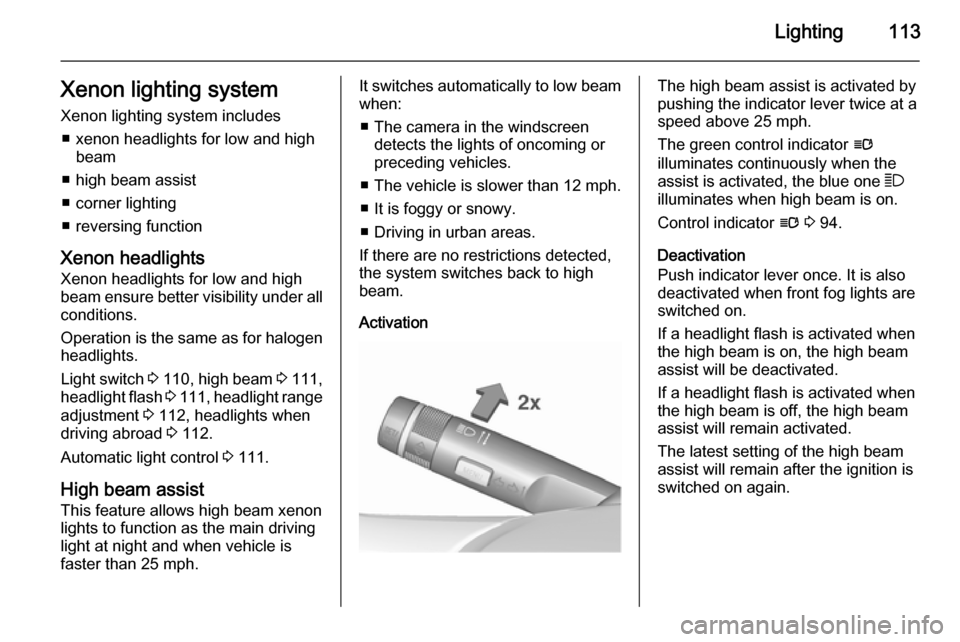
High beam assist This feature allows high beam xenon
lights to function as the main driving
light at night and when vehicle is
faster than 25 mph.It switches automatically to low beam when:
■ The camera in the windscreen detects the lights of oncoming or
preceding vehicles.
■ The vehicle is slower than 12 mph.
■ It is foggy or snowy.
■ Driving in urban areas.
If there are no restrictions detected,
the system switches back to high
beam.
ActivationThe high beam assist is activated by
pushing the indicator lever twice at a
speed above 25 mph.
The green control indicator l
illuminates continuously when the
assist is activated, the blue one 7
illuminates when high beam is on.
Control indicator l 3 94.
Deactivation
Push indicator lever once. It is also
deactivated when front fog lights are
switched on.
If a headlight flash is activated when
the high beam is on, the high beam
assist will be deactivated.
If a headlight flash is activated when
the high beam is off, the high beam
assist will remain activated.
The latest setting of the high beam
assist will remain after the ignition is
switched on again.
Page 116 of 261
114Lighting
Corner lighting
On tight bends or when turning off,
depending on the steering angle or
the indicator light signal, an additional left or right reflector is switched on
which illuminates the road in the
direction of travel. It is activated up to
a speed of 25 mph.
Reversing function If the low beam is on and reverse gear is engaged, both corner lights are
switched on. They remain illuminated
for 20 seconds after disengaging
reverse gear.
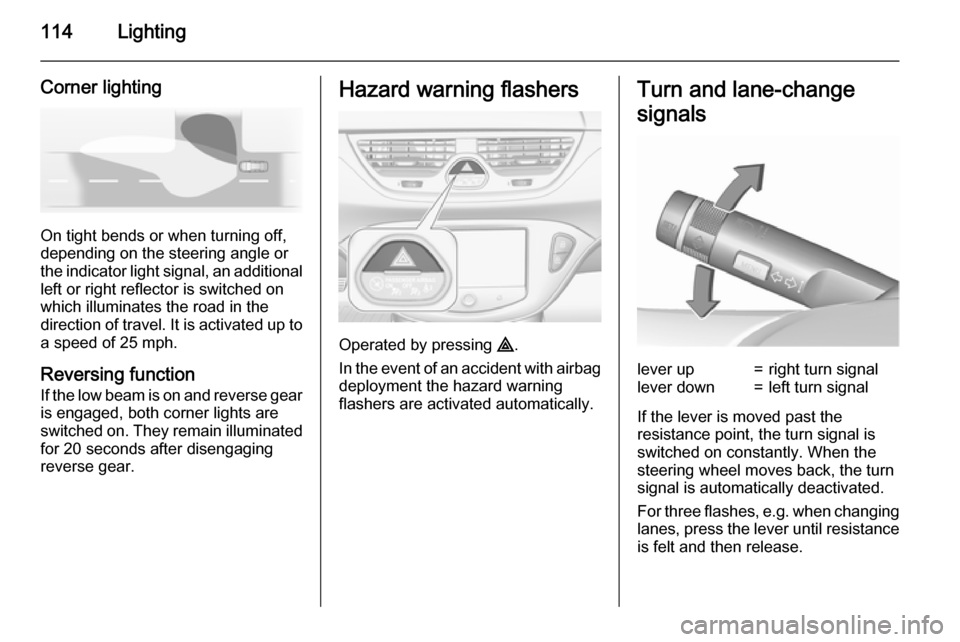
Hazard warning flashers
Operated by pressing ¨.
In the event of an accident with airbag
deployment the hazard warning
flashers are activated automatically.
Turn and lane-change
signalslever up=right turn signallever down=left turn signal
If the lever is moved past the
resistance point, the turn signal is
switched on constantly. When the
steering wheel moves back, the turn
signal is automatically deactivated.
For three flashes, e.g. when changing
lanes, press the lever until resistance
is felt and then release.
Page 117 of 261
Lighting115
With a trailer connected, turn signal
flashes six times when pressing the
lever until resistance is felt and then
releasing.
Move the lever to the resistance point
and hold for longer indication.
Switch the turn signal off manually by moving the lever to its original
position.
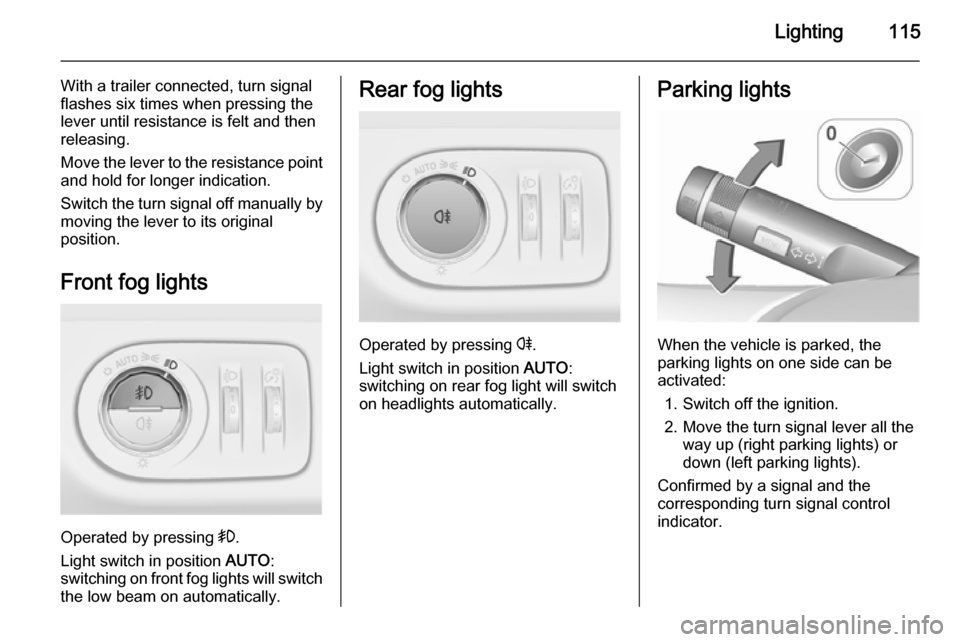
Front fog lights
Operated by pressing >.
Light switch in position AUTO:
switching on front fog lights will switch the low beam on automatically.
Rear fog lights
Operated by pressing r.
Light switch in position AUTO:
switching on rear fog light will switch
on headlights automatically.
Parking lights
When the vehicle is parked, the
parking lights on one side can be
activated:
1. Switch off the ignition.
2. Move the turn signal lever all the way up (right parking lights) or
down (left parking lights).
Confirmed by a signal and the
corresponding turn signal control
indicator.
Page 167 of 261
Driving and operating165
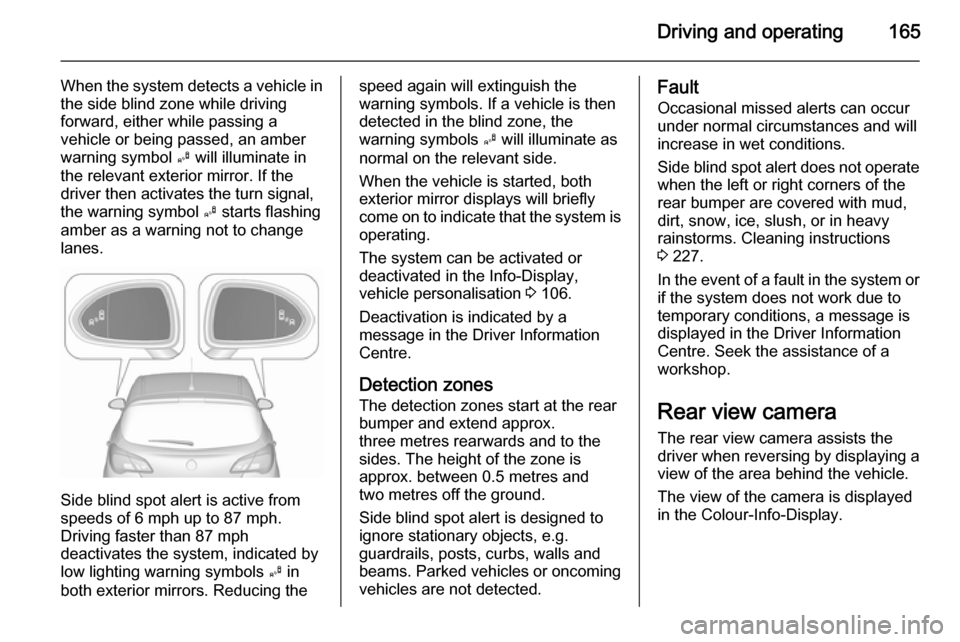
When the system detects a vehicle inthe side blind zone while driving
forward, either while passing a
vehicle or being passed, an amber
warning symbol B will illuminate in
the relevant exterior mirror. If the
driver then activates the turn signal,
the warning symbol B starts flashing
amber as a warning not to change
lanes.
Side blind spot alert is active from
speeds of 6 mph up to 87 mph.
Driving faster than 87 mph
deactivates the system, indicated by
low lighting warning symbols B in
both exterior mirrors. Reducing the
speed again will extinguish the
warning symbols. If a vehicle is then
detected in the blind zone, the
warning symbols B will illuminate as
normal on the relevant side.
When the vehicle is started, both exterior mirror displays will briefly
come on to indicate that the system is operating.
The system can be activated or
deactivated in the Info-Display,
vehicle personalisation 3 106.
Deactivation is indicated by a
message in the Driver Information
Centre.
Detection zones
The detection zones start at the rear
bumper and extend approx.
three metres rearwards and to the
sides. The height of the zone is
approx. between 0.5 metres and
two metres off the ground.
Side blind spot alert is designed to
ignore stationary objects, e.g.
guardrails, posts, curbs, walls and
beams. Parked vehicles or oncoming
vehicles are not detected.Fault
Occasional missed alerts can occur
under normal circumstances and will
increase in wet conditions.
Side blind spot alert does not operate when the left or right corners of the
rear bumper are covered with mud,
dirt, snow, ice, slush, or in heavy
rainstorms. Cleaning instructions
3 227.
In the event of a fault in the system or if the system does not work due to
temporary conditions, a message is
displayed in the Driver Information
Centre. Seek the assistance of a
workshop.
Rear view camera The rear view camera assists the
driver when reversing by displaying a view of the area behind the vehicle.
The view of the camera is displayed
in the Colour-Info-Display.
Page 193 of 261
Vehicle care191Diesel fuel system
bleeding
If the tank has been run dry, the diesel fuel system must be bled. Switch on
the ignition three times for
15 seconds at a time. Then crank the
engine for a maximum of
40 seconds. Repeat this process after no less than five seconds. If the
engine fails to start, seek the
assistance of a workshop.
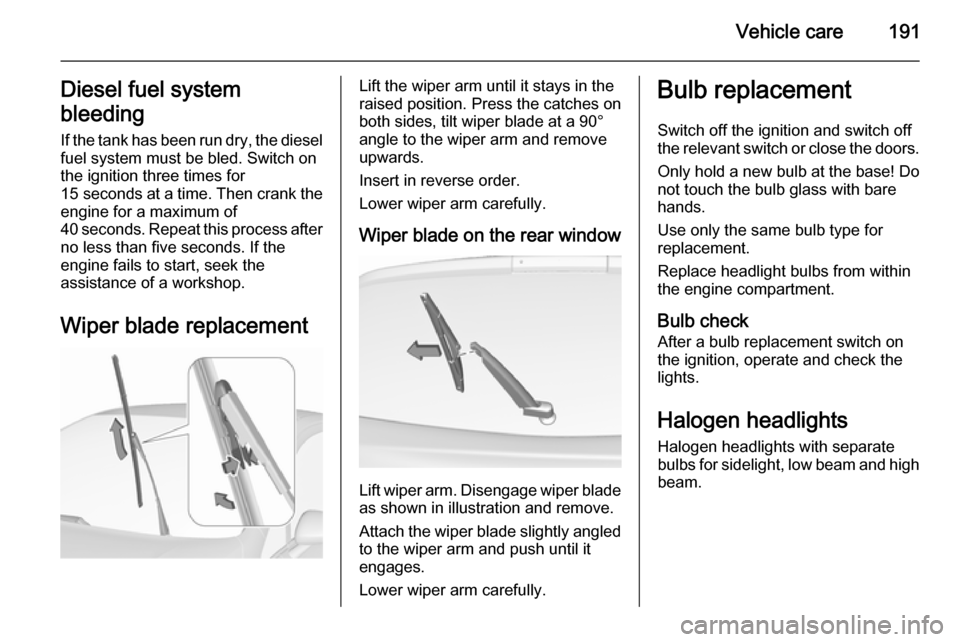
Wiper blade replacementLift the wiper arm until it stays in the
raised position. Press the catches on
both sides, tilt wiper blade at a 90°
angle to the wiper arm and remove
upwards.
Insert in reverse order.
Lower wiper arm carefully.
Wiper blade on the rear window
Lift wiper arm. Disengage wiper blade as shown in illustration and remove.
Attach the wiper blade slightly angled
to the wiper arm and push until it
engages.
Lower wiper arm carefully.
Bulb replacement
Switch off the ignition and switch off
the relevant switch or close the doors.
Only hold a new bulb at the base! Do not touch the bulb glass with bare
hands.
Use only the same bulb type for
replacement.
Replace headlight bulbs from within
the engine compartment.
Bulb check After a bulb replacement switch on
the ignition, operate and check the
lights.
Halogen headlights
Halogen headlights with separate
bulbs for sidelight, low beam and high beam.