Lights VAUXHALL CORSA 2015 Owner's Guide
[x] Cancel search | Manufacturer: VAUXHALL, Model Year: 2015, Model line: CORSA, Model: VAUXHALL CORSA 2015Pages: 249, PDF Size: 7.32 MB
Page 142 of 249

140Driving and operatingManual transmission
automated
The automated manual transmission permits manual gearshifting (manual
mode) or automatic gearshifting
(automatic mode), both with
automatic clutch control.
Manual shifting is possible by tapping the selector lever in manual mode
3 137.
Notice
When unlocking or opening a
vehicle door, a sound may be
audible caused by the hydraulic
system.Transmission display
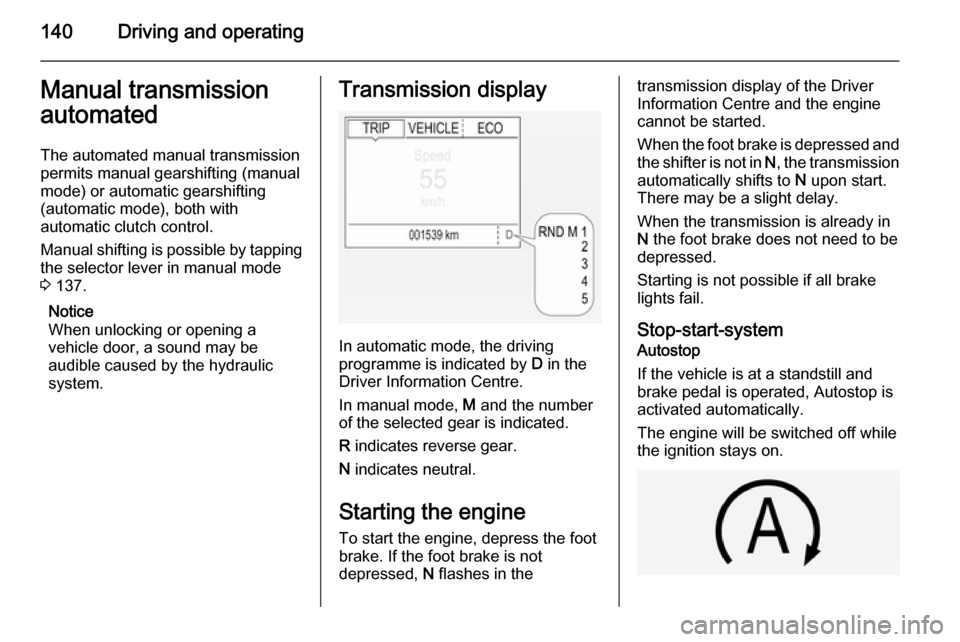
In automatic mode, the driving
programme is indicated by D in the
Driver Information Centre.
In manual mode, M and the number
of the selected gear is indicated.
R indicates reverse gear.
N indicates neutral.
Starting the engine
To start the engine, depress the foot brake. If the foot brake is not
depressed, N flashes in the
transmission display of the Driver
Information Centre and the engine
cannot be started.
When the foot brake is depressed and
the shifter is not in N, the transmission
automatically shifts to N upon start.
There may be a slight delay.
When the transmission is already in
N the foot brake does not need to be
depressed.
Starting is not possible if all brake
lights fail.
Stop-start-system
Autostop
If the vehicle is at a standstill and
brake pedal is operated, Autostop is
activated automatically.
The engine will be switched off while
the ignition stays on.
Page 145 of 249

Driving and operating143
KickdownIf the accelerator pedal is presseddown completely in automatic mode, the transmission shifts to a lower gear
depending on engine speed.
Fault
To prevent damage to the manual
transmission automated, the clutch is engaged automatically at high clutch
temperatures.
In the event of a fault, control indicator
g illuminates. Additionally, a
warning message is displayed in the
Driver Information Centre. Vehicle
messages 3 100.
Continued driving is restricted or not possible, depending on the fault.
Have the cause of the fault remedied
by a workshop.Brakes
The brake system comprises two
independent brake circuits.
If a brake circuit fails, the vehicle can
still be braked using the other brake
circuit. However, braking effect is
achieved only when the brake pedal
is depressed firmly. Considerably
more force is needed for this. The
braking distance is extended. Seek
the assistance of a workshop before
continuing your journey.
When the engine is not running, the
support of the brake servo unit
disappears once the brake pedal has
been depressed once or twice.
Braking effect is not reduced, but
braking requires significantly greater
force. It is especially important to bear this in mind when being towed.
Control indicator R 3 89.
Antilock brake system
Antilock brake system (ABS)
prevents the wheels from locking.ABS starts to regulate brake pressure as soon as a wheel shows a tendency to lock. The vehicle remains
steerable, even during hard braking.
ABS control is made apparent
through a pulse in the brake pedal
and the noise of the regulation
process.
For optimum braking, keep the brake
pedal fully depressed throughout the
braking process, despite the fact that the pedal is pulsating. Do not reduce
the pressure on the pedal.
After starting off the system performs
a self-test which may be audible.
Control indicator u 3 89.
Adaptive brake light
During full braking, all three brake
lights flash for the duration of ABS
control.
Page 165 of 249

Driving and operating163
dirt, snow, ice, slush, or in heavy
rainstorms. Cleaning instructions
3 219.
In the event of a fault in the system or if the system does not work due to
temporary conditions, a message is
displayed in the Driver Information
Centre. Seek the assistance of a
workshop.
Rear view camera The rear view camera assists the
driver when reversing by displaying a
view of the area behind the vehicle.
The view of the camera is displayed
in the Colour-Info-Display.9 Warning
The rear view camera does not
replace driver vision. Note that
objects that are outside the
camera's field of view and the
advanced parking assist sensors,
e.g. below the bumper or
underneath the vehicle, are not
displayed.
Do not reverse the vehicle by only looking at the Info-Display and
check the surrounding area
behind and around the vehicle
before reversing.
Activation
Rear view camera is automatically
activated when reverse gear is
engaged.
Functionality
The camera is mounted between the
number plate lights and has a viewing angle of 130°.
The area displayed by the camera is
limited. The distance of the image that
appears on the display differs from
the actual distance.
Warning symbols
Warning symbols are indicated as
triangles 9 on the picture, which show
obstacles detected by the rear
sensors of the advanced parking
assist.
Display settings
Brightness and contrast can be set by
tapping the touch screen display
when rear view camera is active.
Page 166 of 249

164Driving and operating
Deactivation
The camera is deactivated when a
certain forward speed is exceeded or if reverse gear is not engaged for
approx. 10 seconds.
Activation or deactivation of the visual
guiding lines and the alerting symbols can be changed in the Settings menu in the Info-Display. Vehicle
personalisation 3 103.
Fault
Fault messages are displayed with a 9 on the top line of the Info-Display.
The rear view camera may not
operate properly when:
■ the surrounding is dark
■ the sun or the beam of headlights is
shining directly into the camera
lens
■ ice, snow, mud, or anything else covers the camera lens. Clean the
lens, rinse it with water, and wipe it
with a soft cloth
■ the vehicle had a rear end accident
■ there are extreme temperature changesTraffic sign assistant
Functionality The traffic sign assistant system
detects designated traffic signs via a
front camera and displays them in the
Driver Information Centre.
Traffic signs, which will be detected,
are:
Limit and no passing signs ■ speed limit
■ no passing
■ end of speed limit
■ end of no passingRoad signs
Beginning and end of:
■ motorways
■ A-roads
■ play streetsAdd on signs ■ additional hints to traffic signs
■ restriction of trailer towing
■ tractor constraints
■ wet warning
■ ice warning
■ direction arrows
Speed limit signs and no passing
signs are displayed in the Driver
Information Centre until the next
speed limit sign or end of speed limit
is detected or up to a defined sign
timeout.
Page 180 of 249

178Vehicle care9Danger
The ignition system and Xenon
headlights use extremely high
voltage. Do not touch.
Bonnet
Opening
Pull the release lever and return it to
its original position.
Push the safety catch upwards and open the bonnet.
Secure the bonnet support.
If the bonnet is opened during an
Autostop, the engine will be restarted automatically for safety reasons.
Closing Before closing the bonnet, press the
support into the holder.
Lower the bonnet and let it fall into the
latch from a low height (20-25 cm).
Check that the bonnet is engaged.Caution
Do not press the bonnet into the
latch to avoid dents.
Engine oil
Check the engine oil level manually on a regular basis to prevent damage
to the engine. Ensure that the correct
specification of oil is used.
Recommended fluids and lubricants
3 223.
Check with the vehicle on a level
surface. The engine must be at
operating temperature and switched
off for at least five minutes.
Page 186 of 249

184Vehicle careDiesel fuel system
bleeding
If the tank has been run dry, the diesel fuel system must be bled. Switch on
the ignition three times for
15 seconds at a time. Then crank the
engine for a maximum of
40 seconds. Repeat this process after
no less than five seconds. If the
engine fails to start, seek the
assistance of a workshop.
Wiper blade replacementLift the wiper arm until it stays in the
raised position. Press the catches on
both sides, tilt wiper blade at a 90° to the wiper arm and remove upwards.
Insert in reverse order.
Lower wiper arm carefully.
Wiper blade on the rear window
Lift wiper arm. Disengage wiper blade as shown in illustration and remove.
Attach the wiper blade slightly angled
to the wiper arm and push until it
engages.
Lower wiper arm carefully.
Bulb replacement
Switch off the ignition and switch off
the relevant switch or close the doors.
Only hold a new bulb at the base! Do not touch the bulb glass with bare
hands.
Use only the same bulb type for
replacement.
Replace headlight bulbs from within
the engine compartment.
Bulb check After a bulb replacement switch on
the ignition, operate and check the
lights.
Halogen headlights
Halogen headlights with separate
bulbs for sidelight, low beam and high beam.
Page 187 of 249

Vehicle care185
Sidelight/daytime running light (1)
Low beam (2)
High beam (3)
Front turn signal lights 3 188.
Low beam
1. Rotate the cap (2) anticlockwise
and remove it.
2. Press the clip to disengage bulbholder. Withdraw the bulb holder
from the reflector.
3. Detach the bulb from the bulb holder and replace the bulb.
4. Insert the bulb holder with the clip
downwards and engage into the
reflector until it clicks.
5. Install cap.
Page 189 of 249

Vehicle care187
2. Press both clips together andwithdraw the bulb socket from theheadlamp housing.
3. Remove the bulb from the socket by pulling.
4. Replace and insert new bulb into socket.
5. Insert the bulb socket into the headlamp housing and turn
clockwise.
Sidelight/daytime running light
with LEDs Sidelights and daytime running lights
consist of LEDs which cannot be
changed. Consult a workshop in case
of a defective LED.
Xenon headlights9 Danger
Xenon headlights work under
extremely high electrical voltage.
Do not touch. Have bulbs replaced by a workshop.
Sidelight/daytime running lights are
designed as LEDs and cannot be
changed.
Bulbs for corner lighting can be
changed.
Front turn signal lights 3 188.
Corner lighting
1. Rotate the cap (3) anticlockwise
and remove it.
Page 190 of 249

188Vehicle care
2. Rotate the bulb holderanticlockwise to disengage.
Withdraw the bulb holder from the
reflector.
3. Remove the bulb from the plug connector by disengaging and
pulling.
4. Replace the bulb. Connect and engage bulb holder with the plug
connector.
5. Insert the bulb holder into the reflector and rotate clockwise to
secure.
6. Fit the cap and rotate clockwise.
Fog lights
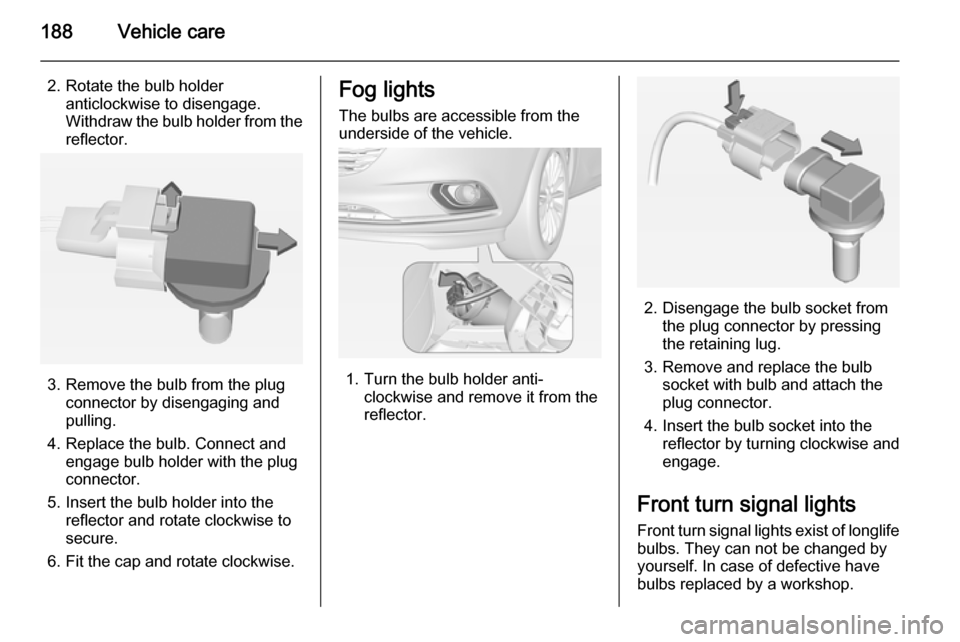
The bulbs are accessible from the
underside of the vehicle.
1. Turn the bulb holder anti- clockwise and remove it from the
reflector.
2. Disengage the bulb socket from the plug connector by pressing
the retaining lug.
3. Remove and replace the bulb socket with bulb and attach the
plug connector.
4. Insert the bulb socket into the reflector by turning clockwise and
engage.
Front turn signal lights
Front turn signal lights exist of longlife bulbs. They can not be changed by
yourself. In case of defective have
bulbs replaced by a workshop.
Page 191 of 249

Vehicle care189Tail lights
1. Release the cover in the loadcompartment on the respective
side and remove.
2. Unscrew both plastic securing nuts from the inside by hand.
3. Carefully withdraw the lightassembly from the recesses and
remove.
4. Press the retaining lugs and remove the bulb carrier from the
light assembly.