change time VAUXHALL CORSA F 2017.5 User Guide
[x] Cancel search | Manufacturer: VAUXHALL, Model Year: 2017.5, Model line: CORSA F, Model: VAUXHALL CORSA F 2017.5Pages: 267, PDF Size: 7.81 MB
Page 119 of 267

Lighting117Turn and lane-changesignalslever up:right turn signallever down:left turn signal
If the lever is moved past the
resistance point, the turn signal is
switched on constantly. When the
steering wheel moves back, the turn
signal is automatically deactivated.
For three flashes, e.g. when changing
lanes, press the lever until resistance
is felt and then release.
With a trailer connected, turn signal
flashes six times and tone frequency
changes when pressing the lever until resistance is felt and then releasing.
Move the lever to the resistance point
and hold for longer indication.
Switch the turn signal off manually by
moving the lever to its original
position.
Front fog lights
Operated by pressing >.
Light switch in position AUTO:
switching on front fog lights will switch the low beam on automatically.
Rear fog light
Operated by pressing r.
Light switch in position AUTO:
switching on rear fog light will switch
on headlights automatically.
Page 122 of 267

120LightingDome light
Spotlight incorporated in the inside
mirror housing comes on when
headlights are switched on.
Dome light illuminates gear shifting
console indirectly.
Reading lights
Operated by pressing 2 for the left
and right side.
Lighting features
Entry lighting
Welcome lighting
The following lights are switched on
for a short time by unlocking the
vehicle with the radio remote control:
● headlights
● tail lights
● number plate lights
● instrument panel light
● interior lights
Some functions are only operable
when it is dark outside, to facilitate locating the vehicle.
Lighting switches off immediately
when the ignition key is turned to
position 1 3 133.
Activation or deactivation of this
function can be changed in the
Info-Display.
Vehicle personalisation 3 105.
The settings can be saved for the key being used 3 22.The following lights will additionally
switch on when the driver's door is
opened:
● illumination of all switches
● Driver Information Centre
Exit lighting
The following lights switch on if the
key is removed from the ignition
switch:
● interior lights
● instrument panel light (only when
it is dark)
They will switch off automatically after
a delay and will be activated again if
the driver's door is opened.
Path lighting Headlights, tail lights and number
plate lights illuminate the surrounding area for an adjustable time after
leaving the vehicle.
Page 123 of 267

Lighting121Activating
1. Switch off the ignition.
2. Remove the ignition key.
3. Open driver's door.
4. Pull the turn signal lever.
5. Close the driver's door.
If the driver's door is not closed the
lights switch off after two minutes.
Exit lighting is switched off
immediately if the turn signal lever is
pulled while the driver's door is open.
Activation, deactivation and duration
of this function can be changed in the Info-Display. Vehicle personalisation
3 105.
The settings can be saved for the key
being used 3 22.
Battery discharge protection
Vehicle battery state of charge
function
The function guarantees longestvehicle battery life via a generator
with controllable power output and
optimised power distribution.
To prevent discharge of the vehicle
battery when driving, the following
systems are reduced automatically in two stages and finally switched off:
● heated rear window
● heated windscreen
● heated mirrors
● heated seats
● fan
In the second stage, a message
which confirms the activation of the
vehicle battery discharge protection
will be displayed in the Driver
Information Centre.Switching off electric lights
To prevent discharge of the vehicle
battery when the ignition is switched off, some interior lights are switched
off automatically after some time.
Page 154 of 267

152Driving and operatingFault
If there is a fault in the system, the control indicator b illuminates
continuously and a message or a
warning code appears in the Driver
Information Centre. The system is not
operational.
Have the cause of the fault remedied by a workshop.
City mode City mode is a feature which enables
increased steering assistance during
lower speed conditions, e.g. city
traffic or parking. Steering assistance
is increased for greater convenience.Activation
Press B when engine is running. The
system works from standstill up to
22 mph, and also in reverse gear. Above this speed, the system
changes to normal mode. When
activated, City mode engages
automatically below 22 mph.
An illuminated LED in the City mode
button indicates that the system is
active and a message pops-up in the
Driver Information Centre.
City mode remains active during an
Autostop, but is only operational when the engine is running.
Stop-start system 3 135.
Deactivation
Press B; LED in the button
extinguishes and a message pops-up in the Driver Information Centre.
Each time the engine is started, City
mode is deactivated.
Fault
In the event of a fault in the system,
control indicator c illuminates and a
message is displayed in the Driver
Information Centre.
Vehicle messages 3 102.
System calibration
If control indicators c and b
illuminate simultaneously, a
calibration of the power steering
system is necessary. This can occur
e.g. when turning the steering wheel
for one rotation with ignition switched
Page 159 of 267

Driving and operating157
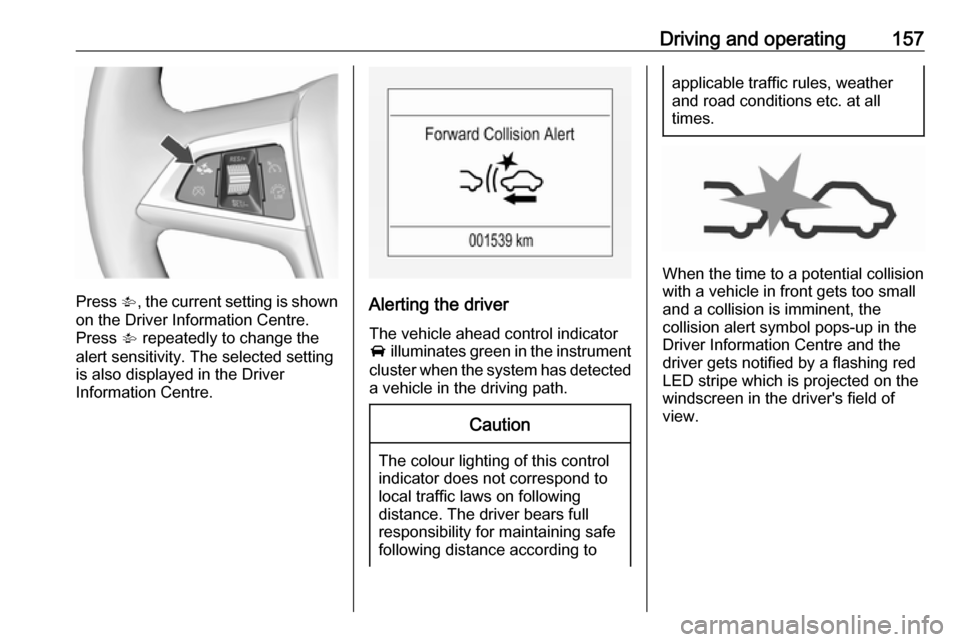
Press V, the current setting is shown
on the Driver Information Centre.
Press V repeatedly to change the
alert sensitivity. The selected setting
is also displayed in the Driver
Information Centre.Alerting the driver
The vehicle ahead control indicator
A illuminates green in the instrument
cluster when the system has detected
a vehicle in the driving path.
Caution
The colour lighting of this control
indicator does not correspond to
local traffic laws on following
distance. The driver bears full
responsibility for maintaining safe
following distance according to
applicable traffic rules, weather
and road conditions etc. at all
times.
When the time to a potential collision
with a vehicle in front gets too small
and a collision is imminent, the
collision alert symbol pops-up in the
Driver Information Centre and the
driver gets notified by a flashing red
LED stripe which is projected on the
windscreen in the driver's field of
view.
Page 171 of 267

Driving and operating169Caution
Performance of the system can bereduced when sensors are
covered, e.g. by ice or snow.
Performance of the parking assist
system can be reduced due to
heavy loading.
Special conditions apply if there
are taller vehicles in the vicinity
(e.g. off-road vehicles, mini vans,
vans). Object identification and correct distance indication in the
upper part of these vehicles
cannot be guaranteed.
Objects with a very small reflection
cross-section, e.g. objects of
narrow size or soft materials, may
not be detected by the system.
Parking assist systems do not
detect objects outside the
detection range.
Notice
It is possible that the sensor detects a non-existing object caused by
echo disturbance from external
acoustic noise or mechanical
misalignments (sporadic false
warnings may occur).
Make sure that the front number
plate is properly mounted (not bent
and no gaps to the bumper on the left
or right side) and the sensors are
firmly in place.
Advanced parking assist system
may not respond to changes in the
available parking space after
initiating a parking manoeuvre. The
system may recognize an entry, a
gateway, a courtyard or even a crossing as a parking slot. After
selecting reverse gear the system
will start a parking manoeuvre. Take care regarding the availability of the
suggested parking slot.
Surface irregularities, e.g. on construction zones, are not detected
by the system. The driver accepts
responsibility.
Notice
If engaging a forward gear and
exceeding a certain speed, the
parking assist will be deactivated
when the rear carrier system is
extended.If engaging reverse for the first time,
the parking assist will detect the rear carrier system and provide a buzzing
sound. Press r or D briefly to
deactivate the parking assist.
Notice
After production, the system
requires a calibration. For optimal
parking guidance, a driving distance
of at least 6 miles, including a
number of bends, is required.
Side blind spot alert
The Side blind spot alert system
detects and reports objects on either
side of the vehicle, within a specified
"blind spot" zone. The system
displays a visual alert in each exterior
mirror, when detecting objects that
may not be visible in the interior and
exterior mirrors.
Side blind spot alert uses some of the advanced parking assist sensors
which are located in the front and rear bumper on both sides of the vehicle.
Page 177 of 267

Driving and operating175In some cases, traffic sign assistant is
cleared up automatically by the
system.
Clearing of traffic signs
There are different scenarios that
lead to clearing the currently
displayed traffic signs. After clearing,
the “Default Sign” is displayed in the
Driver Information Centre.
Reasons for signs being cleared: ● A predefined distance was driven
or time has elapsed (differs for
each sign type)
● Vehicle drives through a turn
● The speed becomes slower than 32 mph (city entry detection)
Fault
The traffic sign assistant system may
not operate correctly if:
● The area of the windscreen, where the front camera is
located, is not clean or affected
by foreign items, e.g. stickers.
● Traffic signs are completely or partially covered or difficult to
discern.● There are adverse environmental
conditions, e.g. heavy rain, snow, direct sunlight or shadows.
● Traffic signs are incorrectly mounted or damaged.
● Traffic signs do not comply with the Vienna Convention on trafficsigns (Wiener Übereinkommen
über Straßenverkehrszeichen).Caution
The system is intended to help the driver within a defined speed
range to discern certain traffic
signs. Do not ignore traffic signs
which are not displayed by the
system.
The system does not discern any other than the conventional traffic
signs that might give or end a
speed limit.
Do not let this special feature
tempt you into taking risks when
driving.
Always adapt speed to the road
conditions.
The driver assistance systems do not relieve the driver from full
responsibility for vehicle
operation.
Lane departure warning
The lane departure warning system
observes the lane markings between
which the vehicle is driving via a front camera. The system detects lane
changes and warns the driver in the
event of an unintended lane change
via visual and acoustic signals.
Criteria for the detection of an
unintended lane change are:
● No operation of turn signals.
● No brake pedal operation.
● No active accelerator operation or speeding-up.
● No active steering.
If the driver is performing these
actions, no warning will be issued.
Page 186 of 267

184Driving and operatingTrailer hitch
General information
Only use towing equipment that has
been approved for your vehicle.
Entrust retrofitting of towing
equipment to a workshop. It may be
necessary to make changes that
affect the cooling system, heat
shields or other equipment.
The bulb outage detection function for trailer brake light cannot detect a
partial bulb outage, e.g. in case of four
times five watt bulbs, the function only detects lamp outage when only a
single five Watt lamp remains or none
remain.
Fitting of towing equipment could
cover the opening of the towing eye.
If this is the case use the coupling ball bar for towing. Always keep the
coupling ball bar in the vehicle when
not in use.Driving characteristics and
towing tips
Before attaching a trailer, lubricatethe coupling ball. However, do not do
so if a stabiliser, which acts on the
coupling ball, is being used to reduce snaking movements.
For trailers with low driving stability
and caravan trailers with a permitted
gross vehicle weight of more than
1000 kg a speed of 50 mph must not
be exceeded; the use of a stabiliser is
recommended.
If the trailer starts snaking, drive more slowly, do not attempt to correct the
steering and brake sharply if
necessary.
When driving downhill, drive in the
same gear as if driving uphill and
drive at a similar speed.
Adjust tyre pressure to the value
specified for full load 3 252.Trailer towing
Trailer loadsThe permissible trailer loads are
vehicle and engine-dependent
maximum values which must not be
exceeded. The actual trailer load is
the difference between the actual
gross weight of the trailer and the
actual coupling socket load with the
trailer coupled.
The permissible trailer loads are
specified in the vehicle documents. In general, they are valid for gradients
up to max. 12%
The permitted trailer loads apply up to the specified incline and up to an
altitude of 1000 metres above sea
level. Since engine power decreases
as altitude increases due to the air
becoming thinner, therefore reducing
climbing ability, the permissible gross
train weight also decreases by 10%
for every 1000 metres of additional
altitude. The gross train weight does
not have to be reduced when driving
on roads with slight inclines (less than
8%, e.g. motorways).
Page 192 of 267

190Vehicle careGeneral Information
Accessories and vehicle modifications
We recommend the use of genuine
parts and accessories and factory
approved parts specific for your
vehicle type. We cannot assess or guarantee reliability of other products
- even if they have a regulatory or
otherwise granted approval.
Any modification, conversion or other changes made to standard vehicle
specifications (including, without
limitation, software modifications,
modifications of the electronic control units) may invalidate the warranty
offered by Vauxhall. Furthermore,
such changes may affect driver
assistance systems, may impact fuel
consumption, CO 2 emissions and
other emissions of the vehicle and
cause the vehicle to no longer
conform to the type approval,
impacting the validity of your vehicle
registration.Caution
When transporting the vehicle on
a train or on a recovery vehicle, the
mud flaps may be damaged.
Vehicle storage
Storage for a long period of time
If the vehicle is to be stored for several months:
● Wash and wax the vehicle.
● Have the wax in the engine compartment and underbody
checked.
● Clean and preserve the rubber seals.
● Fill up fuel tank completely.
● Change the engine oil.
● Drain the washer fluid reservoir.
● Check the coolant antifreeze and
corrosion protection.
● Adjust tyre pressure to the value specified for full load.
● Park the vehicle in a dry, wellventilated place. Engage first or
reverse gear or set selector lever
to P. Prevent the vehicle from
rolling.
● Do not apply the parking brake.
● Open the bonnet, close all doors and lock the vehicle.
● Disconnect the clamp from the negative terminal of the vehicle
battery. Beware that all systems
are not functional, e.g. anti-theft
alarm system.
Putting back into operation
When the vehicle is to be put back into
operation:
● Connect the clamp to the negative terminal of the vehicle
battery. Activate the electronics
of the power windows.
● Check tyre pressure.
● Fill up the washer fluid reservoir.
● Check the engine oil level.
● Check the coolant level.
● Fit the number plate if necessary.
Page 203 of 267

Vehicle care201Sidelight/daytime running light
with LEDs
Sidelights and daytime running lightsare designed as LEDs and cannot be
changed. Consult a workshop in case of a defective LED.
Xenon headlights9 Danger
Xenon headlights work under
extremely high electrical voltage.
Do not touch. Have bulbs replaced by a workshop.
Sidelight/daytime running lights are
designed as LEDs and cannot be
changed.
Bulbs for corner lighting can be
changed.
Front turn signal lights 3 202.
Corner lighting
1. Rotate the cap (3) anticlockwise
and remove it.
2. Rotate the bulb holderanticlockwise to disengage.
Withdraw the bulb holder from the
reflector.
3. Remove the bulb from the plug connector by disengaging and
pulling.
4. Replace the bulb. Connect and engage bulb holder with the plug
connector.
5. Insert the bulb holder into the reflector and rotate clockwise to
secure.
6. Fit the cap and rotate clockwise.