panel VAUXHALL CORSA F 2019 User Guide
[x] Cancel search | Manufacturer: VAUXHALL, Model Year: 2019, Model line: CORSA F, Model: VAUXHALL CORSA F 2019Pages: 229, PDF Size: 6.72 MB
Page 107 of 229
Lighting105Notice
In the event of an accident with
airbag deployment, the courtesy lights are turned on automatically.
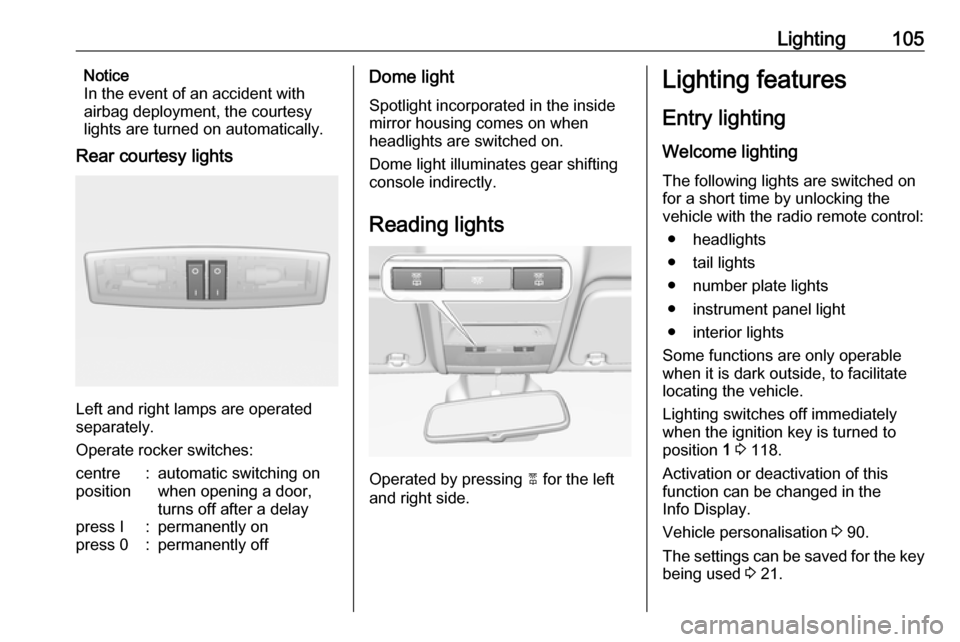
Rear courtesy lights
Left and right lamps are operated
separately.
Operate rocker switches:
centre
position:automatic switching on
when opening a door,
turns off after a delaypress I:permanently onpress 0:permanently offDome light
Spotlight incorporated in the inside
mirror housing comes on when
headlights are switched on.
Dome light illuminates gear shifting
console indirectly.
Reading lights
Operated by pressing 2 for the left
and right side.
Lighting features
Entry lighting
Welcome lighting
The following lights are switched on
for a short time by unlocking the
vehicle with the radio remote control:
● headlights
● tail lights
● number plate lights
● instrument panel light
● interior lights
Some functions are only operable
when it is dark outside, to facilitate locating the vehicle.
Lighting switches off immediately
when the ignition key is turned to
position 1 3 118.
Activation or deactivation of this
function can be changed in the
Info Display.
Vehicle personalisation 3 90.
The settings can be saved for the key being used 3 21.
Page 108 of 229
106LightingThe following lights will additionally
switch on when the driver's door is
opened:
● illumination of all switches
● Driver Information Centre
Exit lighting
The following lights switch on if the
key is removed from the ignition
switch:
● interior lights
● instrument panel light (only when
it is dark)
They will switch off automatically after
a delay and will be activated again if
the driver's door is opened.
Path lighting Headlights, tail lights and number
plate lights illuminate the surrounding area for an adjustable time after
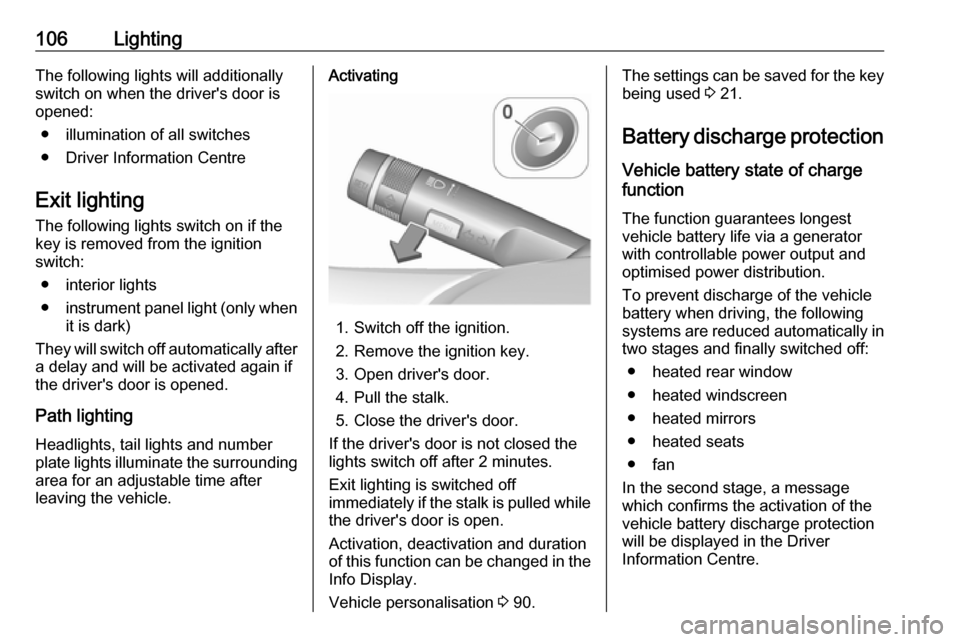
leaving the vehicle.Activating
1. Switch off the ignition.
2. Remove the ignition key.
3. Open driver's door.
4. Pull the stalk.
5. Close the driver's door.
If the driver's door is not closed the
lights switch off after 2 minutes.
Exit lighting is switched off
immediately if the stalk is pulled while
the driver's door is open.
Activation, deactivation and duration
of this function can be changed in the Info Display.
Vehicle personalisation 3 90.
The settings can be saved for the key
being used 3 21.
Battery discharge protection Vehicle battery state of charge
function
The function guarantees longest
vehicle battery life via a generator with controllable power output and
optimised power distribution.
To prevent discharge of the vehicle
battery when driving, the following
systems are reduced automatically in two stages and finally switched off:
● heated rear window
● heated windscreen
● heated mirrors
● heated seats
● fan
In the second stage, a message
which confirms the activation of the
vehicle battery discharge protection
will be displayed in the Driver
Information Centre.
Page 156 of 229

154Vehicle careVehicle careGeneral Information...................154
Accessories and vehicle modifications .......................... 154
Vehicle storage ........................155
End-of-life vehicle recovery .....155
Vehicle checks ........................... 156
Performing work ......................156
Bonnet ..................................... 156
Engine oil ................................. 157
Engine coolant ......................... 158
Washer fluid ............................ 159
Brakes ..................................... 160
Brake fluid ............................... 160
Vehicle battery ......................... 160
Wiper blade replacement ........162
Bulb replacement .......................162
Halogen headlights ..................162
Xenon headlights .....................165
Front fog lights ......................... 166
Front turn lights .......................166
Tail lights ................................. 167
Side turn lights ......................... 169
Centre high-mounted brake light ......................................... 169Number plate light...................169
Interior lights ............................ 170
Electrical system ........................170
Fuses ....................................... 170
Engine compartment fuse box . 171
Instrument panel fuse box .......174
Vehicle tools .............................. 175
Tools ........................................ 175
Wheels and tyres .......................176
Winter tyres ............................. 176
Tyre designations ....................177
Tyre pressure .......................... 177
Tyre pressure monitoring
system .................................... 178
Tread depth ............................. 182
Changing tyre and wheel size . 183
Wheel covers ........................... 183
Tyre chains .............................. 183
Tyre repair kit .......................... 184
Wheel changing .......................189
Spare wheel ............................ 190
Jump starting ............................. 193
Towing ....................................... 194
Towing the vehicle ...................194
Towing another vehicle ...........195
Appearance care .......................196
Exterior care ............................ 196
Interior care ............................. 198General Information
Accessories and vehiclemodifications
We recommend the use of genuine
parts and accessories and factory
approved parts specific for your
vehicle type. We cannot assess or guarantee reliability of other products
- even if they have a regulatory or
otherwise granted approval.
Any modification, conversion or other
changes made to standard vehicle
specifications (including, without
limitation, software modifications,
modifications of the electronic control units) may invalidate the warranty
offered by Vauxhall. Furthermore,
such changes may affect driver
assistance systems, fuel
consumption, CO 2 emissions and
other emissions of the vehicle. They
may also invalidate the vehicle
operating permit.
Page 172 of 229
170Vehicle care
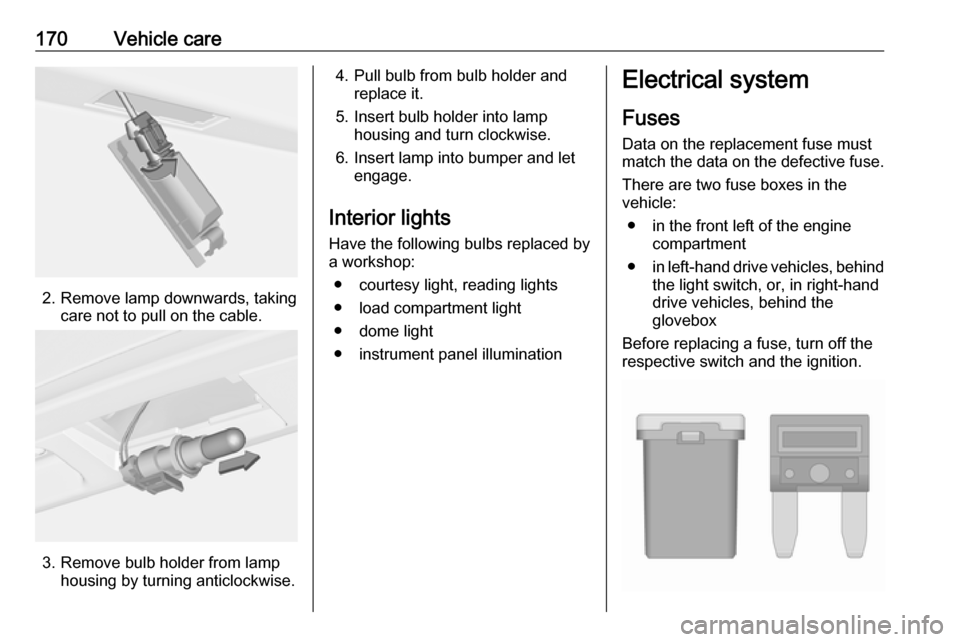
2. Remove lamp downwards, takingcare not to pull on the cable.
3. Remove bulb holder from lamphousing by turning anticlockwise.
4. Pull bulb from bulb holder andreplace it.
5. Insert bulb holder into lamp housing and turn clockwise.
6. Insert lamp into bumper and let engage.
Interior lights
Have the following bulbs replaced by
a workshop:
● courtesy light, reading lights
● load compartment light
● dome light
● instrument panel illuminationElectrical system
Fuses Data on the replacement fuse must
match the data on the defective fuse.
There are two fuse boxes in the
vehicle:
● in the front left of the engine compartment
● in left-hand drive vehicles, behind
the light switch, or, in right-hand
drive vehicles, behind the
glovebox
Before replacing a fuse, turn off the respective switch and the ignition.
Page 176 of 229
174Vehicle careInstrument panel fuse box
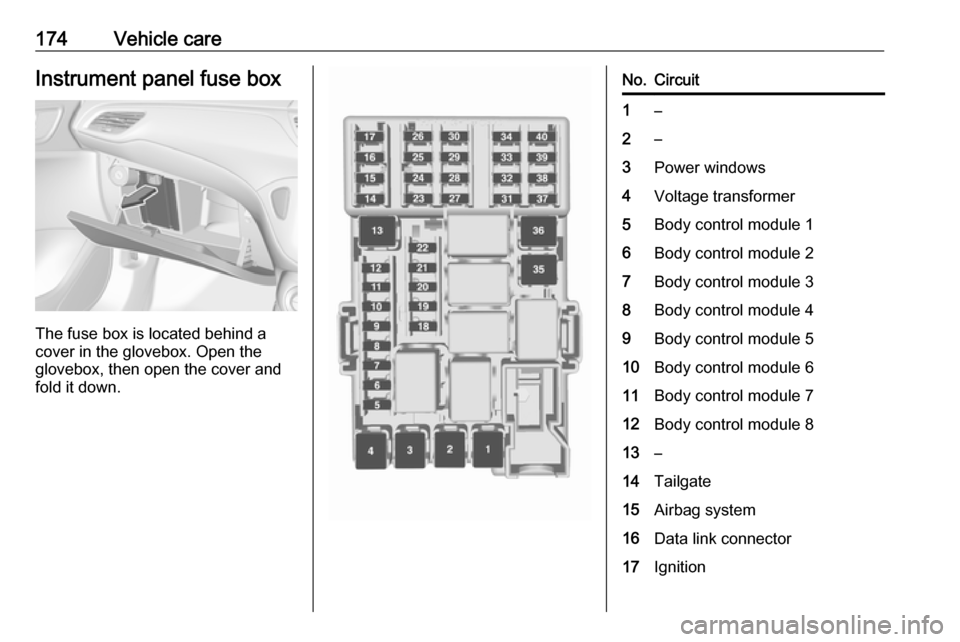
The fuse box is located behind a
cover in the glovebox. Open the
glovebox, then open the cover and
fold it down.
No.Circuit1–2–3Power windows4Voltage transformer5Body control module 16Body control module 27Body control module 38Body control module 49Body control module 510Body control module 611Body control module 712Body control module 813–14Tailgate15Airbag system16Data link connector17Ignition
Page 177 of 229
Vehicle care175No.Circuit18Air conditioning system19–20Parking assist, rain sensor, front
camera21Brake switch22Infotainment system23Display24–25Auxiliary jack26Instrument panel27–28–29–30–31Horn32–33Heated steering wheelNo.Circuit34–35Tyre repair kit36–37Rear wiper38Cigarette lighter39Power windows, automatic
transmission display40–Vehicle tools
Tools
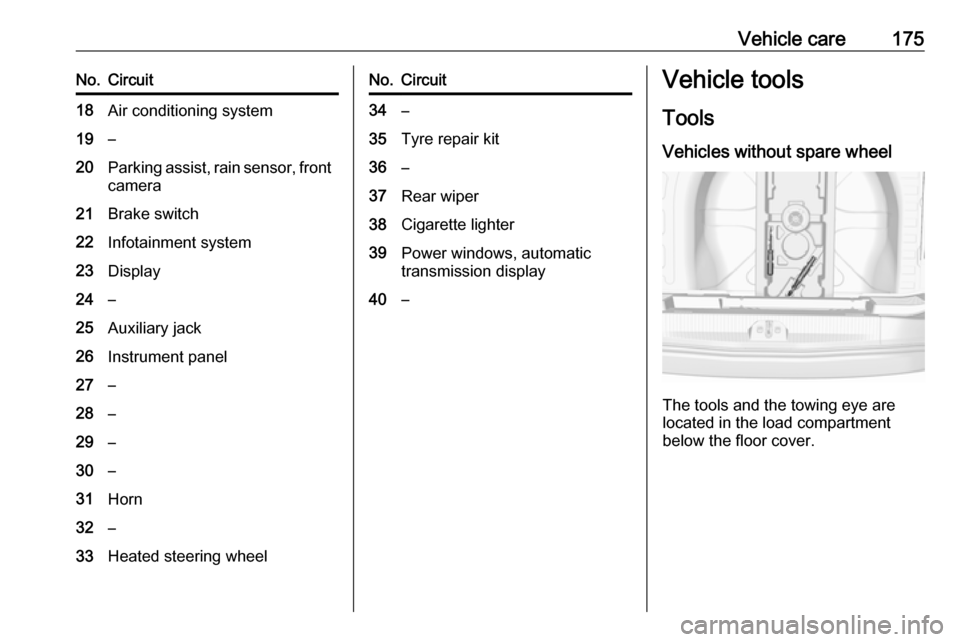
Vehicles without spare wheel
The tools and the towing eye are
located in the load compartment below the floor cover.
Page 193 of 229

Vehicle care191●If the ground on which the vehicle
is standing is soft, a solid board
(max. 1 cm thick) should be
placed under the jack.
● Take heavy objects out of the vehicle before jacking up.
● No people or animals may be in the vehicle when it is jacked-up.
● Never crawl under a jacked-up vehicle.
● Do not start the vehicle when it is
raised on the jack.
● Before screwing in the wheel bolts, clean them and lightly coat
the taper of each wheel bolt with
commercially available grease.9 Warning
Do not grease the thread of the
wheel bolt.
1. Steel wheels:
Pull off the wheel cover.
Alloy wheels with bolt caps Disengage wheel bolt caps with a
screwdriver and remove. To
protect the wheel, place a soft
cloth between the screwdriver
and the alloy wheel.
2. Install the wheel wrench ensuring that it locates securely and loosen
each wheel bolt by half a turn.
The wheels might be protected by
locking wheel bolts. To loosen
these specific bolts, first attach
the adapter for the locking wheel
bolts onto the head of the bolt
before installing the wheel
wrench. The adapter is located in
the glovebox.
3. Ensure the jack is correctly positioned under the relevant
vehicle jacking point.
On versions with sill panels or
retrofitted sill panels, no jack may
be used. The vehicle may be
damaged.
Page 200 of 229
198Vehicle careRemove dirt residues from smearingwiper blades by using a soft cloth and window cleaner. Also make sure to
remove any residues such as wax,
insect residues and similar from the
window.
Ice residues, pollution and continuous wiping on dry windows will damage or
even destroy the wiper blades.
Wheels and tyres Do not use high-pressure jet
cleaners.
Clean rims with a pH-neutral wheel
cleaner.
Rims are painted and can be treated
with the same agents as the body.
Paintwork damage Rectify minor paintwork damage witha touch-up pen before rust forms.
Have more extensive damage or rust areas repaired by a workshop.Underbody
Some areas of the vehicle underbody
have a PVC undercoating while other critical areas have a durable
protective wax coating.
After the underbody is washed, check
the underbody and have it waxed if
necessary.
Bitumen / rubber materials could damage the PVC coating. Have
underbody work carried out by a
workshop.
Before and after winter, wash the
underbody and have the protective
wax coating checked.
Liquid gas system9 Danger
Liquid gas is heavier than air and
can collect in sink points.
Take care when performing work
at the underbody in a pit.
For painting work and when using a
drying booth at a temperature above
60 °C, the liquid gas tank must be
removed.
Do not make any modifications to the
liquid gas system.
Towing equipment
Do not clean the coupling ball bar with a steam-jet or high-pressure jet
cleaner.
Interior care
Interior and upholstery
Only clean the vehicle interior,
including the instrument panel fascia
and panelling, with a dry cloth or
interior cleaner.
Clean the leather upholstery with
clear water and a soft cloth. In case of heavy soiling, use leather care.
The instrument cluster and the
displays should only be cleaned using
a soft damp cloth. If necessary use a
weak soap solution.
Page 205 of 229
Technical data203Technical dataVehicle identification..................203
Vehicle Identification Number ..203
Identification plate ...................204
Engine identification ................204
Vehicle data ............................... 205
Recommended fluids and lubricants ................................ 205
Engine data ............................. 208
Vehicle dimensions .................210
Capacities ................................ 210
Tyre pressures ........................ 212Vehicle identification
Vehicle IdentificationNumber
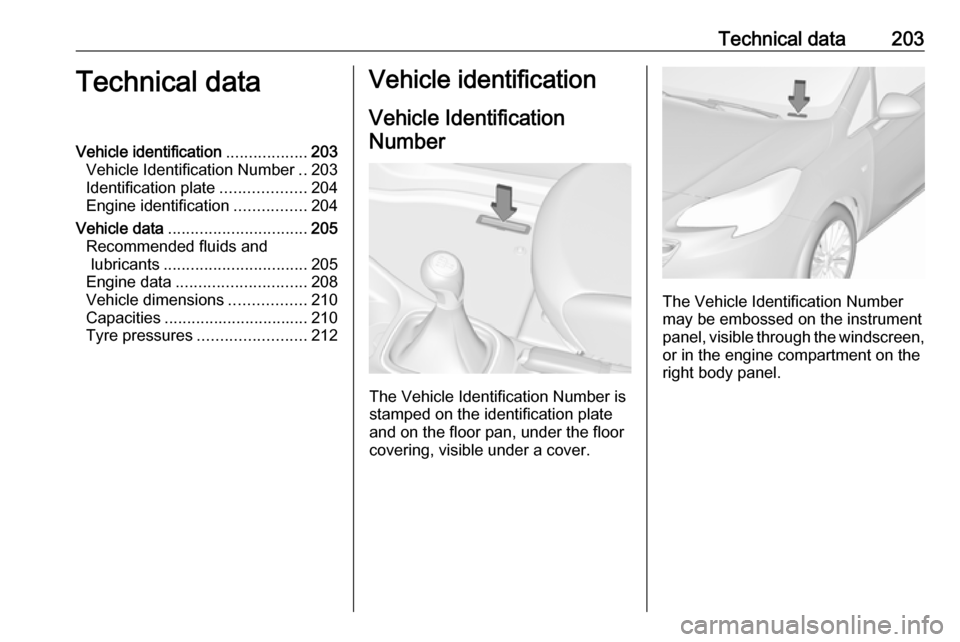
The Vehicle Identification Number is
stamped on the identification plate
and on the floor pan, under the floor
covering, visible under a cover.
The Vehicle Identification Number
may be embossed on the instrument
panel, visible through the windscreen,
or in the engine compartment on the
right body panel.
Page 226 of 229

224I
Identification plate .....................204
Ignition switch positions .............118
Immobiliser ............................ 26, 80
Indicators ...................................... 69
Info Display ................................... 86
Information displays...................... 81
Instrument cluster ........................69
Instrument panel fuse box .........174
Instrument panel illumination control .................................... 104
Instrument panel overview ........... 10
Interior care ............................... 198
Interior lighting ............................ 104
Interior lights ...................... 104, 170
Interior mirrors .............................. 28
Interruption of power supply ......127
Introduction .................................... 3
J
Jump starting ............................. 193
K
Key, memorised settings ..............21
Keys ............................................. 19
Keys, locks ................................... 19
L
Lane departure warning .......78, 147
Lashing eyes ............................... 58
Light switch .................................. 98Load compartment ................24, 55
Load compartment cover .............57
Loading information .....................59
Low fuel ....................................... 80
LPG ...................................... 71, 150
M Malfunction indicator light ............77
Manual anti-dazzle ......................28
Manual mode ............................. 126
Manual transmission .................. 128
Manual windows ..........................29
Memorised settings ......................21
Midlevel display ............................ 81
Mirror adjustment ........................... 8
Misted light covers .....................103
N New vehicle running-in ..............118
Number plate light .....................169
O
Object detection systems ...........139
Odometer ..................................... 69
Oil, engine .......................... 201, 205
OnStar .......................................... 93
Operate pedal ............................... 78
Outside temperature ....................65
Overrun cut-off ........................... 120P
Parking ................................ 17, 122
Parking assist ...................... 78, 139
Parking brake ............................ 130
Parking lights ............................. 103
Particulate filter ........................... 123
Performing work ........................156
Power outlets ............................... 67
Power steering.............................. 78
Power windows ............................ 29
Puncture ..................................... 190
R Radio Frequency Identification (RFID) ..................................... 221
Radio remote control ...................20
REACH ....................................... 216
Reading lights ............................ 105
Rear floor storage cover ..............57
Rear fog light ...............80, 103, 167
Rear view camera ...................... 143
Rear window wiper and washer ..64
Recommended fluids and lubricants ........................ 201, 205
Reduced engine power ................80
Refuelling ................................... 150
Registered trademarks ...............218
Retained power off .....................119
Reversing lights .........................103
Ride control systems ..................131