Headlight VAUXHALL CORSA F 2020 User Guide
[x] Cancel search | Manufacturer: VAUXHALL, Model Year: 2020, Model line: CORSA F, Model: VAUXHALL CORSA F 2020Pages: 227, PDF Size: 18.77 MB
Page 152 of 227
150Driving and operatingThe panoramic view system may not
operate properly when:
● The surrounding is dark.
● The sun or the beam of headlights is shining directly into
the camera lenses.
● Weather limits visibility, such as fog, rain, or snow.
● The camera lenses are blocked by snow, ice, slush, mud, dirt.
● The vehicle had an accident. ● There are extreme temperature changes.
Rear view camera
The rear view camera assists the
driver when reversing by displaying a view of the area behind the vehicle.
The view of the camera is displayed
in the Info Display.9 Warning
The rear view camera does not
replace driver vision. Note that
objects that are outside the
camera's field of view and the
parking assist sensors, e.g. below
the bumper or underneath the
vehicle, are not displayed.
Do not reverse or park the vehicle
using only the rear view camera.
Always check the surrounding of
the vehicle before driving.
Switching on
Rear view camera is automatically
activated when reverse gear is
engaged.
Functionality
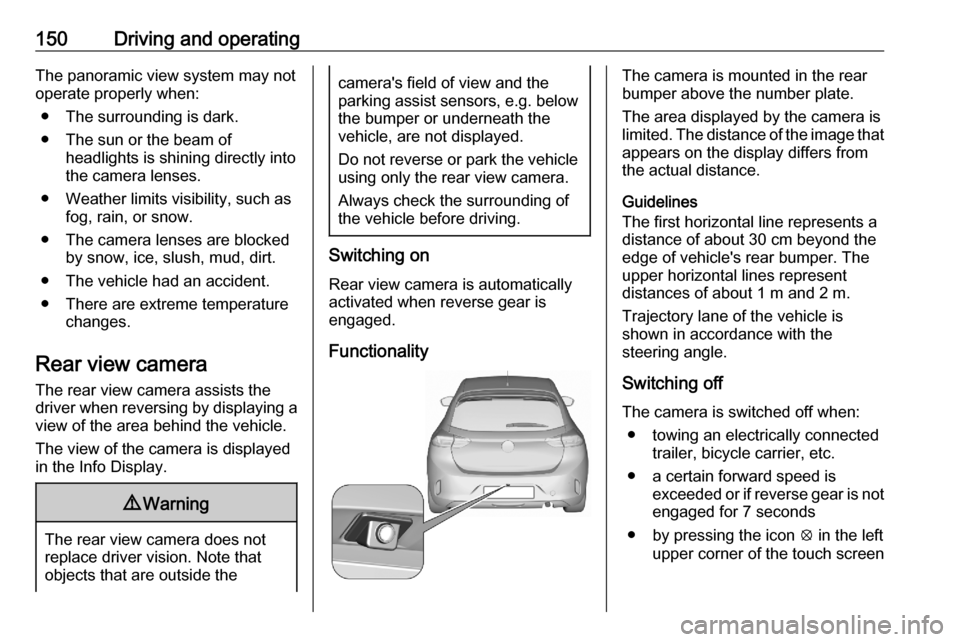
The camera is mounted in the rear
bumper above the number plate.
The area displayed by the camera is
limited. The distance of the image that
appears on the display differs from
the actual distance.
Guidelines
The first horizontal line represents a
distance of about 30 cm beyond the
edge of vehicle's rear bumper. The
upper horizontal lines represent
distances of about 1 m and 2 m.
Trajectory lane of the vehicle is
shown in accordance with the
steering angle.
Switching off
The camera is switched off when: ● towing an electrically connected trailer, bicycle carrier, etc.
● a certain forward speed is exceeded or if reverse gear is not
engaged for 7 seconds
● by pressing the icon q in the left
upper corner of the touch screen
Page 153 of 227
Driving and operating151System limitationsThe rear view camera may not
operate properly when:
● the surrounding is dark
● the beam of headlights is shining
directly into the camera lenses
● weather limits visibility, such as fog, rain, or snow
● the camera lenses are blocked by snow, ice, slush, mud, dirt.Clean the lense, rinse with water,
and wipe with a soft cloth
● the vehicle is towing an electrically connected trailer,
bicycle carrier, etc.
● the vehicle had a rear end accident
● there are extreme temperature changes
Traffic sign assistant
The traffic sign assistant is an
extension of the speed limit
recognition available for speed
limiter, cruise control and adaptive
cruise control.
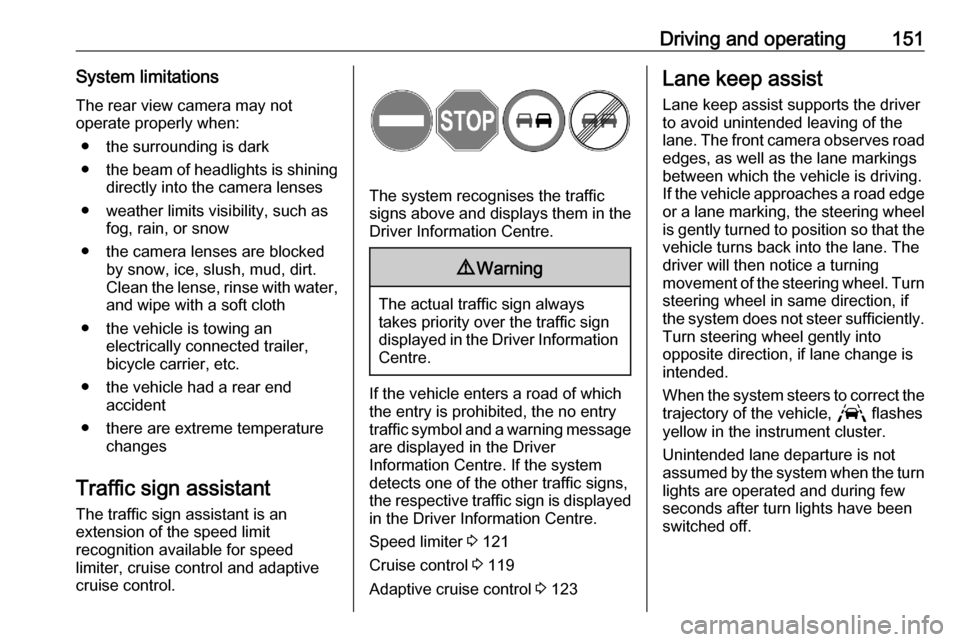
The system recognises the traffic signs above and displays them in the
Driver Information Centre.
9 Warning
The actual traffic sign always
takes priority over the traffic sign displayed in the Driver Information Centre.
If the vehicle enters a road of whichthe entry is prohibited, the no entry
traffic symbol and a warning message are displayed in the Driver
Information Centre. If the system
detects one of the other traffic signs,
the respective traffic sign is displayed
in the Driver Information Centre.
Speed limiter 3 121
Cruise control 3 119
Adaptive cruise control 3 123
Lane keep assist
Lane keep assist supports the driver
to avoid unintended leaving of the
lane. The front camera observes road
edges, as well as the lane markings
between which the vehicle is driving.
If the vehicle approaches a road edge or a lane marking, the steering wheel
is gently turned to position so that the
vehicle turns back into the lane. The
driver will then notice a turning
movement of the steering wheel. Turn steering wheel in same direction, if
the system does not steer sufficiently.
Turn steering wheel gently into
opposite direction, if lane change is
intended.
When the system steers to correct the trajectory of the vehicle, L flashes
yellow in the instrument cluster.
Unintended lane departure is not
assumed by the system when the turn lights are operated and during few
seconds after turn lights have been
switched off.
Page 162 of 227

160Vehicle careVehicle careGeneral Information...................160
Accessories and vehicle modifications .......................... 160
Vehicle storage ........................161
End-of-life vehicle recovery .....161
Vehicle checks ........................... 162
Performing work ......................162
Bonnet ..................................... 162
Engine oil ................................. 163
Engine coolant ......................... 164
Washer fluid ............................ 165
Brakes ..................................... 165
Brake fluid ............................... 165
Vehicle battery ......................... 165
Diesel fuel system bleeding .....168
Wiper blade replacement ........168
Bulb replacement .......................169
Halogen headlights ..................169
LED headlights ........................ 170
Front fog lights ......................... 170
Front turn lights .......................170
Tail lights ................................. 171
Number plate light ...................173
Interior lights ............................ 173Electrical system........................173
Fuses ....................................... 173
Engine compartment fuse box . 174
Instrument panel fuse box .......175
Vehicle tools .............................. 177
Tools ........................................ 177
Wheels and tyres .......................177
Winter tyres ............................. 177
Tyre designations ....................178
Tyre pressure .......................... 178
Tyre deflation detection system .................................... 179
Tread depth ............................. 180
Changing tyre and wheel size . 180
Wheel covers ........................... 181
Tyre chains .............................. 181
Tyre repair kit .......................... 181
Wheel changing .......................184
Spare wheel ............................ 186
Jump starting ............................. 189
Towing ....................................... 191
Towing the vehicle ...................191
Towing another vehicle ...........192
Appearance care .......................193
Exterior care ............................ 193
Interior care ............................. 194
Floor mats ............................... 195General Information
Accessories and vehicle modifications
We recommend the use of genuine parts and accessories and factory
approved parts specific for your
vehicle type. We cannot assess or
guarantee reliability of other products - even if they have a regulatory or
otherwise granted approval.
Any modification, conversion or other
changes made to standard vehicle
specifications (including, without
limitation, software modifications,
modifications of the electronic control units) may invalidate the warranty
offered by Vauxhall. Furthermore,
such changes may affect driver
assistance systems, may impact fuel
consumption, CO 2 emissions and
other emissions of the vehicle and
cause the vehicle to no longer
conform to the operating permit,
impacting the validity of your vehicle
registration.
Page 169 of 227
Vehicle care167Warning label
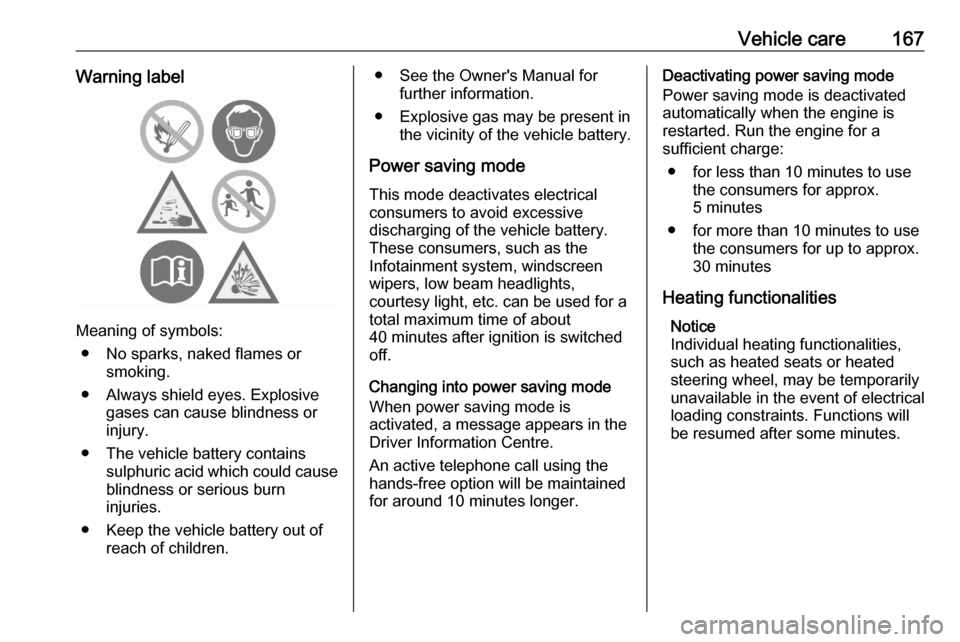
Meaning of symbols:● No sparks, naked flames or smoking.
● Always shield eyes. Explosive gases can cause blindness or
injury.
● The vehicle battery contains sulphuric acid which could cause
blindness or serious burn
injuries.
● Keep the vehicle battery out of reach of children.
● See the Owner's Manual for further information.
● Explosive gas may be present in the vicinity of the vehicle battery.
Power saving mode This mode deactivates electrical
consumers to avoid excessive
discharging of the vehicle battery.
These consumers, such as the
Infotainment system, windscreen
wipers, low beam headlights,
courtesy light, etc. can be used for a
total maximum time of about
40 minutes after ignition is switched
off.
Changing into power saving mode
When power saving mode is
activated, a message appears in the
Driver Information Centre.
An active telephone call using the
hands-free option will be maintained
for around 10 minutes longer.Deactivating power saving mode
Power saving mode is deactivatedautomatically when the engine is
restarted. Run the engine for a
sufficient charge:
● for less than 10 minutes to use the consumers for approx.
5 minutes
● for more than 10 minutes to use the consumers for up to approx.
30 minutes
Heating functionalities Notice
Individual heating functionalities,
such as heated seats or heated
steering wheel, may be temporarily
unavailable in the event of electrical
loading constraints. Functions will be resumed after some minutes.
Page 171 of 227
Vehicle care169Bulb replacement
Before replacing a bulb, ensure that
all exterior and interior lights and the
ignition are switched off.
Only hold a new bulb at the base. Do
not touch the bulb glass with bare
hands.
Use only the same bulb type for
replacement.
Replace headlight bulbs from within the engine compartment.
Bulb check After a bulb replacement switch on
the ignition, operate and check the
lights.
Halogen headlights
Halogen headlights with separate
bulbs for low beam and high beam /
daytime running light.
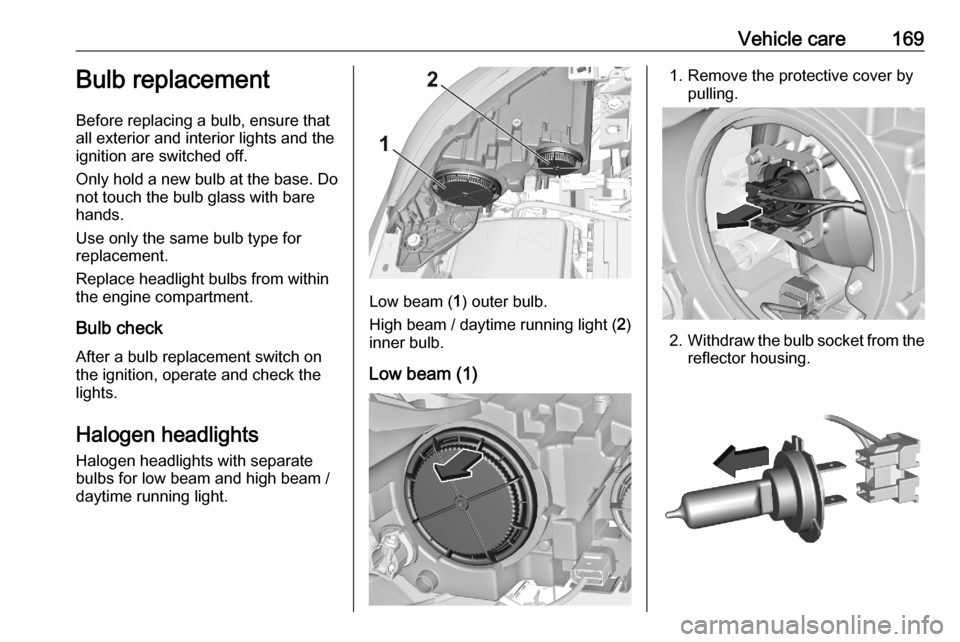
Low beam ( 1) outer bulb.
High beam / daytime running light ( 2)
inner bulb.
Low beam (1)
1. Remove the protective cover by pulling.
2.Withdraw the bulb socket from the
reflector housing.
Page 172 of 227
170Vehicle care3. Detach the bulb from the bulbsocket and replace the bulb.
4. Insert the bulb socket into the reflector housing.
5. Fit the protective cover on.
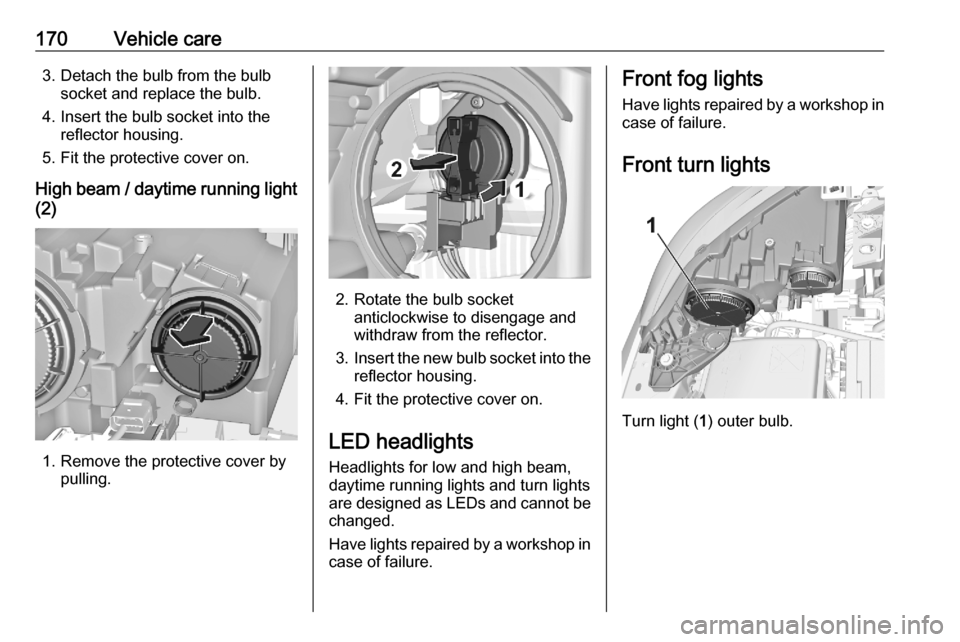
High beam / daytime running light
(2)
1. Remove the protective cover by pulling.
2. Rotate the bulb socket anticlockwise to disengage and
withdraw from the reflector.
3. Insert the new bulb socket into the
reflector housing.
4. Fit the protective cover on.
LED headlights Headlights for low and high beam,
daytime running lights and turn lights
are designed as LEDs and cannot be
changed.
Have lights repaired by a workshop in
case of failure.
Front fog lights
Have lights repaired by a workshop in case of failure.
Front turn lights
Turn light ( 1) outer bulb.
Page 176 of 227

174Vehicle careFuse extractorA fuse extractor may be located in the
cover of the left side of the instrument panel. The extractor has two sides,
each side is designed for a different
type of fuses.
Grab the fuse with the fuse extractor
and withdraw the fuse.
Engine compartment fuse
box
The fuse box is in the front left of the
engine compartment.
Disengage the cover and remove it.
No.Circuit1Climate control system2Brake system3Fuse box (right side of the
instrument panel)4Brake system8Fuel pump16Right headlight / heated wind‐
screen18Right high beam19Left high beam
Page 192 of 227
190Vehicle care● A discharged vehicle battery canalready freeze at a temperature
of 0 °C. Defrost the frozen battery before connecting jump leads.
● Wear eye protection and protective clothing when
handling a battery.
● Use a booster battery with the same voltage (12 V). Its capacity
(Ah) must not be much less than
that of the discharged vehicle
battery.
● Use jump leads with insulated terminals and a cross section of
at least 16 mm 2
(25 mm 2
for
diesel engines).
● Do not disconnect the discharged
vehicle battery from the vehicle.
● Switch off all unnecessary electrical consumers.
● Do not lean over the vehicle battery during jump starting.
● Do not allow the terminals of one
lead to touch those of the other
lead.● The vehicles must not come into contact with each other during
the jump starting process.
● Apply the parking brake, transmission in neutral,
automatic transmission in P.
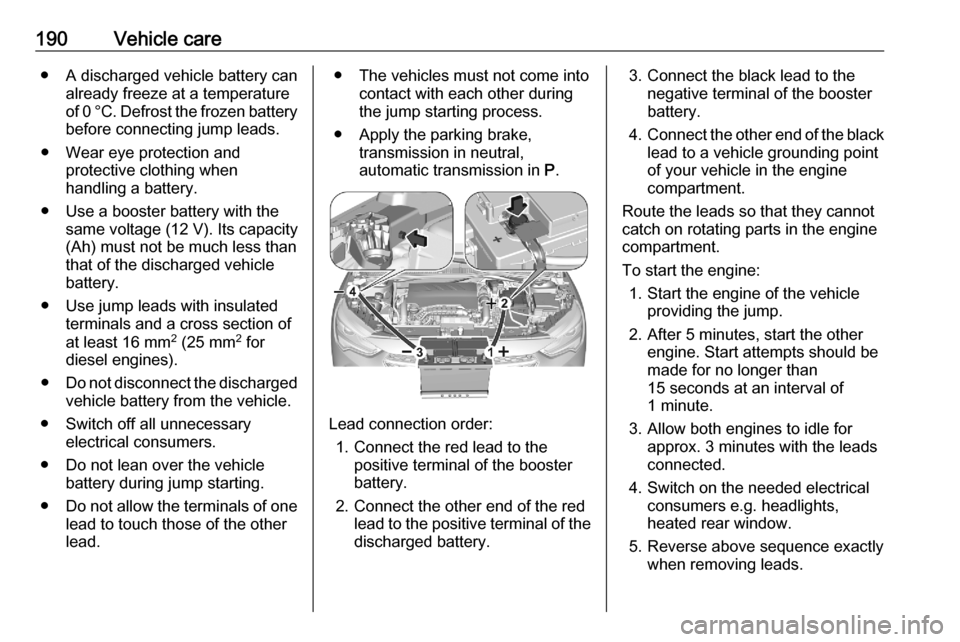
Lead connection order:
1. Connect the red lead to the positive terminal of the booster
battery.
2. Connect the other end of the red lead to the positive terminal of the
discharged battery.
3. Connect the black lead to the negative terminal of the booster
battery.
4. Connect the other end of the black
lead to a vehicle grounding point
of your vehicle in the engine
compartment.
Route the leads so that they cannot
catch on rotating parts in the engine
compartment.
To start the engine: 1. Start the engine of the vehicle providing the jump.
2. After 5 minutes, start the other engine. Start attempts should be
made for no longer than
15 seconds at an interval of 1 minute.
3. Allow both engines to idle for approx. 3 minutes with the leads
connected.
4. Switch on the needed electrical consumers e.g. headlights,
heated rear window.
5. Reverse above sequence exactly when removing leads.
Page 195 of 227
Vehicle care193Appearance care
Exterior care LocksThe locks are lubricated at the factoryusing a high quality lock cylinder
grease. Use a de-icing agent only
when absolutely necessary, as this
has a degreasing effect and impairs
lock function. After using a de-icing
agent, have the locks regreased by a
workshop.
Washing
The paintwork of your vehicle is
exposed to environmental influences.
Bird droppings, dead insects, resin,
pollen and the like should be cleaned
off immediately, as they contain
aggressive constituents which can cause paint damage.
If using a vehicle wash, comply with
the vehicle wash manufacturer's
instructions. The windscreen wiperand rear window wiper must beswitched off. Remove antenna and
external accessories such as roof
racks etc.
If you wash your vehicle by hand,
make sure that the insides of the
wheel housings are also thoroughly
rinsed out.
Clean edges and folds on opened
doors and the bonnet as well as the
areas they cover.
Clean bright metal mouldings with a
cleaning solution approved for
aluminium to avoid damages.Caution
Always use a cleaning agent with
a pH value of 4 to 9.
Do not use cleaning agents on hot surfaces.
Do not clean the engine compartmentwith a steam-jet or high-pressure jet
cleaner.
Thoroughly rinse and leather-off the vehicle. Rinse leather frequently. Use
separate leathers for painted and
glass surfaces: remnants of wax on
the windows will impair vision.
Have the door hinges of all doors
greased by a workshop.
Exterior lights
Headlight and other light covers are
made of plastic. Do not use any
abrasive or caustic agents, do not use an ice scraper, and do not clean them
dry.
Polishing and waxing
Polishing is necessary only if the paint
has become dull or if solid deposits
have become attached to it.
Plastic body parts must not be treated with wax or polishing agents.
Windows and wiper blades Switch off wipers before handling in
their areas.
Use a soft lint-free cloth or chamois
leather together with window cleaner
and insect remover.
When cleaning the rear window from
inside, always wipe in parallel to the
heating element to prevent damage.
Page 223 of 227

221Control of the vehicle ...................98
Controls ........................................ 54
Convex shape .............................. 20
Coolant and antifreeze ...............199
Cruise control ............................ 119
Cupholders .................................. 46
Curtain airbag system .................. 38
Curve lighting................................ 82
D Danger, Warnings and Cautions ...4
Daytime running lights .................82
Declaration of conformity ............210
DEF ............................................ 106
Deflation detection system ...........70
Diesel exhaust fluid ....................106
Diesel fuel system bleeding .......168
Door open .................................... 72
Door panel storage .......................47
Doors ............................................ 17
Driver alert .................................. 153
Driver assistance systems ..........119
Driver Information Centre .............72
Driving characteristics and towing tips .............................. 158
Driving hints .................................. 98
E
Electric adjustment ......................20
Electrical system......................... 173
Electric parking brake ...........68, 114Electric parking brake fault ...........68
Electronic climate control system 91
Electronic driving programmes ..111
Electronic key system ...................10
Electronic Stability Control and Traction Control system ....69, 117
Emergency call ............................. 77
End-of-life vehicle recovery .......161
Engine compartment fuse box ...174
Engine coolant ........................... 164
Engine coolant temperature ........69
Engine coolant temperature gauge ....................................... 63
Engine data ............................... 205
Engine exhaust .......................... 105
Engine identification ...................202
Engine oil ................... 163, 199, 203
Engine oil level monitor ................64
Engine oil pressure ......................70
Entry lighting ................................ 87
Event data recorders ..................215
Exhaust filter ......................... 69, 105
Exit lighting .................................. 87
Exterior care .............................. 193
Exterior light ................................. 71
Exterior lighting ............................. 79
Exterior mirrors ............................. 20F
Fault ........................................... 112
Fixed air vents ............................. 96
Floor mats................................... 195
Folding mirrors ............................. 20
Forward collision alert................. 134
Front airbag system .....................37
Front fog lights ...............71, 84, 170
Front pedestrian protection ........136
Front seats.................................... 27
Front turn lights .......................... 170
Fuel............................................. 155
Fuel for diesel engines ..............155
Fuel for petrol engines ...............155
Fuel gauge ................................... 63
Fuses ......................................... 173
G Gauges ......................................... 62
Gear selection ........................... 110
Gear shifting ................................. 69
General information ...................158
Glass panel .................................. 25 Glovebox ..................................... 46
H Halogen headlights ....................169
Hand brake ................................. 114
Hazard warning flashers ..............84
Headlight flash ............................. 81
Headlight range adjustment ........81