start button VAUXHALL CORSA F 2020 User Guide
[x] Cancel search | Manufacturer: VAUXHALL, Model Year: 2020, Model line: CORSA F, Model: VAUXHALL CORSA F 2020Pages: 227, PDF Size: 18.77 MB
Page 103 of 227
Driving and operating101Diesel engines: wait until control
indicator z extinguishes.
Turn key briefly to position 2 and
release after engine has been
started.
Manual transmission: during an
Autostop, the engine can be started
by depressing the clutch pedal
3 102.
Automatic transmission: during an
Autostop, the engine can be started
by releasing the brake pedal 3 102.
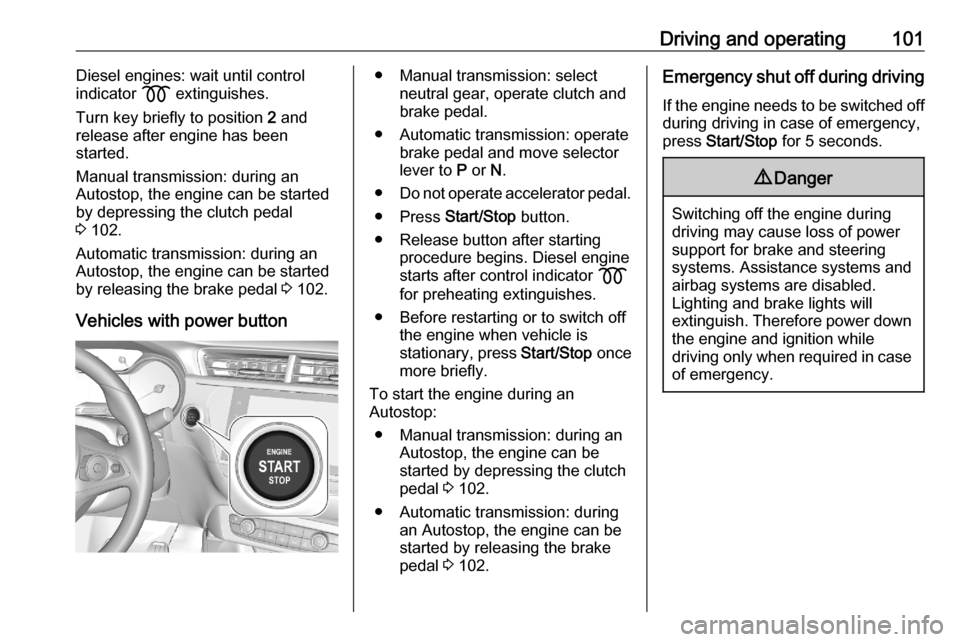
Vehicles with power button● Manual transmission: select neutral gear, operate clutch and
brake pedal.
● Automatic transmission: operate brake pedal and move selector
lever to P or N.
● Do not operate accelerator pedal.
● Press Start/Stop button.
● Release button after starting procedure begins. Diesel engine
starts after control indicator z
for preheating extinguishes.
● Before restarting or to switch off the engine when vehicle is
stationary, press Start/Stop once
more briefly.
To start the engine during an
Autostop:
● Manual transmission: during an Autostop, the engine can be
started by depressing the clutch
pedal 3 102.
● Automatic transmission: during an Autostop, the engine can be
started by releasing the brake pedal 3 102.Emergency shut off during driving
If the engine needs to be switched offduring driving in case of emergency,
press Start/Stop for 5 seconds.9Danger
Switching off the engine during
driving may cause loss of power
support for brake and steering
systems. Assistance systems and
airbag systems are disabled.
Lighting and brake lights will
extinguish. Therefore power down the engine and ignition while
driving only when required in case of emergency.
Page 104 of 227
102Driving and operatingStarting the vehicle at low
temperatures
Starting the engine without additional
heaters is possible down to -25 °С for diesel engines and -30 °C for petrol
engines. Required is an engine oil
with the correct viscosity, the correct
fuel, performed services and a
sufficiently charged vehicle battery.
With temperatures below -30 °C the
automatic transmission requires a
warming phase of approx. 5 minutes.
The selector lever must be in position P .
Turbo engine warm-up Upon start-up, engine available
torque may be limited for a short time,
especially when the engine
temperature is cold. The limitation is
to allow the lubrication system to fully protect the engine.
Overrun cut-off
The fuel supply is automatically cut off
during overrun, i.e. when the vehicle
is driven with a gear engaged but accelerator pedal is released.Depending on driving conditions, the
overrun cut-off may be deactivated.
Stop-start system
The stop-start system helps to save
fuel and to reduce the exhaust
emissions. When conditions allow, it
switches off the engine as soon as the vehicle is at a low speed or at a
standstill, e.g. at a traffic light or in a
traffic jam.
Activation
The stop-start system is available as soon as the engine is started, the
vehicle starts-off and the conditions
as stated below in this section are
fulfilled.
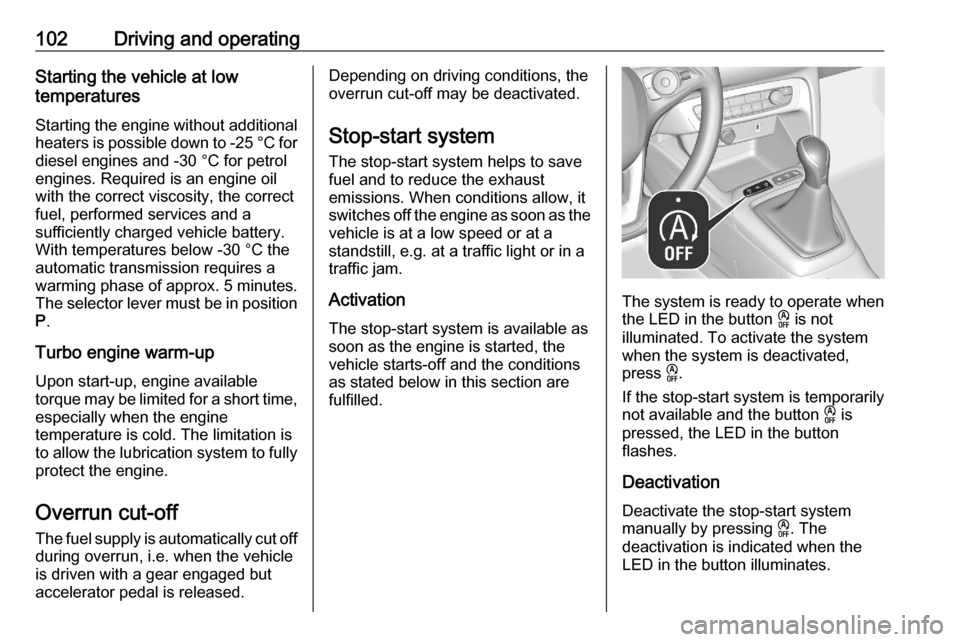
The system is ready to operate when
the LED in the button D is not
illuminated. To activate the system
when the system is deactivated,
press D.
If the stop-start system is temporarily not available and the button D is
pressed, the LED in the button
flashes.
Deactivation
Deactivate the stop-start system
manually by pressing D. The
deactivation is indicated when the
LED in the button illuminates.
Page 107 of 227
Driving and operating105button. Turn the steering wheeluntil the steering wheel lock is
felt to engage.
● Lock the vehicle.
● Activate the anti-theft alarm system.
● The engine cooling fans may run
after the engine has been
switched off 3 162.
Caution
After running at high engine
speeds or with high engine loads,
operate the engine briefly at a low load or run in neutral for
approx. 30 seconds before
switching off, in order to protect
the turbocharger.
Notice
In the event of an accident with airbag deployment, the engine is
switched off automatically if the
vehicle comes to a standstill within a
certain time.
In countries with extreme low
temperatures it may be necessary to park the vehicle without applied
parking brake. Make sure to park the
vehicle on a level surface.Engine exhaust9 Danger
Engine exhaust gases contain
poisonous carbon monoxide,
which is colourless and odourless and could be fatal if inhaled.
If exhaust gases enter the interior
of the vehicle, open the windows.
Have the cause of the fault
rectified by a workshop.
Avoid driving with an open load
compartment, otherwise exhaust
gases could enter the vehicle.
Exhaust filter
Automatic cleaning process
The exhaust filter system filters soot particles out of the exhaust gases.
The start of saturation of the exhaust
filter is indicated by the temporary
illumination of t or C ,
accompanied by a message in the
Driver Information Centre.
Page 112 of 227
110Driving and operatingIn automatic mode, the driving
programme is indicated by D.
In manual mode, M and the number
of the selected gear is indicated.
R indicates reverse gear.
N indicates neutral position.
P indicates park position.
Gear selection
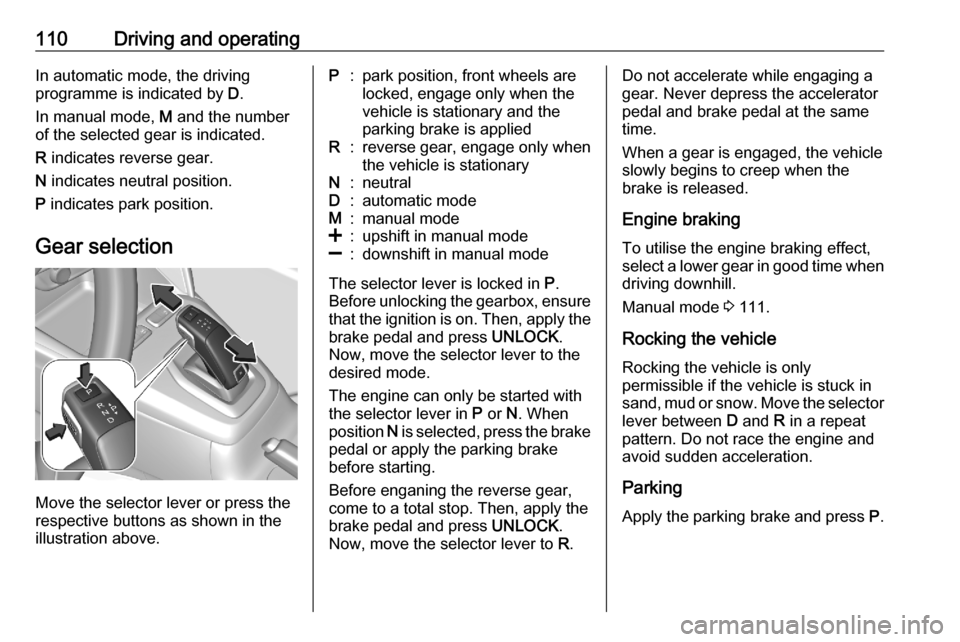
Move the selector lever or press the
respective buttons as shown in the
illustration above.
P:park position, front wheels are
locked, engage only when the
vehicle is stationary and the
parking brake is appliedR:reverse gear, engage only when
the vehicle is stationaryN:neutralD:automatic modeM:manual mode<:upshift in manual mode]:downshift in manual mode
The selector lever is locked in P.
Before unlocking the gearbox, ensure
that the ignition is on. Then, apply the
brake pedal and press UNLOCK.
Now, move the selector lever to the desired mode.
The engine can only be started with
the selector lever in P or N. When
position N is selected, press the brake
pedal or apply the parking brake
before starting.
Before enganing the reverse gear,
come to a total stop. Then, apply the
brake pedal and press UNLOCK.
Now, move the selector lever to R.
Do not accelerate while engaging a
gear. Never depress the accelerator
pedal and brake pedal at the same
time.
When a gear is engaged, the vehicle
slowly begins to creep when the
brake is released.
Engine braking To utilise the engine braking effect,
select a lower gear in good time when
driving downhill.
Manual mode 3 111.
Rocking the vehicle Rocking the vehicle is only
permissible if the vehicle is stuck in
sand, mud or snow. Move the selector
lever between D and R in a repeat
pattern. Do not race the engine and
avoid sudden acceleration.
Parking Apply the parking brake and press P.
Page 113 of 227
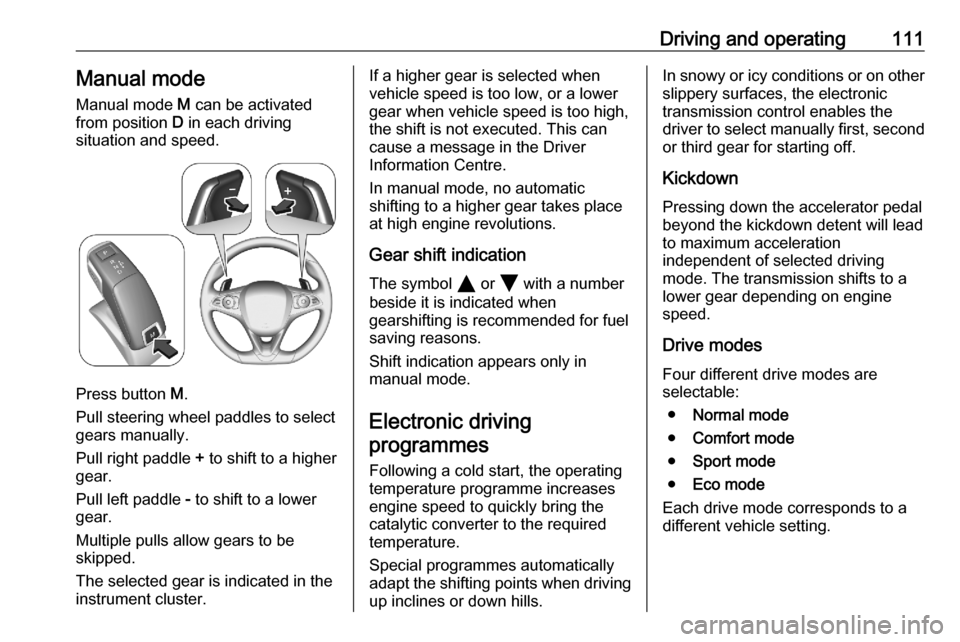
Driving and operating111Manual modeManual mode M can be activated
from position D in each driving
situation and speed.
Press button M.
Pull steering wheel paddles to select
gears manually.
Pull right paddle + to shift to a higher
gear.
Pull left paddle - to shift to a lower
gear.
Multiple pulls allow gears to be
skipped.
The selected gear is indicated in the
instrument cluster.
If a higher gear is selected when
vehicle speed is too low, or a lower
gear when vehicle speed is too high,
the shift is not executed. This can
cause a message in the Driver
Information Centre.
In manual mode, no automatic
shifting to a higher gear takes place
at high engine revolutions.
Gear shift indication
The symbol Y or Z with a number
beside it is indicated when
gearshifting is recommended for fuel
saving reasons.
Shift indication appears only in
manual mode.
Electronic driving programmes
Following a cold start, the operatingtemperature programme increasesengine speed to quickly bring the
catalytic converter to the required
temperature.
Special programmes automatically
adapt the shifting points when driving
up inclines or down hills.In snowy or icy conditions or on other
slippery surfaces, the electronic
transmission control enables the
driver to select manually first, second or third gear for starting off.
Kickdown
Pressing down the accelerator pedal
beyond the kickdown detent will lead to maximum acceleration
independent of selected driving
mode. The transmission shifts to a lower gear depending on engine
speed.
Drive modes Four different drive modes are
selectable:
● Normal mode
● Comfort mode
● Sport mode
● Eco mode
Each drive mode corresponds to a
different vehicle setting.
Page 145 of 227
Driving and operating143
Move forwards and backwards as
instructed by observing the warnings of the parking assist and paying
attention to the acoustic signals until
the end of manoeuvre is indicated.
During the parking manoeuvre, the
system is automatically deactivated
once the rear of the vehicle is within
50 cm of an obstacle.
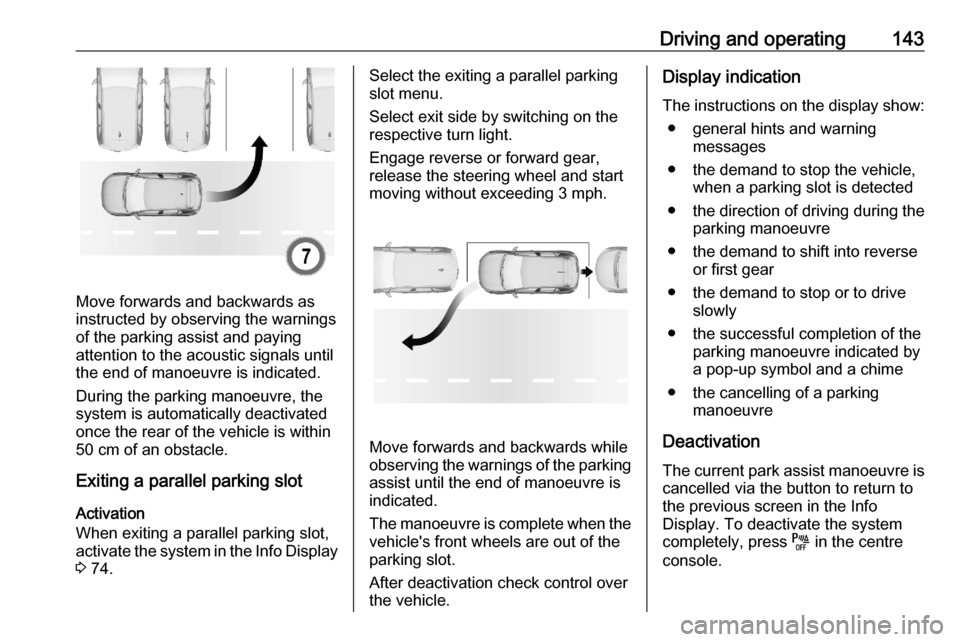
Exiting a parallel parking slot
Activation
When exiting a parallel parking slot,
activate the system in the Info Display 3 74.
Select the exiting a parallel parking
slot menu.
Select exit side by switching on the
respective turn light.
Engage reverse or forward gear,
release the steering wheel and start
moving without exceeding 3 mph.
Move forwards and backwards while
observing the warnings of the parking
assist until the end of manoeuvre is
indicated.
The manoeuvre is complete when the vehicle's front wheels are out of the
parking slot.
After deactivation check control over
the vehicle.
Display indication
The instructions on the display show: ● general hints and warning messages
● the demand to stop the vehicle, when a parking slot is detected
● the direction of driving during the
parking manoeuvre
● the demand to shift into reverse or first gear
● the demand to stop or to drive slowly
● the successful completion of the parking manoeuvre indicated bya pop-up symbol and a chime
● the cancelling of a parking manoeuvre
Deactivation
The current park assist manoeuvre is cancelled via the button to return to
the previous screen in the Info
Display. To deactivate the system
completely, press e in the centre
console.
Page 170 of 227
168Vehicle careDiesel fuel system bleedingIf the tank has been run dry, the diesel
fuel system must be bled. Refuel at
least five lieter diesel. Switch on the
ignition for about 60 seconds and switch off again. Then crank the
engine. If the engine does not start
directly, repeat this process a few
times. If the engine then fails to start,
seek the assistance of a workshop.
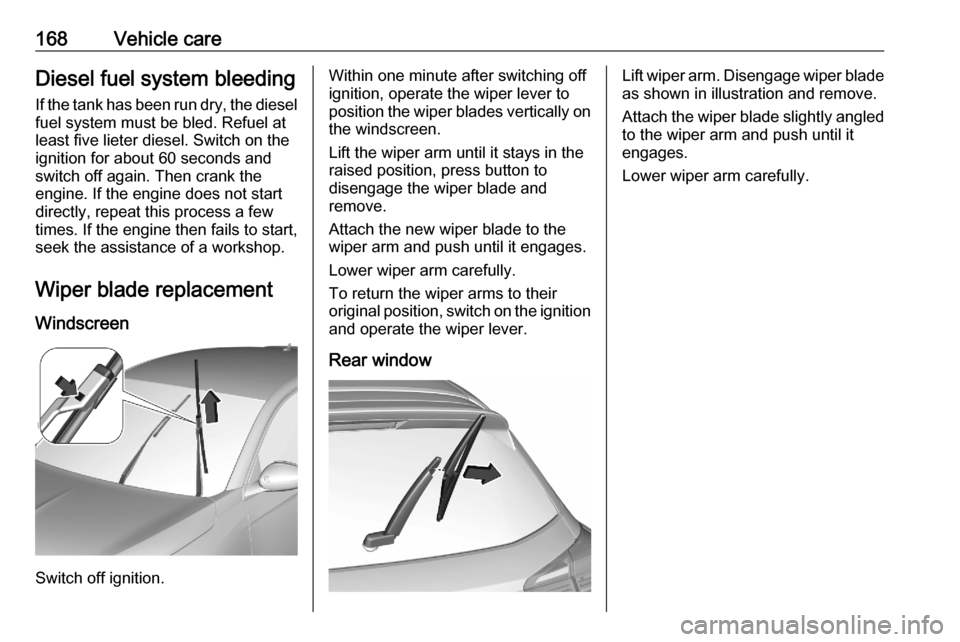
Wiper blade replacement
Windscreen
Switch off ignition.
Within one minute after switching off
ignition, operate the wiper lever to
position the wiper blades vertically on the windscreen.
Lift the wiper arm until it stays in the
raised position, press button to
disengage the wiper blade and
remove.
Attach the new wiper blade to the
wiper arm and push until it engages.
Lower wiper arm carefully.
To return the wiper arms to their
original position, switch on the ignition
and operate the wiper lever.
Rear windowLift wiper arm. Disengage wiper bladeas shown in illustration and remove.
Attach the wiper blade slightly angled
to the wiper arm and push until it
engages.
Lower wiper arm carefully.
Page 185 of 227
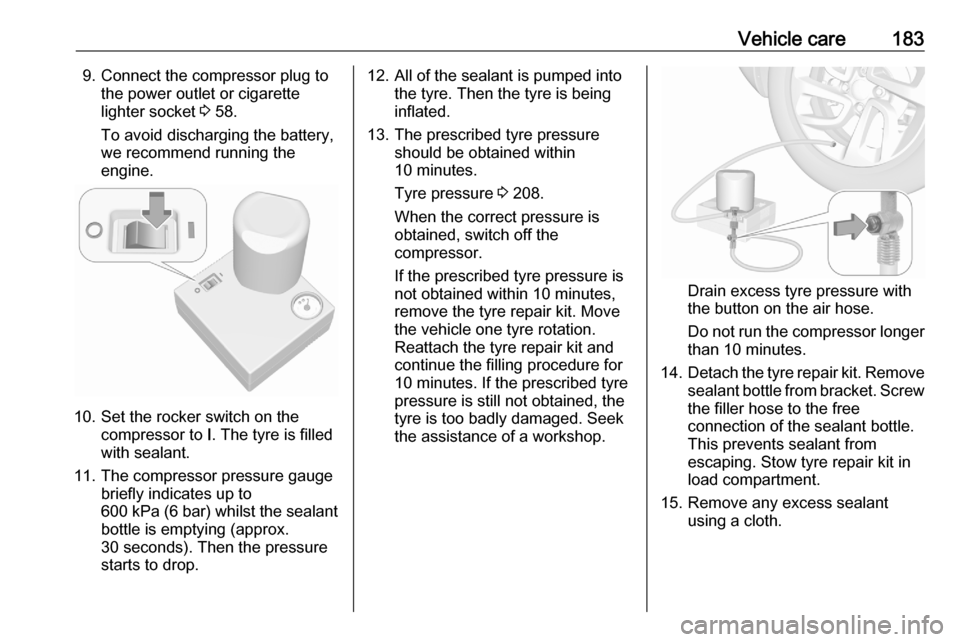
Vehicle care1839. Connect the compressor plug tothe power outlet or cigarette
lighter socket 3 58.
To avoid discharging the battery,
we recommend running the
engine.
10. Set the rocker switch on the compressor to I. The tyre is filled
with sealant.
11. The compressor pressure gauge briefly indicates up to
600 kPa (6 bar) whilst the sealant
bottle is emptying (approx.
30 seconds). Then the pressure
starts to drop.
12. All of the sealant is pumped into the tyre. Then the tyre is being
inflated.
13. The prescribed tyre pressure should be obtained within
10 minutes.
Tyre pressure 3 208.
When the correct pressure is
obtained, switch off the
compressor.
If the prescribed tyre pressure is
not obtained within 10 minutes,
remove the tyre repair kit. Move
the vehicle one tyre rotation.
Reattach the tyre repair kit and
continue the filling procedure for 10 minutes. If the prescribed tyre
pressure is still not obtained, the
tyre is too badly damaged. Seek
the assistance of a workshop.
Drain excess tyre pressure with
the button on the air hose.
Do not run the compressor longer
than 10 minutes.
14. Detach the tyre repair kit. Remove
sealant bottle from bracket. Screw the filler hose to the free
connection of the sealant bottle.
This prevents sealant from
escaping. Stow tyre repair kit in
load compartment.
15. Remove any excess sealant using a cloth.
Page 224 of 227

222Headlights..................................... 79Headlights when driving abroad ..82
Head restraints ............................ 26
Heated mirrors ............................. 21
Heated rear window ..................... 24
Heated steering wheel .................54
Heating ........................................ 30
Heating and ventilation system ...88
High beam ............................. 71, 80
High beam assist ....................71, 80
Hill start assist ........................... 117
Horn ............................................. 55
I
Identification plate .....................201
Ignition switch positions ...............98
Immobiliser .................................. 19
Indicators ...................................... 62
Inductive charging ........................59
Info Display ................................... 74
Instrument cluster ........................61
Instrument panel fuse box .........175
Instrument panel illumination control ...................................... 86
Instrument panel overview ............. 6
Interior care ............................... 194
Interior lighting .............................. 86
Interior lights ........................ 86, 173
Interior mirrors .............................. 21Interruption of power supply ......112
Introduction .................................... 3
J Jump starting ............................. 189
K Keys ............................................... 8
Keys, locks ..................................... 8
L
Lane keep assist ..................69, 151
Lashing eyes ............................... 50
LED headlights ...............71, 82, 170
Light switch .................................. 79
Load compartment ................17, 48
Load compartment cover .............49
Loading information .....................51
Low beam ..................................... 71
Low fuel ....................................... 71
M Malfunction indicator light ............67
Manual anti-dazzle ......................21
Manual mode ............................. 111
Manual seat adjustment ...............28
Manual transmission .................. 113
Massage ....................................... 31
Misted light covers .......................85N
New vehicle running-in ................98
Number plate light .....................173
O Object detection systems ...........137
Odometer ..................................... 62 Oil, engine .......................... 199, 203
Outside temperature ....................57
Overrun cut-off ........................... 102
P Panoramic roof ............................. 25
Panoramic view system ..............147
Parking ...................................... 104
Parking assist ............................ 137
Parking brake ....................... 68, 114
Parking lights ............................... 85
Particulate filter ........................... 105
Performance .............................. 206
Performing work ........................162
Peripheral lighting .........................87
Power button ................................ 99
Power outlets ............................... 58
Power seat adjustment ................29
Power windows ............................ 22
Preheating ................................... 69
Puncture ..................................... 186
Q
Quickheat ..................................... 95