wheel VAUXHALL CORSA F 2020 User Guide
[x] Cancel search | Manufacturer: VAUXHALL, Model Year: 2020, Model line: CORSA F, Model: VAUXHALL CORSA F 2020Pages: 227, PDF Size: 18.77 MB
Page 58 of 227
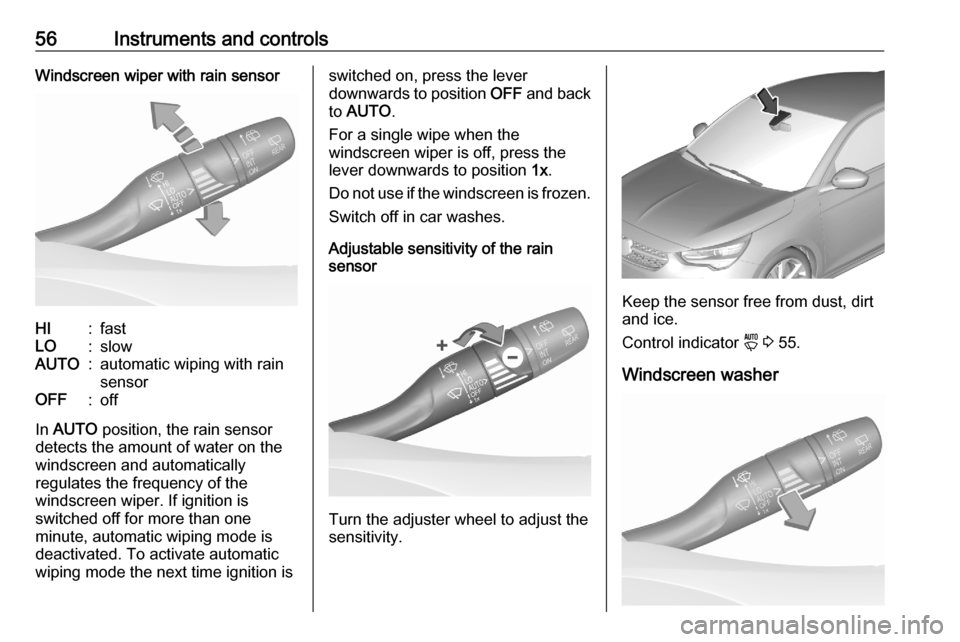
56Instruments and controlsWindscreen wiper with rain sensorHI:fastLO:slowAUTO:automatic wiping with rain
sensorOFF:off
In AUTO position, the rain sensor
detects the amount of water on the
windscreen and automatically
regulates the frequency of the
windscreen wiper. If ignition is
switched off for more than one
minute, automatic wiping mode is
deactivated. To activate automatic
wiping mode the next time ignition is
switched on, press the lever
downwards to position OFF and back
to AUTO .
For a single wipe when the
windscreen wiper is off, press the
lever downwards to position 1x.
Do not use if the windscreen is frozen. Switch off in car washes.
Adjustable sensitivity of the rain
sensor
Turn the adjuster wheel to adjust the
sensitivity.
Keep the sensor free from dust, dirt
and ice.
Control indicator y 3 55.
Windscreen washer
Page 72 of 227

70Instruments and controlsContinue driving until the control
indicator extinguishes.
Illuminates temporarily Start of saturation of the exhaust filter.
Start cleaning process as soon as
possible by driving at a vehicle speed
of at least 40 mph.
Illuminates constantlyIndication of a low additive level. Seek
the assistance of a workshop.
Exhaust filter 3 105.
AdBlue
u flashes or illuminates yellow.
Illuminates yellow The remaining driving range is
between 500 miles and 1500 miles.
Flashes yellow The remaining driving range is
between 0 and 500 miles.AdBlue level is low. Refill AdBlue
soon to avoid prevention of the
engine start. Up to 13 l of AdBlue can
be added.
AdBlue 3 106.
Deflation detection system q illuminates or flashes yellow.
Illuminates
Tyre pressure loss in one or more wheels. Stop immediately and check
tyre pressure.
Flashes
Fault in system. Consult a workshop.
Deflation detection system 3 179.
Engine oil pressure
T illuminates red.
Illuminates when the ignition is
switched on and extinguishes shortly after the engine starts.Illuminates when the engine is
runningCaution
Engine lubrication may be
interrupted. This may result in
damage to the engine and / or
locking of the drive wheels.
1. Select neutral gear.
2. Move out of the flow of traffic as quickly as possible without
impeding other vehicles.
3. Switch off ignition.
Page 73 of 227

Instruments and controls719Warning
When the engine is off,
considerably more force is needed
to brake and steer. During an
Autostop the brake servo unit will still be operational.
Do not remove key until vehicle is stationary, otherwise the steeringwheel lock could engage
unexpectedly.
Keep engine turned off and let the
vehicle be towed to a workshop.
Low fuel 2 illuminates yellow.
Level in fuel tank is too low.
Refuelling 3 156.
Bleeding the diesel fuel system
3 168.
Autostop n illuminates or flashes green.
Illuminates green
Engine is in an Autostop.
Flashes green
Autostop is temporarily unavailable,
or Autostop mode is invoked
automatically.
Stop-start system 3 102.
Exterior light
F illuminates green.
The exterior lights are on 3 79.
Low beam D illuminates green.
Illuminated when low beam is on.
High beam
A illuminates blue.
Illuminates when high beam is on,
during headlight flash 3 80.
High beam assist
B illuminates green.The high beam assist is activated
3 82.
LED headlights C illuminates and a warning
message is displayed in the Driver
Information Centre.
Seek the assistance of a workshop.
Front fog lights
G illuminates green.
The front fog lights are on 3 84.
Rear fog light H illuminates yellow.
The rear fog light is on 3 85.
Rain sensor y illuminates green.
Illuminated when rain sensor position on wiper lever is selected.
Windscreen wiper and washer 3 55.
Page 75 of 227
Instruments and controls73
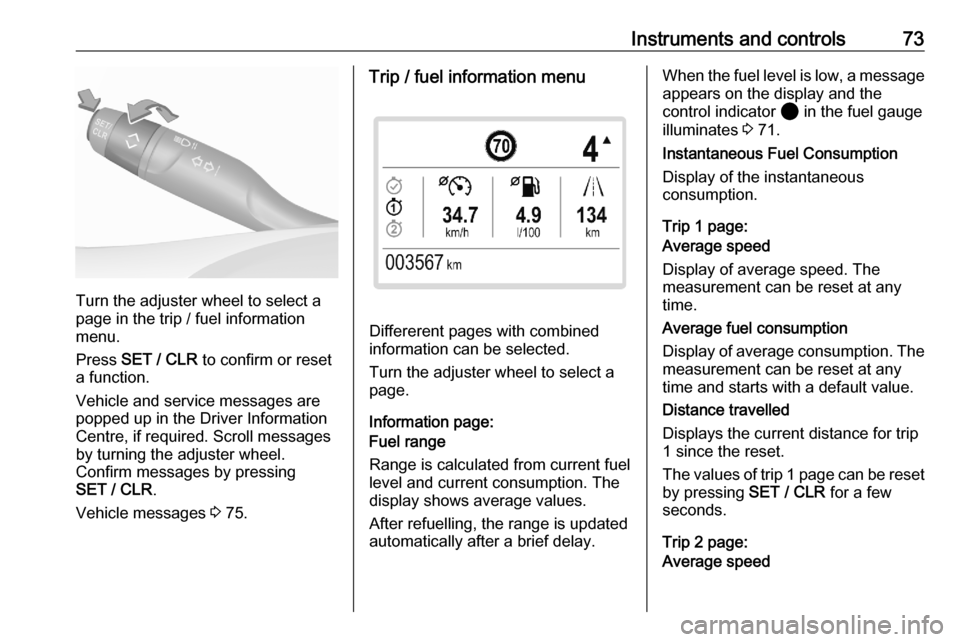
Turn the adjuster wheel to select a
page in the trip / fuel information
menu.
Press SET / CLR to confirm or reset
a function.
Vehicle and service messages are
popped up in the Driver Information
Centre, if required. Scroll messages
by turning the adjuster wheel.
Confirm messages by pressing
SET / CLR .
Vehicle messages 3 75.
Trip / fuel information menu
Differerent pages with combined
information can be selected.
Turn the adjuster wheel to select a
page.
Information page:
Fuel range
Range is calculated from current fuel
level and current consumption. The
display shows average values.
After refuelling, the range is updated
automatically after a brief delay.
When the fuel level is low, a message appears on the display and the
control indicator 2 in the fuel gauge
illuminates 3 71.
Instantaneous Fuel Consumption
Display of the instantaneous
consumption.
Trip 1 page:
Average speed
Display of average speed. The
measurement can be reset at any
time.
Average fuel consumption
Display of average consumption. The
measurement can be reset at any
time and starts with a default value.
Distance travelled
Displays the current distance for trip
1 since the reset.
The values of trip 1 page can be reset by pressing SET / CLR for a few
seconds.
Trip 2 page:
Average speed
Page 83 of 227
Lighting81High beam is switched on
automatically at a speed above
28 mph . High beam is switched off at
a speed below 22 mph, but high beam
assist remains active.
The green control indicator B
illuminates continuously when the
high beam assist is activated, the blue
A illuminates when high beam is
on.
Control indicator B 3 71, A
3 71.
Pushing left indicator lever once
switches on manual high beam
without high beam assist.
High beam assist switches
automatically to low beam when:
● Driving in urban areas.
● Camera detects heavy fog.
● Rear fog light is switched on.
● Oncoming vehicles are detected by the camera.
If there are no restrictions detected, the system switches back to high
beam.Deactivation
The system can be deactivated via
the vehicle settings menu in the Info
Display.
Info Display 3 74.
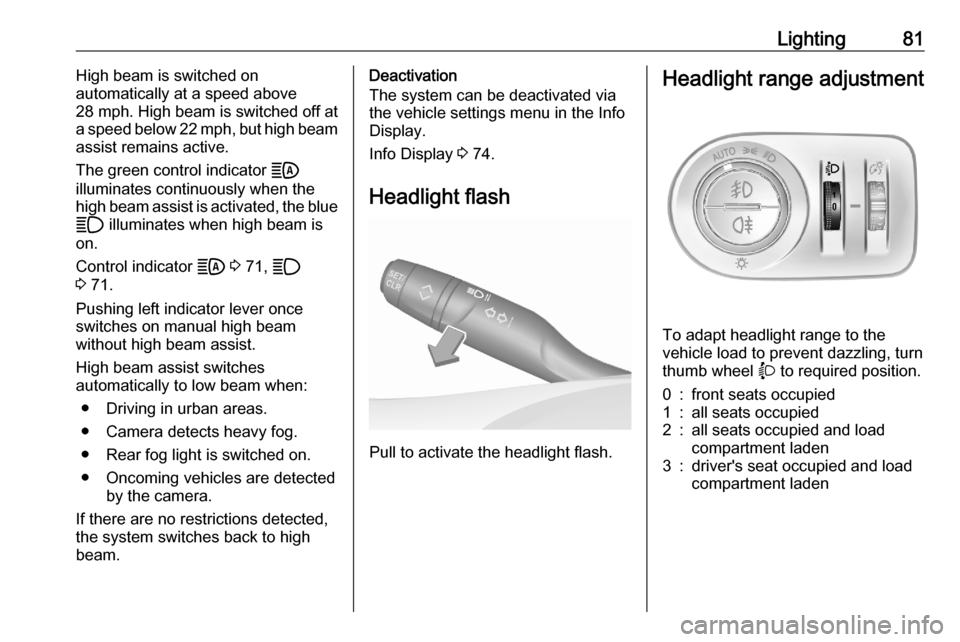
Headlight flash
Pull to activate the headlight flash.
Headlight range adjustment
To adapt headlight range to the
vehicle load to prevent dazzling, turn thumb wheel X to required position.
0:front seats occupied1:all seats occupied2:all seats occupied and load
compartment laden3:driver's seat occupied and load
compartment laden
Page 86 of 227
84LightingHazard warning flashers
Operated by pressing c.
When braking in an emergency, the
hazard warning flashers are switched
on automatically, depending on the
force of deceleration. They are
switched off automatically the first
time you accelerate.
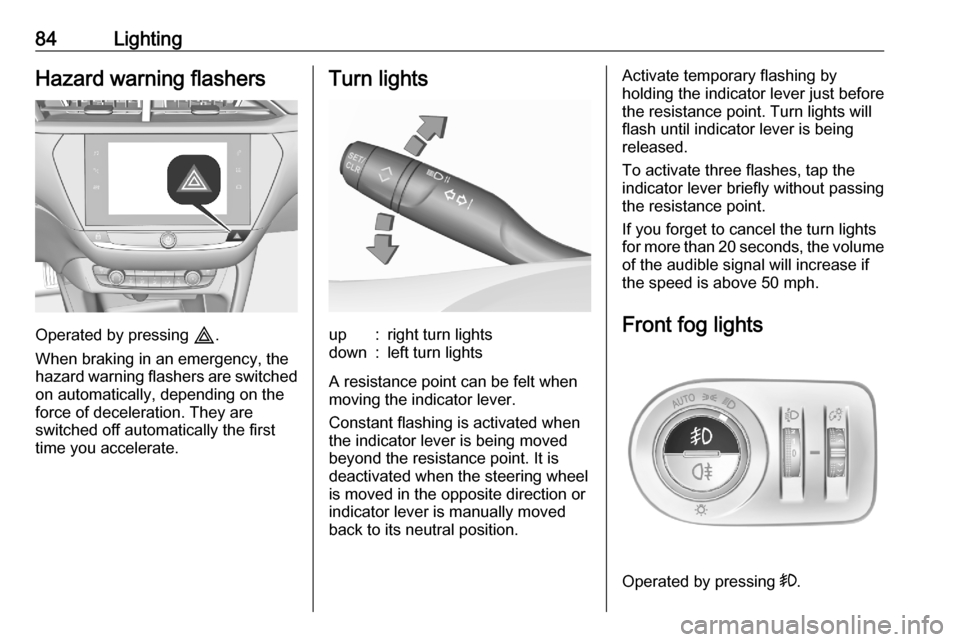
Turn lightsup:right turn lightsdown:left turn lights
A resistance point can be felt when
moving the indicator lever.
Constant flashing is activated when
the indicator lever is being moved
beyond the resistance point. It is
deactivated when the steering wheel
is moved in the opposite direction or
indicator lever is manually moved
back to its neutral position.
Activate temporary flashing by
holding the indicator lever just before
the resistance point. Turn lights will
flash until indicator lever is being
released.
To activate three flashes, tap the
indicator lever briefly without passing
the resistance point.
If you forget to cancel the turn lights
for more than 20 seconds, the volume
of the audible signal will increase if
the speed is above 50 mph.
Front fog lights
Operated by pressing >.
Page 88 of 227
86LightingInterior lightingInstrument panelillumination control
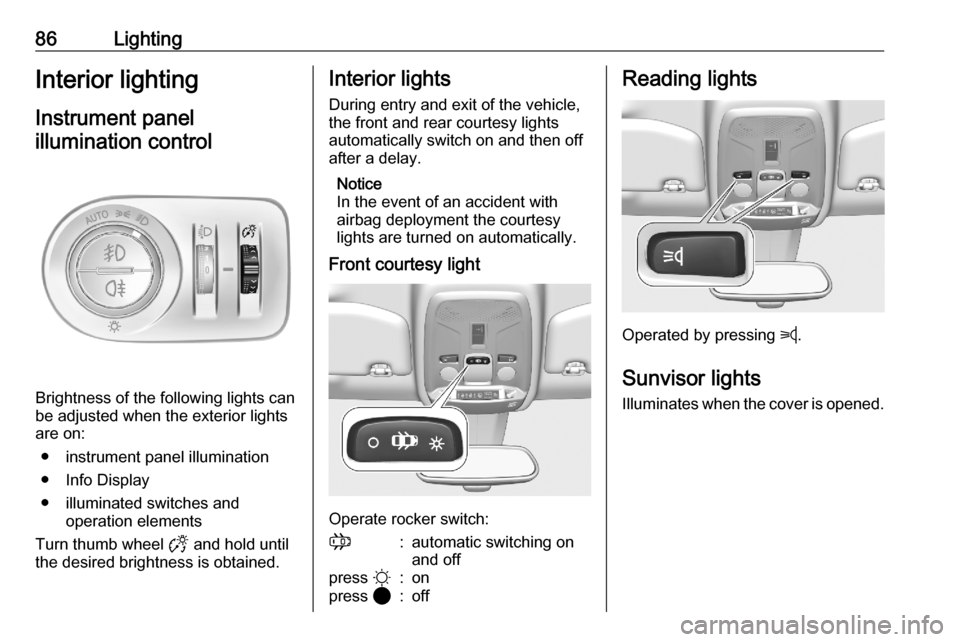
Brightness of the following lights can
be adjusted when the exterior lights
are on:
● instrument panel illumination
● Info Display
● illuminated switches and operation elements
Turn thumb wheel F and hold until
the desired brightness is obtained.
Interior lights
During entry and exit of the vehicle,
the front and rear courtesy lights
automatically switch on and then off
after a delay.
Notice
In the event of an accident with
airbag deployment the courtesy
lights are turned on automatically.
Front courtesy light
Operate rocker switch:
;:automatic switching on
and offpress §:onpress 2:offReading lights
Operated by pressing z.
Sunvisor lights Illuminates when the cover is opened.
Page 101 of 227
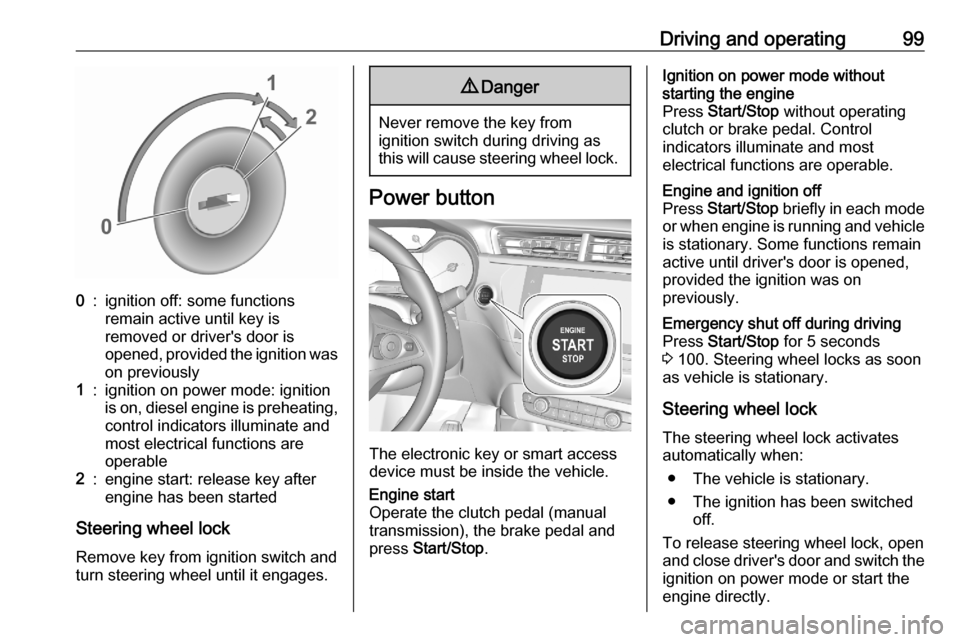
Driving and operating990:ignition off: some functions
remain active until key is
removed or driver's door is
opened, provided the ignition was
on previously1:ignition on power mode: ignition
is on, diesel engine is preheating, control indicators illuminate and
most electrical functions are
operable2:engine start: release key after
engine has been started
Steering wheel lock
Remove key from ignition switch and
turn steering wheel until it engages.
9 Danger
Never remove the key from
ignition switch during driving as
this will cause steering wheel lock.
Power button
The electronic key or smart access
device must be inside the vehicle.
Engine start
Operate the clutch pedal (manual
transmission), the brake pedal and
press Start/Stop .Ignition on power mode without
starting the engine
Press Start/Stop without operating
clutch or brake pedal. Control
indicators illuminate and most
electrical functions are operable.Engine and ignition off
Press Start/Stop briefly in each mode
or when engine is running and vehicle
is stationary. Some functions remain
active until driver's door is opened,
provided the ignition was on
previously.Emergency shut off during driving
Press Start/Stop for 5 seconds
3 100. Steering wheel locks as soon
as vehicle is stationary.
Steering wheel lock
The steering wheel lock activates
automatically when:
● The vehicle is stationary.
● The ignition has been switched off.
To release steering wheel lock, open
and close driver's door and switch the ignition on power mode or start the
engine directly.
Page 102 of 227
100Driving and operating9Warning
If the vehicle battery is discharged,
the vehicle must not be towed,
tow-started or jump-started as the
steering wheel lock cannot be
disengaged.
Smart access
This function enables the starting of the vehicle via a mobile device. The
vehicle is controlled via an
application.
After entering into the vehicle and
confirming a message, there are
10 seconds to start the vehicle.
When no message pops up, place the smart phone in the designated area.
Operation on vehicles with
electronic key system in case of
failure
If either the electronic key fails or the battery of the electronic key is weak,
a message may be displayed in the
Driver Information Centre.
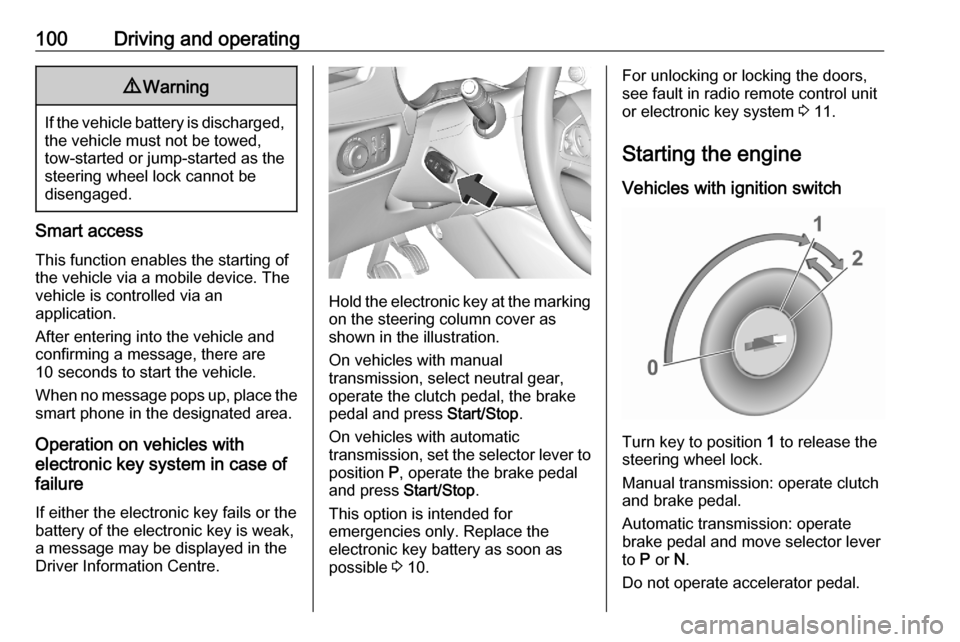
Hold the electronic key at the marking on the steering column cover as
shown in the illustration.
On vehicles with manual
transmission, select neutral gear,
operate the clutch pedal, the brake
pedal and press Start/Stop.
On vehicles with automatic
transmission, set the selector lever to position P, operate the brake pedal
and press Start/Stop.
This option is intended for
emergencies only. Replace the
electronic key battery as soon as
possible 3 10.
For unlocking or locking the doors,
see fault in radio remote control unit
or electronic key system 3 11.
Starting the engine
Vehicles with ignition switch
Turn key to position 1 to release the
steering wheel lock.
Manual transmission: operate clutch
and brake pedal.
Automatic transmission: operate
brake pedal and move selector lever
to P or N.
Do not operate accelerator pedal.
Page 106 of 227

104Driving and operatingPower saving measures
During an Autostop, several electrical
features such as auxiliary electric
heater or rear window heating are
disabled or switched to a power
saving mode. The fan speed of the
climate control system is reduced to
save power.
Restart of the engine by the driver
Vehicles with manual transmission
Depress the clutch pedal without
depressing the brake pedal to restart
the engine.
Vehicles with automatic transmission The engine is restarted in the
following cases:
● brake pedal released while the selector lever in position D or M
● brake pedal released or selector lever in position N when selector
lever is moved to position D or
M
● selector lever moved to position RRestart of the engine by the stop-
start system
The selector lever must be in neutral to enable an automatic restart.
If one of the following conditions occurs during an Autostop, the
engine will be restarted automatically by the stop-start system:
● stop-start system manually deactivated
● driver's seat belt unfastened and driver's door opened
● engine temperature too low
● charging level of vehicle battery below a defined level
● brake vacuum not sufficient
● vehicle driven at least at walking speed
● climate control system requests engine start
● air conditioning manually switched on
If an electrical accessory, e.g. a
portable CD player, is connected to
the power outlet, a brief power drop
during the restart might be noticeable.Parking9 Warning
● Do not park the vehicle on an
easily ignitable surface. The
high temperature of the
exhaust system could ignite the
surface.
● Always apply the parking brake.
● If the vehicle is on a level surface or uphill slope, engage
first gear or set the selector
lever to position P. On an uphill
slope, turn the front wheels
away from the kerb.
If the vehicle is on a downhill
slope, engage reverse gear or
set the selector lever to position
P . Turn the front wheels
towards the kerb.
● Close the windows.
● Switch off the engine.
● Remove the ignition key from the ignition switch or switch off
ignition on vehicles with power