auto stop VAUXHALL CORSA F 2020 Owner's Guide
[x] Cancel search | Manufacturer: VAUXHALL, Model Year: 2020, Model line: CORSA F, Model: VAUXHALL CORSA F 2020Pages: 227, PDF Size: 18.77 MB
Page 134 of 227

132Driving and operatingOn vehicles equipped with radar
sensor and front camera, the active
emergency braking operates from
3 mph to 87 mph when a vehicle has
been detected.
Active emergency braking only works when the seat belts of the front
passengers are fastened.
The system includes: ● brake preparation system
● emergency automatic braking ● smart brake assist
● forward collision alert
● front pedestrian protection
Brake preparation system
When approaching a vehicle ahead
or a pedestrian so quickly that a
collision is likely, the brake
preparation system slightly
pressurises the brakes. This reduces
the response time, when braking is
requested.Emergency automatic braking
After activation of brake preparation
system and just before the imminent
collision, this function automatically
applies limited braking to reduce the
impact speed of the collision or
prohibit a crash.
If active emergency braking is
applied, m flashes in the instrument
cluster.
Emergency automatic braking can
only occur if a vehicle or a pedestrian
ahead is detected.
Forward collision alert 3 134
Front pedestrian protection 3 136
Below a speed of 19 mph, emergency automatic braking may slow down thevehicle to a complete stop. If the
speed exceeds 19 mph, emergency
automatic braking reduces the speed. However, the driver must apply the
brake.
Emergency automatic braking may slow the vehicle to a complete stop to
try to avoid a potential crash.● Automatic transmission: If the vehicle comes to a complete
stop, automatic braking is
maintained for up to two
seconds. Keep the brake pedal
depressed to prevent the vehicle
from starting off again.
● Manual transmission: If the vehicle comes to a complete
stop, the engine may stall.
Operation of the function may be felt
by a slight vibration in the brake
pedal.9 Warning
Emergency automatic braking is
an emergency crash preparation
feature and is not designed to
avoid crashes. Do not rely on the
system to brake the vehicle.
Emergency automatic braking will
not brake outside of its operating speed range and only responds to
detected vehicles and
pedestrians.
Page 142 of 227
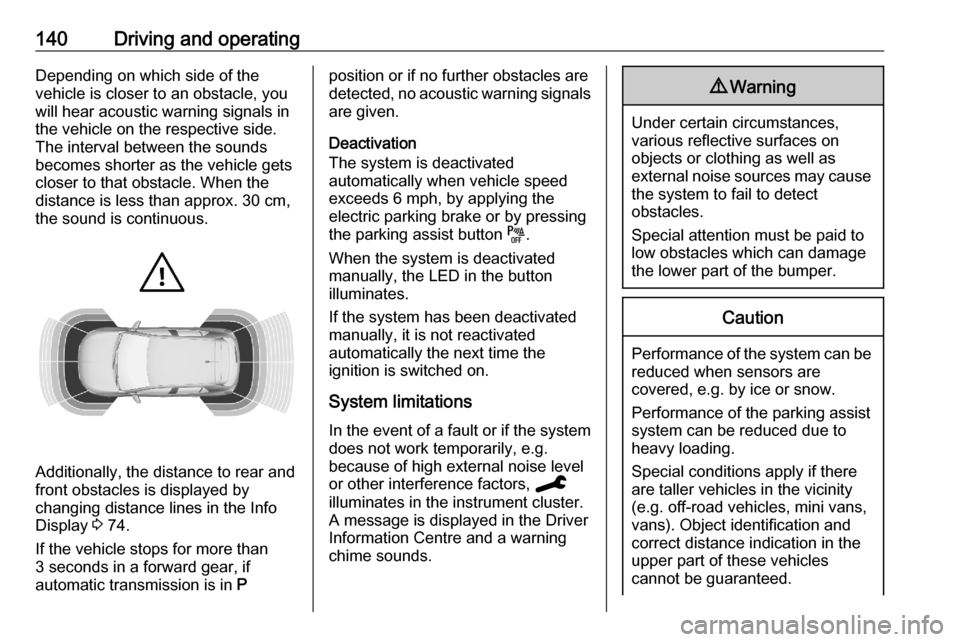
140Driving and operatingDepending on which side of the
vehicle is closer to an obstacle, you will hear acoustic warning signals inthe vehicle on the respective side.
The interval between the sounds
becomes shorter as the vehicle gets
closer to that obstacle. When the
distance is less than approx. 30 cm,
the sound is continuous.
Additionally, the distance to rear and
front obstacles is displayed by
changing distance lines in the Info Display 3 74.
If the vehicle stops for more than
3 seconds in a forward gear, if
automatic transmission is in P
position or if no further obstacles are
detected, no acoustic warning signals
are given.
Deactivation
The system is deactivated
automatically when vehicle speed
exceeds 6 mph, by applying the
electric parking brake or by pressing
the parking assist button e.
When the system is deactivated
manually, the LED in the button
illuminates.
If the system has been deactivated
manually, it is not reactivated
automatically the next time the
ignition is switched on.
System limitations
In the event of a fault or if the system does not work temporarily, e.g.
because of high external noise level
or other interference factors, C
illuminates in the instrument cluster. A message is displayed in the Driver
Information Centre and a warning
chime sounds.9 Warning
Under certain circumstances,
various reflective surfaces on
objects or clothing as well as
external noise sources may cause the system to fail to detect
obstacles.
Special attention must be paid to
low obstacles which can damage
the lower part of the bumper.
Caution
Performance of the system can be reduced when sensors are
covered, e.g. by ice or snow.
Performance of the parking assist
system can be reduced due to
heavy loading.
Special conditions apply if there
are taller vehicles in the vicinity
(e.g. off-road vehicles, mini vans,
vans). Object identification and correct distance indication in the
upper part of these vehicles
cannot be guaranteed.
Page 145 of 227
Driving and operating143
Move forwards and backwards as
instructed by observing the warnings of the parking assist and paying
attention to the acoustic signals until
the end of manoeuvre is indicated.
During the parking manoeuvre, the
system is automatically deactivated
once the rear of the vehicle is within
50 cm of an obstacle.
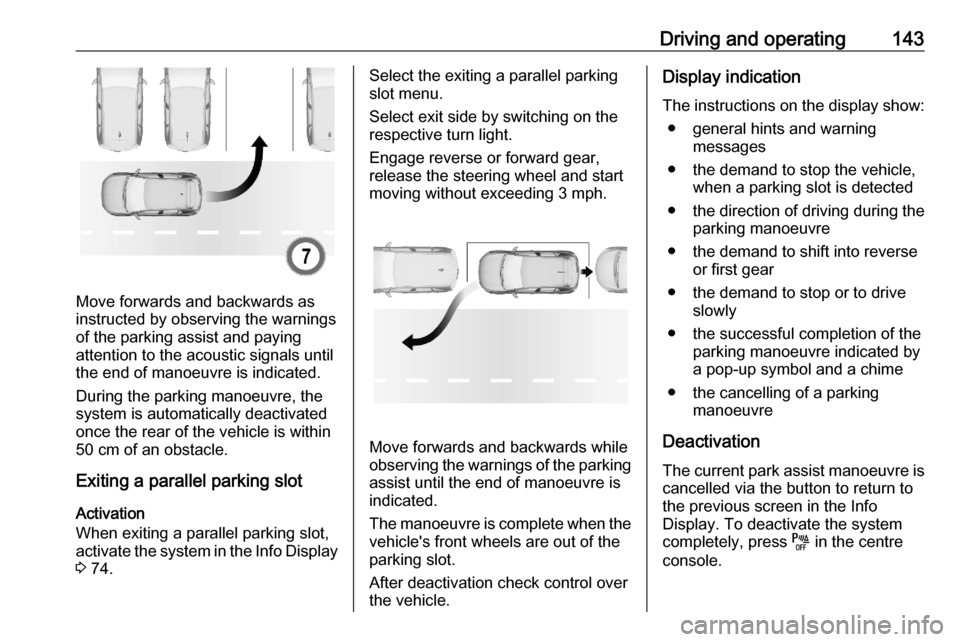
Exiting a parallel parking slot
Activation
When exiting a parallel parking slot,
activate the system in the Info Display 3 74.
Select the exiting a parallel parking
slot menu.
Select exit side by switching on the
respective turn light.
Engage reverse or forward gear,
release the steering wheel and start
moving without exceeding 3 mph.
Move forwards and backwards while
observing the warnings of the parking
assist until the end of manoeuvre is
indicated.
The manoeuvre is complete when the vehicle's front wheels are out of the
parking slot.
After deactivation check control over
the vehicle.
Display indication
The instructions on the display show: ● general hints and warning messages
● the demand to stop the vehicle, when a parking slot is detected
● the direction of driving during the
parking manoeuvre
● the demand to shift into reverse or first gear
● the demand to stop or to drive slowly
● the successful completion of the parking manoeuvre indicated bya pop-up symbol and a chime
● the cancelling of a parking manoeuvre
Deactivation
The current park assist manoeuvre is cancelled via the button to return to
the previous screen in the Info
Display. To deactivate the system
completely, press e in the centre
console.
Page 146 of 227
144Driving and operatingThe system is deactivated
automatically:
● if the ignition is switched off
● if stalling the engine
● if no manoeuvre is started within 5 minutes of selection of the type
of manoeuvre
● after a prolonged stop of the vehicle during a manoeuvre
● activating the turn light on the opposite side to that of the
manoeuvre
● if the electronic stability control is
triggered
● if the speed of the vehicle exceeds the stated limit
● when the driver interrupts movement of the steering wheel
● after ten manoeuvres to enter or exit a a parallel parking slot or
after seven manoeuvres to enter
a perpendicular parking slot
● by opening the driver's door
● if one of the front wheels encounters an obstacle
● parking manoeuvre successfully endedDeactivation by the driver or by the
system during manoeuvring will be indicated on the display. Additionally, a chime sounds.
The system is switched off
automatically when towing an
electrically connected trailer, bicycle
carrier, etc.
Contact your dealer to switch off the
system for a prolonged period.
Fault
In the event of a fault, a message is
displayed in the Colour Info Display,
accompanied by an acoustic signal.
In the event of a fault in the powersteering, C illuminates and a
message is displayed in the Driver
Information Centre.9 Warning
Under certain circumstances,
various reflective surfaces on
objects or clothing as well as
external noise sources may cause the system to fail to detect
obstacles.
Special attention must be paid to
low obstacles which can damage
the lower part of the bumper.Caution
Performance of the system can be reduced when sensors are
covered, e.g. by ice or snow.
Performance of the parking assist
system can be reduced due to
heavy loading.
Special conditions apply if there
are taller vehicles in the vicinity
(e.g. off-road vehicles, mini vans,
vans). Object identification and correct distance indication in the
upper part of these vehicles
cannot be guaranteed.
Objects with a very small reflection
cross-section, e.g. objects of
narrow size or soft materials, may
not be detected by the system.
Parking assist systems do not
detect objects outside the
detection range.
Page 168 of 227
166Vehicle care
Batteries do not belong in household
waste. They must be disposed of at
an appropriate recycling collection
point.
Laying up the vehicle for more than
four weeks can lead to battery
discharge. Disconnect the clamp from the negative terminal of the vehicle
battery.
Ensure the ignition is switched off
before connecting or disconnecting
the vehicle battery.
Battery discharge protection 3 87.
Replacing the vehicle battery Notice
Any deviation from the instructions
given in this section may lead to
temporary deactivation or
disturbance of the stop-start system.
When the vehicle battery is being
replaced, please ensure that there
are no open ventilation holes in the
vicinity of the positive terminal. If a
ventilation hole is open in this area, it
must be closed off with a dummy cap, and the ventilation in the vicinity of the
negative terminal must be opened.
Ensure that the battery is always
replaced by the same type of battery.
The vehicle battery has to be
replaced by a workshop.
Stop-start system 3 102.
Charging the vehicle battery9 Warning
On vehicles with stop-start
system, ensure that the charging potential does not exceed 14.6 V
when using a battery charger.
Otherwise the vehicle battery may be damaged.
Jump starting 3 189.
Discharge protection
Battery voltage
When the vehicle battery voltage is
running low, a warning message will
appear in the Driver Information
Centre.
When the vehicle is being driven, the
load reduction function temporarily
deactivates certain functions, such as
the air conditioning, the heated rear
window, heated steering wheel, etc.
The deactivated functions are
reactivated automatically as soon as
conditions permit.
Idle boost
If charging of the vehicle battery is
required due to battery condition, the
power output of the generator must
be increased. This will be achieved by
an idle boost which may be audible.
A message appears in the Driver
Information Centre.
Power outlet
The power outlets are deactivated in
the event of low vehicle battery
voltage.
Page 193 of 227
Vehicle care191Towing
Towing the vehicle
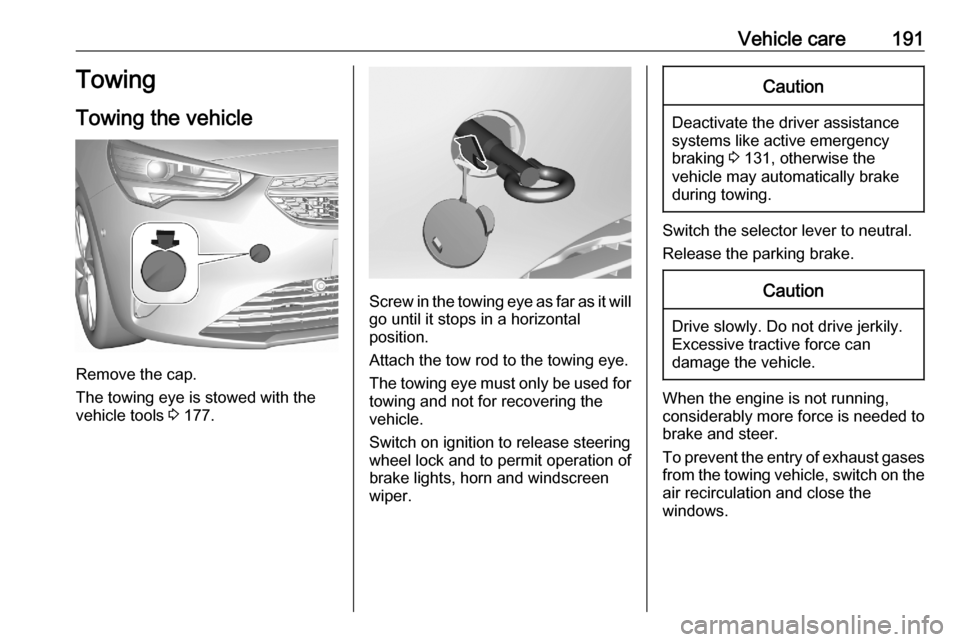
Remove the cap.
The towing eye is stowed with the
vehicle tools 3 177.
Screw in the towing eye as far as it will
go until it stops in a horizontal
position.
Attach the tow rod to the towing eye. The towing eye must only be used for
towing and not for recovering the
vehicle.
Switch on ignition to release steering
wheel lock and to permit operation of
brake lights, horn and windscreen
wiper.
Caution
Deactivate the driver assistance
systems like active emergency
braking 3 131, otherwise the
vehicle may automatically brake during towing.
Switch the selector lever to neutral.
Release the parking brake.
Caution
Drive slowly. Do not drive jerkily.
Excessive tractive force can
damage the vehicle.
When the engine is not running,
considerably more force is needed to
brake and steer.
To prevent the entry of exhaust gases from the towing vehicle, switch on the
air recirculation and close the
windows.
Page 194 of 227
192Vehicle care
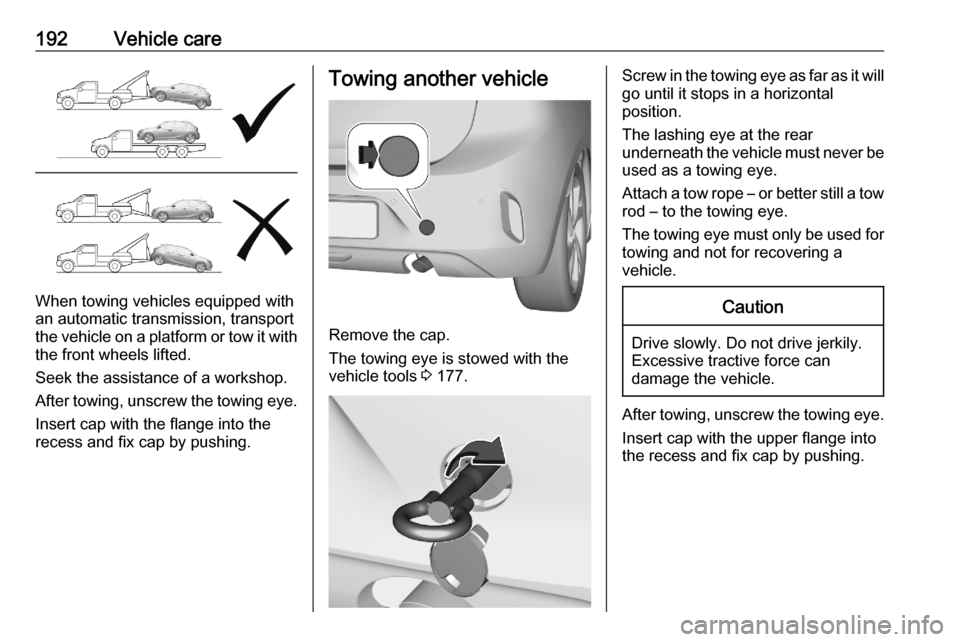
When towing vehicles equipped with
an automatic transmission, transport
the vehicle on a platform or tow it with
the front wheels lifted.
Seek the assistance of a workshop.
After towing, unscrew the towing eye.
Insert cap with the flange into the
recess and fix cap by pushing.
Towing another vehicle
Remove the cap.
The towing eye is stowed with the
vehicle tools 3 177.
Screw in the towing eye as far as it will
go until it stops in a horizontal
position.
The lashing eye at the rear
underneath the vehicle must never be used as a towing eye.
Attach a tow rope – or better still a tow
rod – to the towing eye.
The towing eye must only be used for towing and not for recovering a
vehicle.Caution
Drive slowly. Do not drive jerkily.
Excessive tractive force can
damage the vehicle.
After towing, unscrew the towing eye.
Insert cap with the upper flange into
the recess and fix cap by pushing.
Page 222 of 227

220IndexAAccessories and vehicle modifications .......................... 160
Active emergency braking ....72, 131
Adaptive cruise control ..............123
AdBlue .................................. 70, 106
Adjustable air vents .....................95
Advanced parking assist ............141
Airbag and belt tensioners ...........66
Airbag deactivation ................38, 66
Airbag label................................... 33 Airbag system .............................. 33
Air conditioning regular operation 96
Air conditioning system ................ 89
Air intake ...................................... 96
Air vents........................................ 95
Antilock brake system ................ 114
Antilock brake system (ABS) .......68
Anti-theft alarm system ................18
Anti-theft locking system .............. 17
Appearance care ........................193
Armrest ......................................... 30
Ashtrays ....................................... 60 Automatic anti-dazzle ..................22
Automatic crash notification (ACN) 77
Automatic light control .................80
Automatic locking ........................15
Automatic operation of electric parking brake off .......................68
Automatic transmission .............109Autostop............................... 71, 102
Auxiliary heater ............................. 95
B Battery discharge protection ........87
BlueInjection ............................... 106
Bonnet ....................................... 162
Brake and clutch fluid .................199
Brake and clutch system .............67
Brake assist ............................... 117
Brake fluid .................................. 165
Brakes ........................................ 165
Breakdown.................................. 191
Bulb replacement ....................... 169
C Capacities .................................. 208
Catalytic converter .....................106
Central locking system ................11
Centre console storage ...............47
Changing tyre and wheel size ...180
Charging system .......................... 66
Child locks ................................... 16
Child restraint installation locations ................................... 43
Child restraints.............................. 40
Child restraint systems ................40
Cigarette lighter ........................... 60
Climate control systems ...............88
Clock............................................. 58
Control indicators.......................... 65