ECU VAUXHALL CROSSLAND X 2017.75 Owner's Guide
[x] Cancel search | Manufacturer: VAUXHALL, Model Year: 2017.75, Model line: CROSSLAND X, Model: VAUXHALL CROSSLAND X 2017.75Pages: 245, PDF Size: 7.38 MB
Page 196 of 245
194Vehicle careNo.Circuit10Power outlet rear11–12–Vehicle tools
Tools
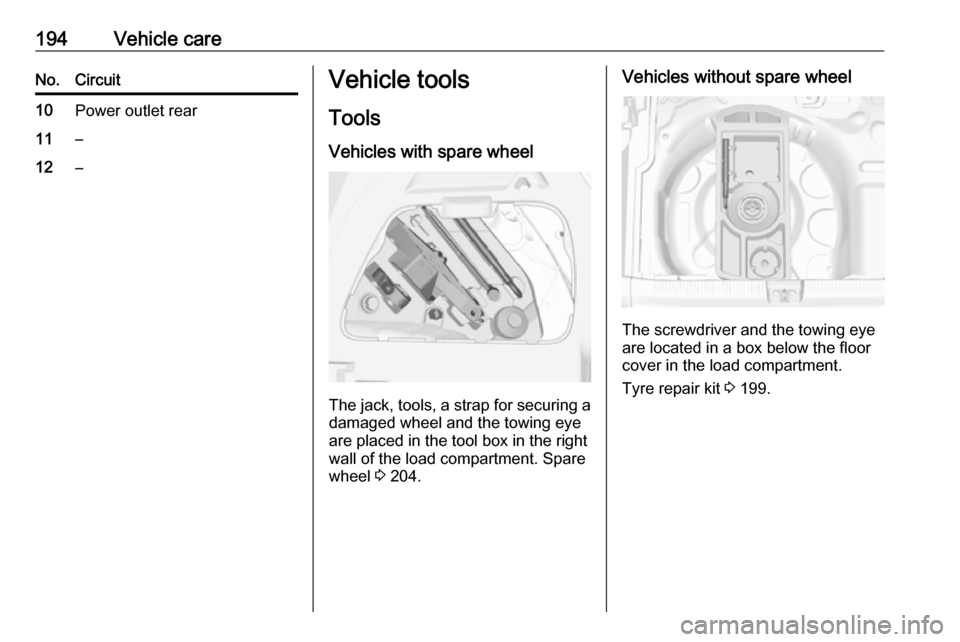
Vehicles with spare wheel
The jack, tools, a strap for securing a damaged wheel and the towing eye
are placed in the tool box in the right
wall of the load compartment. Spare
wheel 3 204.
Vehicles without spare wheel
The screwdriver and the towing eye
are located in a box below the floor
cover in the load compartment.
Tyre repair kit 3 199.
Page 205 of 245
Vehicle care2039Warning
Do not grease the thread of the
wheel bolt.
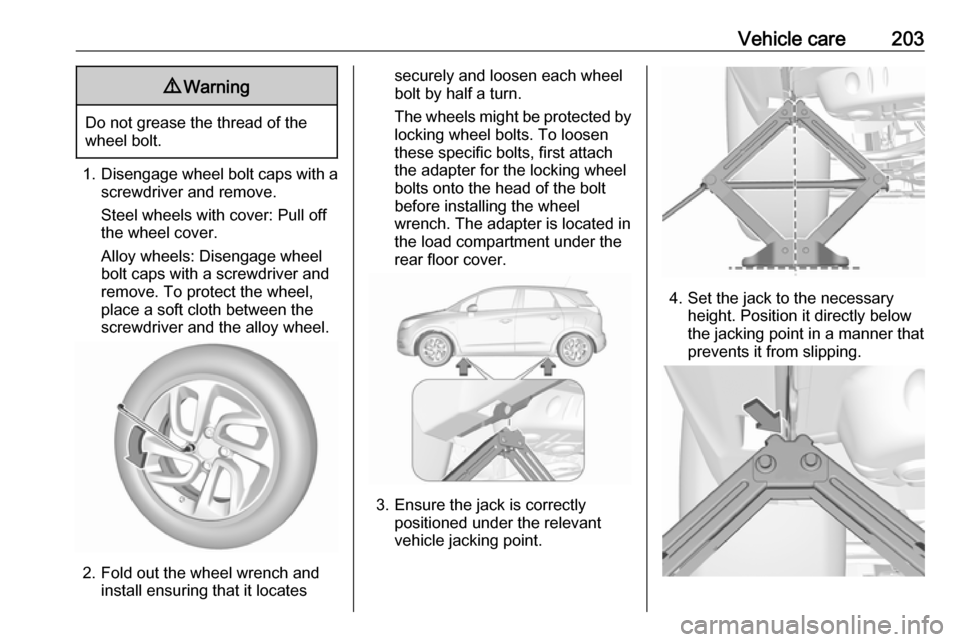
1. Disengage wheel bolt caps with a
screwdriver and remove.
Steel wheels with cover: Pull off
the wheel cover.
Alloy wheels: Disengage wheel
bolt caps with a screwdriver and
remove. To protect the wheel,
place a soft cloth between the
screwdriver and the alloy wheel.
2. Fold out the wheel wrench and install ensuring that it locates
securely and loosen each wheel
bolt by half a turn.
The wheels might be protected by
locking wheel bolts. To loosen
these specific bolts, first attach
the adapter for the locking wheel
bolts onto the head of the bolt
before installing the wheel
wrench. The adapter is located in
the load compartment under the
rear floor cover.
3. Ensure the jack is correctly positioned under the relevant
vehicle jacking point.
4. Set the jack to the necessary height. Position it directly below
the jacking point in a manner that
prevents it from slipping.
Page 206 of 245

204Vehicle careEnsure that the edge of the body
fits into the notch of the jack.
Attach wheel wrench and with the
jack correctly aligned rotate wheel wrench until wheel is clear of the
ground.
5. Unscrew the wheel bolts. 6. Change the wheel. Spare wheel 3 204.
7. Screw on the wheel bolts.
8. Lower vehicle.
9. Install the wheel wrench ensuring that it locates securely and tighten
each bolt in a crosswise
sequence. Tightening torque is
110 Nm.
10. Align the valve hole in the wheel cover with the tyre valve before
installing.
Install wheel bolt caps.
11. Stow and secure the replaced wheel 3 204, the vehicle tools
3 194 and the adapter for the
locking wheel bolts 3 63.
12. Check the tyre pressure of the installed tyre and the wheel bolttorque as soon as possible.
Have the defective tyre renewed or
repaired as soon as possible.
Jacking position for lifting platformRear arm position of the lifting
platform at the underbody.
Front arm position of the lifting
platform at the underbody.
Spare wheel Mounting the temporary spare
wheel
Only mount one temporary spare
wheel. Do not drive faster than
50 mph. Take curves slowly. Do not use for a long period of time.
Page 207 of 245

Vehicle care205Caution
The use of a spare wheel that issmaller than the other wheels or in combination with winter tyres
could affect driveability. Have the defective tyre replaced as soon as
possible.
The temporary spare wheel has a
steel rim.
The temporary spare wheel is located in the load compartment beneath the
floor covering.
To remove: 1. Open the floor cover.
2. The temporary spare wheel is secured with a wing nut. Turn
wing nut anticlockwise and
remove the wheel.
There is a box with tools in the
right wall of the load
compartment. Vehicle tools 3 194
3. When, after a wheel change, no wheel is placed in the spare wheel
well, secure the tool box by
turning right back the wing nut and close the floor cover.
4. After a wheel change back to a full
size wheel, place the spare wheel outside up in the well and secure
with the wing nut.
If your vehicle gets a flat tyre on the
rear while towing another vehicle,
mount the temporary spare wheel in
the front and the full tyre in the rear.
Tyre chains 3 199.
Stowing a damaged full size
wheel in the load compartment
The spare wheel well is not designed
for other tyre sizes than the temporary spare wheel. A damaged full size
wheel must be stowed in the loadcompartment and secured with a
strap. Vehicle tools 3 194. To secure
the wheel:
1. Position the wheel outside up close to one sidewall of the load
compartment.
2. Place the loop end of the strap through the front lashing eye on
the appropriate side.
3. Place the hook end of the strap through the loop and pull it until
the strap is fastened securely to
the lashing eye.
Page 208 of 245
206Vehicle care
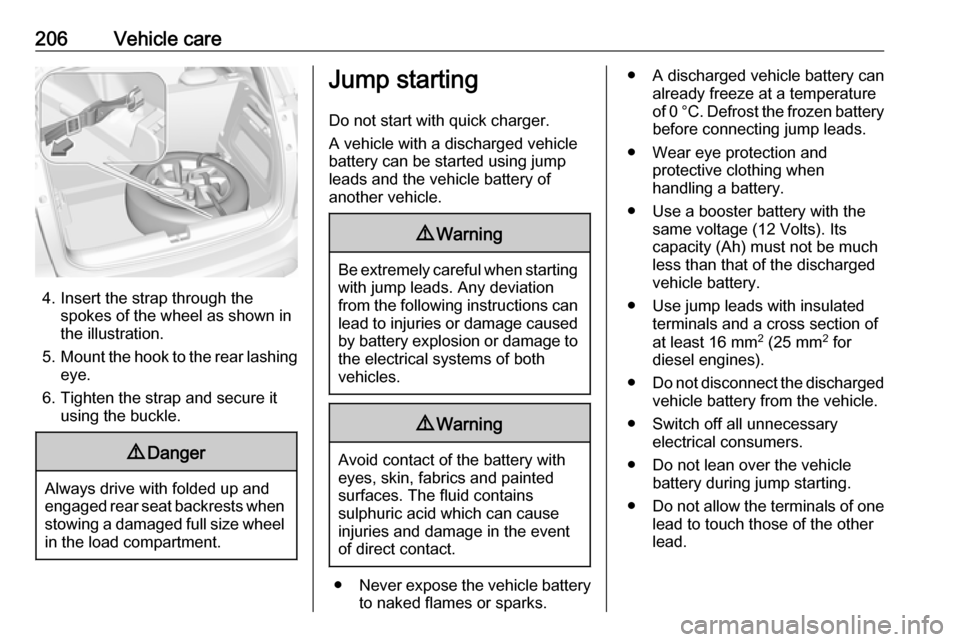
4. Insert the strap through thespokes of the wheel as shown in
the illustration.
5. Mount the hook to the rear lashing
eye.
6. Tighten the strap and secure it using the buckle.
9 Danger
Always drive with folded up and
engaged rear seat backrests when stowing a damaged full size wheel
in the load compartment.
Jump starting
Do not start with quick charger.
A vehicle with a discharged vehicle
battery can be started using jump
leads and the vehicle battery of
another vehicle.9 Warning
Be extremely careful when starting
with jump leads. Any deviation
from the following instructions can
lead to injuries or damage caused
by battery explosion or damage to the electrical systems of both
vehicles.
9 Warning
Avoid contact of the battery with
eyes, skin, fabrics and painted
surfaces. The fluid contains
sulphuric acid which can cause
injuries and damage in the event
of direct contact.
● Never expose the vehicle battery
to naked flames or sparks.
● A discharged vehicle battery can already freeze at a temperature
of 0 °C. Defrost the frozen battery before connecting jump leads.
● Wear eye protection and protective clothing when
handling a battery.
● Use a booster battery with the same voltage (12 Volts). Its
capacity (Ah) must not be much less than that of the discharged
vehicle battery.
● Use jump leads with insulated terminals and a cross section of
at least 16 mm 2
(25 mm 2
for
diesel engines).
● Do not disconnect the discharged
vehicle battery from the vehicle.
● Switch off all unnecessary electrical consumers.
● Do not lean over the vehicle battery during jump starting.
● Do not allow the terminals of one
lead to touch those of the other
lead.
Page 235 of 245

Customer information233copyright holders be liable for any
claim, damages or other liability,
whether in an action of contract, tort
or otherwise, arising from, out of or in
connection with the software or the
use or other dealings in the software.
Except as contained in this notice, the
name of a copyright holder shall not
be used in advertising or otherwise to
promote the sale, use or other
dealings in this Software without prior
written authorization of the copyright
holder.
unzip
This is version 2005-Feb-10 of the Info-ZIP copyright and license. The
definitive version of this document
should be available at ftp://ftp.info-
zip.org/pub/infozip/license.html
indefinitely.
Copyright (c) 1990-2005 Info-ZIP. All
rights reserved.
For the purposes of this copyright and license, “Info-ZIP” is defined as thefollowing set of individuals:
Mark Adler, John Bush, Karl Davis,
Harald Denker, Jean-Michel Dubois,
Jean-loup Gailly, Hunter Goatley, EdGordon, Ian Gorman, Chris Herborth,
Dirk Haase, Greg Hartwig, Robert
Heath, Jonathan Hudson, Paul
Kienitz, David Kirschbaum, Johnny
Lee, Onno van der Linden, Igor
Mandrichenko, Steve P. Miller, Sergio Monesi, Keith Owens, George
Petrov, Greg Roelofs, Kai Uwe
Rommel, Steve Salisbury, Dave
Smith, Steven M. Schweda, Christian Spieler, Cosmin Truta, Antoine
Verheijen, Paul von Behren, Rich
Wales, Mike White.
This software is provided “as is,”
without warranty of any kind, express
or implied. In no event shall Info-ZIP
or its contributors be held liable for
any direct, indirect, incidental, special
or consequential damages arising out of the use of or inability to use this
software.
Permission is granted to anyone to
use this software for any purpose,
including commercial applications,
and to alter it and redistribute it freely,
subject to the following restrictions:1. Redistributions of source code must retain the above copyright
notice, definition, disclaimer, and
this list of conditions.
2. Redistributions in binary form (compiled executables) must
reproduce the above copyright
notice, definition, disclaimer, and
this list of conditions in
documentation and/or other
materials provided with the distribution. The sole exception to
this condition is redistribution of a
standard UnZipSFX binary
(including SFXWiz) as part of a
self-extracting archive; that is
permitted without inclusion of this
license, as long as the normal
SFX banner has not been
removed from the binary or
disabled.
3. Altered versions--including, but not limited to, ports to new
operating systems, existing ports
with new graphical interfaces, and dynamic, shared, or static library
versions--must be plainly marked
as such and must not be
misrepresented as being the
Page 238 of 245

236Customer informationWhen using the vehicle, situations
may occur in which these technical
data related to other information
(accident report, damages on the
vehicle, witness statements etc.) may be associated with a specific person -
possibly, with the assistance of an
expert.
Additional functions contractually
agreed upon with the client (e.g.
vehicle location in emergency cases)
allow the transmission of particular vehicle data from the vehicle.
Radio Frequency
Identification (RFID)
RFID technology is used in some
vehicles for functions such as tyre
pressure monitoring and ignition
system security. It is also used in
connection with conveniences such
as radio remote controls for door
locking/unlocking and starting, and in-
vehicle transmitters for garage door
openers. RFID technology in
Vauxhall vehicles does not use or
record personal information or link
with any other Vauxhall system
containing personal information.
Page 244 of 245

242VValet mode ................................... 94
Vehicle battery ........................... 179
Vehicle checks............................ 176
Vehicle data ................................ 219
Vehicle data recording and privacy ..................................... 235
Vehicle dimensions .................... 225
Vehicle Identification Number ....217
Vehicle jack ................................ 194
Vehicle messages .......................97
Vehicle personalisation ...............99
Vehicle security ............................ 31
Vehicle specific data ......................3
Vehicle storage ........................... 175
Vehicle tools ............................... 194
Vehicle unlocking ........................... 6
Vehicle weight ........................... 225
Ventilation ................................... 114
W
Warning chimes ........................... 98
Warning lights ............................... 82
Warning triangle .......................... 69
Washer and wiper systems .........13
Washer fluid ............................... 178
Wheel changing .........................202
Wheel covers ............................. 198
Wheels and tyres .......................195
Windows ....................................... 36Windscreen................................... 36
Windscreen wiper/washer ...........74
Winter tyres ............................... 195
Wiper blade replacement ..........181