seats VAUXHALL CROSSLAND X 2018.5 Owner's Guide
[x] Cancel search | Manufacturer: VAUXHALL, Model Year: 2018.5, Model line: CROSSLAND X, Model: VAUXHALL CROSSLAND X 2018.5Pages: 259, PDF Size: 7.9 MB
Page 59 of 259

Seats, restraints57ISOFIX brackets
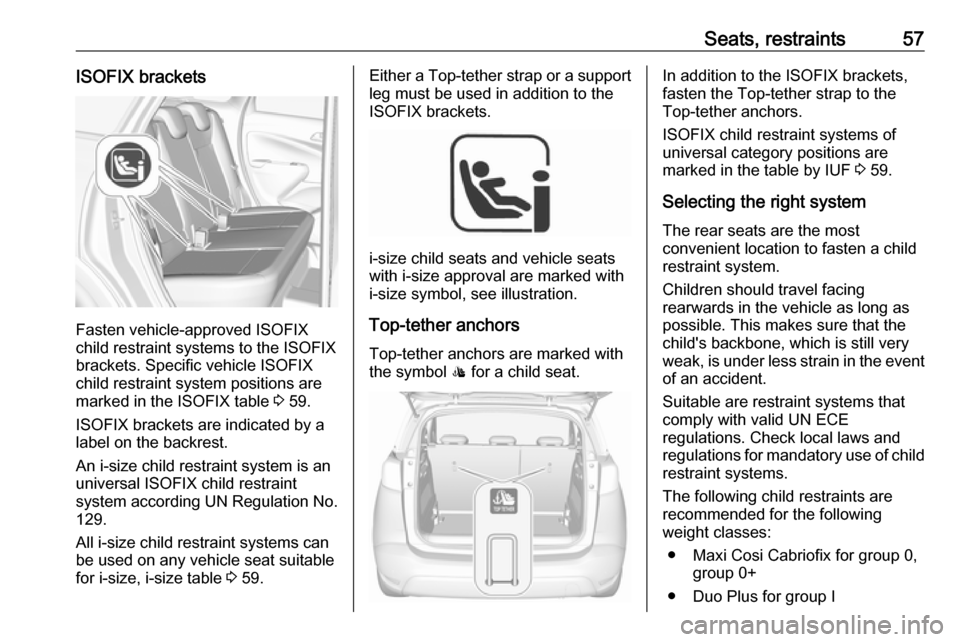
Fasten vehicle-approved ISOFIX
child restraint systems to the ISOFIX
brackets. Specific vehicle ISOFIX
child restraint system positions are
marked in the ISOFIX table 3 59.
ISOFIX brackets are indicated by a
label on the backrest.
An i-size child restraint system is an
universal ISOFIX child restraint
system according UN Regulation No.
129.
All i-size child restraint systems can
be used on any vehicle seat suitable
for i-size, i-size table 3 59.
Either a Top-tether strap or a support
leg must be used in addition to the
ISOFIX brackets.
i-size child seats and vehicle seats
with i-size approval are marked with
i-size symbol, see illustration.
Top-tether anchors Top-tether anchors are marked with
the symbol : for a child seat.
In addition to the ISOFIX brackets,
fasten the Top-tether strap to the
Top-tether anchors.
ISOFIX child restraint systems of
universal category positions are
marked in the table by IUF 3 59.
Selecting the right system The rear seats are the most
convenient location to fasten a child
restraint system.
Children should travel facing
rearwards in the vehicle as long as
possible. This makes sure that the child's backbone, which is still very
weak, is under less strain in the event of an accident.
Suitable are restraint systems that
comply with valid UN ECE
regulations. Check local laws and
regulations for mandatory use of child
restraint systems.
The following child restraints are recommended for the following
weight classes:
● Maxi Cosi Cabriofix for group 0, group 0+
● Duo Plus for group I
Page 60 of 259

58Seats, restraints● Kidfix XP for group II/III
● Graco Junior for group III
Ensure that the child restraint system to be installed is compatible with the
vehicle type.
Ensure that the mounting location of
the child restraint system within the
vehicle is correct, see following
tables.
Allow children to enter and exit the
vehicle only on the side facing away
from the traffic.
When the child restraint system is not in use, secure the seat with a seat beltor remove it from the vehicle.
Notice
Do not affix anything on the child
restraint systems and do not cover
them with any other materials.
A child restraint system which has
been subjected to stress in an
accident must be replaced.
Page 61 of 259

Seats, restraints59Child restraint installation locations
Permissible options for fastening a child restraint system with a three-point seat belt
Weight class
On front passenger seat
On rear outboard seatsOn rear centre seat
activated airbagdeactivated airbagGroup 0: up to 10 kgXU/L 1,2U/L 3XGroup 0+: up to 13 kgXU/L1,2U/L3XGroup I: 9 to 18 kgXU/L 1,2U/L3,4XGroup II: 15 to 25 kgU/L1,2XU/L3,4XGroup III: 22 to 36 kgU/L1,2XU/L3,4XU:universal suitability in conjunction with three-point seat beltL:suitable for particular child restraint systems of the 'specific-vehicle', 'restricted' or 'semi-universal' categories. The
child restraint system must be approved for the specific vehicle type (refer to the vehicle type list of the child restraint
system)X:no child restraint system permitted in this weight class1:move seat forwards as far as necessary and adjust seat backrest inclination as far as necessary to a vertical position to ensure that the belt runs forwards from the upper anchorage point2:move seat height adjustment upwards as far as necessary and adjust seat backrest inclination as far as necessaryto a vertical position to ensure that the belt is tight on the buckle side3:move the respective front seat ahead of the child restraint system forwards and the sliding rear seat backwards as far as necessary4:adjust the respective headrest as necessary or remove if required
Page 62 of 259

60Seats, restraintsPermissible options for fitting an ISOFIX child restraint system with ISOFIX brackets
Weight classSize classFixture
On front passenger seatOn rear outboard
seatsOn rear centre
seatactivated airbagdeactivated airbagGroup 0: up to 10 kgGISO/L2XXXXFISO/L1XXXXEISO/R1XXIL 1XGroup 0+: up to 13 kgEISO/R1XXIL 1XDISO/R2XXIL1XCISO/R3XXIL1XGroup I: 9 to 18 kgDISO/R2XXIL 1,2XCISO/R3XXIL1,2XBISO/F2XXIL, IUF 1,2XB1ISO/F2XXXIL, IUF 1,2XAISO/F3XXIL, IUF1,2XGroup II: 15 to 25 kgXXIL1,2XGroup III: 22 to 36 kgXXIL1,2X
Page 63 of 259

Seats, restraints61IL:suitable for particular ISOFIX restraint systems of the 'specific-vehicle', 'restricted' or 'semi-universal' categories.The ISOFIX restraint system must be approved for the specific vehicle type (refer to the vehicle type list of the child
restraint system)IUF:suitable for ISOFIX forward-facing child restraint systems of universal category approved for use in this weight classX:no ISOFIX child restraint system approved in this weight class1:move the respective front seat ahead of the child restraint system forwards and the sliding rear seat backwards as far as necessary2:adjust the respective headrest as necessary or remove if required
ISOFIX size class and seat device
A – ISO/F3:forward-facing child restraint system for children of maximum size in the weight class 9 to 18 kgB – ISO/F2:forward-facing child restraint system for smaller children in the weight class 9 to 18 kgB1 – ISO/F2X:forward-facing child restraint system for smaller children in the weight class 9 to 18 kgC – ISO/R3:rear-facing child restraint system for children of maximum size in the weight class up to 18 kgD – ISO/R2:rear-facing child restraint system for smaller children in the weight class up to 18 kgE – ISO/R1:rear-facing child restraint system for young children in the weight class up to 13 kgF– ISO/L1:left lateral facing position child restraint system (carry-cot)G – ISO/L2:right lateral facing position child restraint system (carry-cot)
Permissible options for fitting an i-Size child restraint system with ISOFIX brackets
On front passenger seat
On rear outboard seatsOn rear centre seat
activated airbagdeactivated airbagi-Size child restraint systemsXXi - UXi - U:suitable for i-Size 'universal' forward and rearward facing child restraint systemsX:seating position not suitable for i-Size 'universal' child restraint systems
Page 65 of 259

Storage63
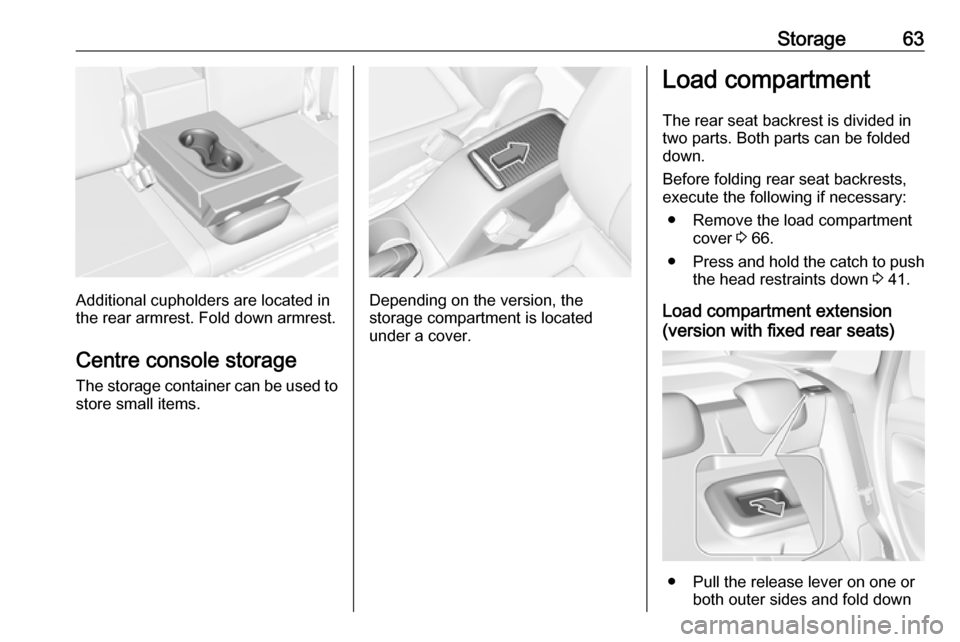
Additional cupholders are located in
the rear armrest. Fold down armrest.
Centre console storage
The storage container can be used to
store small items.Depending on the version, the
storage compartment is located
under a cover.
Load compartment
The rear seat backrest is divided in
two parts. Both parts can be folded
down.
Before folding rear seat backrests,
execute the following if necessary:
● Remove the load compartment cover 3 66.
● Press and hold the catch to push
the head restraints down 3 41.
Load compartment extension
(version with fixed rear seats)
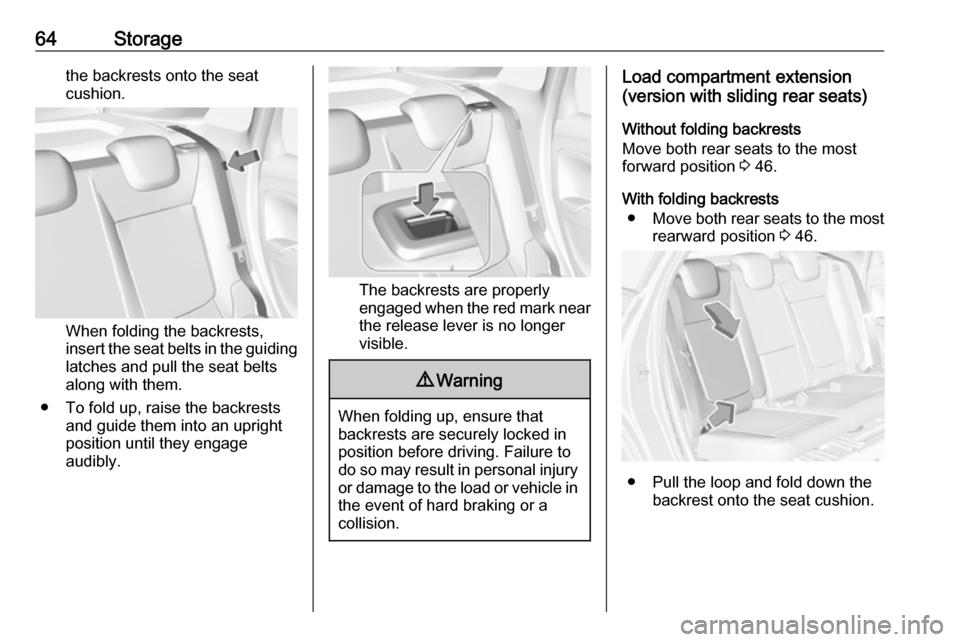
● Pull the release lever on one or both outer sides and fold down
Page 66 of 259

64Storagethe backrests onto the seat
cushion.
When folding the backrests,
insert the seat belts in the guiding
latches and pull the seat belts
along with them.
● To fold up, raise the backrests and guide them into an upright
position until they engage
audibly.
The backrests are properly
engaged when the red mark near the release lever is no longer
visible.
9 Warning
When folding up, ensure that
backrests are securely locked in
position before driving. Failure to
do so may result in personal injury or damage to the load or vehicle in the event of hard braking or a
collision.
Load compartment extension
(version with sliding rear seats)
Without folding backrests
Move both rear seats to the most
forward position 3 46.
With folding backrests ● Move both rear seats to the most
rearward position 3 46.
● Pull the loop and fold down the
backrest onto the seat cushion.
Page 69 of 259

Storage67The cover can also be stored behind
the rear seats.
Double load floor
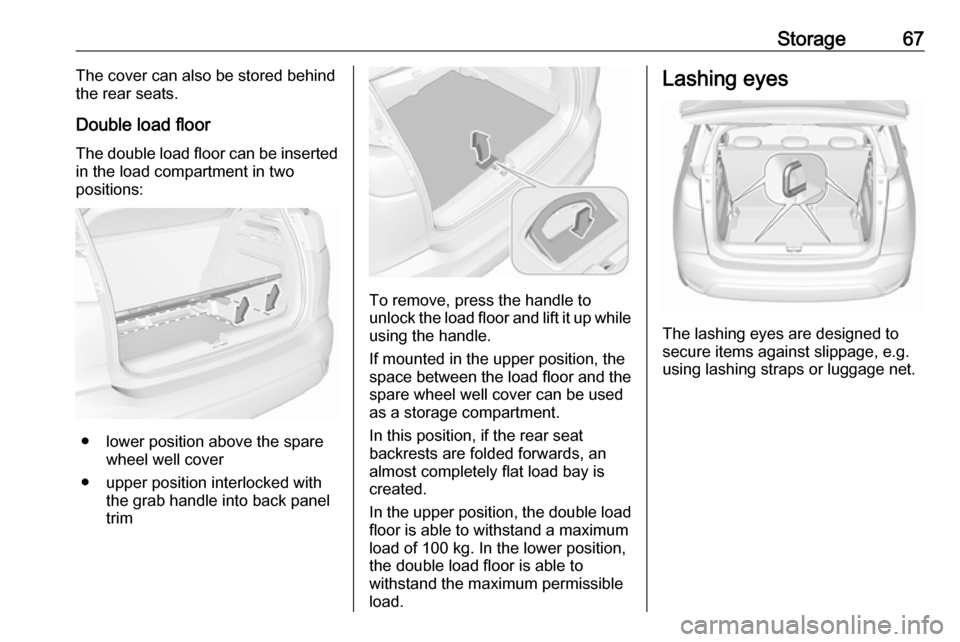
The double load floor can be inserted
in the load compartment in two
positions:
● lower position above the spare wheel well cover
● upper position interlocked with the grab handle into back panel
trim
To remove, press the handle to
unlock the load floor and lift it up while
using the handle.
If mounted in the upper position, the
space between the load floor and the spare wheel well cover can be used
as a storage compartment.
In this position, if the rear seat
backrests are folded forwards, an
almost completely flat load bay is
created.
In the upper position, the double load
floor is able to withstand a maximum
load of 100 kg. In the lower position,
the double load floor is able to
withstand the maximum permissible
load.
Lashing eyes
The lashing eyes are designed to
secure items against slippage, e.g.
using lashing straps or luggage net.
Page 72 of 259

70Storage● Secure loose objects in the loadcompartment to prevent from
sliding.
● When transporting objects in the load compartment, the backrests
of the rear seats must not be
angled forward.
● Do not allow the load to protrude above the upper edge of the
backrests.
● Do not place any objects on the load compartment cover or the
instrument panel, and do not cover the sensor on top of the
instrument panel.
● The load must not obstruct the operation of the pedals, parking
brake and gear selector, or
hinder the freedom of movement of the driver. Do not place any
unsecured objects in the interior.
● Do not drive with an open load compartment.9Warning
Always make sure that the load in
the vehicle is securely stowed.
Otherwise objects can be thrown
around inside the vehicle and
cause personal injury or damage
to the load or car.
● The payload is the difference between the permitted gross
vehicle weight (see identification
plate 3 229) and the EC kerb
weight.
To calculate the payload, enter
the data for your vehicle in the
weights table at the front of this
manual.
The EC kerb weight includes
weights for the driver (68 kg),
luggage (7 kg) and all fluids (fuel
tank 90% full).
Optional equipment and
accessories increase the kerb
weight.
● Driving with a roof load increases
the sensitivity of the vehicle to
cross-winds and has a
detrimental effect on vehicle
handling due to the vehicle's
higher centre of gravity.
Distribute the load evenly and secure it properly with retaining
straps. Adjust the tyre pressure
and vehicle speed according to
the load conditions. Check and
retighten the straps frequently.
Do not drive faster than 75 mph.
The permissible roof load is
60 kg. The roof load is the
combined weight of the roof rack and the load.
Page 78 of 259

76Instruments and controls9Warning
The road surface may already be
icy even though the display
indicates a few degrees above 0
°C.
Clock
Date and time are shown in the
Info Display 3 96.
Setting date and time, see
Infotainment manual.
Power outlets
A 12 V power outlet is located in the
centre console.
Another power outlet is located in the console between the front seats.
Do not exceed the maximum power
consumption of 120 W.
With ignition off, the power outlet is deactivated. Additionally, the poweroutlet is deactivated in the event of
low vehicle battery voltage.
Electrical accessories that are
connected must comply with the
electromagnetic compatibility
requirements laid down in
DIN VDE 40 839.
Do not connect any current-delivering
accessories, e.g. electrical charging
devices or batteries.
Do not damage the outlets by using
unsuitable plugs.
Stop-start system 3 135.
USB charging port
One or two USB ports are located in
the centre console. Both USB ports
are prepared for charging devices.
When two USB ports are available,
the upper USB port can be used to
connect a phone for phone projection.