battery cover VAUXHALL CROSSLAND X 2018 Owner's Manual
[x] Cancel search | Manufacturer: VAUXHALL, Model Year: 2018, Model line: CROSSLAND X, Model: VAUXHALL CROSSLAND X 2018Pages: 255, PDF Size: 7.57 MB
Page 25 of 255
Keys, doors and windows23
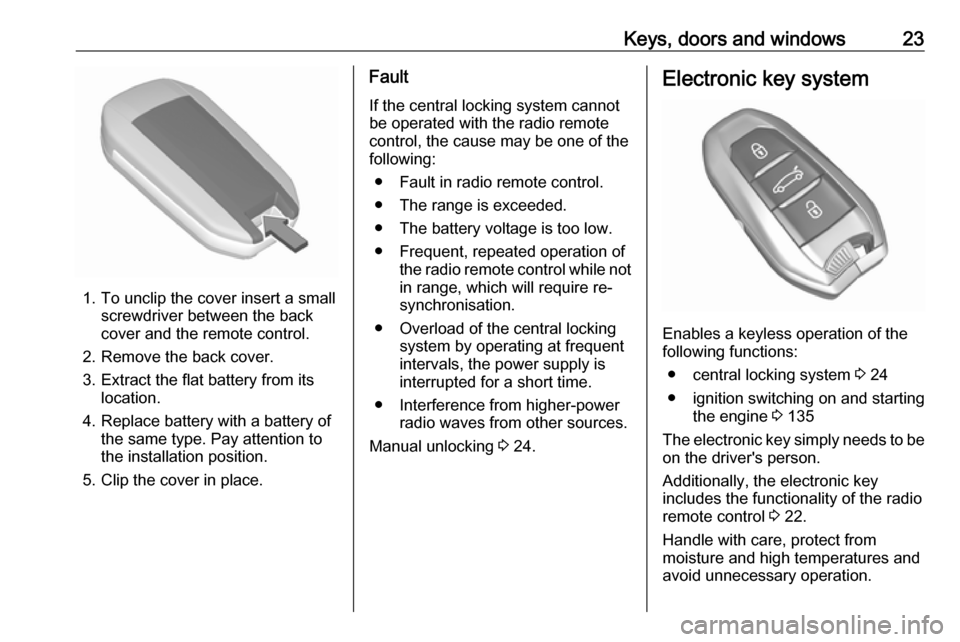
1. To unclip the cover insert a smallscrewdriver between the back
cover and the remote control.
2. Remove the back cover.
3. Extract the flat battery from its location.
4. Replace battery with a battery of the same type. Pay attention to
the installation position.
5. Clip the cover in place.
Fault
If the central locking system cannot
be operated with the radio remote
control, the cause may be one of the
following:
● Fault in radio remote control.
● The range is exceeded.
● The battery voltage is too low.
● Frequent, repeated operation of the radio remote control while not
in range, which will require re-
synchronisation.
● Overload of the central locking system by operating at frequent
intervals, the power supply is
interrupted for a short time.
● Interference from higher-power radio waves from other sources.
Manual unlocking 3 24.Electronic key system
Enables a keyless operation of the
following functions:
● central locking system 3 24
● ignition switching on and starting the engine 3 135
The electronic key simply needs to be on the driver's person.
Additionally, the electronic key
includes the functionality of the radio
remote control 3 22.
Handle with care, protect from
moisture and high temperatures and
avoid unnecessary operation.
Page 26 of 255
24Keys, doors and windowsReplacing battery in electronic
key
Replace the battery as soon as the
system no longer operates properly
or the range is reduced. The need for battery replacement is indicated by a
message in the Driver Information
Centre 3 101.
Batteries do not belong in household
waste. They must be disposed of at
an appropriate recycling collection
point.
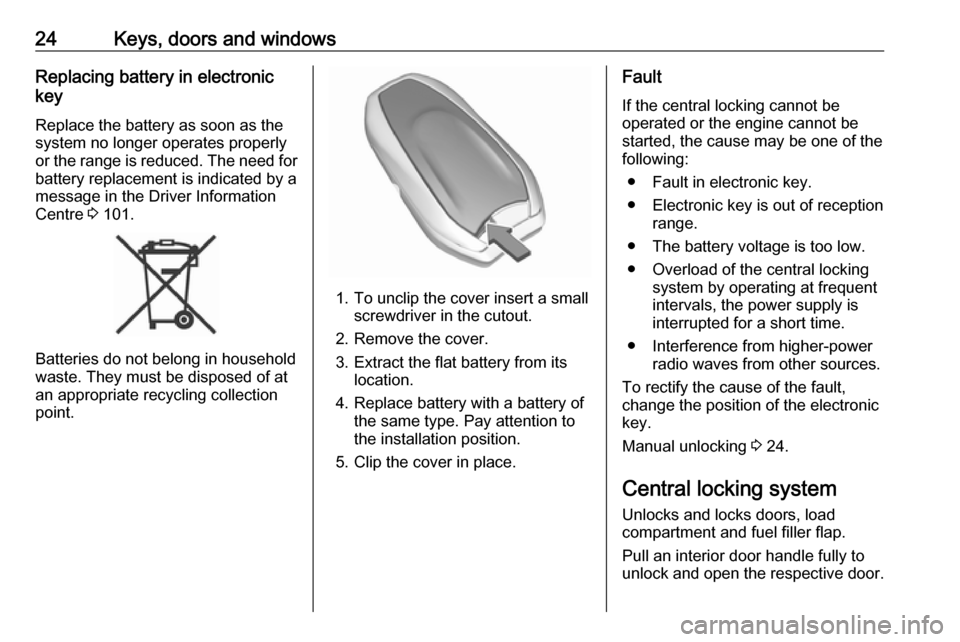
1. To unclip the cover insert a small screwdriver in the cutout.
2. Remove the cover.
3. Extract the flat battery from its location.
4. Replace battery with a battery of the same type. Pay attention to
the installation position.
5. Clip the cover in place.
Fault
If the central locking cannot be operated or the engine cannot be
started, the cause may be one of the
following:
● Fault in electronic key.
● Electronic key is out of reception range.
● The battery voltage is too low.
● Overload of the central locking system by operating at frequentintervals, the power supply is
interrupted for a short time.
● Interference from higher-power radio waves from other sources.
To rectify the cause of the fault,
change the position of the electronic
key.
Manual unlocking 3 24.
Central locking system Unlocks and locks doors, load
compartment and fuel filler flap.
Pull an interior door handle fully to
unlock and open the respective door.
Page 30 of 255
28Keys, doors and windowsOperation with the key in case of
a central locking system fault
In case of a fault, e.g. vehicle battery
or remote control/electronic key
battery is discharged, the driver's
door can be locked or unlocked with
the mechanical key.
Manual unlocking
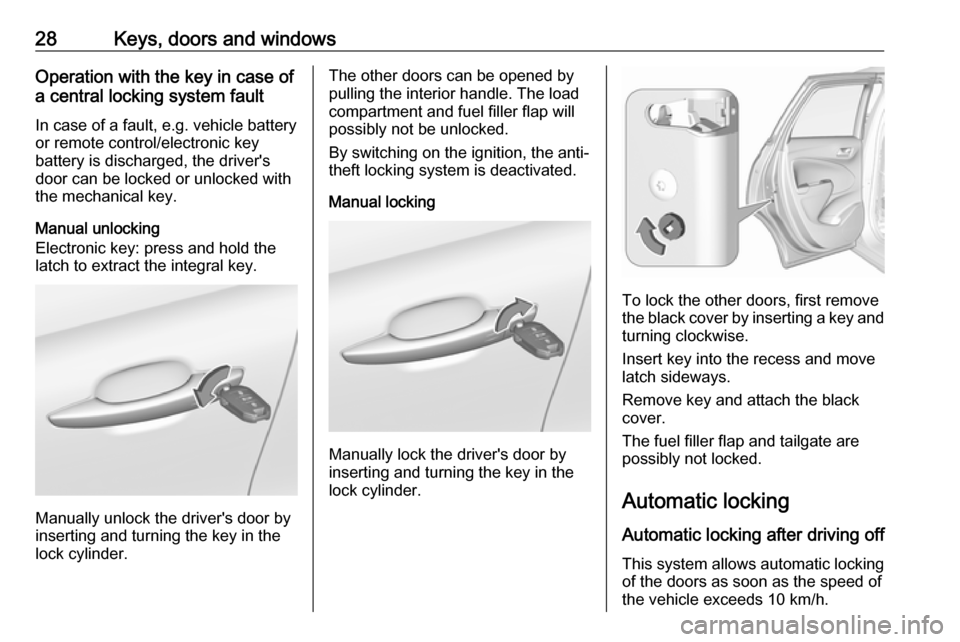
Electronic key: press and hold the
latch to extract the integral key.
Manually unlock the driver's door by
inserting and turning the key in the
lock cylinder.
The other doors can be opened by
pulling the interior handle. The load
compartment and fuel filler flap will
possibly not be unlocked.
By switching on the ignition, the anti- theft locking system is deactivated.
Manual locking
Manually lock the driver's door by
inserting and turning the key in the lock cylinder.
To lock the other doors, first remove
the black cover by inserting a key and turning clockwise.
Insert key into the recess and move
latch sideways.
Remove key and attach the black
cover.
The fuel filler flap and tailgate are
possibly not locked.
Automatic locking Automatic locking after driving off This system allows automatic locking
of the doors as soon as the speed of
the vehicle exceeds 10 km/h.
Page 112 of 255
110LightingLightingExterior lighting.......................... 110
Light switch .............................. 110
Automatic light control .............111
High beam ............................... 111
Headlight flash ......................... 111
Headlight range adjustment ....112
Daytime running lights .............112
Adaptive forward lighting .........112
Hazard warning flashers ..........113
Turn and lane-change signals . 114
Front fog lights ......................... 114
Rear fog light ........................... 115
Parking lights ........................... 115
Reversing lights .......................115
Misted light covers ...................115
Interior lighting ........................... 116
Instrument panel illumination control ..................................... 116
Interior lights ............................ 116
Reading lights .......................... 116
Sunvisor lights ......................... 117
Lighting features ........................117
Centre console lighting ............117
Entry lighting ............................ 117Exit lighting.............................. 117
Battery discharge protection ....118Exterior lighting
Light switch
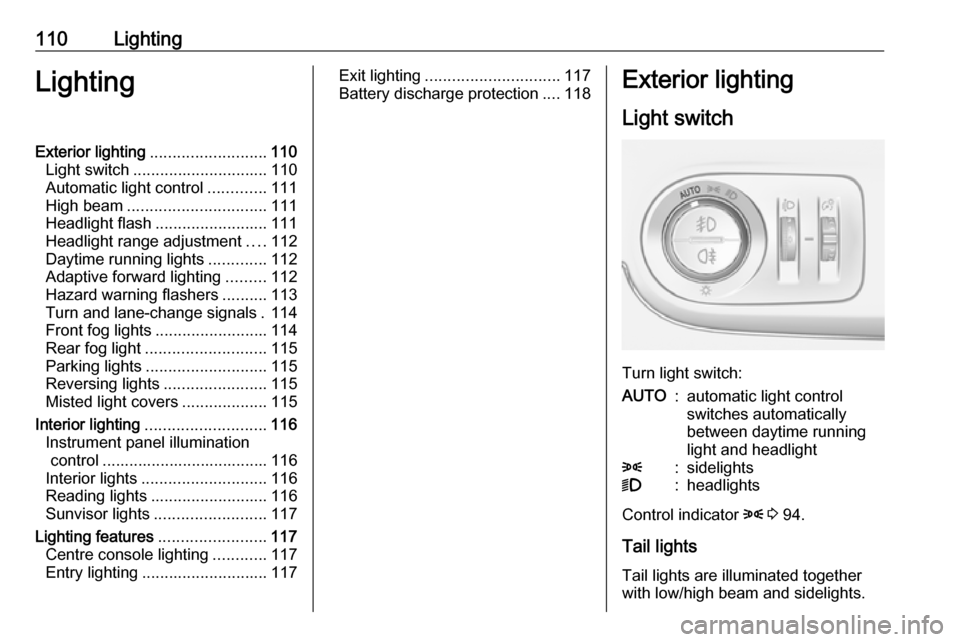
Turn light switch:
AUTO:automatic light control
switches automatically
between daytime running
light and headlight8:sidelights9:headlights
Control indicator 8 3 94.
Tail lights Tail lights are illuminated together
with low/high beam and sidelights.
Page 136 of 255
134Driving and operating9Warning
If the vehicle battery is discharged,
the vehicle must not be towed,
tow-started or jump-started as the
steering wheel lock cannot be
disengaged.
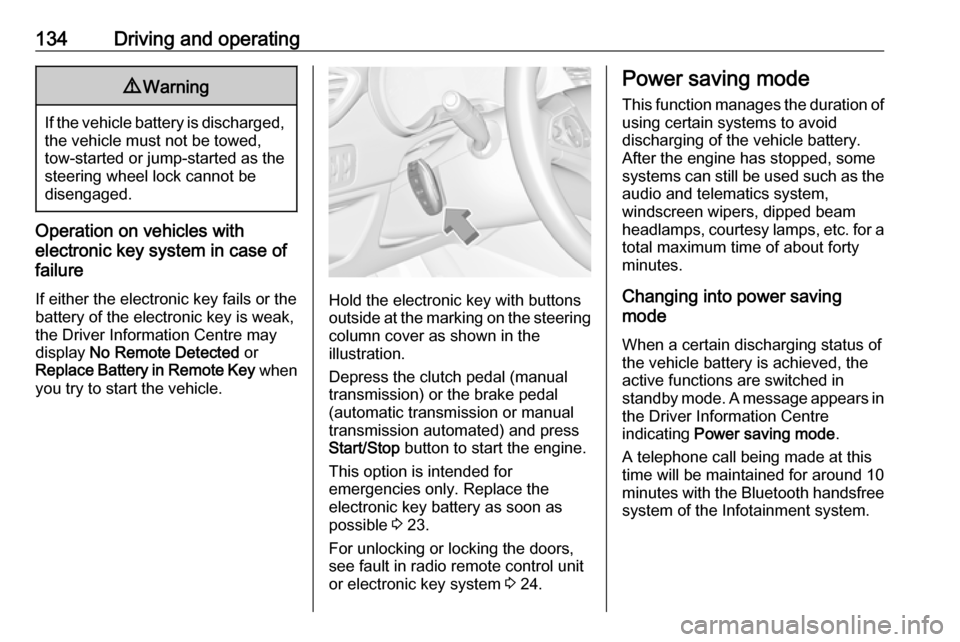
Operation on vehicles with
electronic key system in case of
failure
If either the electronic key fails or the
battery of the electronic key is weak,
the Driver Information Centre may
display No Remote Detected or
Replace Battery in Remote Key when
you try to start the vehicle.
Hold the electronic key with buttons outside at the marking on the steering column cover as shown in the
illustration.
Depress the clutch pedal (manual
transmission) or the brake pedal
(automatic transmission or manual
transmission automated) and press
Start/Stop button to start the engine.
This option is intended for
emergencies only. Replace the
electronic key battery as soon as
possible 3 23.
For unlocking or locking the doors,
see fault in radio remote control unit
or electronic key system 3 24.
Power saving mode
This function manages the duration of
using certain systems to avoid
discharging of the vehicle battery.
After the engine has stopped, some
systems can still be used such as the audio and telematics system,
windscreen wipers, dipped beam
headlamps, courtesy lamps, etc. for a total maximum time of about forty
minutes.
Changing into power saving
mode
When a certain discharging status of
the vehicle battery is achieved, the
active functions are switched in
standby mode. A message appears in the Driver Information Centre
indicating Power saving mode .
A telephone call being made at this
time will be maintained for around 10
minutes with the Bluetooth handsfree
system of the Infotainment system.
Page 186 of 255

184Vehicle careVehicle careGeneral Information...................184
Accessories and vehicle modifications .......................... 184
Vehicle storage ........................185
End-of-life vehicle recovery .....185
Vehicle checks ........................... 186
Performing work ......................186
Bonnet ..................................... 186
Engine oil ................................. 187
Engine coolant ......................... 188
Washer fluid ............................ 188
Brakes ..................................... 189
Brake fluid ............................... 189
Vehicle battery ......................... 189
Diesel fuel system bleeding .....190
Wiper blade replacement ........191
Bulb replacement .......................191
Halogen headlights ..................191
LED headlights ........................ 194
Fog lights ................................. 194
Tail lights ................................. 194
Side turn signal lights ..............198
Number plate light ...................199
Interior lights ............................ 199
Instrument panel illumination ...199Electrical system ........................199
Fuses ....................................... 199
Engine compartment fuse box . 200
Instrument panel fuse box .......201
Vehicle tools .............................. 204
Tools ........................................ 204
Wheels and tyres .......................204
Winter tyres ............................. 204
Tyre designations ....................205
Tyre pressure .......................... 205
Tyre deflation detection system .................................... 206
Tread depth ............................. 207
Changing tyre and wheel size . 208
Wheel covers ........................... 208
Tyre chains .............................. 208
Tyre repair kit .......................... 209
Wheel changing .......................212
Spare wheel ............................ 214
Jump starting ............................. 216
Towing ....................................... 217
Towing the vehicle ...................217
Towing another vehicle ...........218
Appearance care .......................219
Exterior care ............................ 219
Interior care ............................. 221General Information
Accessories and vehiclemodifications
We recommend the use of genuine
parts and accessories and factory approved parts specific for your
vehicle type. We cannot assess or guarantee reliability of other products
- even if they have a regulatory or
otherwise granted approval.
Any modification, conversion or other changes made to standard vehicle
specifications (including, without
limitation, software modifications,
modifications of the electronic control
units) may invalidate the warranty
offered by Vauxhall. Furthermore,
such changes may affect driver
assistance systems, may impact fuel
consumption, CO 2 emissions and
other emissions of the vehicle and
cause the vehicle to no longer
conform to the operating permit,
impacting the validity of your vehicle
registration.
Page 187 of 255

Vehicle care185Caution
When transporting the vehicle on
a train or on a recovery vehicle, the
mud flaps might be damaged.
Vehicle storage
Storage for a long period of time
If the vehicle is to be stored for several months:
● Wash and wax the vehicle.
● Have the wax in the engine compartment and underbody
checked.
● Clean and preserve the rubber seals.
● Fill up fuel tank completely.
● Change the engine oil.
● Drain the washer fluid reservoir.
● Check the coolant antifreeze and
corrosion protection.
● Adjust tyre pressure to the value specified for full load.
● Park the vehicle in a dry, wellventilated place. Engage first or
reverse gear or set selector lever
to P. Prevent the vehicle from
rolling.
● Do not apply the parking brake.
● Open the bonnet, close all doors and lock the vehicle.
● Disconnect the clamp from the negative terminal of the vehicle
battery. Beware that all systems
are not functional, e.g. anti-theft
alarm system.
Putting back into operation
When the vehicle is to be put back into
operation:
● Connect the clamp to the negative terminal of the vehicle
battery. Activate the electronics
of the power windows.
● Check tyre pressure.
● Fill up the washer fluid reservoir.
● Check the engine oil level.
● Check the coolant level.
● Fit the number plate if necessary.End-of-life vehicle recovery
Information on end-of-life vehicle
recovery centres and the recycling of
end-of-life vehicles is available on our website, where legally required. Only
entrust this work to an authorised
recycling centre.
Page 203 of 255

Vehicle care201No.Circuit10Engine control11Engine control12Engine cooling unit13Body control module14Intelligent battery sensor15–16Front fog light17–18High beam right19High beam left20Engine control fuel pump21Starter22–23Starter24Trailer hitch25Instrument panel fuse box26Transmission control moduleNo.Circuit27Body control module28Engine control module29Front wiper30Body control module
After having changed defective fuses,
close the fuse box cover and press
until it engages.
If the fuse box cover is not closed
correctly, malfunction may occur.
Instrument panel fuse box
Fuse box on the left side of the
instrument panel
In right-hand drive vehicles, the fuse
box is located behind a cover in the
glovebox. Open the glovebox and
remove the cover.
Page 254 of 255

252UUltrasonic parking assist............. 160
Upholstery .................................. 221
Using this manual ..........................3
V Valet mode ................................... 97
Vehicle battery ........................... 189
Vehicle checks............................ 186
Vehicle data ................................ 229
Vehicle data recording and privacy ..................................... 246
Vehicle dimensions .................... 236
Vehicle Identification Number ....227
Vehicle jack ................................ 204
Vehicle messages .....................101
Vehicle personalisation .............102
Vehicle security ............................ 31
Vehicle specific data ......................3
Vehicle storage ........................... 185
Vehicle tools ............................... 204
Vehicle unlocking ........................... 6
Vehicle weight ........................... 235
Ventilation ................................... 119
W
Warning chimes .........................101
Warning lights ............................... 84
Warning triangle .......................... 70
Washer and wiper systems .........13
Washer fluid ............................... 188Wheel changing .........................212
Wheel covers ............................. 208
Wheels and tyres .......................204
Windows ....................................... 36
Windscreen................................... 36 Windscreen wiper/washer ...........75
Winter tyres ............................... 204
Wiper blade replacement ..........191