lock VAUXHALL CROSSLAND X 2020 Owner's Guide
[x] Cancel search | Manufacturer: VAUXHALL, Model Year: 2020, Model line: CROSSLAND X, Model: VAUXHALL CROSSLAND X 2020Pages: 245, PDF Size: 21.85 MB
Page 35 of 245
Keys, doors and windows33lights. They will flash quickly four
times the next time the vehicle is
unlocked with the radio remote
control.
If the vehicle's battery is to be
disconnected (e.g. for maintenance
work), the alarm siren must be
deactivated as follows: switch the
ignition on then off, then disconnect
the vehicle's battery within
15 seconds.
If the battery has been reconnected
(e.g. after maintenance work), wait for
10 minutes to restart the engine.
Immobiliser The system checks whether the
vehicle is allowed to be started with the key being used.
The immobiliser is activated
automatically at the end of a trip.
Notice
Radio Frequency Identification
(RFID) tags may cause interference with the key. Do not have it placednear the key when starting the
vehicle.Notice
The immobiliser does not lock the doors. Always lock the vehicle after
leaving it 3 23.
Switch on the anti-theft alarm system 3 31.
Emergency operation of electronic key 3 123.Exterior mirrors
Convex shape The shape of the mirror makes
objects appear smaller, which will affect the ability to estimate
distances.
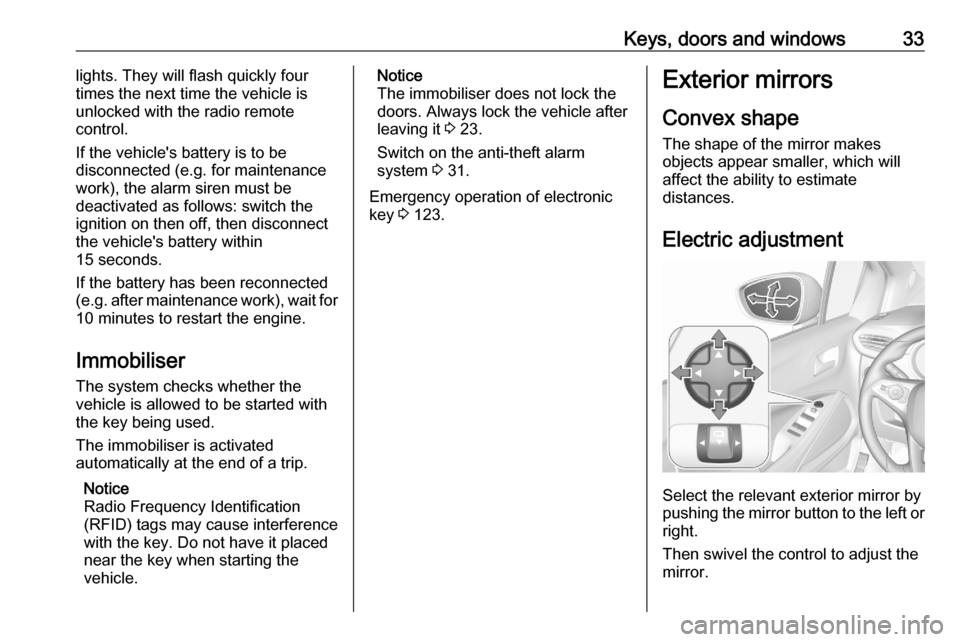
Electric adjustment
Select the relevant exterior mirror by
pushing the mirror button to the left or right.
Then swivel the control to adjust the
mirror.
Page 36 of 245
34Keys, doors and windowsFolding mirrors
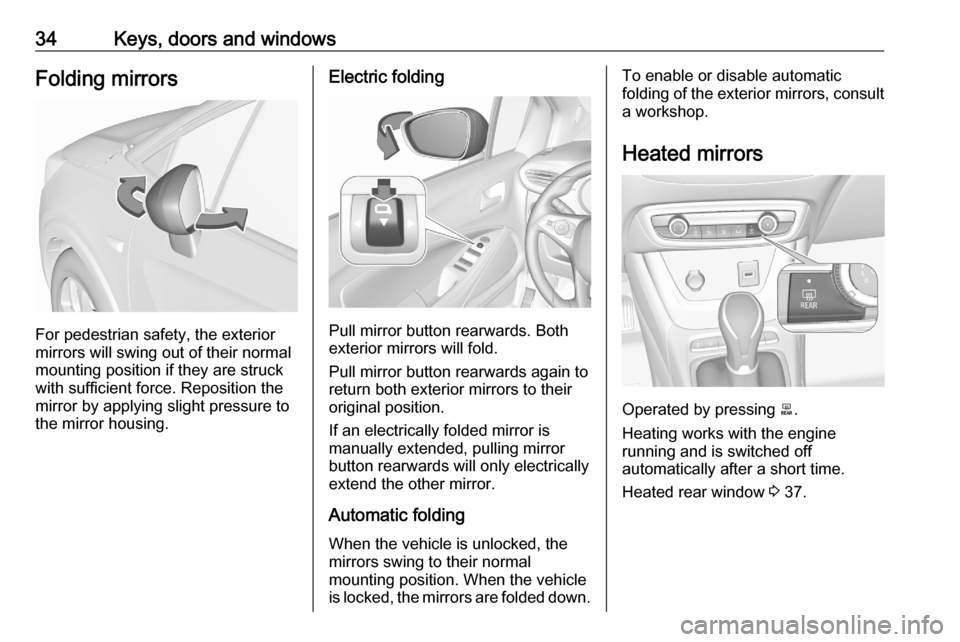
For pedestrian safety, the exterior
mirrors will swing out of their normal
mounting position if they are struck
with sufficient force. Reposition the mirror by applying slight pressure tothe mirror housing.
Electric folding
Pull mirror button rearwards. Both
exterior mirrors will fold.
Pull mirror button rearwards again to return both exterior mirrors to their
original position.
If an electrically folded mirror is
manually extended, pulling mirror
button rearwards will only electrically
extend the other mirror.
Automatic folding When the vehicle is unlocked, the
mirrors swing to their normal
mounting position. When the vehicle
is locked, the mirrors are folded down.
To enable or disable automatic
folding of the exterior mirrors, consult
a workshop.
Heated mirrors
Operated by pressing b
.
Heating works with the engine
running and is switched off
automatically after a short time.
Heated rear window 3 37.
Page 44 of 245

42Seats, restraints● Sit with shoulders as far backagainst the backrest as possible.
Set the backrest rake so that it is possible to easily reach the
steering wheel with arms slightly
bent. Maintain contact between
shoulders and the backrest when turning the steering wheel. Do
not angle the backrest too far
back. We recommend a
maximum rake of approx. 25°.
● Adjust seat and steering wheel in
a way that the wrist rests on top
of the steering wheel while the
arm is fully extended and
shoulders on the backrest.
● Adjust the steering wheel 3 70.
● Adjust the head restraint 3 40.
● Adjust the thigh support so that there is a space approx. two
fingers wide between the edge of the seat and the hollow of the
knee.
● Adjust the lumbar support so that
it supports the natural shape ofthe spine.Seat adjustment
Drive only with engaged seats and
backrests.
Longitudinal adjustment
Pull handle, slide seat, release
handle. Try to move the seat back and forth to ensure that the seat is locked
in place.
Backrest inclination
Turn handwheel. Do not lean on
backrest when adjusting.
Page 47 of 245

Seats, restraints45Rear seats
Drive only with engaged seats and backrests.9 Warning
Never adjust seats while driving as
they could move uncontrollably.
Folding backrests 3 62.
Longitudinal adjustment Both parts of the rear seat can be
individually moved forwards or
backwards.
Pull handle, slide seat, release
handle. Try to move the seat back and forth to ensure that the seat is locked
in place.
Backrest inclination
Pull the loop, adjust inclination and
release loop. Do not lean on backrest
when adjusting.
Armrest
Folding down armrest 3 62.
Page 48 of 245
46Seats, restraintsSeat belts
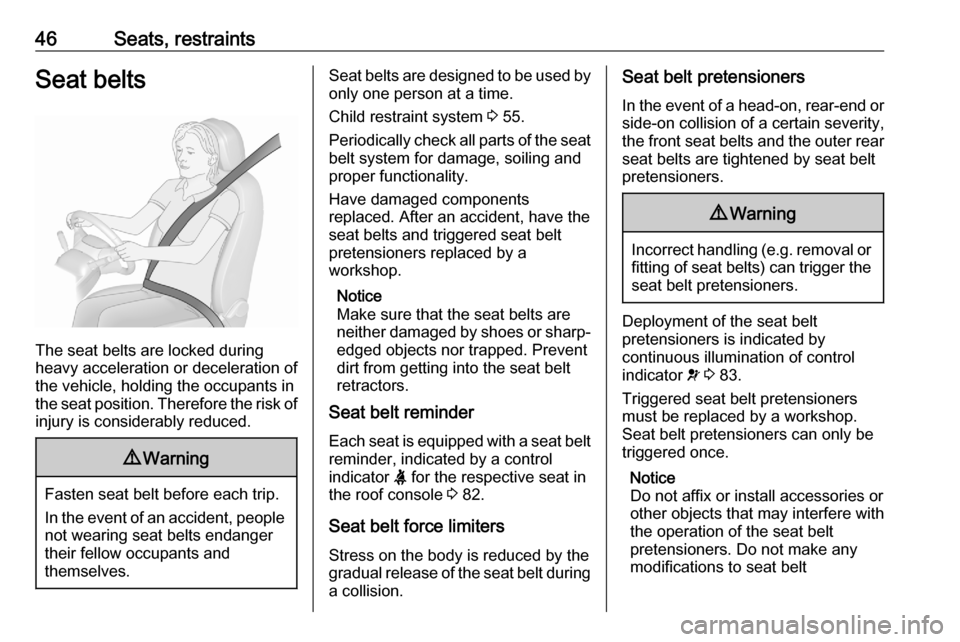
The seat belts are locked during
heavy acceleration or deceleration of
the vehicle, holding the occupants in
the seat position. Therefore the risk of injury is considerably reduced.
9 Warning
Fasten seat belt before each trip.
In the event of an accident, people
not wearing seat belts endanger their fellow occupants and
themselves.
Seat belts are designed to be used by only one person at a time.
Child restraint system 3 55.
Periodically check all parts of the seat
belt system for damage, soiling and
proper functionality.
Have damaged components
replaced. After an accident, have the
seat belts and triggered seat belt pretensioners replaced by a
workshop.
Notice
Make sure that the seat belts are neither damaged by shoes or sharp-
edged objects nor trapped. Prevent
dirt from getting into the seat belt
retractors.
Seat belt reminder
Each seat is equipped with a seat belt
reminder, indicated by a control
indicator X for the respective seat in
the roof console 3 82.
Seat belt force limiters Stress on the body is reduced by the
gradual release of the seat belt during
a collision.Seat belt pretensioners
In the event of a head-on, rear-end or
side-on collision of a certain severity,
the front seat belts and the outer rear
seat belts are tightened by seat belt
pretensioners.9 Warning
Incorrect handling ( e.g. removal or
fitting of seat belts) can trigger the
seat belt pretensioners.
Deployment of the seat belt
pretensioners is indicated by
continuous illumination of control
indicator v 3 83.
Triggered seat belt pretensioners
must be replaced by a workshop.
Seat belt pretensioners can only be
triggered once.
Notice
Do not affix or install accessories or
other objects that may interfere with
the operation of the seat belt
pretensioners. Do not make any
modifications to seat belt
Page 64 of 245

62StorageCentre console storage
The storage container can be used to
store small items.
Depending on the version, the
storage compartment is located
under a cover.
Load compartment
The rear seat backrest is divided in
two parts. Both parts can be folded
down.9 Warning
When folding up, ensure that
backrests are securely locked in
position before driving. Failure to
do so may result in personal injury
or damage to the load or vehicle in the event of hard braking or a
collision.
Before folding rear seat backrests,
execute the following if necessary:
● Remove the load compartment cover 3 64.
● Press and hold the catch to push
the head restraints down 3 40.
● Insert the seat belts in the guiding
latches.
Load compartment extension
(version with lever)
Page 67 of 245
Storage65Tyre repair kit 3 200.
Spare wheel 3 204.
Double load floor
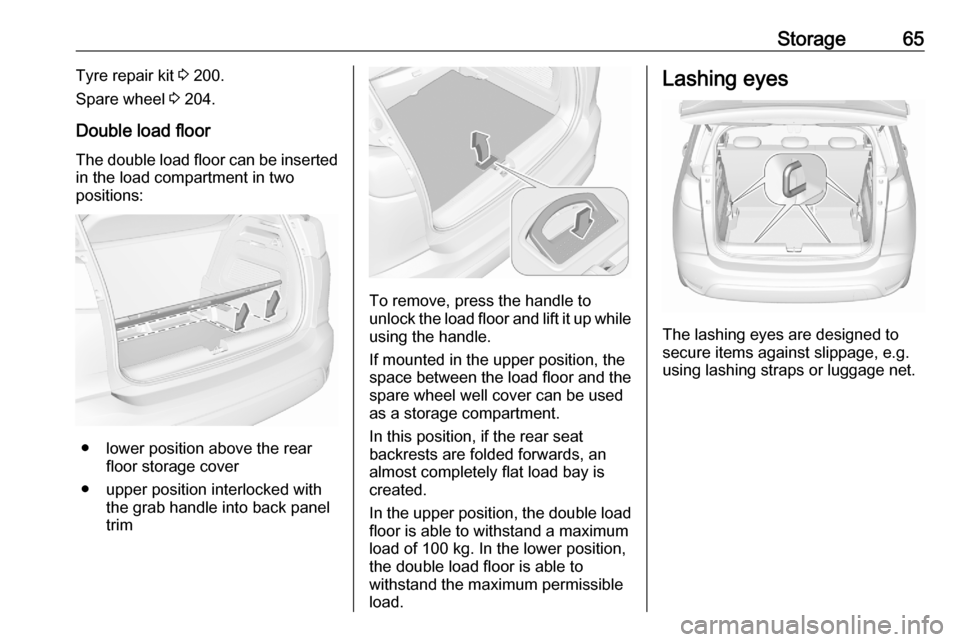
The double load floor can be inserted
in the load compartment in two
positions:
● lower position above the rear floor storage cover
● upper position interlocked with the grab handle into back panel
trim
To remove, press the handle to
unlock the load floor and lift it up while
using the handle.
If mounted in the upper position, the
space between the load floor and the spare wheel well cover can be used
as a storage compartment.
In this position, if the rear seat
backrests are folded forwards, an
almost completely flat load bay is
created.
In the upper position, the double load
floor is able to withstand a maximum
load of 100 kg. In the lower position,
the double load floor is able to
withstand the maximum permissible
load.
Lashing eyes
The lashing eyes are designed to
secure items against slippage, e.g.
using lashing straps or luggage net.
Page 71 of 245

Instruments and controls69Instruments and
controlsControls ....................................... 70
Steering wheel adjustment ........70
Steering wheel controls .............70
Heated steering wheel ...............70
Horn ........................................... 71
Windscreen wiper and washer ..71
Rear window wiper and washer ...................................... 73
Outside temperature ..................73
Clock ......................................... 74
Power outlets ............................. 74
Inductive charging .....................75
Cigarette lighter ......................... 76
Ashtrays .................................... 76
Warning lights, gauges and indi‐ cators ........................................... 77
Instrument cluster ......................77
Speedometer ............................. 79
Odometer .................................. 79
Trip odometer ............................ 79
Tachometer ............................... 80
Fuel gauge ................................ 80
Engine coolant temperature gauge ....................................... 80Engine oil level monitor.............81
Service display .......................... 81
Control indicators ......................82
Turn lights .................................. 82
Seat belt reminder .....................82
Airbag and belt tensioners .........83
Airbag deactivation ....................83
Charging system .......................83
Malfunction indicator light ..........84
Service vehicle soon .................84
Stop engine ............................... 84
System check ............................ 84
Brake and clutch system ...........84
Parking brake ............................ 85
Antilock brake system (ABS) .....85
Gear shifting .............................. 85
Lane departure warning ............85
Electronic Stability Control and Traction Control system ...........85
Electronic Stability Control and Traction Control system off ......86
Engine coolant temperature ......86
Preheating ................................. 86
Exhaust filter .............................. 86
AdBlue ....................................... 86
Deflation detection system ........86
Engine oil pressure ....................87
Low fuel ..................................... 87
Autostop .................................... 87
Exterior light .............................. 87Low beam.................................. 87
High beam ................................. 87
High beam assist .......................88
Front fog lights ........................... 88
Rear fog light ............................. 88
Rain sensor ............................... 88
Cruise control ............................ 88
Side blind spot alert ...................88
Active emergency braking .........88
Speed limiter ............................. 88
Door open .................................. 88
Displays ....................................... 89
Driver Information Centre ..........89
Info Display ................................ 91
Head-up display ........................93
Vehicle messages ........................95
Warning chimes .........................95
Vehicle personalisation ................96
Telematics services .....................99
Vauxhall Connect ......................99
Page 72 of 245
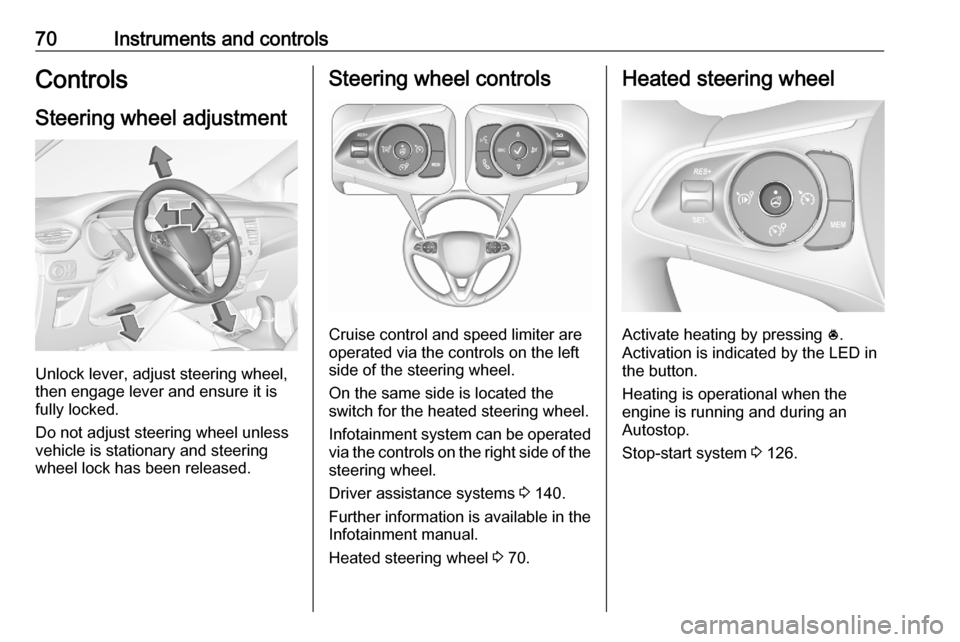
70Instruments and controlsControlsSteering wheel adjustment
Unlock lever, adjust steering wheel,
then engage lever and ensure it is
fully locked.
Do not adjust steering wheel unless
vehicle is stationary and steering
wheel lock has been released.
Steering wheel controls
Cruise control and speed limiter are
operated via the controls on the left
side of the steering wheel.
On the same side is located the
switch for the heated steering wheel.
Infotainment system can be operated
via the controls on the right side of the
steering wheel.
Driver assistance systems 3 140.
Further information is available in the
Infotainment manual.
Heated steering wheel 3 70.
Heated steering wheel
Activate heating by pressing *.
Activation is indicated by the LED in
the button.
Heating is operational when the
engine is running and during an
Autostop.
Stop-start system 3 126.
Page 74 of 245

72Instruments and controlsWindscreen wiper with rain
sensorHI:fastLO:slowAUTO:automatic wiping with rain
sensorOFF:off1x:single wipe
In AUTO position, the rain sensor
detects the amount of water on the
windscreen and automatically
regulates the frequency of the
windscreen wiper. If ignition is
switched off, automatic wiping mode
is deactivated. To activate automatic
wiping mode the next time ignition is
switched on, press the lever
downwards to position OFF and back
to AUTO .
Do not use if the windscreen is frozen. Switch off in car washes.
Adjustable sensitivity of the rain
sensor
Wiper lever in position AUTO.
Turn the adjuster wheel to adjust the
sensitivity of the rain sensor.
Make sure the sensor is not blocked
3 35, 3 10.
Control indicator < 3 71.
Windscreen washer
Pull lever. Washer fluid is sprayed
onto the windscreen and the wiper
wipes a few times.
Washer fluid 3 178.