Interior light VAUXHALL CROSSLAND X 2020 Owner's Manual
[x] Cancel search | Manufacturer: VAUXHALL, Model Year: 2020, Model line: CROSSLAND X, Model: VAUXHALL CROSSLAND X 2020Pages: 245, PDF Size: 21.85 MB
Page 31 of 245
Keys, doors and windows29Turn the red child lock in the rear
doors to the horizontal position by
using a key. The door cannot be
opened from the inside.
To deactivate, turn the child lock to
the vertical position.
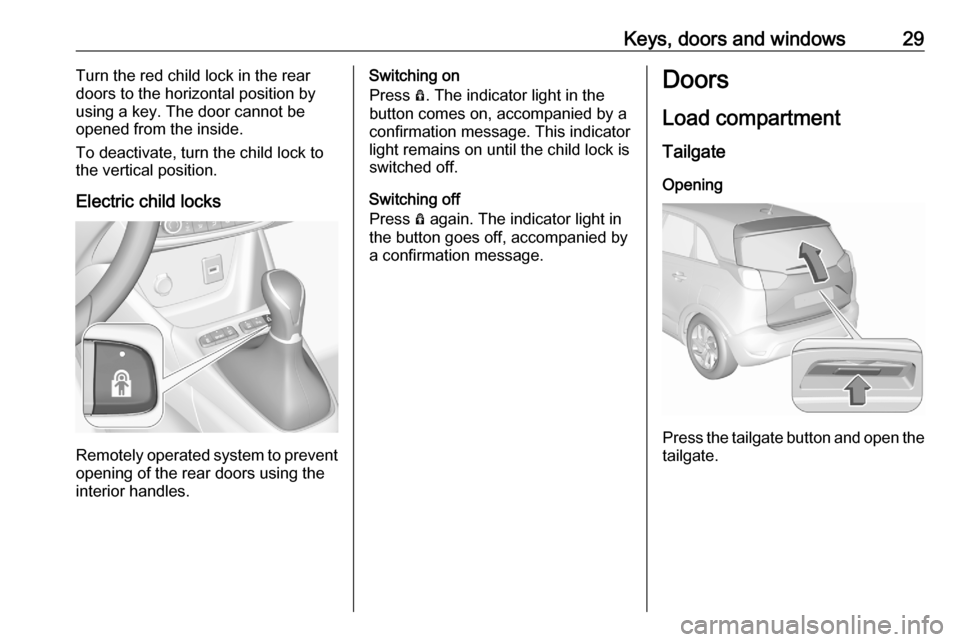
Electric child locks
Remotely operated system to prevent
opening of the rear doors using the
interior handles.
Switching on
Press Ô. The indicator light in the
button comes on, accompanied by a
confirmation message. This indicator
light remains on until the child lock is
switched off.
Switching off
Press Ô again. The indicator light in
the button goes off, accompanied by
a confirmation message.Doors
Load compartmentTailgate
Opening
Press the tailgate button and open the
tailgate.
Page 37 of 245
Keys, doors and windows35Interior mirrors
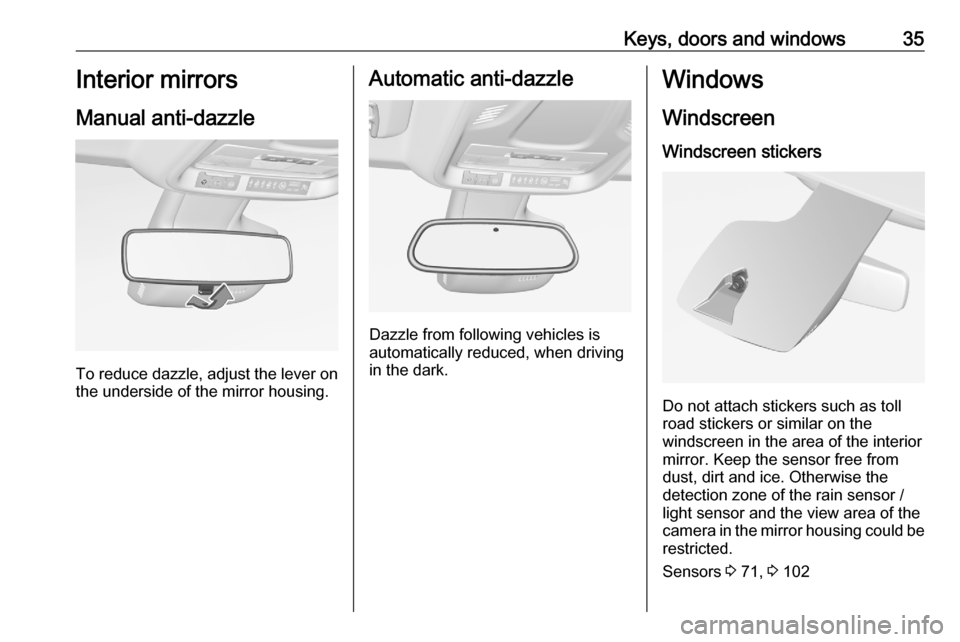
Manual anti-dazzle
To reduce dazzle, adjust the lever on the underside of the mirror housing.
Automatic anti-dazzle
Dazzle from following vehicles is
automatically reduced, when driving
in the dark.
Windows
Windscreen
Windscreen stickers
Do not attach stickers such as toll
road stickers or similar on the
windscreen in the area of the interior
mirror. Keep the sensor free from
dust, dirt and ice. Otherwise the
detection zone of the rain sensor /
light sensor and the view area of the
camera in the mirror housing could be
restricted.
Sensors 3 71, 3 102
Page 103 of 245
Lighting101LightingExterior lighting.......................... 101
Light switch .............................. 101
Automatic light control .............102
High beam ............................... 102
High beam assist .....................102
Headlight flash ......................... 103
Headlight range adjustment ....103
Headlights when driving abroad .................................... 104
Daytime running lights .............104
LED headlights ........................ 104
Hazard warning flashers ..........104
Turn lights ................................ 105
Front fog lights ......................... 105
Rear fog light ........................... 106
Parking lights ........................... 106
Reversing lights .......................106
Misted light covers ...................106
Interior lighting ........................... 107
Instrument panel illumination control ..................................... 107
Interior lights ............................ 107
Reading lights .......................... 107
Sun visor lights ........................ 108Lighting features ........................108
Centre console lighting ............108
Entry lighting ............................ 108
Exit lighting .............................. 108
Battery discharge protection ....109Exterior lighting
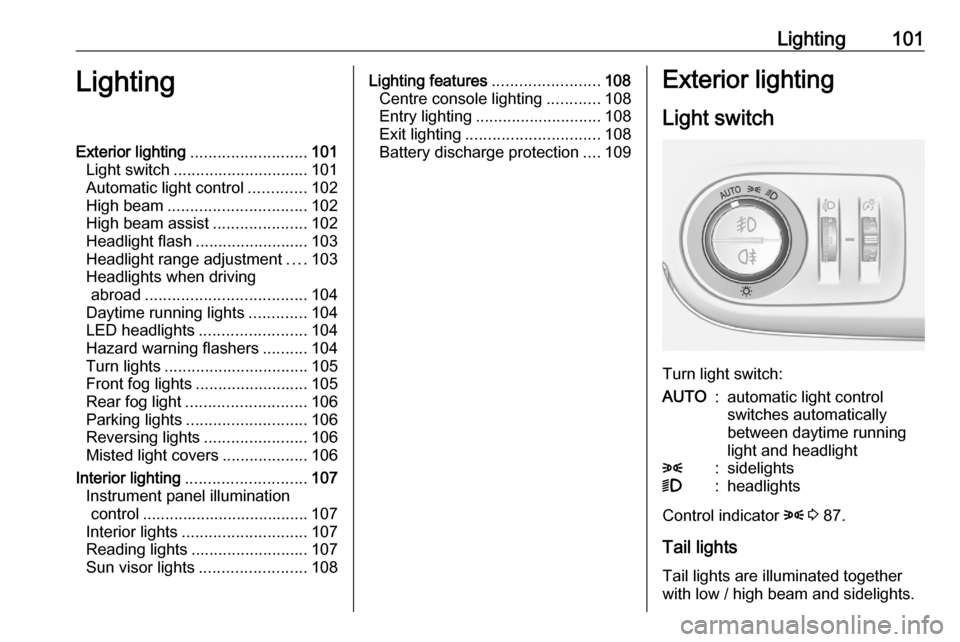
Light switch
Turn light switch:
AUTO:automatic light control
switches automatically
between daytime running
light and headlight8:sidelights9:headlights
Control indicator 8 3 87.
Tail lights Tail lights are illuminated together
with low / high beam and sidelights.
Page 109 of 245
Lighting107Interior lighting
Instrument panel
illumination control
Brightness of the following lights can
be adjusted when headlights are
switched on:
● instrument cluster illumination
● Info Display
● illuminated switches and operation elements
Turn thumb wheel A and hold until
the desired brightness is obtained.
Interior lights
During entry and exit of the vehicle,
the front and rear courtesy lights
automatically switch on and then off
after a delay.
Notice
In the event of an accident with
airbag deployment the courtesy
lights are turned on automatically.
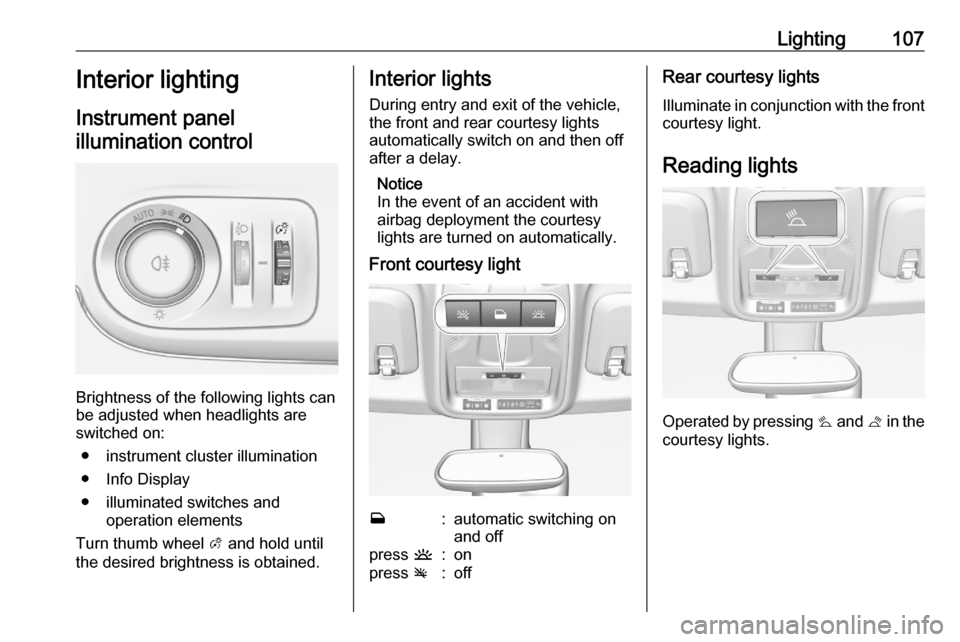
Front courtesy lightw:automatic switching on
and offpress u:onpress v:offRear courtesy lights
Illuminate in conjunction with the front courtesy light.
Reading lights
Operated by pressing s and t in the
courtesy lights.
Page 110 of 245

108Lighting
Illustration shows rear reading lights.Sun visor lights
Illuminates when the cover is opened.
Lighting features
Centre console lighting A spotlight integrated in the overheadconsole illuminates the centre
console when headlights are
switched on.
Entry lighting Welcome lighting
Some or all of the following lights are
switched on for a short time by
unlocking the vehicle:
● headlights
● tail lights
● number plate lights
● centre console lighting
● interior lights
The number of activated lights
depends on the surrounding light
conditions.
The lighting switches off immediately
when the ignition is switched on.This function can be activated or
deactivated in the vehicle
personalisation.
Vehicle personalisation 3 96.
The following lights will additionally
switch on when the driver's door is
opened:
● illumination of some switches
● Driver Information Centre
● door pocket lights
Exit lighting The following lights are switched on if
the ignition is switched off:
● interior lights
● centre console lighting
They will switch off automatically after
a delay. This function works only in
the dark.
Page 111 of 245

Lighting109Battery discharge protection
Vehicle battery state of charge
function
The function guarantees longest
vehicle battery life via a generator with controllable power output and
optimised power distribution.
To prevent discharge of the vehicle
battery when driving, the following
systems are reduced automatically in two stages and finally switched off:
● auxiliary heater
● heated rear window and heated mirrors
● heated seats
● fan
In the second stage, a message
which confirms the activation of the
vehicle battery discharge protection
will be displayed in the Driver
Information Centre.Switching off interior lights
To prevent discharge of the vehicle
battery when the ignition is switched off, some interior lights are switched
off automatically after some time.
Page 160 of 245

158Driving and operatingcrossing as a parking slot. After
selecting reverse gear the system will start a parking manoeuvre. Take care regarding the availability of the
suggested parking slot.
Low curbs and surface irregularities,
e.g. on construction zones, are not
detected by the system. The driver
accepts responsibility.
Side blind spot alert The side blind spot alert system
detects and reports objects on either
side of the vehicle, within a specified
blind spot zone. The system displays
a visual alert in each exterior mirror,
when detecting objects that may not
be visible in the interior and exterior
mirrors.
Side blind spot alert uses some of the
parking assist sensors.9 Warning
Side blind spot alert does not
replace driver vision.
The system does not detect:
● vehicles outside the side blind zones which may be rapidly
approaching
● pedestrians, cyclists or animals
Before changing a lane, always
check all mirrors, look over the
shoulder and use the turn light.
Activation
7'' Colour Info Display: select Blind
spot monitoring on the Info Display
and activate the function.
8'' Colour Info Display: press Í.
Select Driving functions on the Info
Display and then Blind spot
monitoring . Activate the function.
B illuminates continously green in the
instrument cluster to confirm the
function.
Functionality
When the system detects a vehicle in the side blind zone while driving
forwards, an LED will illuminate in the
relevant exterior mirror.
The LED comes on immediately when being passed.
The LED comes on after a delay when
passing another vehicle slowly.
Page 176 of 245

174Vehicle careVehicle careGeneral Information...................174
Accessories and vehicle modifications .......................... 174
Vehicle storage ........................175
End-of-life vehicle recovery .....175
Vehicle checks ........................... 176
Performing work ......................176
Bonnet ..................................... 176
Engine oil ................................. 177
Engine coolant ......................... 178
Washer fluid ............................ 178
Brakes ..................................... 179
Brake fluid ............................... 179
Vehicle battery ......................... 179
Diesel fuel system bleeding .....181
Wiper blade replacement ........181
Bulb replacement .......................182
Halogen headlights ..................182
LED headlights ........................ 185
Front fog lights ......................... 185
Tail lights ................................. 186
Side turn lights ......................... 190
Number plate light ...................190
Interior lights ............................ 190Electrical system........................191
Fuses ....................................... 191
Engine compartment fuse box . 191
Instrument panel fuse box .......193
Vehicle tools .............................. 195
Tools ........................................ 195
Wheels and tyres .......................196
Winter tyres ............................. 196
Tyre designations ....................196
Tyre pressure .......................... 196
Tyre deflation detection system .................................... 197
Tread depth ............................. 198
Changing tyre and wheel size . 199
Wheel covers ........................... 199
Tyre chains .............................. 199
Tyre repair kit .......................... 200
Wheel changing .......................203
Spare wheel ............................ 204
Jump starting ............................. 208
Towing ....................................... 209
Towing the vehicle ...................209
Towing another vehicle ...........210
Appearance care .......................211
Exterior care ............................ 211
Interior care ............................. 213
Floor mats ............................... 214General Information
Accessories and vehicle modifications
We recommend the use of genuine parts and accessories and factory
approved parts specific for this
vehicle type. We cannot assess or
guarantee reliability of other products - even if they have a regulatory or
otherwise granted approval.
Any modification, conversion or other
changes made to standard vehicle
specifications (including, without
limitation, software modifications,
modifications of the electronic control units) may invalidate the warranty
offered by Vauxhall.
Furthermore, such changes may
affect driver assistance systems, may
impact fuel consumption, CO 2
emissions and other emissions of the
vehicle and cause the vehicle to no
longer conform to the operating
permit, impacting the validity of your
vehicle registration.
Page 192 of 245
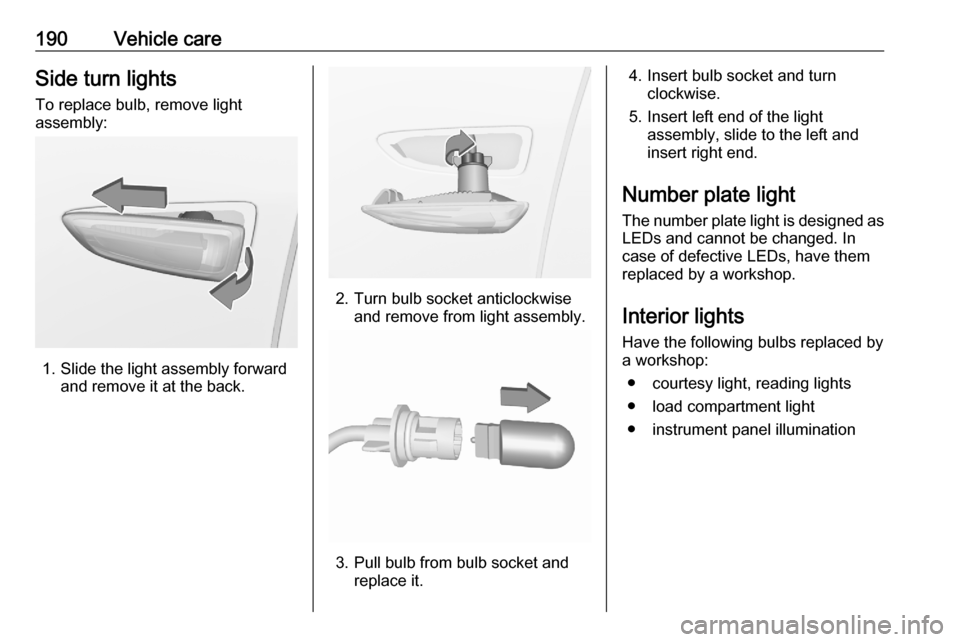
190Vehicle careSide turn lightsTo replace bulb, remove light
assembly:
1. Slide the light assembly forward and remove it at the back.
2. Turn bulb socket anticlockwiseand remove from light assembly.
3. Pull bulb from bulb socket andreplace it.
4. Insert bulb socket and turn clockwise.
5. Insert left end of the light assembly, slide to the left and
insert right end.
Number plate light
The number plate light is designed as
LEDs and cannot be changed. In
case of defective LEDs, have them
replaced by a workshop.
Interior lights
Have the following bulbs replaced by
a workshop:
● courtesy light, reading lights
● load compartment light
● instrument panel illumination
Page 215 of 245

Vehicle care213Glass panelUse a soft lint-free cloth or chamoisleather together with window cleaner
to clean the glass panel.
Wheels and tyres Do not use high-pressure jet
cleaners.
Clean rims with a pH-neutral wheel
cleaner.
Rims are painted and can be treated
with the same agents as the body.
Paintwork damage Rectify minor paintwork damage witha touch-up pen before rust forms.
Have more extensive damage or rust areas repaired by a workshop.
Underbody
Some areas of the vehicle underbody
have a PVC undercoating while other critical areas have a durable
protective wax coating.
After the underbody is washed, check
the underbody and have it waxed if
necessary.Bitumen / rubber materials could
damage the PVC coating. Have
underbody work carried out by a
workshop.
Before and after winter, wash the
underbody and have the protective
wax coating checked.
Towing equipment
Do not clean the coupling ball bar with a steam-jet or high-pressure jet
cleaner.
Interior care
Interior and upholstery Only clean the vehicle interior,
including the instrument panel fascia
and panelling, with a dry cloth or
interior cleaner.
Clean the leather upholstery with
clear water and a soft cloth. In case of
heavy soiling, use leather care.
The instrument cluster and the
displays should only be cleaned using
a soft damp cloth. If necessary use a
weak soap solution.Clean fabric upholstery with a
vacuum cleaner and brush. Remove
stains with an upholstery cleaner.
Clothing fabrics may not be
colourfast. This could cause visible
discolourations, especially on light-
coloured upholstery. Removable
stains and discolourations should be
cleaned as soon as possible.
Clean seat belts with lukewarm water or interior cleaner.Caution
Close Velcro fasteners as open
Velcro fasteners on clothing could
damage seat upholstery.
The same applies to clothing with
sharp-edged objects, like zips or
belts or studded jeans.