oil VAUXHALL CROSSLAND X 2020 Owner's Manual
[x] Cancel search | Manufacturer: VAUXHALL, Model Year: 2020, Model line: CROSSLAND X, Model: VAUXHALL CROSSLAND X 2020Pages: 245, PDF Size: 21.85 MB
Page 18 of 245

16In briefTransmission
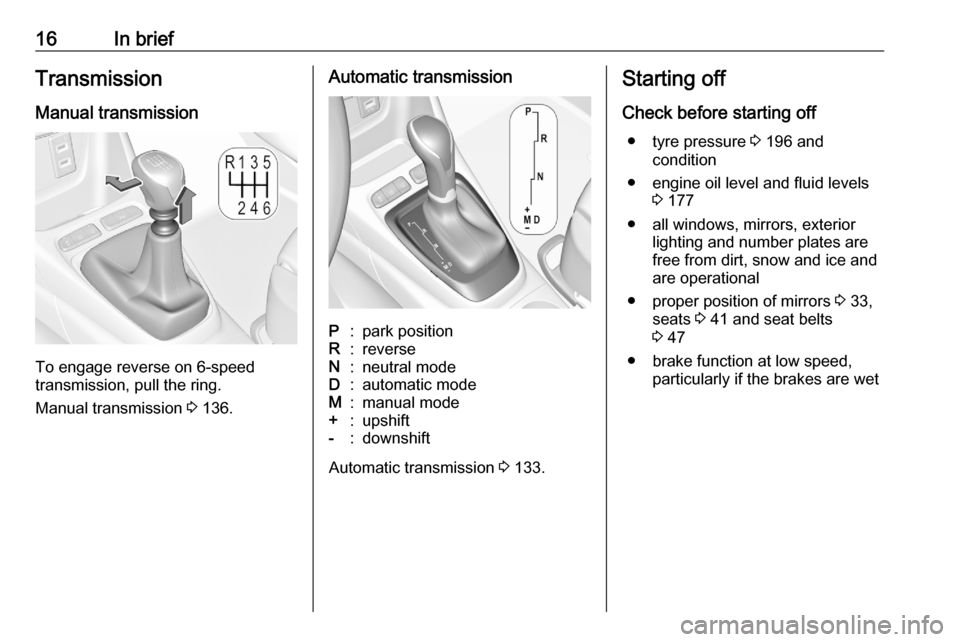
Manual transmission
To engage reverse on 6-speed
transmission, pull the ring.
Manual transmission 3 136.
Automatic transmissionP:park positionR:reverseN:neutral modeD:automatic modeM:manual mode+:upshift-:downshift
Automatic transmission 3 133.
Starting off
Check before starting off ● tyre pressure 3 196 and
condition
● engine oil level and fluid levels 3 177
● all windows, mirrors, exterior lighting and number plates are
free from dirt, snow and ice and
are operational
● proper position of mirrors 3 33,
seats 3 41 and seat belts
3 47
● brake function at low speed, particularly if the brakes are wet
Page 48 of 245

46Seats, restraintsSeat belts
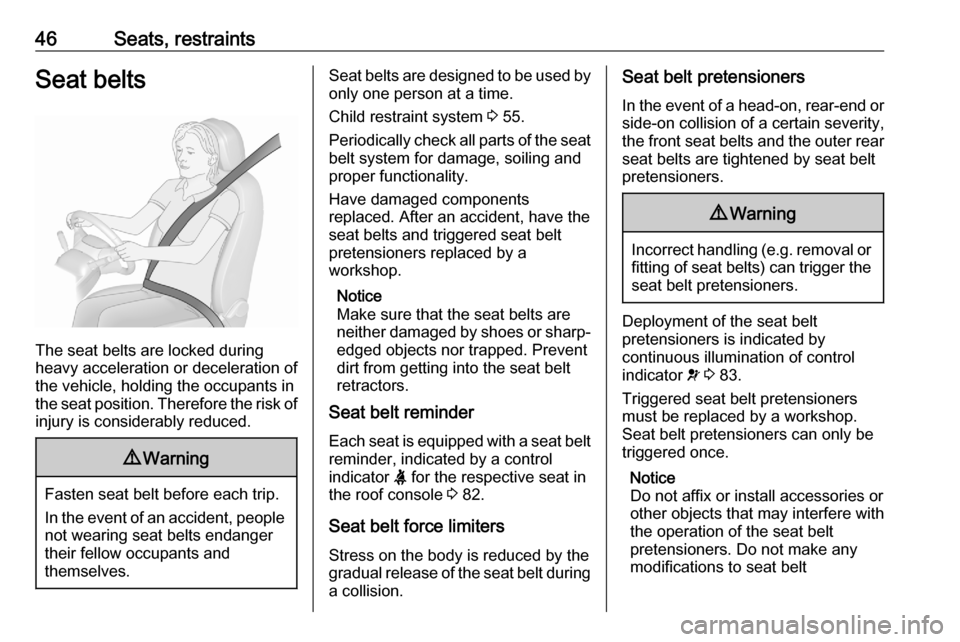
The seat belts are locked during
heavy acceleration or deceleration of
the vehicle, holding the occupants in
the seat position. Therefore the risk of injury is considerably reduced.
9 Warning
Fasten seat belt before each trip.
In the event of an accident, people
not wearing seat belts endanger their fellow occupants and
themselves.
Seat belts are designed to be used by only one person at a time.
Child restraint system 3 55.
Periodically check all parts of the seat
belt system for damage, soiling and
proper functionality.
Have damaged components
replaced. After an accident, have the
seat belts and triggered seat belt pretensioners replaced by a
workshop.
Notice
Make sure that the seat belts are neither damaged by shoes or sharp-
edged objects nor trapped. Prevent
dirt from getting into the seat belt
retractors.
Seat belt reminder
Each seat is equipped with a seat belt
reminder, indicated by a control
indicator X for the respective seat in
the roof console 3 82.
Seat belt force limiters Stress on the body is reduced by the
gradual release of the seat belt during
a collision.Seat belt pretensioners
In the event of a head-on, rear-end or
side-on collision of a certain severity,
the front seat belts and the outer rear
seat belts are tightened by seat belt
pretensioners.9 Warning
Incorrect handling ( e.g. removal or
fitting of seat belts) can trigger the
seat belt pretensioners.
Deployment of the seat belt
pretensioners is indicated by
continuous illumination of control
indicator v 3 83.
Triggered seat belt pretensioners
must be replaced by a workshop.
Seat belt pretensioners can only be
triggered once.
Notice
Do not affix or install accessories or
other objects that may interfere with
the operation of the seat belt
pretensioners. Do not make any
modifications to seat belt
Page 71 of 245

Instruments and controls69Instruments and
controlsControls ....................................... 70
Steering wheel adjustment ........70
Steering wheel controls .............70
Heated steering wheel ...............70
Horn ........................................... 71
Windscreen wiper and washer ..71
Rear window wiper and washer ...................................... 73
Outside temperature ..................73
Clock ......................................... 74
Power outlets ............................. 74
Inductive charging .....................75
Cigarette lighter ......................... 76
Ashtrays .................................... 76
Warning lights, gauges and indi‐ cators ........................................... 77
Instrument cluster ......................77
Speedometer ............................. 79
Odometer .................................. 79
Trip odometer ............................ 79
Tachometer ............................... 80
Fuel gauge ................................ 80
Engine coolant temperature gauge ....................................... 80Engine oil level monitor.............81
Service display .......................... 81
Control indicators ......................82
Turn lights .................................. 82
Seat belt reminder .....................82
Airbag and belt tensioners .........83
Airbag deactivation ....................83
Charging system .......................83
Malfunction indicator light ..........84
Service vehicle soon .................84
Stop engine ............................... 84
System check ............................ 84
Brake and clutch system ...........84
Parking brake ............................ 85
Antilock brake system (ABS) .....85
Gear shifting .............................. 85
Lane departure warning ............85
Electronic Stability Control and Traction Control system ...........85
Electronic Stability Control and Traction Control system off ......86
Engine coolant temperature ......86
Preheating ................................. 86
Exhaust filter .............................. 86
AdBlue ....................................... 86
Deflation detection system ........86
Engine oil pressure ....................87
Low fuel ..................................... 87
Autostop .................................... 87
Exterior light .............................. 87Low beam.................................. 87
High beam ................................. 87
High beam assist .......................88
Front fog lights ........................... 88
Rear fog light ............................. 88
Rain sensor ............................... 88
Cruise control ............................ 88
Side blind spot alert ...................88
Active emergency braking .........88
Speed limiter ............................. 88
Door open .................................. 88
Displays ....................................... 89
Driver Information Centre ..........89
Info Display ................................ 91
Head-up display ........................93
Vehicle messages ........................95
Warning chimes .........................95
Vehicle personalisation ................96
Telematics services .....................99
Vauxhall Connect ......................99
Page 77 of 245

Instruments and controls75Inductive charging9Warning
Inductive charging can affect the
operation of implanted
pacemakers or other medical
devices. If applicable, seek
medical advice before using the
inductive charging device.
9 Warning
Remove any metal objects from
the charging device before
charging a mobile device, as these objects could become very hot.
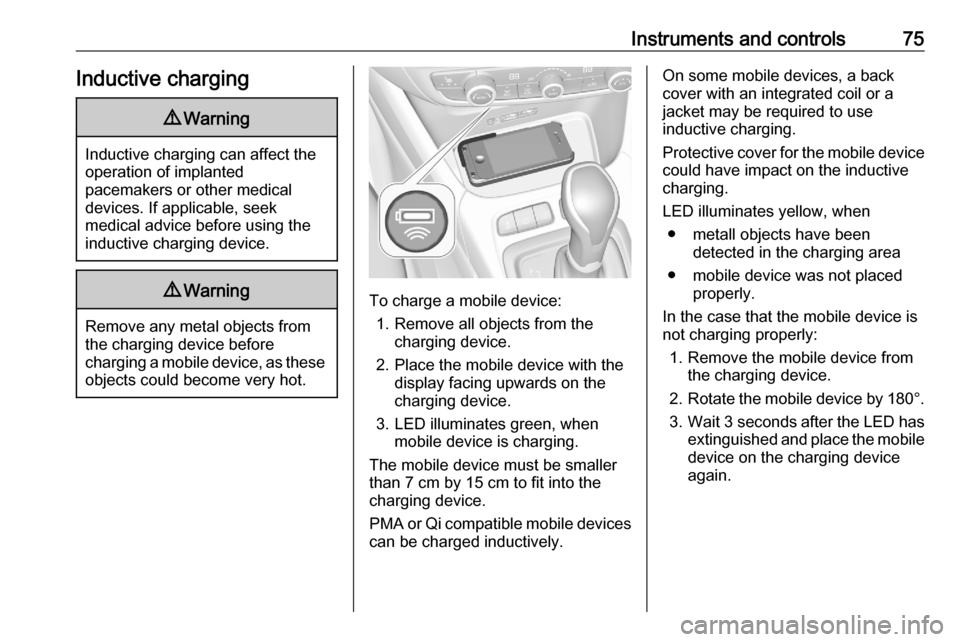
To charge a mobile device:
1. Remove all objects from the charging device.
2. Place the mobile device with the display facing upwards on the
charging device.
3. LED illuminates green, when mobile device is charging.
The mobile device must be smaller
than 7 cm by 15 cm to fit into the
charging device.
PMA or Qi compatible mobile devices can be charged inductively.
On some mobile devices, a back
cover with an integrated coil or a
jacket may be required to use
inductive charging.
Protective cover for the mobile device
could have impact on the inductive
charging.
LED illuminates yellow, when ● metall objects have been detected in the charging area
● mobile device was not placed properly.
In the case that the mobile device is
not charging properly:
1. Remove the mobile device from the charging device.
2. Rotate the mobile device by 180°.
3. Wait 3 seconds after the LED has
extinguished and place the mobile
device on the charging device
again.
Page 80 of 245

78Instruments and controlsOverviewOTurn lights 3 82XSeat belt reminder 3 82vAirbag and seat belt
tensioners 3 83VAirbag deactivation 3 83pCharging system 3 83ZMalfunction indicator light
3 84CService vehicle soon 3 84STOPStop engine 3 84JSystem check 3 84RBrake and clutch system
3 84mParking brake 3 85uAntilock brake system (ABS)
3 85RGear shifting 3 85)Lane departure warning
3 85bElectronic Stability Control
and Traction Control system
3 85aElectronic Stability Control
and Traction Control system
off 3 86W oEngine coolant temperature
high 3 86!Preheating 3 86%Exhaust filter 3 86YAdBlue 3 86wDeflation detection system
3 86IEngine oil pressure 3 87
Engine oil level monitor
3 81Y oLow fuel 3 87DAutostop 3 878Exterior light 3 879Low beam 3 87CHigh beam 3 87fHigh beam assist 3 88>Front fog lights 3 88øRear fog light 3 88
Page 83 of 245

Instruments and controls81Caution
If engine coolant temperature is
too high, stop vehicle, switch off
engine. Danger to engine. Check
coolant level.
Engine oil level monitor
The state of the engine oil level is
displayed in the Driver Information
Centre for a few seconds following
the service information after switching
on the ignition.
A proper state of engine oil level is
indicated by the message Oil level
correct .
If engine oil level is low, I flashes
and Oil level incorrect is indicated,
accompanied by the C indicator.
Confirm engine oil level by using the
dipstick and top up engine oil
respectively.
Engine oil 3 177.
A fault of measurement is indicated
by the message Oil level
measurement invalid . Check engine
oil level manually by using the
dipstick.
Service display
The service system informs when to
change the engine oil and filter or a
vehicle service is required. Based on
driving conditions, the interval at
which an engine oil and filter change
is required can vary considerably.
Service information 3 215.
A required service due is displayed in the Driver Information Centre for
7 seconds after switching on the
ignition.
If no service is required for the next
1800 miles or more no service
information appears in the display.
If service is required within the next
1800 miles, the remaining distance or
time duration is indicated for several
seconds. Simultaneously C
illuminates permanently as reminder.
If service is required in less than
600 miles, C flashes and then
illuminates permanently. Remaining
distance or time duration is indicated
for several seconds.
Overdued service is indicated by a
message in the Driver Information
Centre which indicates the overdueddistance. C flashes and then
illuminates permanently until service
is executed.
Reset of service interval
After each service, the service
indicator must be reset to ensure
proper functionality. It is
recommended to seek the assistance
of a workshop.
Operate as following: ● switch off ignition
● press and hold button M or
CHECK
● switch on ignition, the distance indication begins a countdown
● when the display indicates =0,
release the button
The C disappears.
Retrieving service information
To retrieve the status of the service
information at any time press left
button underneath the Driver
Information Centre.
Page 89 of 245

Instruments and controls87Illuminates
Tyre pressure loss in one or more
wheels. Stop immediately and check
tyre pressure.
Flashes
Fault in system. Consult a workshop.
Deflation detection system 3 197.
Engine oil pressure I illuminates red.
Illuminates when the ignition is
switched on and extinguishes shortly
after the engine starts.
Illuminates when the engine is
runningCaution
Engine lubrication may be
interrupted. This may result in
damage to the engine and / or
locking of the drive wheels.
1. Select neutral gear.
2. Move out of the flow of traffic as quickly as possible without
impeding other vehicles.
3. Switch off ignition.9 Warning
When the engine is off,
considerably more force is needed
to brake and steer.
During an Autostop, the brake
servo unit will still be operational.
Do not remove key until vehicle is stationary, otherwise the steeringwheel lock could engage
unexpectedly.
Keep engine turned off and let the
vehicle be towed to a workshop
3 177.
Low fuel o illuminates yellow.
Level in fuel tank is too low.
Refuelling 3 167.
Bleeding the diesel fuel system
3 181.
Autostop D illuminates or flashes green.
Illuminates green
Engine is in an Autostop.
Flashes green
Autostop is temporarily unavailable,
or Autostop mode is invoked
automatically.
Stop-start system 3 126.
Exterior light 8 illuminates green.
The exterior lights are on 3 101.
Low beam
9 illuminates green.
Illuminated when low beam is on.
High beam
C illuminates blue.
Page 124 of 245

122Driving and operatingDriving hints
Control of the vehicle
Never coast with engine not
running
Many systems will not function in this situation ( e.g. brake servo unit, power
steering). Driving in this manner is a
danger to yourself and others.
All systems function during an
Autostop.
Stop-start system 3 126.
Pedals
To ensure the pedal travel is
uninhibited, there must be no mats in the area of the pedals.
Use only floor mats, which fit properly
and are fixed by the retainers on the
driver side.Steering
If power steering assist is lost
because the engine stops or due to a system malfunction, the vehicle can
be steered but may require increased
effort.Starting and operating
New vehicle running-in Do not brake unnecessarily hard for
the first few journeys.
During the first drive, smoke may
occur because of wax and engine oil
evaporating off the exhaust system.
Park the vehicle in the open for a
while after the first drive and avoid
inhaling the fumes.
During the running-in period, fuel and engine oil consumption may be
higher.
Additionally, the cleaning process of
the exhaust filter may take place more
often.
Exhaust filter 3 129.
Page 127 of 245

Driving and operating125●Do not operate accelerator pedal.
● Diesel engines: wait until control indicator ! extinguishes.
● Turn key to position 2 and
release after the engine has been started.
Manual transmission: during an
Autostop, the engine can be started
by depressing the clutch pedal
3 126.
Automatic transmission: during an
Autostop, the engine can be started
by releasing the brake pedal 3 126.
Vehicles with power button● Manual transmission: operate clutch and brake pedal.
● Automatic transmission: operate brake pedal and move selector
lever to P or N.
● Do not operate accelerator pedal.
● Press Start/Stop button. Release
button after starting procedure
begins.
● Diesel engine starts after control indicator ! for preheating
extinguishes.
● Before restarting or to switch off the engine when vehicle is
stationary, press Start/Stop once
more briefly.
To start the engine during an
Autostop:
● Manual transmission: during an Autostop, the engine can be
started by depressing the clutch
pedal 3 126.
● Automatic transmission: during an Autostop, the engine can be
started by releasing the brake
pedal 3 126.Starting the vehicle at low
temperatures
Starting the engine without additional
heaters is possible down to -25 °С for diesel engines and -30 °C for petrol
engines.
Required is an engine oil with the
correct viscosity, the correct fuel,
performed services and a sufficiently
charged vehicle battery.
With temperatures below -30 °C the
automatic transmission requires a
warming phase of approx. 5 minutes.
The selector lever must be in position
P .
Turbo engine warm-up
Upon start-up, engine available
torque may be limited for a short time, especially when the engine
temperature is cold. The limitation is
to allow the lubrication system to fully
protect the engine.
Page 169 of 245

Driving and operating167
The use of B20 or B30 fuel meetingstandard EN16709 is possible.
However, this use, even occasional, requires strict application of the
special servicing conditions referred
to as "arduous conditions".
For further information, contact a
workshop.
Caution
The use of any other type of (bio)
fuel (vegetable or animal oils, pure
or diluted, domestic fuel etc.) is
strictly prohibited (risk of damage
to the engine and fuel system).
Notice
The only diesel additives authorised for use are those that meet the
B715000 standard.
Low temperature operation
At temperatures below 0 °C, some
diesel products with biodiesel blends may clog, freeze or gel, which may
affect the fuel supply system. Starting
and engine operation may not work
properly. Make sure to fill winter
grade diesel fuel at ambient
temperatures below 0 °C.
Arctic grade diesel fuel can be used
in extreme cold temperatures below
-20 °C. Using this fuel grade in warm
or hot climates is not recommended
and may cause engine stalling, poor
starting or damage on the fuel
injection system.Refuelling9 Danger
Before refuelling, switch off
ignition and any external heaters
with combustion chambers.
Follow the operating and safety
instructions of the filling station
when refuelling.