ignition VAUXHALL GRANDLAND X 2018.5 Manual PDF
[x] Cancel search | Manufacturer: VAUXHALL, Model Year: 2018.5, Model line: GRANDLAND X, Model: VAUXHALL GRANDLAND X 2018.5Pages: 271, PDF Size: 7.61 MB
Page 209 of 271
Vehicle care207
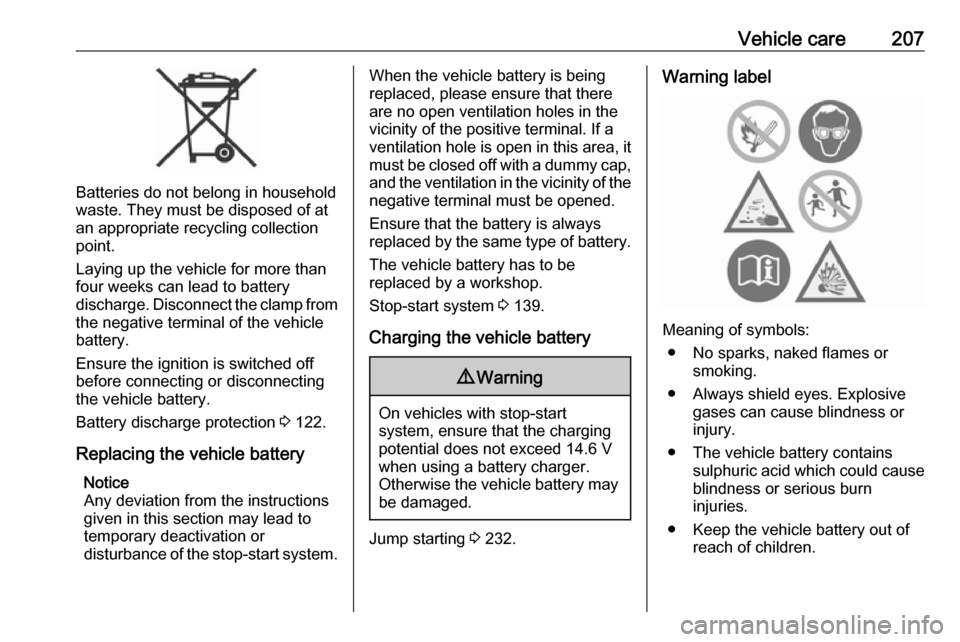
Batteries do not belong in household
waste. They must be disposed of at
an appropriate recycling collection
point.
Laying up the vehicle for more than
four weeks can lead to battery
discharge. Disconnect the clamp from the negative terminal of the vehicle
battery.
Ensure the ignition is switched off
before connecting or disconnecting
the vehicle battery.
Battery discharge protection 3 122.
Replacing the vehicle battery Notice
Any deviation from the instructions
given in this section may lead to
temporary deactivation or
disturbance of the stop-start system.
When the vehicle battery is being
replaced, please ensure that there
are no open ventilation holes in the
vicinity of the positive terminal. If a
ventilation hole is open in this area, it
must be closed off with a dummy cap, and the ventilation in the vicinity of the negative terminal must be opened.
Ensure that the battery is always
replaced by the same type of battery.
The vehicle battery has to be
replaced by a workshop.
Stop-start system 3 139.
Charging the vehicle battery9 Warning
On vehicles with stop-start
system, ensure that the charging potential does not exceed 14.6 V
when using a battery charger.
Otherwise the vehicle battery may be damaged.
Jump starting 3 232.
Warning label
Meaning of symbols:
● No sparks, naked flames or smoking.
● Always shield eyes. Explosive gases can cause blindness or
injury.
● The vehicle battery contains sulphuric acid which could cause
blindness or serious burn
injuries.
● Keep the vehicle battery out of reach of children.
Page 210 of 271
208Vehicle care● See the Owner's Manual forfurther information.
● Explosive gas may be present in the vicinity of the vehicle battery.
Diesel fuel system bleeding If the tank has been run dry, the diesel
fuel system must be bled. Switch on
the ignition three times for
15 seconds at a time. Then crank the
engine for a maximum of
40 seconds. Repeat this process after
no less than five seconds. If the
engine fails to start, seek the
assistance of a workshop.Wiper blade replacement
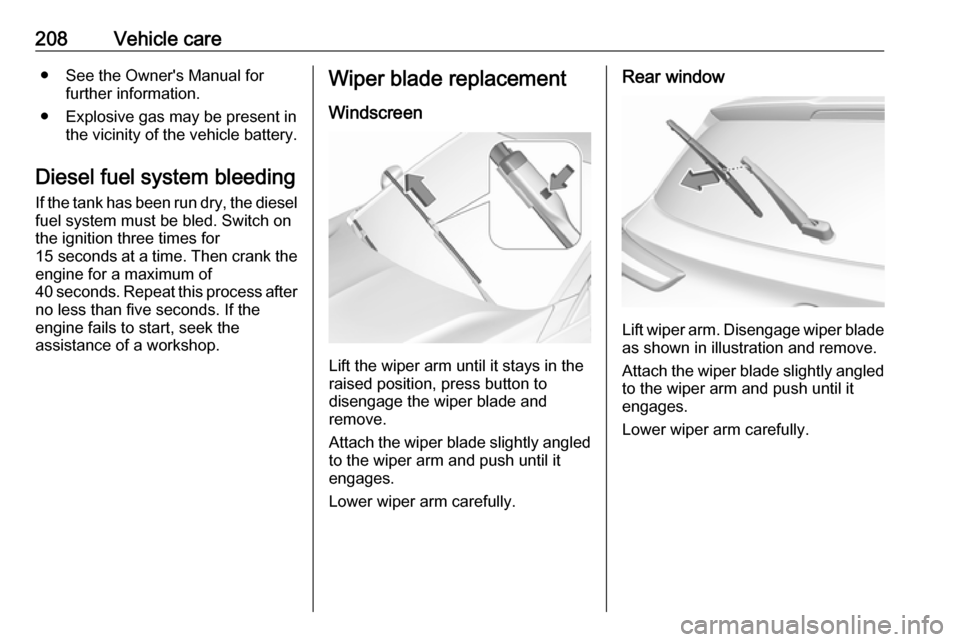
Windscreen
Lift the wiper arm until it stays in the
raised position, press button to
disengage the wiper blade and
remove.
Attach the wiper blade slightly angled
to the wiper arm and push until it
engages.
Lower wiper arm carefully.
Rear window
Lift wiper arm. Disengage wiper blade as shown in illustration and remove.
Attach the wiper blade slightly angled
to the wiper arm and push until it
engages.
Lower wiper arm carefully.
Page 211 of 271
Vehicle care209Bulb replacement
Switch off the ignition and switch off
the relevant switch or close the doors.
Only hold a new bulb at the base. Do
not touch the bulb glass with bare
hands.
Use only the same bulb type for
replacement.
Replace headlight bulbs from within
the engine compartment.
Bulb check After a bulb replacement switch on
the ignition, operate and check the
lights.
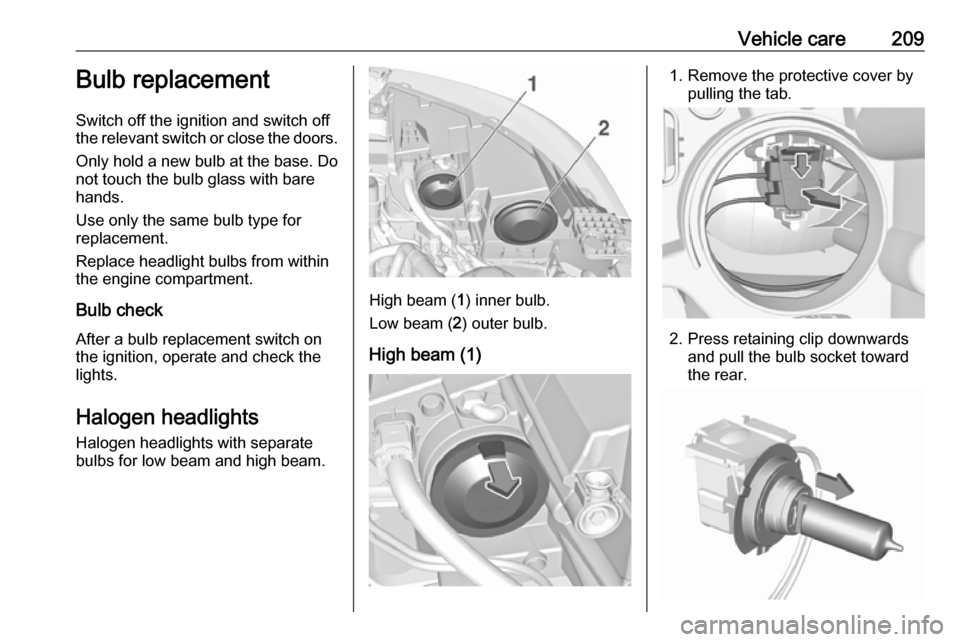
Halogen headlights Halogen headlights with separate
bulbs for low beam and high beam.
High beam ( 1) inner bulb.
Low beam ( 2) outer bulb.
High beam (1)
1. Remove the protective cover by pulling the tab.
2. Press retaining clip downwardsand pull the bulb socket toward
the rear.
Page 215 of 271
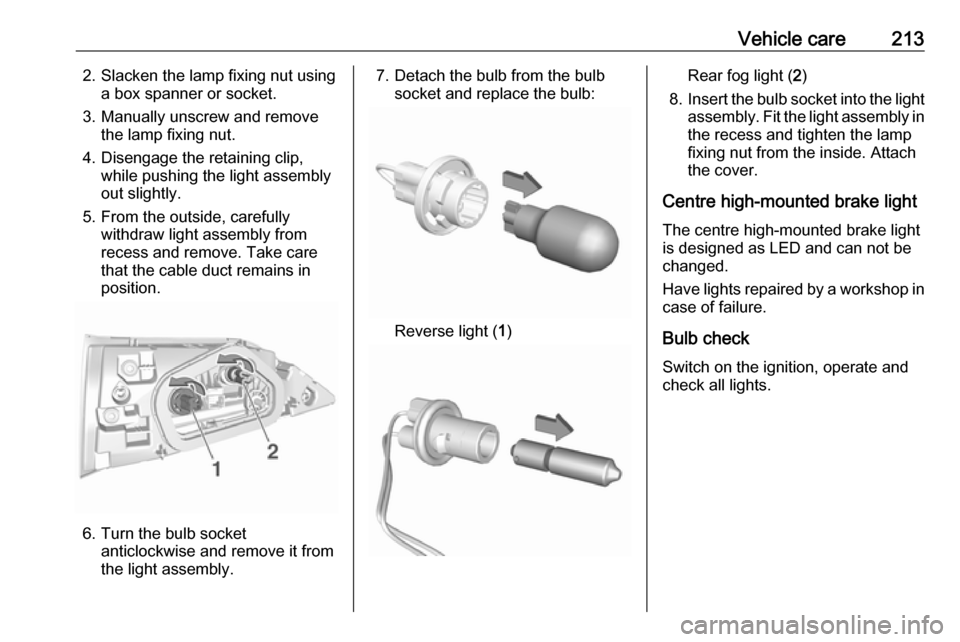
Vehicle care2132. Slacken the lamp fixing nut usinga box spanner or socket.
3. Manually unscrew and remove the lamp fixing nut.
4. Disengage the retaining clip, while pushing the light assembly
out slightly.
5. From the outside, carefully withdraw light assembly from
recess and remove. Take care
that the cable duct remains in
position.
6. Turn the bulb socket anticlockwise and remove it from
the light assembly.
7. Detach the bulb from the bulb socket and replace the bulb:
Reverse light ( 1)
Rear fog light ( 2)
8. Insert the bulb socket into the light
assembly. Fit the light assembly in the recess and tighten the lamp
fixing nut from the inside. Attach
the cover.
Centre high-mounted brake light The centre high-mounted brake light
is designed as LED and can not be
changed.
Have lights repaired by a workshop in
case of failure.
Bulb check
Switch on the ignition, operate and
check all lights.
Page 217 of 271
Vehicle care215Electrical system
Fuses Data on the replacement fuse must
match the data on the defective fuse.
There are two fuse boxes in the
vehicle:
● engine compartment
● instrument panel
Before replacing a fuse, turn off the
respective switch and the ignition.
A blown fuse can be recognised by its melted wire.Caution
Do not replace the fuse until the
cause of the fault has been
remedied.
Some functions are protected by
several fuses.
Fuses may also be inserted without
existence of a function.
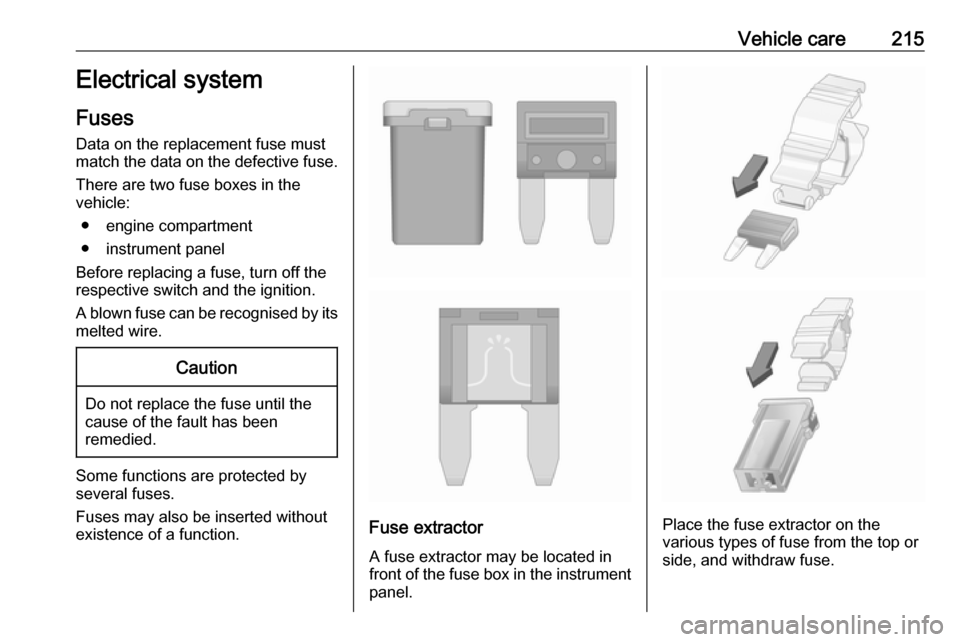
Fuse extractor
A fuse extractor may be located in
front of the fuse box in the instrument
panel.Place the fuse extractor on the
various types of fuse from the top or
side, and withdraw fuse.
Page 235 of 271
Vehicle care2333. Connect the black lead to thenegative terminal of the booster
battery.
4. Connect the other end of the black
lead to a vehicle grounding point
of your vehicle in the engine
compartment.
Route the leads so that they cannot
catch on rotating parts in the engine
compartment.
To start the engine: 1. Start the engine of the vehicle providing the jump.
2. After five minutes, start the other engine. Start attempts should be
made for no longer than
15 seconds at an interval of one
minute.
3. Allow both engines to idle for approx. three minutes with the
leads connected.
4. Switch on electrical consumers e.g. headlights, heated rear
window of the vehicle receiving
the jump start.
5. Reverse above sequence exactly when removing leads.Towing
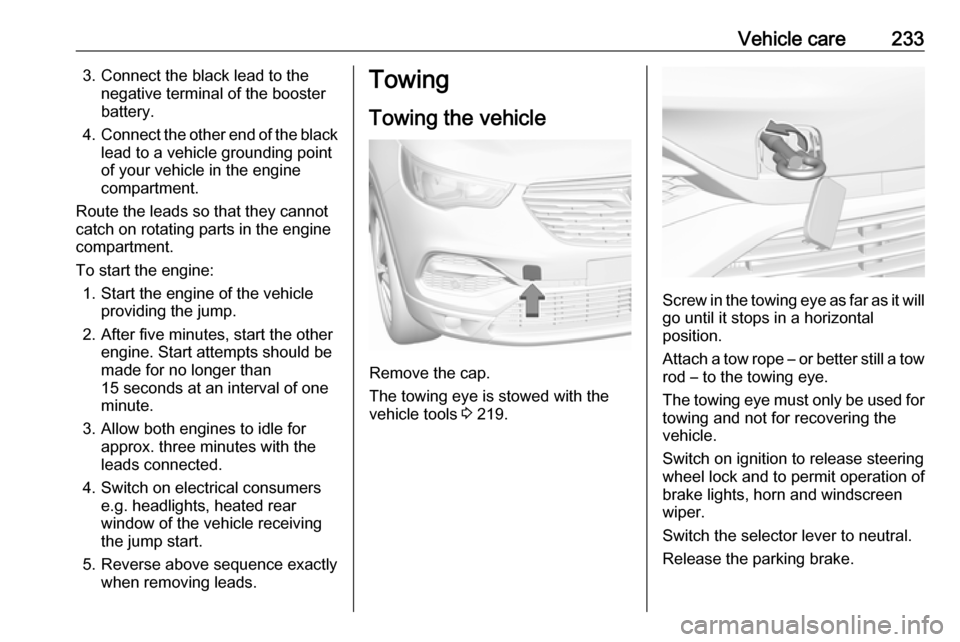
Towing the vehicle
Remove the cap.
The towing eye is stowed with the
vehicle tools 3 219.
Screw in the towing eye as far as it will
go until it stops in a horizontal
position.
Attach a tow rope – or better still a tow
rod – to the towing eye.
The towing eye must only be used for towing and not for recovering the
vehicle.
Switch on ignition to release steering
wheel lock and to permit operation of
brake lights, horn and windscreen
wiper.
Switch the selector lever to neutral.
Release the parking brake.
Page 264 of 271

262Customer informationprocessing and use of personal data
for the purposes of preparation of services take place solely on the
basis of legal permission, e.g. in the
case of the eCall emergency
communication system or a
contractual agreement, or by virtue of
consent.
You can activate or deactivate the
services and functions (which are
subject to charges to some extent)
and, in some cases, the vehicle's
entire radio network connection. In
particular, this does not include
statutory functions and services such
as eCall.
Third party services If you make use of online services
from other providers (third parties),
these services are subject to the
liability and data protection and usage
conditions of the provider in question.
The manufacturer frequently has no
influence over the content exchanged
in this regard.Therefore, please note the nature,
scope and purpose of the collection
and use of personal data within the
scope of third party services provided
by the service provider in question.
Radio FrequencyIdentification (RFID)
RFID technology is used in some
vehicles for functions such as tyre
pressure monitoring and ignition
system security. It is also used in
connection with conveniences such
as radio remote controls for door
locking / unlocking and starting, and
in-vehicle transmitters for garage
door openers. RFID technology in
Vauxhall vehicles does not use or
record personal information or link
with any other Vauxhall system
containing personal information.
Page 268 of 271

266HHalogen headlights ....................209
Hazard warning flashers ............118
Headlight flash ........................... 114
Headlight range adjustment ......115
Headlights................................... 113 Head restraint adjustment .............8
Head restraints ............................ 44
Heated mirrors ............................. 38
Heated rear window ..................... 40
Heated steering wheel .................79
Heated windscreen .......................41
Heating .................................. 50, 51
Heating and ventilation system . 123
High beam ........................... 98, 114
High beam assist ..........................98
Hill start assist ........................... 153
Horn ....................................... 13, 80
I
Identification plate .....................242
Ignition switch positions .............134
Immobiliser .................................. 36
Indicators ...................................... 89
Inductive charging ........................86
Info Display ................................. 102
Instrument cluster ........................87
Instrument panel fuse box .........217
Instrument panel illumination .....214Instrument panel illumination
control .................................... 120
Instrument panel overview ........... 10
Interior care ............................... 237
Interior lighting ............................ 120
Interior lights ...................... 120, 214
Interior mirrors .............................. 38
Interruption of power supply ......149
Introduction .................................... 3
J
Jump starting ............................. 232
K
Keys ............................................. 20
Keys, locks ................................... 20
L
Lane departure warning .......96, 188
Lane keep assist ..................96, 189
Lashing eyes ............................... 73
LED headlights .............98, 115, 210
Lighting features .........................121
Light switch ................................ 113
Load compartment ................29, 69
Load compartment cover .............71
Loading information .....................76
Low beam ..................................... 98
Low fuel ....................................... 98M
Malfunction indicator light ............94
Manual anti-dazzle ......................38
Manual mode ............................. 148
Manual seat adjustment ...............46
Manual transmission .................. 150
Mirror adjustment ........................... 9
Misted light covers .....................120
N
New vehicle running-in ..............134
Number plate light .....................214
O Object detection systems ...........174
Odometer ..................................... 90
Oil, engine .......................... 240, 244
OnStar ........................................ 108
Outside temperature ....................82
Overrun cut-off ........................... 139
P Panoramic view system ..............185
Parking ................................ 19, 141
Parking assist ............................ 174
Parking brake ............................ 151
Parking lights ............................. 119
Particulate filter ........................... 142
Performance .............................. 248
Performing work ........................203
Pollen filter ................................. 132