Ignition VAUXHALL GRANDLAND X 2018 Repair Manual
[x] Cancel search | Manufacturer: VAUXHALL, Model Year: 2018, Model line: GRANDLAND X, Model: VAUXHALL GRANDLAND X 2018Pages: 263, PDF Size: 7.41 MB
Page 187 of 263
Driving and operating185AUTO mode is activated by default. In
this mode, the system selects the
best view, standard, or zoom, to
display according to the information
from the parking sensors.
The state of the system is not kept in memory when the ignition is switched
off.
Standard view
The Standard view consists of a rear
view and a front view.Rear view
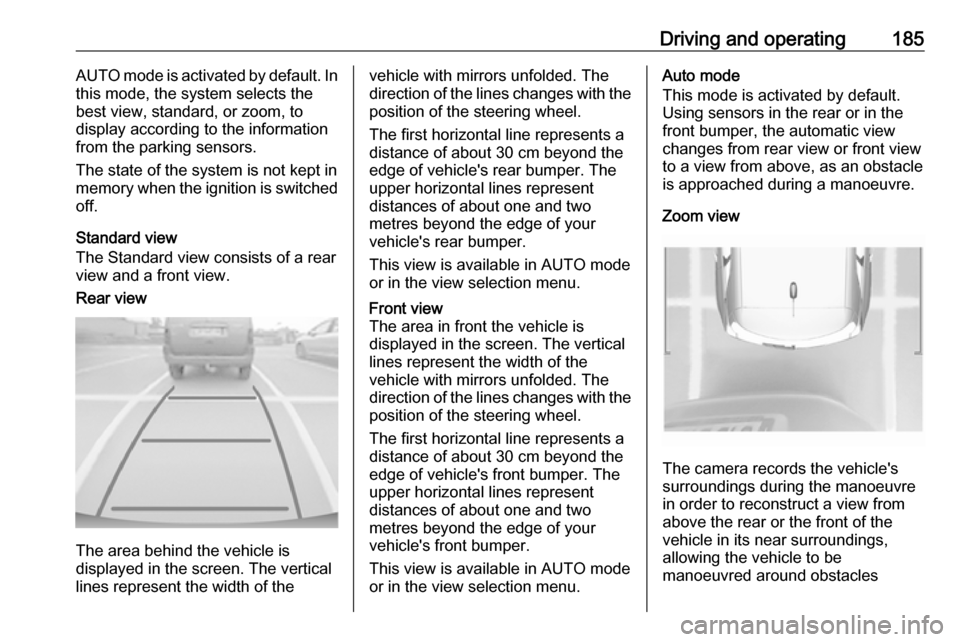
The area behind the vehicle is
displayed in the screen. The vertical
lines represent the width of the
vehicle with mirrors unfolded. The
direction of the lines changes with the position of the steering wheel.
The first horizontal line represents a
distance of about 30 cm beyond the
edge of vehicle's rear bumper. The
upper horizontal lines represent
distances of about one and two
metres beyond the edge of your
vehicle's rear bumper.
This view is available in AUTO mode
or in the view selection menu.Front view
The area in front the vehicle is
displayed in the screen. The vertical
lines represent the width of the
vehicle with mirrors unfolded. The
direction of the lines changes with the position of the steering wheel.
The first horizontal line represents a
distance of about 30 cm beyond the
edge of vehicle's front bumper. The
upper horizontal lines represent
distances of about one and two
metres beyond the edge of your
vehicle's front bumper.
This view is available in AUTO mode
or in the view selection menu.Auto mode
This mode is activated by default.
Using sensors in the rear or in the
front bumper, the automatic view
changes from rear view or front view
to a view from above, as an obstacle is approached during a manoeuvre.
Zoom view
The camera records the vehicle's
surroundings during the manoeuvre in order to reconstruct a view fromabove the rear or the front of the
vehicle in its near surroundings,
allowing the vehicle to be
manoeuvred around obstacles
Page 191 of 263
Driving and operating1899Warning
This system is a driving aid that
cannot, in any circumstances,
replace the need for vigilance on
the part of the driver.
Activation
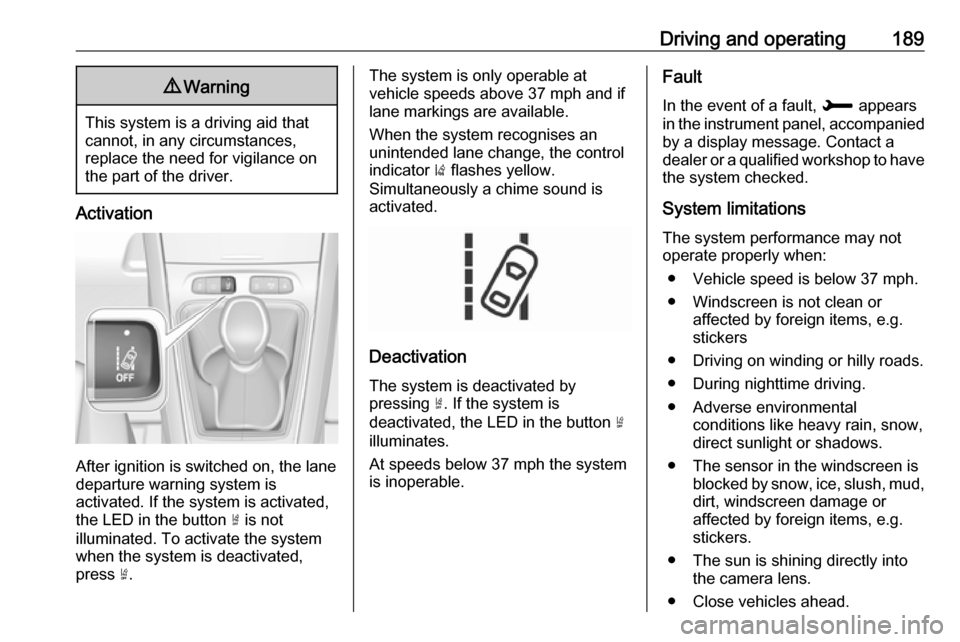
After ignition is switched on, the lane
departure warning system is
activated. If the system is activated,
the LED in the button ½ is not
illuminated. To activate the system
when the system is deactivated,
press ½.
The system is only operable at
vehicle speeds above 37 mph and if
lane markings are available.
When the system recognises an
unintended lane change, the control
indicator ) flashes yellow.
Simultaneously a chime sound is
activated.
Deactivation
The system is deactivated by
pressing ½. If the system is
deactivated, the LED in the button ½
illuminates.
At speeds below 37 mph the system
is inoperable.
Fault
In the event of a fault, H appears
in the instrument panel, accompanied by a display message. Contact a
dealer or a qualified workshop to have
the system checked.
System limitations
The system performance may not
operate properly when:
● Vehicle speed is below 37 mph.
● Windscreen is not clean or affected by foreign items, e.g.
stickers
● Driving on winding or hilly roads. ● During nighttime driving.
● Adverse environmental conditions like heavy rain, snow,
direct sunlight or shadows.
● The sensor in the windscreen is blocked by snow, ice, slush, mud,dirt, windscreen damage or
affected by foreign items, e.g.
stickers.
● The sun is shining directly into the camera lens.
● Close vehicles ahead.
Page 192 of 263
190Driving and operating● Driving on banked roads.
● Driving on road edges.
● Driving on roads with poor lane markings.
● Sudden lighting changes.
The system can not operate when no
lane marking is detected.
Lane keep assist Lane keep assist helps to avoid
crashes due to unintentional lane
departures. The front camera
observes the lane markings between which the vehicle is driving. If the
vehicle approaches a lane marking,
the steering wheel is gently turned to
position the vehicle back into the lane. Turn steering wheel in same
direction, if system steers not
sufficient. Turn steering wheel gently
into opposite direction, if lane change
is intended.
When crossing a lane marking
significantly, lane keep assist starts a
visual and acoustic warning.Unintended lane departure is
assumed
● without using turn signal
● without braking
● without acceleration
● without active steering.
Notice
The system is switched off during
detection of ambiguous lane
markings, e.g. in construction areas.
Notice
The system may be switched off if it
detects lanes which are too narrow,
too wide or too curved.
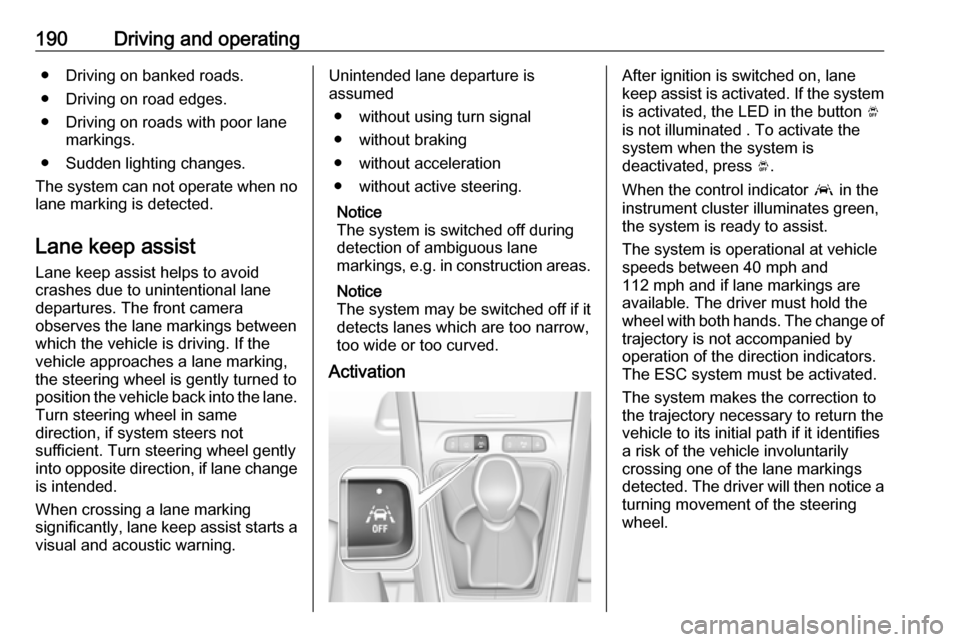
ActivationAfter ignition is switched on, lane
keep assist is activated. If the system is activated, the LED in the button Ó
is not illuminated . To activate the
system when the system is
deactivated, press Ó.
When the control indicator a in the
instrument cluster illuminates green,
the system is ready to assist.
The system is operational at vehicle
speeds between 40 mph and
112 mph and if lane markings are
available. The driver must hold the
wheel with both hands. The change of trajectory is not accompanied by
operation of the direction indicators.
The ESC system must be activated.
The system makes the correction to
the trajectory necessary to return the
vehicle to its initial path if it identifies
a risk of the vehicle involuntarily
crossing one of the lane markings
detected. The driver will then notice a
turning movement of the steering
wheel.
Page 194 of 263

192Driving and operatingvehicle and is always required tokeep the hands on the steeringwheel while driving.
Using the system while towing a
trailer or on slippery roads could
cause loss of control of the vehicle
and a crash. Switch the system off.
Driver alert
The driver alert system monitores the driving time and the vigilance of the
driver. Monitoring the vigilance of the
driver is based on the trajectory
variations of the vehicle compared to
the lane markings.
The system includes a driving time
alert combined with driver drowsiness
detection.
9 Warning
The system cannot replace the
need for vigilance on the part of
the driver. It is recommended that
you take a break as soon as you
feel tired or at least every two
hours. Do not take the wheel if you are tired.
Activation or Deactivation
The system can be activated or
deactivated in the vehicle
personalisation 3 104
The state of the system stays in
memory when the ignition is switched
off.
Driving time alert The driver gets notified by a pop-upreminder symbol € in the Driver
Information Centre simultaneously with a acoustic alert if the driver has
not taken a break after two hours of
driving at a speed above 40 mph. The alert is repeated hourly until the
vehicle is stopped, no matter how
vehicle speed evolves.
The counting of driving time alert is
reset when the ignition has been
switched off for a few minutes.
Driver drowsiness detection
The system monitors the driver's level
of vigilance. A camera at the top of the windscreen detects variations in
trajectory compared to the lanemarkings. This system is particularly
suited to fast roads (speed higher
than 40 mph).
If the trajectory of the vehicle
suggests a certain level of
drowsiness or inattention by the
driver, the system triggers the first
level of alert. The driver is notified by
a message and an audible signal is
given.
After three first level alerts, the
system triggers a new alert with a
message, accompanied by a more
pronounced audible signal.
In certain driving conditions (poor
road surface or strong winds), the
system may give alerts independent of the driver's level of vigilance.
The driver drowsiness detection is reinitialised when the ignition hasbeen switched off for a few minutes or
the speed remains below 40 mph for
a few minutes.
Page 197 of 263
Driving and operating195Refuelling9Danger
Before refuelling, switch off
ignition and any external heaters
with combustion chambers.
Follow the operating and safety
instructions of the filling station
when refuelling.
9 Danger
Fuel is flammable and explosive.
No smoking. No naked flames or
sparks.
If you can smell fuel in your
vehicle, have the cause of this
remedied immediately by a
workshop.
Caution
In case of misfuelling, do not
switch on ignition.
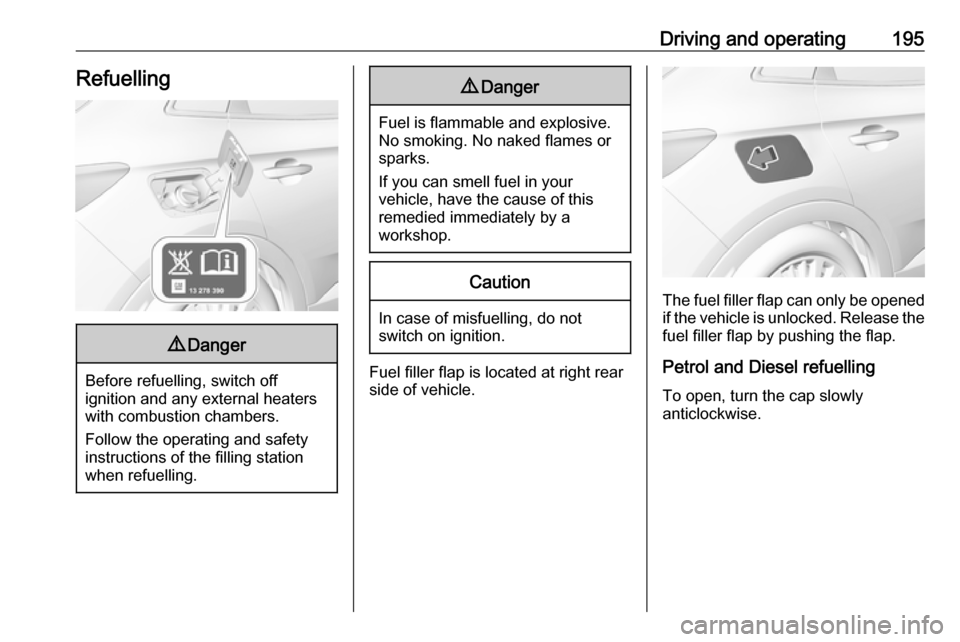
Fuel filler flap is located at right rear
side of vehicle.
The fuel filler flap can only be opened
if the vehicle is unlocked. Release the
fuel filler flap by pushing the flap.
Petrol and Diesel refuelling To open, turn the cap slowly
anticlockwise.
Page 206 of 263
204Vehicle careEnd-of-life vehicle recoveryInformation on end-of-life vehicle
recovery centres and the recycling of
end-of-life vehicles is available on our website, where legally required. Only
entrust this work to an authorised
recycling centre.Vehicle checks
Performing work9 Warning
Only perform engine compartment
checks when the ignition is off.
The cooling fan may start
operating even if the ignition is off.
9 Danger
The ignition system uses
extremely high voltage. Do not
touch.
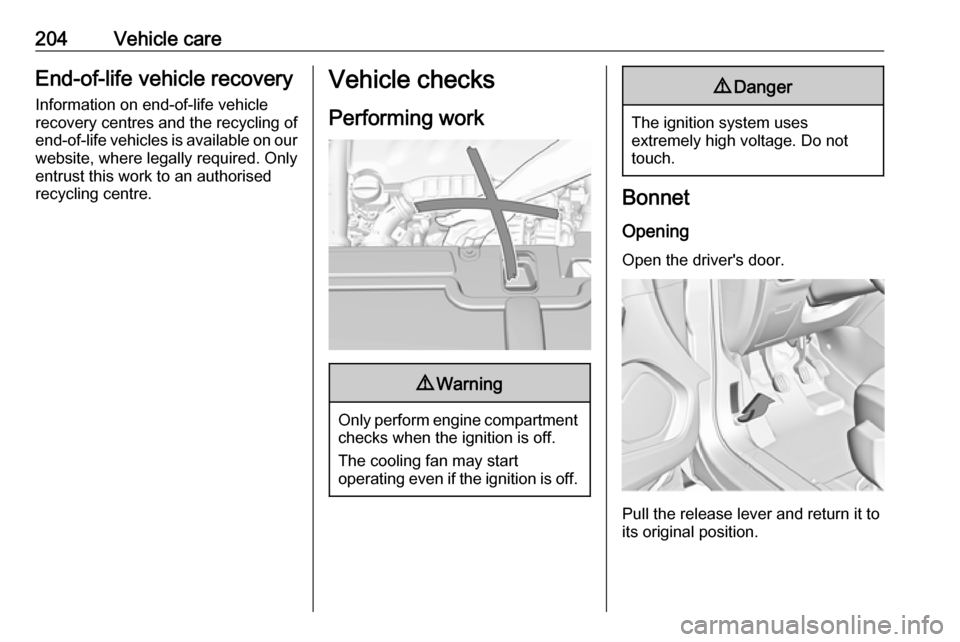
Bonnet
Opening
Open the driver's door.
Pull the release lever and return it to
its original position.
Page 210 of 263
208Vehicle care
Batteries do not belong in household
waste. They must be disposed of at
an appropriate recycling collection
point.
Laying up the vehicle for more than
four weeks can lead to battery
discharge. Disconnect the clamp from the negative terminal of the vehicle
battery.
Ensure the ignition is switched off
before connecting or disconnecting
the vehicle battery.
Battery discharge protection 3 122.
Replacing the vehicle battery Notice
Any deviation from the instructions
given in this section may lead to
temporary deactivation or
disturbance of the stop-start system.
When the vehicle battery is being
replaced, please ensure that there
are no open ventilation holes in the
vicinity of the positive terminal. If a
ventilation hole is open in this area, it
must be closed off with a dummy cap, and the ventilation in the vicinity of the negative terminal must be opened.
Ensure that the battery is always
replaced by the same type of battery.
The vehicle battery has to be
replaced by a workshop.
Stop-start system 3 139.
Charging the vehicle battery9 Warning
On vehicles with stop-start
system, ensure that the charging potential does not exceed
14.6 volts when using a battery
charger. Otherwise the vehicle
battery might be damaged.
Jump starting 3 228.
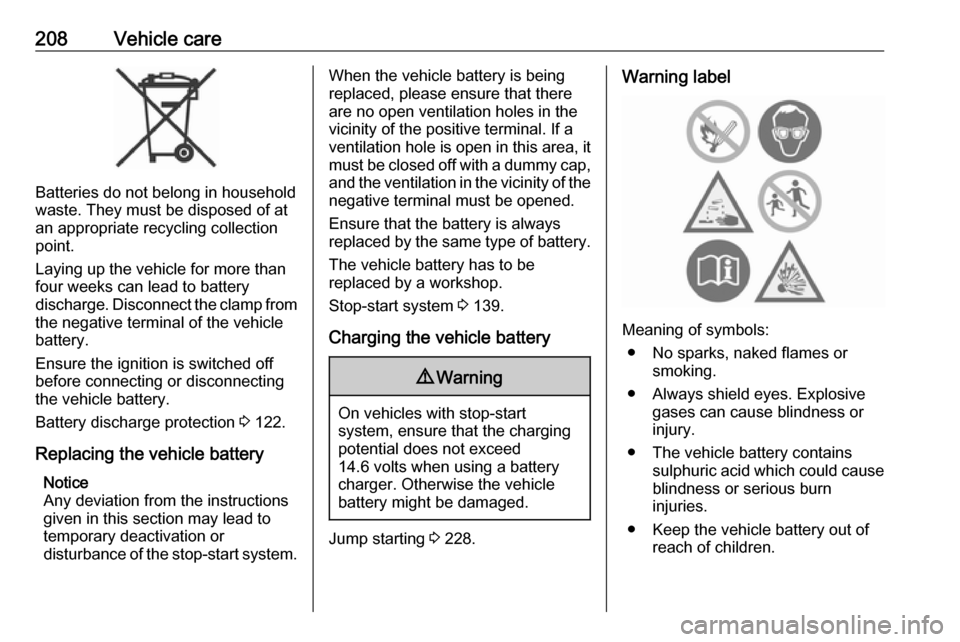
Warning label
Meaning of symbols:
● No sparks, naked flames or smoking.
● Always shield eyes. Explosive gases can cause blindness or
injury.
● The vehicle battery contains sulphuric acid which could cause
blindness or serious burn
injuries.
● Keep the vehicle battery out of reach of children.
Page 211 of 263
Vehicle care209● See the Owner's Manual forfurther information.
● Explosive gas may be present in the vicinity of the vehicle battery.
Diesel fuel system bleeding If the tank has been run dry, the diesel
fuel system must be bled. Switch on the ignition three times for
15 seconds at a time. Then crank the
engine for a maximum of
40 seconds. Repeat this process after
no less than five seconds. If the
engine fails to start, seek the
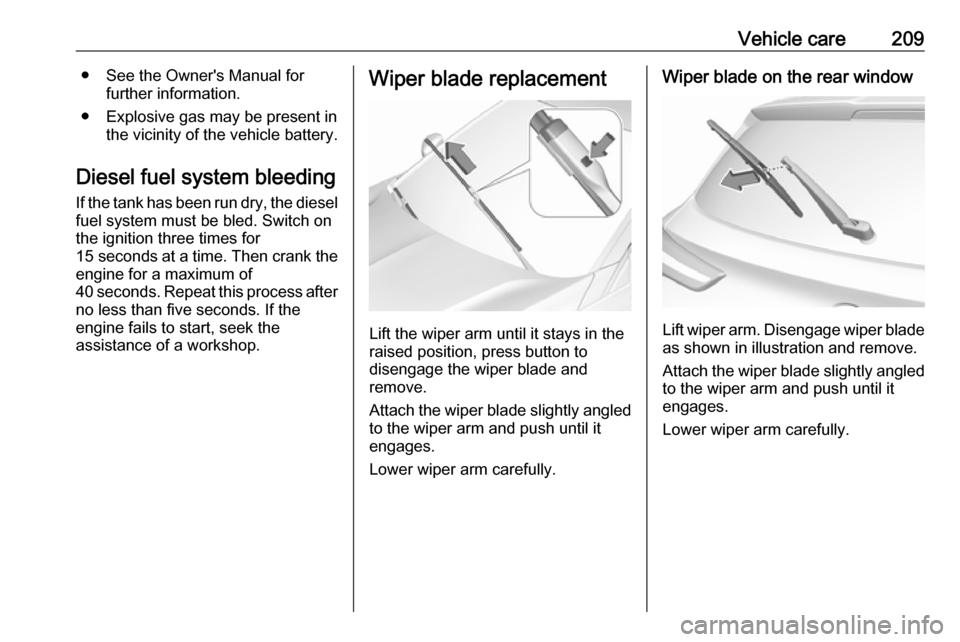
assistance of a workshop.Wiper blade replacement
Lift the wiper arm until it stays in the
raised position, press button to
disengage the wiper blade and
remove.
Attach the wiper blade slightly angled
to the wiper arm and push until it
engages.
Lower wiper arm carefully.
Wiper blade on the rear window
Lift wiper arm. Disengage wiper blade as shown in illustration and remove.
Attach the wiper blade slightly angled
to the wiper arm and push until it
engages.
Lower wiper arm carefully.
Page 212 of 263
210Vehicle careBulb replacement
Switch off the ignition and switch off
the relevant switch or close the doors.
Only hold a new bulb at the base. Do not touch the bulb glass with bare
hands.
Use only the same bulb type for
replacement.
Replace headlight bulbs from within
the engine compartment.
Bulb check After a bulb replacement switch on
the ignition, operate and check the
lights.
Halogen headlights
Halogen headlights with separate
bulbs for low beam and high beam.
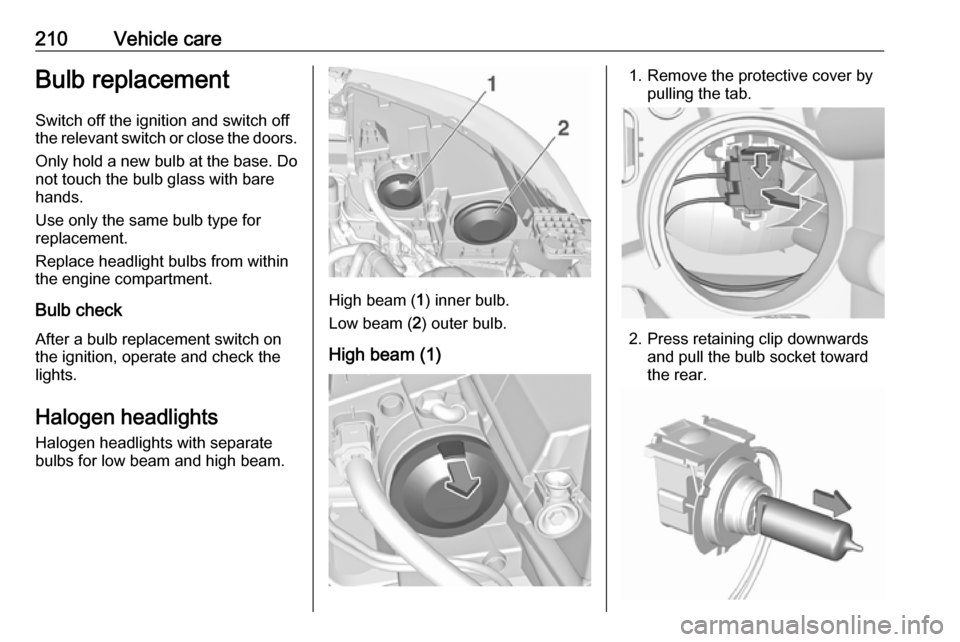
High beam ( 1) inner bulb.
Low beam ( 2) outer bulb.
High beam (1)
1. Remove the protective cover by pulling the tab.
2. Press retaining clip downwardsand pull the bulb socket toward
the rear.
Page 216 of 263
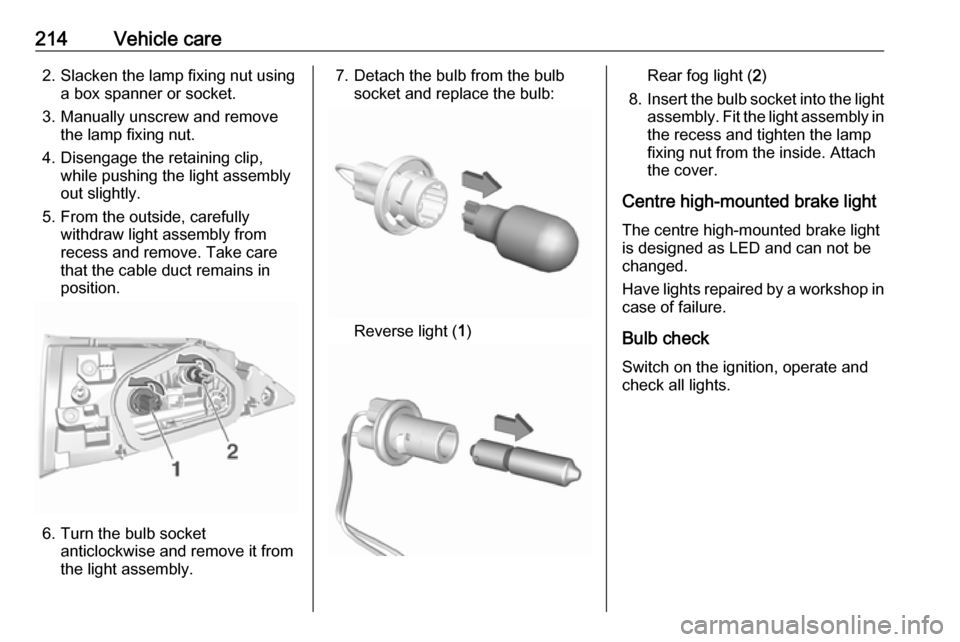
214Vehicle care2. Slacken the lamp fixing nut usinga box spanner or socket.
3. Manually unscrew and remove the lamp fixing nut.
4. Disengage the retaining clip, while pushing the light assembly
out slightly.
5. From the outside, carefully withdraw light assembly from
recess and remove. Take care
that the cable duct remains in
position.
6. Turn the bulb socket anticlockwise and remove it from
the light assembly.
7. Detach the bulb from the bulb socket and replace the bulb:
Reverse light ( 1)
Rear fog light ( 2)
8. Insert the bulb socket into the light
assembly. Fit the light assembly in the recess and tighten the lamp
fixing nut from the inside. Attach
the cover.
Centre high-mounted brake light The centre high-mounted brake light
is designed as LED and can not be
changed.
Have lights repaired by a workshop in
case of failure.
Bulb check
Switch on the ignition, operate and
check all lights.