tow bar VAUXHALL GRANDLAND X 2019.75 Owner's Manual
[x] Cancel search | Manufacturer: VAUXHALL, Model Year: 2019.75, Model line: GRANDLAND X, Model: VAUXHALL GRANDLAND X 2019.75Pages: 271, PDF Size: 7.73 MB
Page 58 of 271

56Seats, restraintsNL: Gebruik NOOIT een achterwaarts
gericht kinderzitje op een stoel met
een ACTIEVE AIRBAG ervoor, om
DODELIJK of ERNSTIG LETSEL van het KIND te voorkomen.
DA: Brug ALDRIG en bagudvendt
autostol på et forsæde med AKTIV
AIRBAG, BARNET kan komme i
LIVSFARE eller komme ALVORLIGT
TIL SKADE.
SV: Använd ALDRIG en bakåtvänd
barnstol på ett säte som skyddas med en framförvarande AKTIV AIRBAG.
DÖDSFALL eller ALLVARLIGA
SKADOR kan drabba BARNET.
FI: ÄLÄ KOSKAAN sijoita taaksepäin
suunnattua lasten turvaistuinta
istuimelle, jonka edessä on
AKTIIVINEN TURVATYYNY, LAPSI
VOI KUOLLA tai VAMMAUTUA
VAKAVASTI.
NO: Bakovervendt
barnesikringsutstyr må ALDRI brukes
på et sete med AKTIV
KOLLISJONSPUTE foran, da det kan
føre til at BARNET utsettes for
LIVSFARE og fare for ALVORLIGE
SKADER.PT: NUNCA use um sistema de
retenção para crianças voltado para
trás num banco protegido com um AIRBAG ACTIVO na frente do
mesmo, poderá ocorrer a PERDA DE VIDA ou FERIMENTOS GRAVES na
CRIANÇA.
IT: Non usare mai un sistema di
sicurezza per bambini rivolto
all'indietro su un sedile protetto da
AIRBAG ATTIVO di fronte ad esso:
pericolo di MORTE o LESIONI
GRAVI per il BAMBINO!
EL: ΠΟΤΕ μη χρησιμοποιείτε παιδικό
κάθισμα ασφαλείας με φορά προς τα πίσω σε κάθισμα που προστατεύεται
από μετωπικό ΕΝΕΡΓΟ ΑΕΡΟΣΑΚΟ, διότι το παιδί μπορεί να υποστεί
ΘΑΝΑΣΙΜΟ ή ΣΟΒΑΡΟ
ΤΡΑΥΜΑΤΙΣΜΟ.
PL: NIE WOLNO montować fotelika
dziecięcego zwróconego tyłem do
kierunku jazdy na fotelu, przed
którym znajduje się WŁĄCZONA
PODUSZKA POWIETRZNA.
Niezastosowanie się do tego
zalecenia może być przyczyną
ŚMIERCI lub POWAŻNYCH
OBRAŻEŃ u DZIECKA.TR: Arkaya bakan bir çocuk emniyet
sistemini KESİNLİKLE önünde bir
AKTİF HAVA YASTIĞI ile
korunmakta olan bir koltukta
kullanmayınız. ÇOCUK ÖLEBİLİR
veya AĞIR ŞEKİLDE
YARALANABİLİR.
UK: НІКОЛИ не використовуйте
систему безпеки для дітей, що
встановлюється обличчям назад,
на сидінні з УВІМКНЕНОЮ
ПОДУШКОЮ БЕЗПЕКИ, інакше це
може призвести до СМЕРТІ чи
СЕРЙОЗНОГО ТРАВМУВАННЯ
ДИТИНИ.
HU: SOHA ne használjon hátrafelé
néző biztonsági gyerekülést előlről
AKTÍV LÉGZSÁKKAL védett ülésen,
mert a GYERMEK HALÁLÁT vagy
KOMOLY SÉRÜLÉSÉT okozhatja.
HR: NIKADA nemojte koristiti sustav
zadržavanja za djecu okrenut prema
natrag na sjedalu s AKTIVNIM
ZRAČNIM JASTUKOM ispred njega,
to bi moglo dovesti do SMRTI ili
OZBILJNJIH OZLJEDA za DIJETE.
SL: NIKOLI ne nameščajte otroškega
varnostnega sedeža, obrnjenega v
nasprotni smeri vožnje, na sedež z
Page 170 of 271

168Driving and operating● sensor in the windscreen isblocked by snow, ice, slush, mud,dirt
● windscreen damaged or stickered
Complete attention is always required
while driving, and you should be
ready to take action and apply the
brakes and / or steer the vehicle to
avoid crashes.
We recommend to deactivate the
system in the vehicle personalisation
in the following cases:
● when towing a trailer or caravan
● when carrying long objects on roof bars or a roof rack
● when the vehicle is being towed with the engine running
● when a spare wheel is fitted that is smaller than the other wheels
● before using an automatic car wash with the engine running
● before placing the vehicle on a rolling road in a workshop
● if the windscreen has been damaged close to the camera● if the front bumper has been damaged
● if the brake lamps are not working
Fault
In case the system requires a service, a message is displayed in the Driver
Information Centre.
If the system does not work as it
should do, vehicle messages are
displayed in the Driver Information
Centre.
Vehicle messages 3 102.
Front pedestrian protection
Front pedestrian protection may help
to avoid or reduce the harm caused
by front-end crashes with pedestrians when driving forward.
The system uses the front camera in
the windscreen and a radar unit in the front bumper to detect a pedestrian
directly ahead in your path.
Front pedestrian protection can
detect and alert to pedestrians in a forward gear at speeds between
3 mph and 37 mph. Additionally frontpedestrian protection can provide a
boost to braking or automatically
brake the vehicle.
During nighttime driving, system
performance is limited.9 Danger
Front pedestrian braking does not
provide an alert or automatically
brake the vehicle, unless it detects
a pedestrian.
The system may not detect
pedestrians, including children,
when the pedestrian is not directly ahead, not fully visible, not
standing upright, or when part of a
group.
Front pedestrian protection includes:
● detecting front pedestrian ahead● front pedestrian alert
Front pedestrian protection is
activated together with forward
collision alert.
Forward collision alert 3 163.
Page 180 of 271

178Driving and operatingThe LED comes on after a delay when
passing another vehicle slowly.
Operation conditions
The following conditions must be
fulfilled for proper operation:
● all vehicles are moving in the same direction and in adjacent
lanes
● the speed of your vehicle is between 7 and 87 mph
● passing a vehicle with a speed difference of less than 6 mph
● another vehicle is passing with a speed difference of less than
15 mph
● the traffic flow is normal
● driving on a straight or slightly curved road
● the vehicle is not pulling a trailer
No alert will be given in the following
situations:
● in the presence of non-moving objects, e.g. parked vehicles,
barriers, street lamps, road signs
● with vehicles moving in the opposite direction● driving on a winding road or asharp corner
● when passing or being passed by
a very long vehicle, e.g. lorry,
coach, which is at the same time
detected at the rear in the blind
spot angle and present in the
driver's forward field of vision
● in very heavy traffic, vehicles detected in front and behind are
confused with a lorry or a
stationary object
● when passing too quickly
Deactivation The system is deactivated in the
vehicle personalisation 3 103. B
extinguishes in the instrument cluster.
Additionally, an acoustic signal
sounds.
The state of the system is stored
when switching off the ignition.
The system is automatically
deactivated when towing an
electrically connected trailer.
Due to adverse weather conditions
such as heavy rain, false detections
may occur.Fault
In the event of a fault, B flashes for a
few moments in the instrument panel,
accompanied by C and a display
message. Contact a dealer or a
qualified workshop to have the
system checked.
Panoramic view system
This system allows views of the
vehicle's surroundings to be
displayed as a nearly 360° picture in
the Info Display, like a bird's eye view.
The system uses: ● rear camera, installed in the tailgate
● ultrasonic parking sensors in the rear bumper
● front camera, installed in the front
grill below the enblem
● ultrasonic parking sensors in the front bumper
Page 193 of 271

Driving and operating191Trailer hitch
General information
Only use towing equipment that has
been approved for your vehicle. If
using non-factory fitted towing
equipment, deactivation of the hands- free tailgate operation may be
required 3 29.
Entrust retrofitting of towing
equipment to a workshop. It may be
necessary to make changes that
affect the cooling system, heat
shields or other equipment.
The bulb outage detection function for trailer brake light cannot detect a
partial bulb outage. E.g. in case of
four bulbs with a power of 5 W each,
the function only detects lamp outage
when only a single 5 W lamp remains
or none remain.
Trailers equipped with LED lights are
not suitable for the wiring harness of
this trailer hitch.
Fitting of towing equipment could
cover the opening of the towing eye.
If this is the case use the coupling ballbar for towing. Always keep the
coupling ball bar in the vehicle to have
it on hand if needed.
Driving characteristics andtowing tips
Before attaching a trailer, lubricate
the coupling ball. However, do not do
so if a stabiliser, which acts on the
coupling ball, is being used to reduce snaking movements.
During trailer towing do not exceed a
speed of 50 mph. A maximum speed
of 60 mph is only appropriate if an
oscillation damper is used and the
permissible gross trailer weight does
not exceed the vehicle's curb weight.
For trailers with low driving stability
and caravan trailers, the use of an
oscillation damper is strongly
recommended.
If the trailer starts snaking, drive more
slowly, do not attempt to correct the
steering and brake sharply if
necessary.
When driving downhill, drive in the
same gear as if driving uphill and
drive at a similar speed.Adjust tyre pressure to the value
specified for full load 3 252.
Trailer towing Trailer loadsThe permissible trailer loads are
vehicle and engine-dependent
maximum values which must not be
exceeded. The actual trailer load is
the difference between the actual
gross weight of the trailer and the
actual coupling socket load with the
trailer coupled.
The permissible trailer loads are
specified in the vehicle documents. In general, they are valid for gradients
up to 12%.
The permissible trailer load applies
up to the specified incline and at sea
level. Since engine power decreases
as altitude increases due to the air
becoming thinner, therefore reducing
climbing ability, the permissible gross
train weight also decreases by 10%
for every 1000 m of altitude. The
gross train weight does not have to be
Page 194 of 271
192Driving and operatingreduced when driving on roads with
slight inclines (less than 8%, e.g.
motorways).
The permissible gross train weight
must not be exceeded. This weight is
specified on the identification plate
3 243.
Vertical coupling load The vertical coupling load is the load
exerted by the trailer on the coupling
ball. It can be varied by changing the
weight distribution when loading the
trailer.
The maximum permissible vertical
coupling load (70 kg) is specified on
the towing equipment identification
plate and in the vehicle documents.
Always aim for the maximum vertical
coupling load, especially in the case
of heavy trailers. The vertical coupling
load should never fall below 25 kg.Rear axle load
When the trailer is coupled and the
towing vehicle fully loaded, the
permissible rear axle load (see
identification plate or vehicle
documents) may be exceeded by
60 kg , the gross vehicle weight rating
must not be exceeded. If the
permissible rear axle load is
exceeded, a maximum speed of
60 mph applies.
Towing equipmentCaution
When operating without a trailer,
remove the coupling ball bar.
Fitting the coupling ball bar
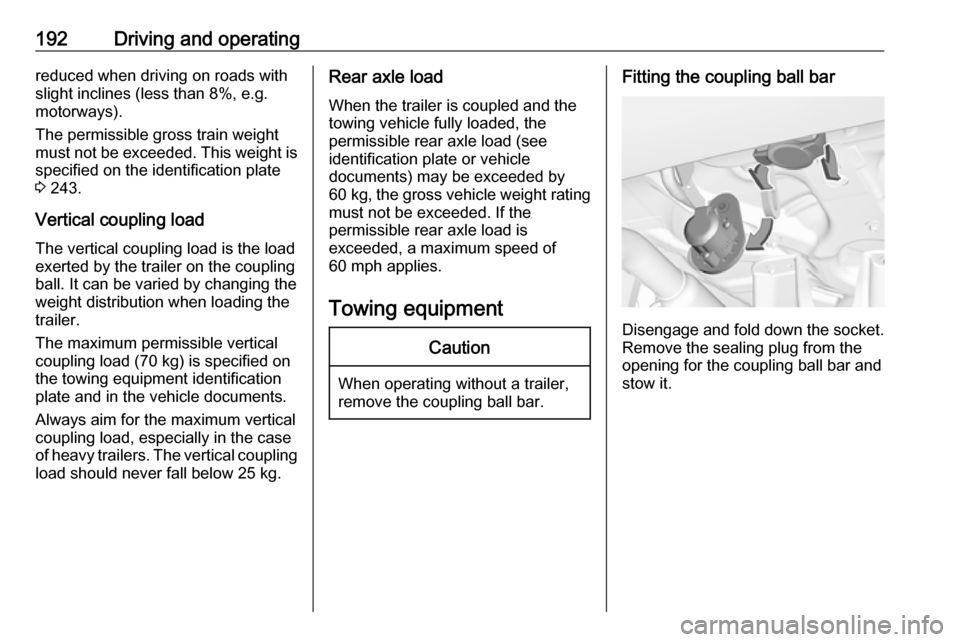
Disengage and fold down the socket. Remove the sealing plug from the
opening for the coupling ball bar and
stow it.
Page 195 of 271
Driving and operating193Checking the tensioning of the
coupling ball bar
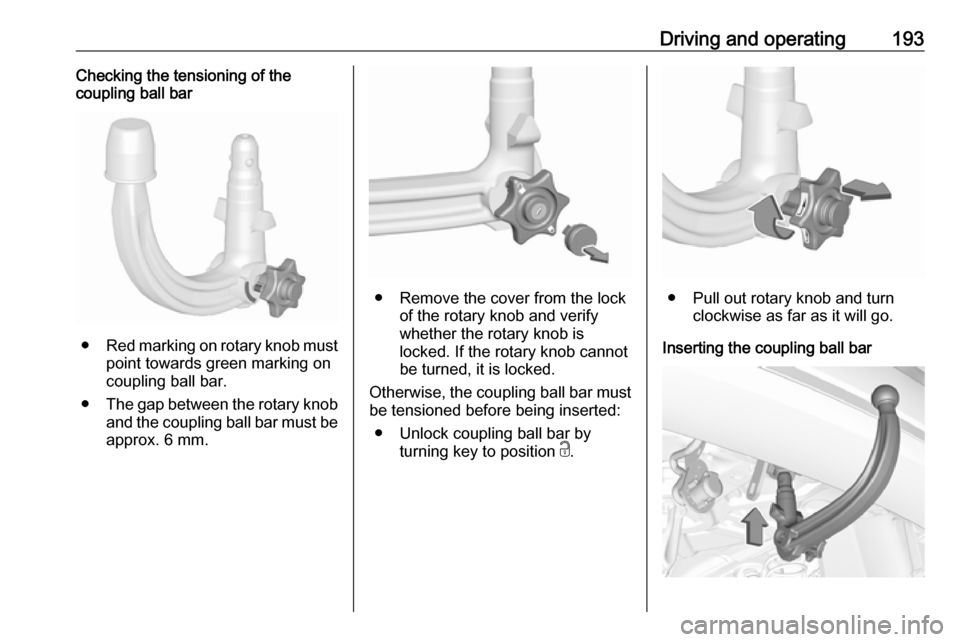
● Red marking on rotary knob must
point towards green marking on
coupling ball bar.
● The gap between the rotary knob
and the coupling ball bar must be approx. 6 mm.
● Remove the cover from the lock of the rotary knob and verify
whether the rotary knob is
locked. If the rotary knob cannot be turned, it is locked.
Otherwise, the coupling ball bar must be tensioned before being inserted:
● Unlock coupling ball bar by turning key to position c.● Pull out rotary knob and turn
clockwise as far as it will go.
Inserting the coupling ball bar
Page 196 of 271
194Driving and operatingInsert the tensioned coupling ball bar
in the opening and push firmly
upwards until it audibly engages.
The rotary handle snaps back into its
original position resting against the
coupling ball bar without a gap.9 Warning
Do not touch rotary handle during
insertion.
Lock the coupling ball bar by turning
the key to position e. Remove the key
and close the protective flap.
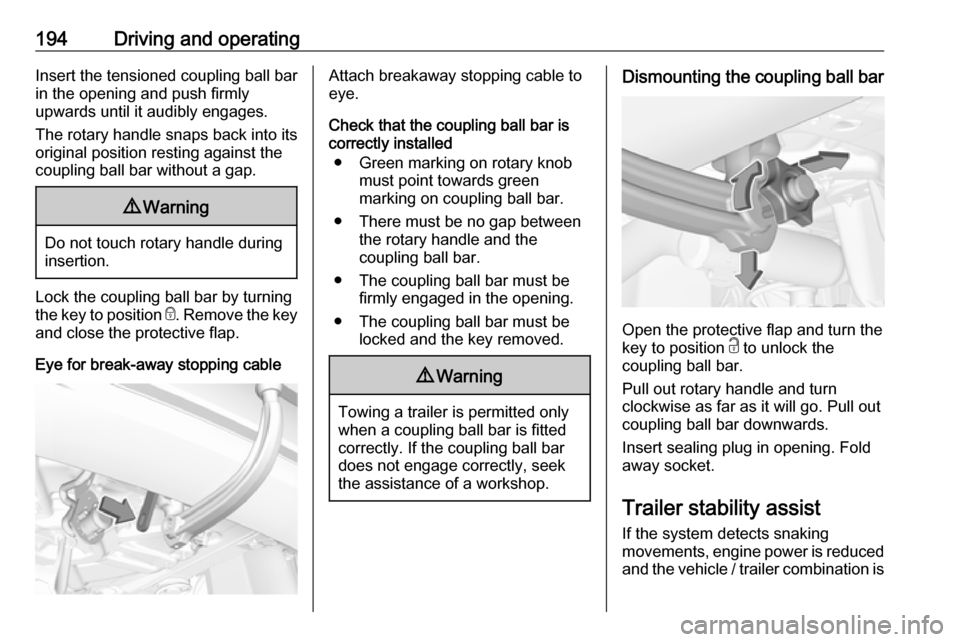
Eye for break-away stopping cable
Attach breakaway stopping cable to
eye.
Check that the coupling ball bar is correctly installed
● Green marking on rotary knob must point towards green
marking on coupling ball bar.
● There must be no gap between the rotary handle and the
coupling ball bar.
● The coupling ball bar must be firmly engaged in the opening.
● The coupling ball bar must be locked and the key removed.9Warning
Towing a trailer is permitted only
when a coupling ball bar is fitted correctly. If the coupling ball bardoes not engage correctly, seekthe assistance of a workshop.
Dismounting the coupling ball bar
Open the protective flap and turn the
key to position c to unlock the
coupling ball bar.
Pull out rotary handle and turn
clockwise as far as it will go. Pull out coupling ball bar downwards.
Insert sealing plug in opening. Fold away socket.
Trailer stability assist
If the system detects snaking
movements, engine power is reduced
and the vehicle / trailer combination is
Page 224 of 271
222Vehicle care9. Connect the compressor plug tothe power outlet or cigarette
lighter socket.
The tyre repair kit may only be
plugged in to the front 12 V power
outlet, in order to work properly.
To avoid discharging the battery,
we recommend running the
engine.
10. Set the rocker switch on the compressor to I. The tyre is filled
with sealant.
11. The compressor pressure gauge briefly indicates up to
600 kPa (6 bar) whilst the sealant
bottle is emptying (approx.
30 seconds). Then the pressure
starts to drop.
12. All of the sealant is pumped into the tyre. Then the tyre is being
inflated.
13. The prescribed tyre pressure should be obtained within
10 minutes.
Tyre pressure 3 252.
When the correct pressure is
obtained, switch off the
compressor.
If the prescribed tyre pressure is
not obtained within 10 minutes,
remove the tyre repair kit. Move
the vehicle one tyre rotation.
Reattach the tyre repair kit and
continue the filling procedure for 10 minutes. If the prescribed tyre
pressure is still not obtained, the
tyre is too badly damaged. Seek
the assistance of a workshop.
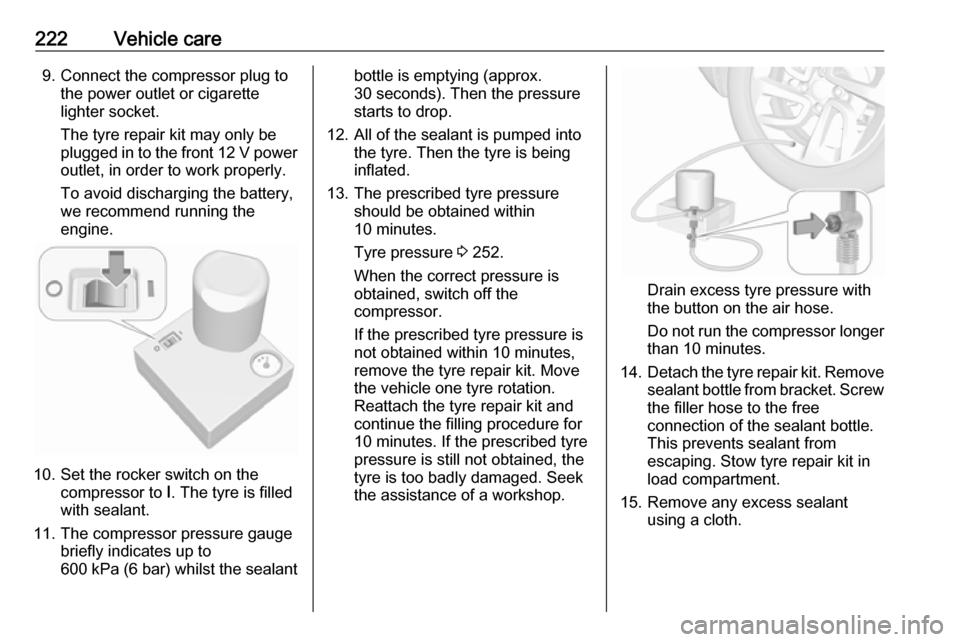
Drain excess tyre pressure with
the button on the air hose.
Do not run the compressor longer
than 10 minutes.
14. Detach the tyre repair kit. Remove
sealant bottle from bracket. Screw the filler hose to the free
connection of the sealant bottle.
This prevents sealant from
escaping. Stow tyre repair kit in
load compartment.
15. Remove any excess sealant using a cloth.
Page 225 of 271
Vehicle care223
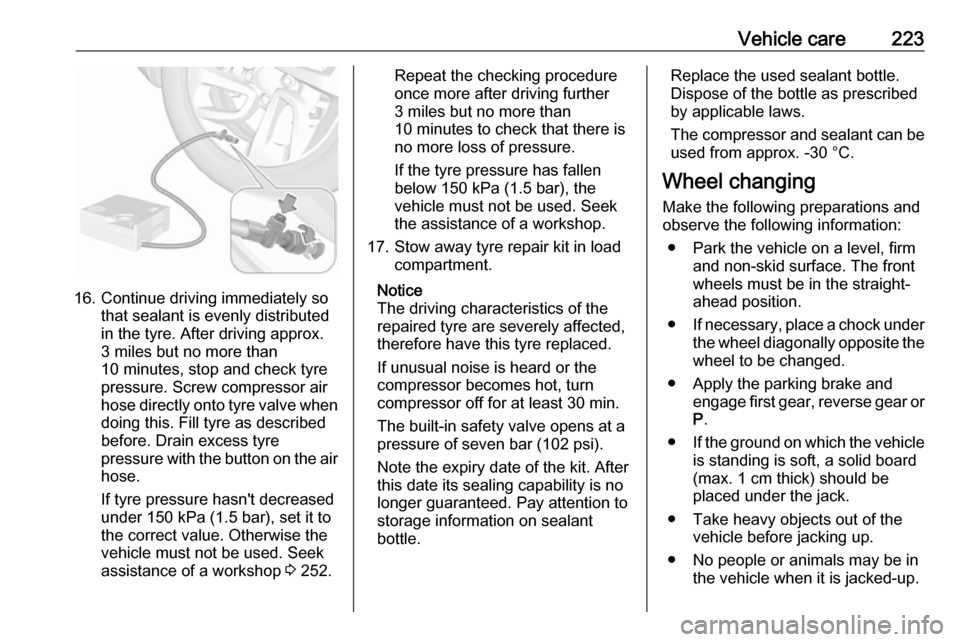
16. Continue driving immediately sothat sealant is evenly distributed
in the tyre. After driving approx.
3 miles but no more than
10 minutes, stop and check tyre
pressure. Screw compressor air
hose directly onto tyre valve when
doing this. Fill tyre as described
before. Drain excess tyre
pressure with the button on the air
hose.
If tyre pressure hasn't decreased
under 150 kPa (1.5 bar), set it to
the correct value. Otherwise the
vehicle must not be used. Seek
assistance of a workshop 3 252.
Repeat the checking procedure
once more after driving further
3 miles but no more than
10 minutes to check that there is
no more loss of pressure.
If the tyre pressure has fallen
below 150 kPa (1.5 bar), the
vehicle must not be used. Seek
the assistance of a workshop.
17. Stow away tyre repair kit in load compartment.
Notice
The driving characteristics of the repaired tyre are severely affected,
therefore have this tyre replaced.
If unusual noise is heard or the
compressor becomes hot, turn
compressor off for at least 30 min.
The built-in safety valve opens at a
pressure of seven bar (102 psi).
Note the expiry date of the kit. After
this date its sealing capability is no
longer guaranteed. Pay attention to
storage information on sealant
bottle.Replace the used sealant bottle. Dispose of the bottle as prescribed
by applicable laws.
The compressor and sealant can be used from approx. -30 °C.
Wheel changing
Make the following preparations and
observe the following information:
● Park the vehicle on a level, firm and non-skid surface. The front
wheels must be in the straight- ahead position.
● If necessary, place a chock under
the wheel diagonally opposite the
wheel to be changed.
● Apply the parking brake and engage first gear, reverse gear orP .
● If the ground on which the vehicle
is standing is soft, a solid board
(max. 1 cm thick) should be
placed under the jack.
● Take heavy objects out of the vehicle before jacking up.
● No people or animals may be in the vehicle when it is jacked-up.
Page 236 of 271
234Vehicle careTowing equipment
Do not clean the coupling ball bar with
a steam-jet or high-pressure jet
cleaner.
Interior care
Interior and upholstery
Only clean the vehicle interior,
including the instrument panel fascia
and panelling, with a dry cloth or
interior cleaner.
Clean the leather upholstery with
clear water and a soft cloth. In case of
heavy soiling, use leather care.
The instrument cluster and the
displays should only be cleaned using a soft damp cloth. If necessary use aweak soap solution.
Clean fabric upholstery with a
vacuum cleaner and brush. Remove
stains with an upholstery cleaner.
Clothing fabrics may not be
colourfast. This could cause visible discolourations, especially on light-coloured upholstery. Removable
stains and discolourations should be
cleaned as soon as possible.
Clean seat belts with lukewarm water
or interior cleaner.Caution
Close Velcro fasteners as open
Velcro fasteners on clothing could
damage seat upholstery.
The same applies to clothing with
sharp-edged objects, like zips or
belts or studded jeans.
Plastic and rubber parts
Plastic and rubber parts can be
cleaned with the same cleaner as
used to clean the body. Use interior cleaner if necessary. Do not use any
other agent. Avoid solvents and petrol in particular. Do not use high-
pressure jet cleaners.
Floor mats9 Warning
If a floor mat has the wrong size or
is not properly installed, it can
interfere with the accelerator pedal
and/or brake pedal, what can
cause unintended acceleration
and/or increased stopping
distance which can cause a crash and injury.
Use the following guidelines for
proper floor mat usage.
● The original equipped floor mats were designed for your vehicle.
Have damaged floor mats only replaced by certified floor mats.
Always check that the floor mats
do not interfere with the pedals.
● Use the floor mat with the correct
side up. Do not turn it over.
● Do not place anything on top of the driver's side floor mat.
● Use only a single floor mat on the
driver's side.