start VAUXHALL GRANDLAND X 2020 Workshop Manual
[x] Cancel search | Manufacturer: VAUXHALL, Model Year: 2020, Model line: GRANDLAND X, Model: VAUXHALL GRANDLAND X 2020Pages: 283, PDF Size: 21.87 MB
Page 167 of 283
Driving and operating1659Warning
The complete driver attention is
always required while driving with adaptive cruise control. The driver stays fully in control of the vehicle
because the brake pedal, the
accelerator pedal and the button
Ñ have priority over any adaptive
cruise control operation.
Switching on the system
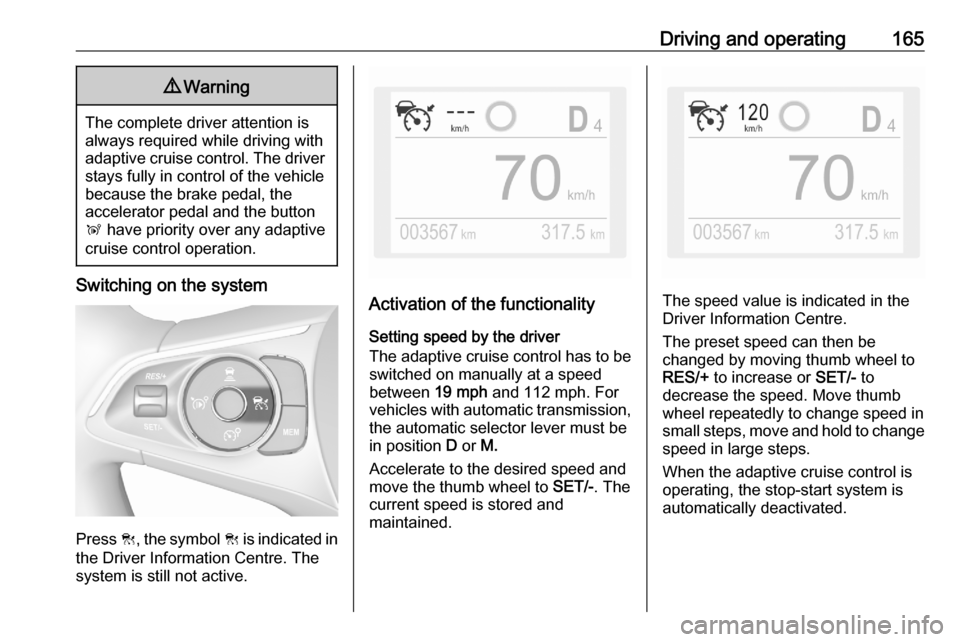
Press C, the symbol C is indicated in
the Driver Information Centre. The system is still not active.
Activation of the functionality
Setting speed by the driver
The adaptive cruise control has to be switched on manually at a speed
between 19 mph and 112 mph. For
vehicles with automatic transmission, the automatic selector lever must be
in position D or M.
Accelerate to the desired speed and
move the thumb wheel to SET/-. The
current speed is stored and
maintained.The speed value is indicated in the
Driver Information Centre.
The preset speed can then be
changed by moving thumb wheel to
RES/+ to increase or SET/- to
decrease the speed. Move thumb wheel repeatedly to change speed in
small steps, move and hold to change
speed in large steps.
When the adaptive cruise control is
operating, the stop-start system is
automatically deactivated.
Page 169 of 283
Driving and operating167opened and the driver's seat belt is
unfastened, then the electric parking
brake is applied automatically to hold
the vehicle. Control indicator m will
illuminate. To release electric parking
brake, press the accelerator pedal.
Electric parking brake 3 153.9 Warning
When the system is deactivated or
cancelled, the vehicle will no
longer be held at a stop and can
start moving. Be always prepared
to manually apply the brake to hold the vehicle stationary.
Do not leave the vehicle while it is
being held at a stop by adaptive
cruise control. Always move
selector lever to park position P
and switch off the ignition before
leaving the vehicle.
Setting the following distance
When adaptive cruise control detects
a slower moving vehicle in the driving path, it will adjust the vehicle speed tomaintain the following distance
selected by the driver.
The following distance can be set to
close (1 bar), normal (2 bars) or far (3 bars).
If the engine is running and the
adaptive cruise control is enabled
(grey), you can modify the following
distance setting:
Press Ö, the current setting is shown
in the Driver Information Centre.
Press Ö again to change the following
distance: The new setting is
displayed in the Driver Information
Centre.
The selected following distance is
indicated by full bars in the adaptive
cruise control page.9 Warning
The driver accepts full
responsibility for the appropriate
following distance based on traffic, weather and visibility conditions.
Following distance must be
adjusted or the system switched
off when required by the prevailing
conditions.
Detecting the vehicle ahead
If the system detects a vehicle in the
driving path, the adaptive cruise
control symbol displayed in the Driver
Information Centre changes: - is
changed to w.
Deactivation of the functionality
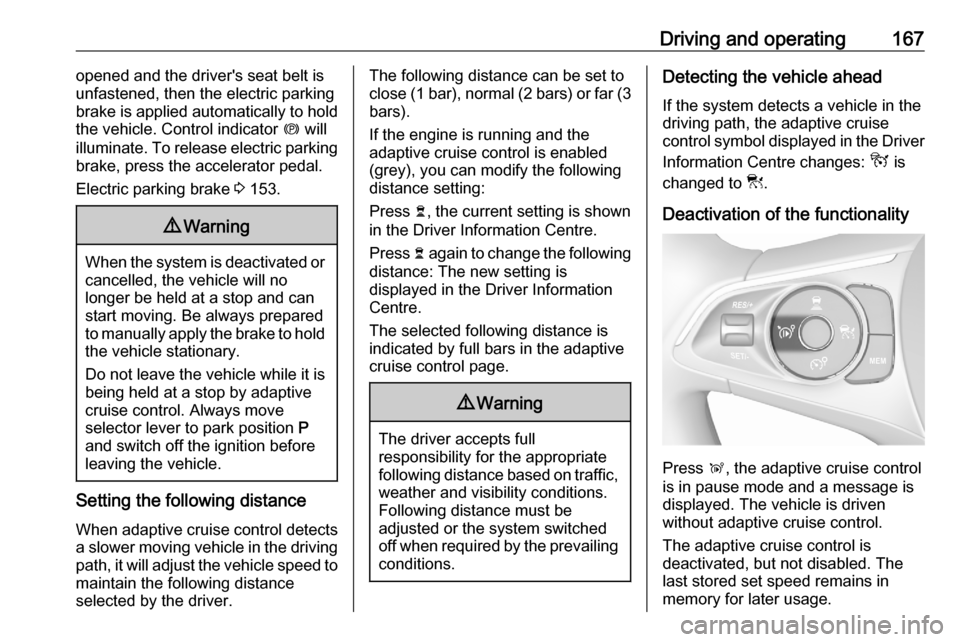
Press Ñ, the adaptive cruise control
is in pause mode and a message is
displayed. The vehicle is driven
without adaptive cruise control.
The adaptive cruise control is
deactivated, but not disabled. The
last stored set speed remains in
memory for later usage.
Page 182 of 283
180Driving and operating
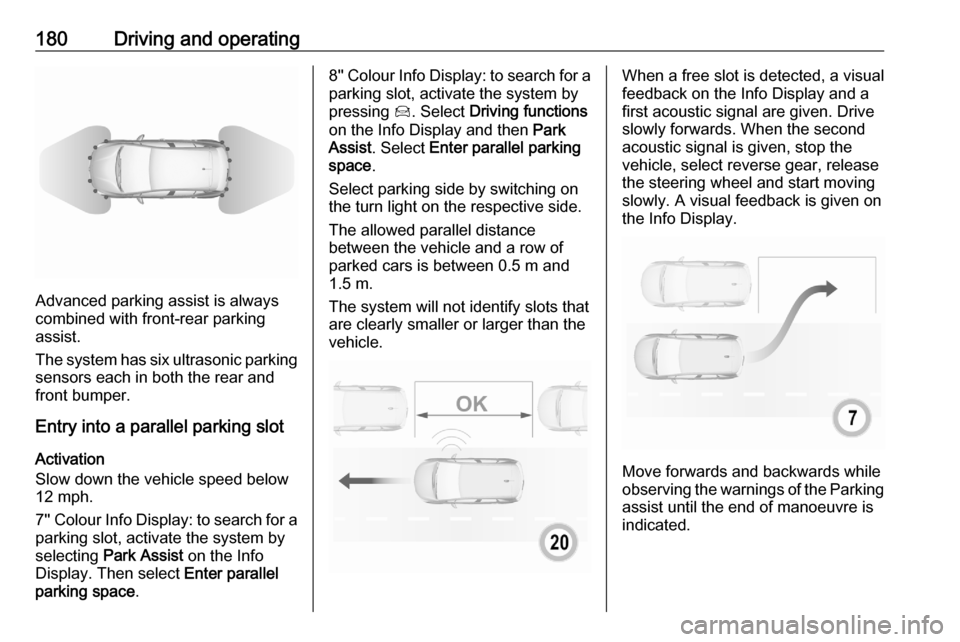
Advanced parking assist is always
combined with front-rear parking assist.
The system has six ultrasonic parking
sensors each in both the rear and
front bumper.
Entry into a parallel parking slot
Activation
Slow down the vehicle speed below
12 mph.
7'' Colour Info Display: to search for a parking slot, activate the system by
selecting Park Assist on the Info
Display. Then select Enter parallel
parking space .
8'' Colour Info Display: to search for a
parking slot, activate the system by
pressing Í. Select Driving functions
on the Info Display and then Park
Assist . Select Enter parallel parking
space .
Select parking side by switching on
the turn light on the respective side.
The allowed parallel distance
between the vehicle and a row of
parked cars is between 0.5 m and 1.5 m.
The system will not identify slots that are clearly smaller or larger than the
vehicle.When a free slot is detected, a visual
feedback on the Info Display and a
first acoustic signal are given. Drive
slowly forwards. When the second
acoustic signal is given, stop the
vehicle, select reverse gear, release
the steering wheel and start moving
slowly. A visual feedback is given on
the Info Display.
Move forwards and backwards while
observing the warnings of the Parking
assist until the end of manoeuvre is
indicated.
Page 183 of 283
Driving and operating181Entry into a perpendicular parkingslot
Activation
7'' Colour Info Display: to search for a parking slot, activate the system by
selecting Park Assist on the Info
Display. Then select Enter
perpendicular parking space .
8'' Colour Info Display: when search
for a parking slot, activate the system
by pressing Í. Select Driving
functions on the Info Display and then
Park Assist . Select Enter bay parking
space .
Slow down the vehicle speed below
12 mph.
Select parking side by switching on
the turn light on the respective side.
The allowed parallel distance
between the vehicle and a row of
parked cars is between 0.5 m and 1.5 m.
When several successive slots are found, the vehicle will be directedtowards the last one.
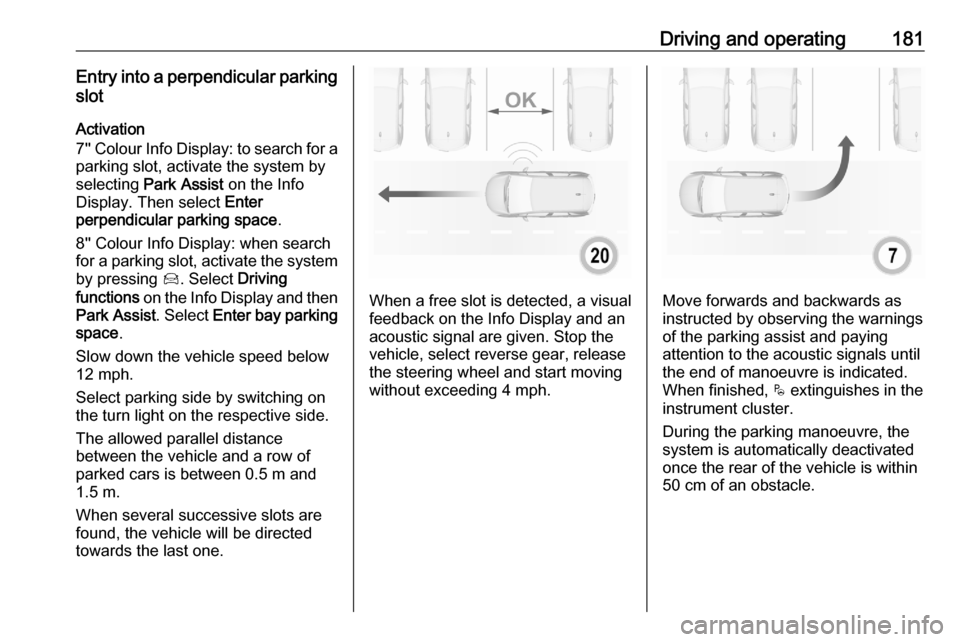
When a free slot is detected, a visual
feedback on the Info Display and an
acoustic signal are given. Stop the
vehicle, select reverse gear, release
the steering wheel and start moving without exceeding 4 mph.Move forwards and backwards as
instructed by observing the warnings
of the parking assist and paying
attention to the acoustic signals until
the end of manoeuvre is indicated. When finished, $ extinguishes in the
instrument cluster.
During the parking manoeuvre, the
system is automatically deactivated
once the rear of the vehicle is within
50 cm of an obstacle.
Page 184 of 283
182Driving and operatingExiting a parallel parking slot
Activation
7'' Colour Info Display: when exiting a parallel parking slot, activate the
system by selecting Park Assist on
the Info Display. Then select Exit
parallel parking space .
8'' Colour Info Display: when exiting a parallel parking slot, activate the
system by pressing Í. Select Driving
functions on the Info Display and then
Park Assist . Select Exit parallel
parking space .
Select exit side by switching on the
respective turn light.
Engage reverse or forward gear,
release the steering wheel and start
moving without exceeding 3 mph.
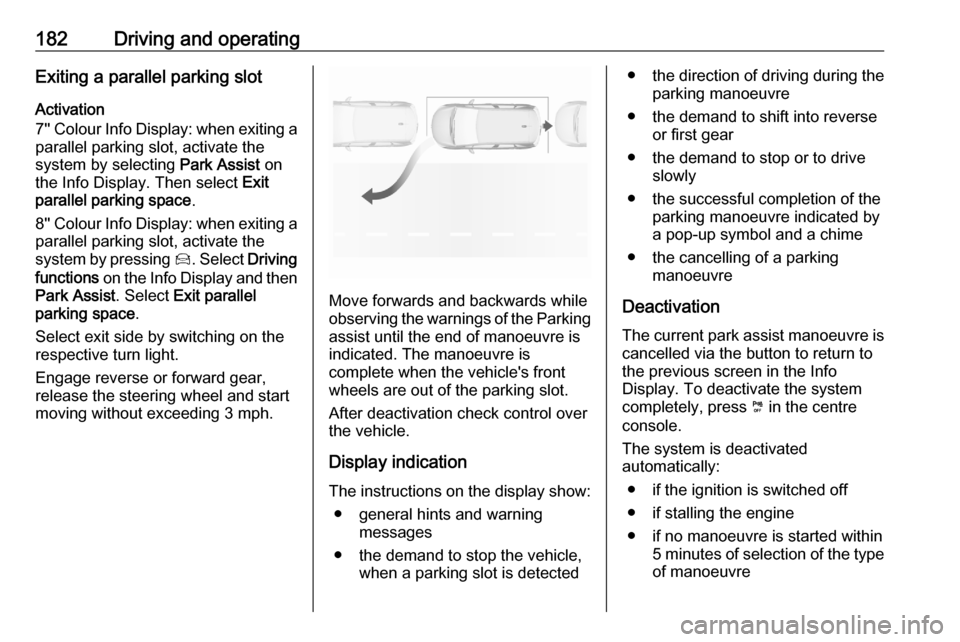
Move forwards and backwards while
observing the warnings of the Parking
assist until the end of manoeuvre is
indicated. The manoeuvre is
complete when the vehicle's front
wheels are out of the parking slot.
After deactivation check control over
the vehicle.
Display indication The instructions on the display show: ● general hints and warning messages
● the demand to stop the vehicle, when a parking slot is detected
●the direction of driving during the
parking manoeuvre
● the demand to shift into reverse or first gear
● the demand to stop or to drive slowly
● the successful completion of the parking manoeuvre indicated by
a pop-up symbol and a chime
● the cancelling of a parking manoeuvre
Deactivation The current park assist manoeuvre is
cancelled via the button to return to
the previous screen in the Info
Display. To deactivate the system
completely, press ¼ in the centre
console.
The system is deactivated
automatically:
● if the ignition is switched off
● if stalling the engine
● if no manoeuvre is started within 5 minutes of selection of the typeof manoeuvre
Page 186 of 283
184Driving and operatingacoustic noise or mechanical
misalignments (sporadic false
warnings may occur).
Make sure that the front number
plate is properly mounted (not bent
and no gaps to the bumper on the left
or right side) and the sensors are
firmly in place.
Advanced parking assist system
may not respond to changes in the
available parking space after
initiating a parking manoeuvre. The
system may recognize an entry, a
gateway, a courtyard or even a
crossing as a parking slot. After
selecting reverse gear the system
will start a parking manoeuvre. Take care regarding the availability of the
suggested parking slot.
Surface irregularities, e.g. on
construction zones, are not detected
by the system. The driver accepts
responsibility.
Side blind spot alert The side blind spot alert system
detects and reports objects on either
side of the vehicle, within a specified
blind spot zone. The system displaysa visual alert in each exterior mirror,
when detecting objects that may not
be visible in the interior and exterior
mirrors.
Side blind spot alert uses some of the
advanced parking assist sensors
which are located in the front and rear bumper on both sides of the vehicle.9 Warning
Side blind spot alert does not
replace driver vision.
The system does not detect:
● vehicles outside the side blind zones which may be rapidly
approaching
● pedestrians, cyclists or animals
Before changing a lane, always
check all mirrors, look over the
shoulder and use the turn light.
Activation
7'' Colour Info Display: select Blind
spot monitoring on the Info Display
and activate the function.
8'' Colour Info Display: press Í.
Select Driving functions on the Info
Display and then Blind spot sensors .
Activate the function.
B illuminates continously green in the
instrument cluster to confirm the
function.
Functionality
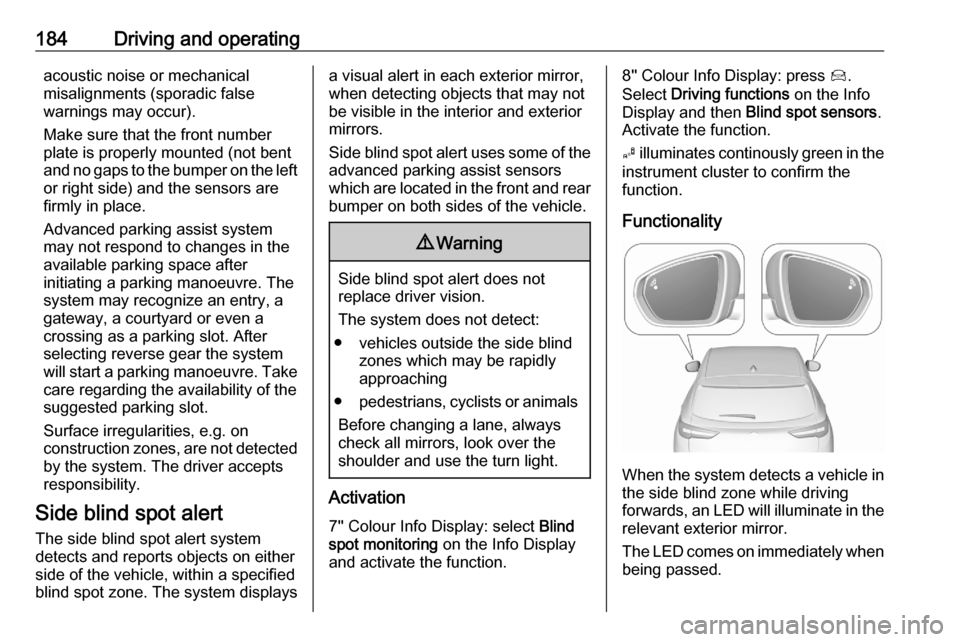
When the system detects a vehicle in the side blind zone while driving
forwards, an LED will illuminate in the
relevant exterior mirror.
The LED comes on immediately when being passed.
Page 197 of 283
Driving and operating195Charging at domestic electricaloutlets
Start charging9 Warning
Only use a domestic electrical
outlet which is properly grounded and protected by a 30 mA
differential switch.
Only use a domestic electrical
outlet protected by a circuit
breaker adapted to the amperage
of the electrical circuit.
Have a qualified electrician check
the electrical installation to be
used. The installation has to be in
compliance with national
standards and compatible with the vehicle.
When using a dedicated domestic electrical outlet, have it installed
by a qualified electrician.
Make sure that the electrical
outlet, the plug and the cable do
not support the weight of the
control box.
9 Warning
Do not carry out any works in the
engine compartment during
charging.
The vehicle can be charged at
domestic electrical outlets. Charging
an empty high voltage battery at a
domestic electrical outlet takes
approx. 7 hours.
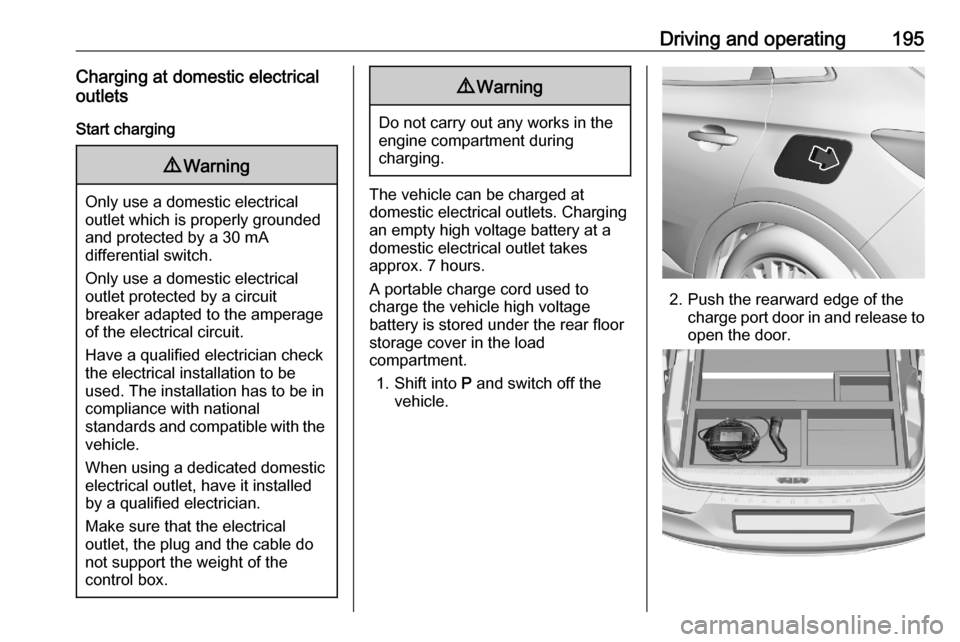
A portable charge cord used to charge the vehicle high voltage
battery is stored under the rear floor
storage cover in the load
compartment.
1. Shift into P and switch off the
vehicle.
2. Push the rearward edge of the charge port door in and release to
open the door.
Page 198 of 283
196Driving and operating3. Open the tailgate. Lift the rearfloor storage cover and remove
the charge cord.
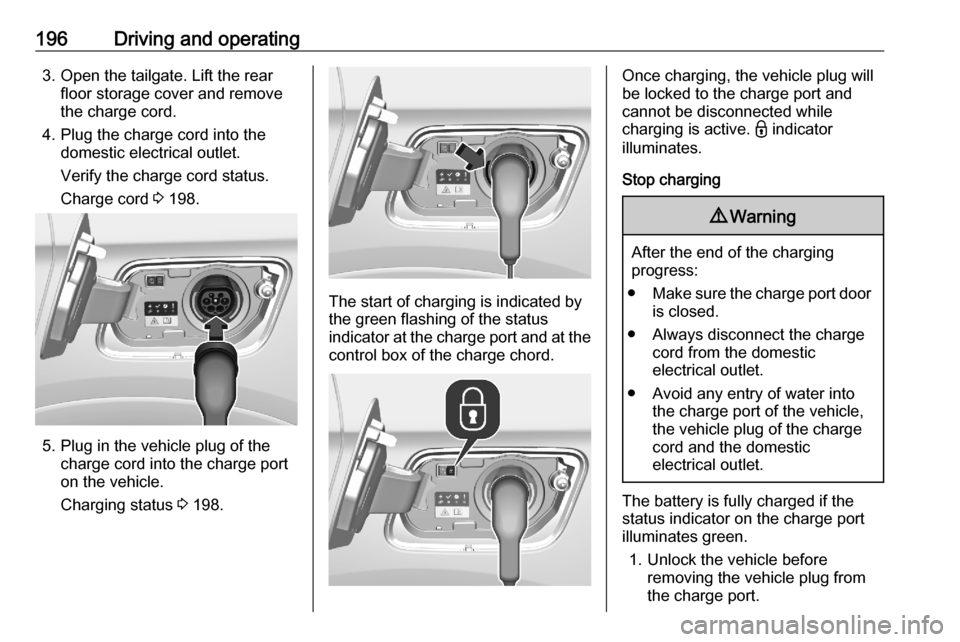
4. Plug the charge cord into the domestic electrical outlet.
Verify the charge cord status.
Charge cord 3 198.
5. Plug in the vehicle plug of the
charge cord into the charge port
on the vehicle.
Charging status 3 198.
The start of charging is indicated by
the green flashing of the status
indicator at the charge port and at the
control box of the charge chord.
Once charging, the vehicle plug will
be locked to the charge port and cannot be disconnected while
charging is active. - indicator
illuminates.
Stop charging9 Warning
After the end of the charging
progress:
● Make sure the charge port door
is closed.
● Always disconnect the charge cord from the domestic
electrical outlet.
● Avoid any entry of water into the charge port of the vehicle,the vehicle plug of the charge
cord and the domestic
electrical outlet.
The battery is fully charged if the status indicator on the charge port
illuminates green.
1. Unlock the vehicle before removing the vehicle plug from
the charge port.
Page 199 of 283

Driving and operating197If the vehicle is already unlocked,
lock the vehicle and unlock it
again.
2. Disconnect the vehicle plug from the charge port within 30 seconds.
3. Close the charge port door by pressing firmly in the centre to
latch properly.
4. Disconnect the charging cord from the domestic electrical
outlet.
Charging at wallboxes and public
charging stations
When charging at a wallbox / public
charging station, follow the
instructions for the use of the wallbox / public charging station.
Programmable charging
By default, charging starts as soon as the vehicle plug of the charge cord is
plugged into the charge port of the
vehicle. It is also possible to schedule charging using the Colour Info
Display.
1. Press m.
2. Select Charge.
3. Press /.
4. Enter a start time for loading.
5. Press OK.
6. Plug in the vehicle. Charging 3 194.
7. Within 1 minute, press b to
activate programmable charging.
Page 204 of 283
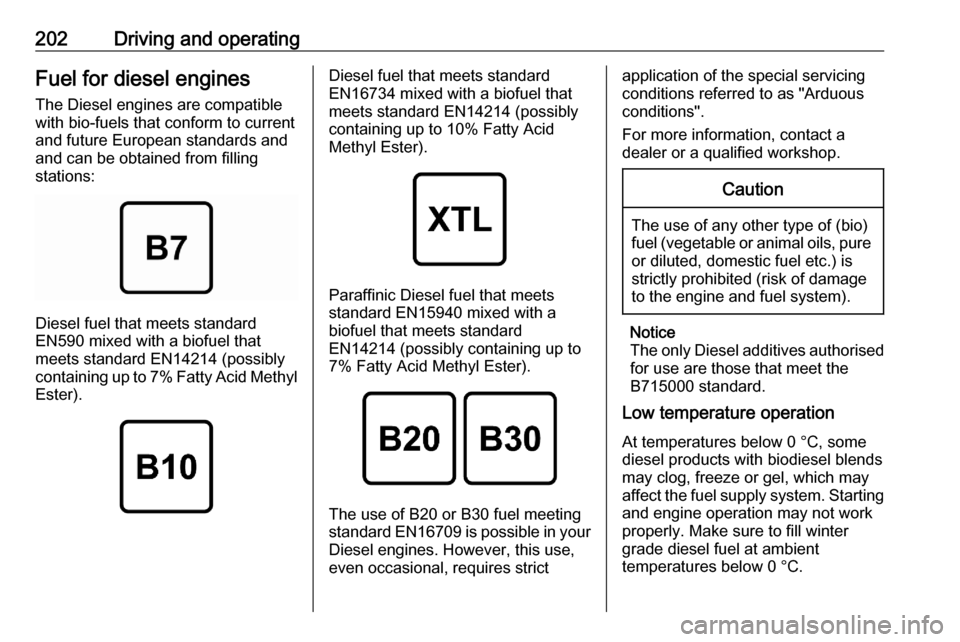
202Driving and operatingFuel for diesel enginesThe Diesel engines are compatible
with bio-fuels that conform to current and future European standards and
and can be obtained from filling
stations:
Diesel fuel that meets standard
EN590 mixed with a biofuel that
meets standard EN14214 (possibly
containing up to 7% Fatty Acid Methyl
Ester).
Diesel fuel that meets standard
EN16734 mixed with a biofuel that
meets standard EN14214 (possibly
containing up to 10% Fatty Acid
Methyl Ester).
Paraffinic Diesel fuel that meets
standard EN15940 mixed with a
biofuel that meets standard
EN14214 (possibly containing up to
7% Fatty Acid Methyl Ester).
The use of B20 or B30 fuel meeting standard EN16709 is possible in your
Diesel engines. However, this use,
even occasional, requires strict
application of the special servicing
conditions referred to as "Arduous
conditions".
For more information, contact a
dealer or a qualified workshop.Caution
The use of any other type of (bio)
fuel (vegetable or animal oils, pure
or diluted, domestic fuel etc.) is
strictly prohibited (risk of damage
to the engine and fuel system).
Notice
The only Diesel additives authorised for use are those that meet the
B715000 standard.
Low temperature operation
At temperatures below 0 °C, some
diesel products with biodiesel blends may clog, freeze or gel, which mayaffect the fuel supply system. Starting
and engine operation may not work
properly. Make sure to fill winter
grade diesel fuel at ambient
temperatures below 0 °C.