phone VAUXHALL INSIGNIA 2014 Infotainment system
[x] Cancel search | Manufacturer: VAUXHALL, Model Year: 2014, Model line: INSIGNIA, Model: VAUXHALL INSIGNIA 2014Pages: 143, PDF Size: 2.53 MB
Page 5 of 143

Introduction.................................... 6
Basic operation ............................ 14
Radio ........................................... 47
CD Player .................................... 52
External devices .......................... 55
Navigation .................................... 62
Speech recognition ......................80
Phone .......................................... 86
Frequently asked questions .........95
Index ............................................ 98Touch R700 / Navi 900
Page 6 of 143

6IntroductionIntroductionGeneral information.......................6
Theft-deterrent feature ...................7
Control elements overview ............8
Usage .......................................... 12General information
The Infotainment system provides
you with state-of-the-art in-car
infotainment.
Using the FM, AM or DAB radio
functions, you can register a great
number of stations on various
favourites pages.
You can even register music tracks,
telephone numbers, destination
addresses or tone settings on the
favourites pages.
You can connect external data
storage devices, e.g. iPod, USB
devices, or other auxiliary devices to
the Infotainment system as further
audio sources; either via a cable or
via Bluetooth.
The navigation system with dynamic
route planning will reliably guide you
to your destination, and, if desired,
automatically avoid traffic jams or
other traffic problems.
In addition, the Infotainment system is equipped with a Phone portal that
allows comfortable and safe use of
your mobile phone in the vehicle.Optionally, the Infotainment system
can be operated using controls on the steering wheel, a touch pad between
the front seats, or via the speech recognition system.
The well-thought-out design of the
control elements, the touch screen
and the clear displays enable you to
control the system easily and
intuitively.
Notice
This manual describes all options
and features available for the
various Infotainment systems.
Certain descriptions, including those
for display and menu functions, may not apply to your vehicle due to
model variant, country
specifications, special equipment or
accessories.
Page 10 of 143
10Introduction
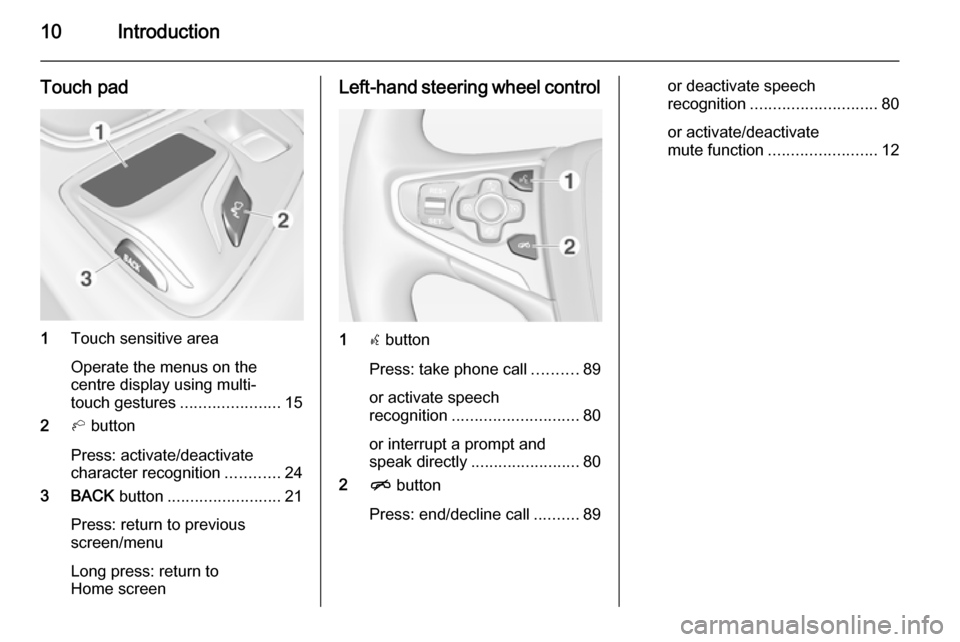
Touch pad
1Touch sensitive area
Operate the menus on the
centre display using multi-
touch gestures ......................15
2 h button
Press: activate/deactivate
character recognition ............24
3 BACK button......................... 21
Press: return to previous
screen/menu
Long press: return to
Home screen
Left-hand steering wheel control
1 s button
Press: take phone call ..........89
or activate speech
recognition ............................ 80
or interrupt a prompt and
speak directly ........................ 80
2 n button
Press: end/decline call ..........89
or deactivate speech
recognition ............................ 80
or activate/deactivate
mute function ........................ 12
Page 13 of 143

Introduction13
External devices
Press the MEDIA button repeatedly to
activate the playback mode for a
connected external device (e.g. USB
device, iPod or smartphone).
Find a detailed description on
connecting and operating external
devices 3 55.
Navigation
Press the ; button to display the
Home screen.
Tap on the NAV icon to display the
navigation map showing the area
around the current location.
Find a detailed description of the
navigation functions 3 62.
Phone
Press the ; button to display the
Home screen.
Select the PHONE icon.
If a connection to a paired mobile
phone can be established, the main
menu of the phone mode is displayed.Find a detailed description of mobile
phone operation via the Infotainment
system 3 89.
If no connection can be established,
a corresponding message is
displayed. For a detailed description
of preparing and establishing a
Bluetooth connection between the
Infotainment system and a mobile
phone 3 87.
Page 23 of 143
Basic operation23
Exiting edit mode
The system automatically exits the
edit mode after a few seconds of
inactivity.
To exit the edit mode immediately,
press the ; button on the instrument
panel.Moving icons
To enter the edit mode, see "Entering edit mode" above.
Drag the icon you wish to move to its
new position. Release the icon to
drop it in the respective location.
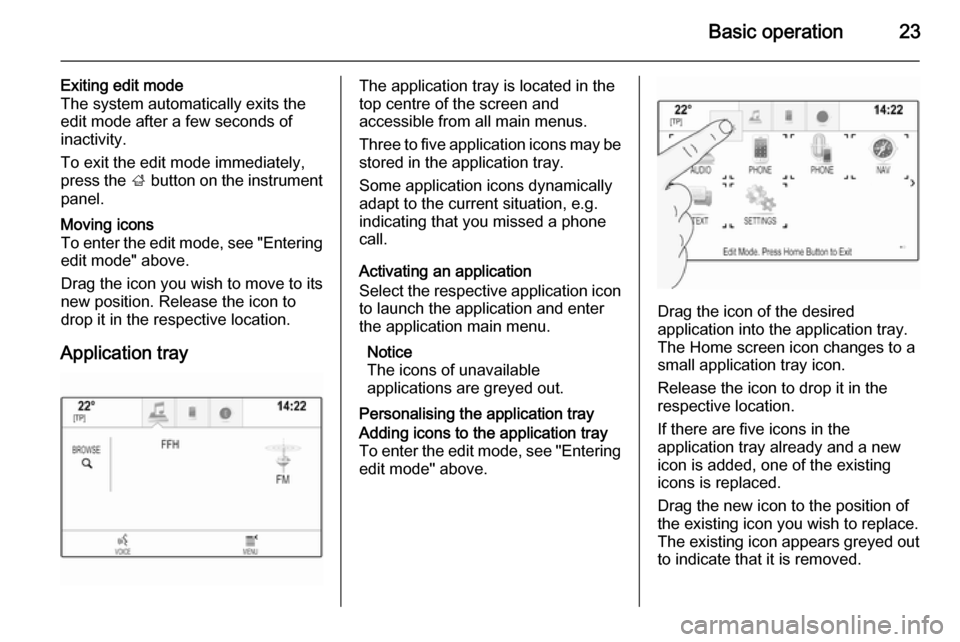
Application tray
The application tray is located in the
top centre of the screen and
accessible from all main menus.
Three to five application icons may be stored in the application tray.
Some application icons dynamically
adapt to the current situation, e.g.
indicating that you missed a phone
call.
Activating an application
Select the respective application icon
to launch the application and enter
the application main menu.
Notice
The icons of unavailable
applications are greyed out.
Personalising the application trayAdding icons to the application tray To enter the edit mode, see "Entering edit mode" above.
Drag the icon of the desired
application into the application tray.
The Home screen icon changes to a
small application tray icon.
Release the icon to drop it in the
respective location.
If there are five icons in the
application tray already and a new
icon is added, one of the existing
icons is replaced.
Drag the new icon to the position of
the existing icon you wish to replace.
The existing icon appears greyed out
to indicate that it is removed.
Page 24 of 143
24Basic operation
Release the new icon to store it in therespective location.Removing icons from the application
tray
To enter the edit mode, see "Entering edit mode" above.
Drag the respective application icon
out of the application tray and release it anywhere on the screen. The
application is removed from the
application tray.
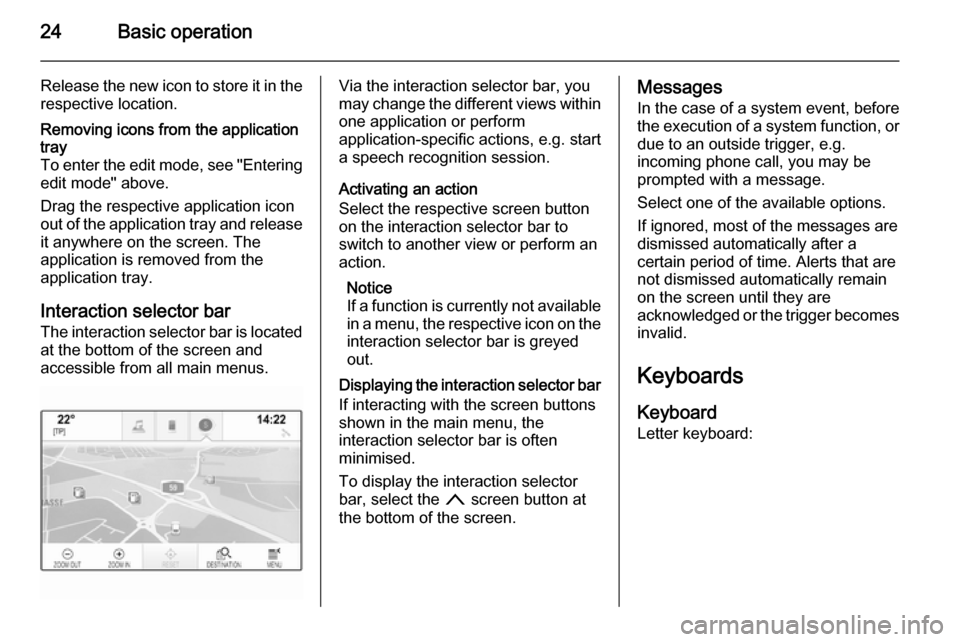
Interaction selector bar
The interaction selector bar is located at the bottom of the screen and
accessible from all main menus.
Via the interaction selector bar, you
may change the different views within one application or perform
application-specific actions, e.g. start
a speech recognition session.
Activating an action
Select the respective screen button
on the interaction selector bar to
switch to another view or perform an
action.
Notice
If a function is currently not available
in a menu, the respective icon on the
interaction selector bar is greyed
out.
Displaying the interaction selector bar If interacting with the screen buttonsshown in the main menu, the
interaction selector bar is often
minimised.
To display the interaction selector
bar, select the n screen button at
the bottom of the screen.Messages
In the case of a system event, before
the execution of a system function, or
due to an outside trigger, e.g.
incoming phone call, you may be
prompted with a message.
Select one of the available options.
If ignored, most of the messages are
dismissed automatically after a
certain period of time. Alerts that are
not dismissed automatically remain
on the screen until they are
acknowledged or the trigger becomes invalid.
Keyboards Keyboard
Letter keyboard:
Page 28 of 143
28Basic operation
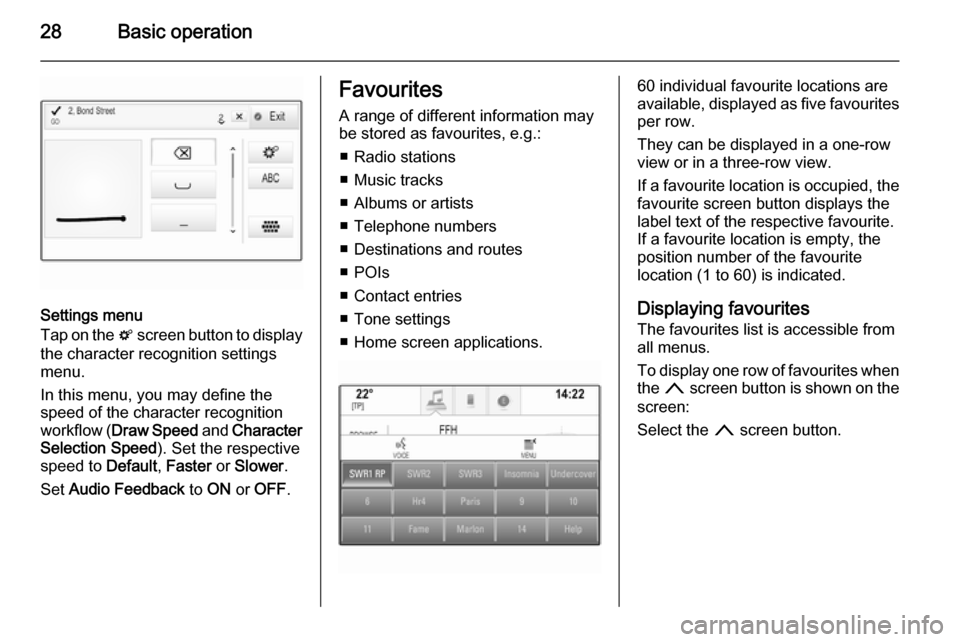
Settings menu
Tap on the t screen button to display
the character recognition settings
menu.
In this menu, you may define the
speed of the character recognition
workflow ( Draw Speed and Character
Selection Speed ). Set the respective
speed to Default, Faster or Slower .
Set Audio Feedback to ON or OFF .
Favourites
A range of different information may
be stored as favourites, e.g.:
■ Radio stations
■ Music tracks
■ Albums or artists
■ Telephone numbers
■ Destinations and routes
■ POIs
■ Contact entries
■ Tone settings
■ Home screen applications.60 individual favourite locations are
available, displayed as five favourites
per row.
They can be displayed in a one-row
view or in a three-row view.
If a favourite location is occupied, the favourite screen button displays the
label text of the respective favourite. If a favourite location is empty, the
position number of the favourite
location (1 to 60) is indicated.
Displaying favourites
The favourites list is accessible from
all menus.
To display one row of favourites when the n screen button is shown on the
screen:
Select the n screen button.
Page 30 of 143

30Basic operation
Storing favourites
Favourites may be stored from the
Home screen, the audio application,
the navigation application or the
phone application.
There are two different basic
situations:
■ only one storable item on the screen
■ more than one storable items on the screen.
Reveal the favourites list and scroll to
the respective favourites page.
Tap and hold the respective favourite screen button.
If there is only one storable item on
the screen, a beeping sound is given
out and the station is stored to the respective screen button.
If there are more than one storable
items on the screen, the favourites
page is minimised and the previously shown menu is redisplayed. Select
the item you wish to store as a
favourite. A beeping sound is given
out and the station is stored to the
respective screen button.A few examples for storing favourites
are given below.
Example: Radio station
Repeatedly press the RADIO button
to activate the radio function and the
desired waveband.
Seek for the station you wish to store
as a favourite 3 47.
To store this station as a favourite,
reveal the favourites list and scroll to
the respective favourites page.
Tap and hold the respective favourite screen button. The station is stored
as a favourite.
Example: Album
Repeatedly press the MEDIA button
and select the desired audio source.
Select the BROWSE screen button to
activate the browse menu and then
select the ALBUMS tab 3 57.
To store one of the albums as a
favourite, reveal the favourites list
and scroll to the respective favourites page.Tap and hold the respective favourite
screen button. The favourites page is
minimised and the list of albums is
redisplayed.
Select the album you wish to store as a favourite. The selected album is
stored as a favourite.
Example: Destination
Press the ; button to display the
Home screen and then select the
NAV icon.
Select DESTINATION in the
interaction selector bar and then
select the RECENT tab 3 70.
To store one of the addresses in the
recent destinations list as a favourite,
reveal the favourites list and scroll to
the respective favourites page.
Tap and hold the respective favourite
screen button. The favourites page is minimised and the recent
destinations menu is redisplayed.
Select the address you wish to store
as a favourite. The selected address
is stored as a favourite.
Page 31 of 143
Basic operation31
Example: Telephone number
Press the ; button to display the
Home screen and then select the
PHONE icon.
Select the KEYPAD tab and enter the
number you wish to call 3 89.
To store this number as a favourite,
reveal the favourites list and scroll to
the respective favourites page.
Tap and hold the respective favourite
screen button. The number is stored
as a favourite.
Retrieving favourites
Display a favourites page (see above)
and scroll to the respective favourites
page (if necessary).
Notice
Unavailable favourites are greyed
out.
Select the desired favourite screen
button. Depending on the kind of
favourite selected, a radio station or
track is played, a phone call is
initiated, a route is calculated or an
application is started.Notice
The active favourite is highlighted.
Using the right-hand steering wheel
remote control
Repeatedly press the k or l buttons
to select the desired audio favourite.
Alternatively, using the five-way
controller: Press the i button to
display the cluster menu for
application selection. Select the
Audio list item and then Favourites.
Select the desired favourite.
Editing favourites Select the SETTINGS icon on the
Home screen, the Radio list item and
then Manage Favourites . A three-row
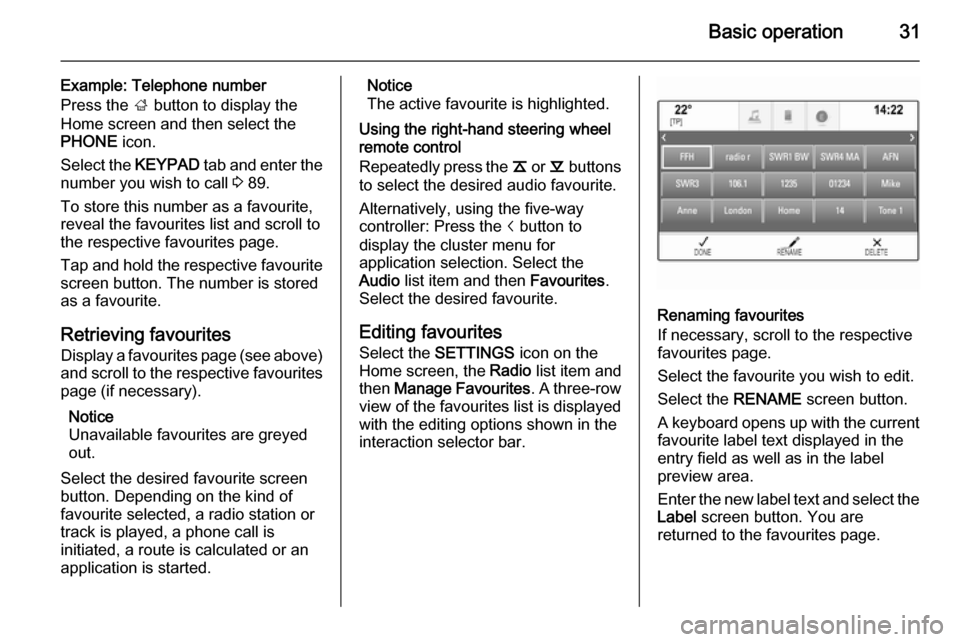
view of the favourites list is displayed with the editing options shown in the
interaction selector bar.
Renaming favourites
If necessary, scroll to the respective
favourites page.
Select the favourite you wish to edit. Select the RENAME screen button.
A keyboard opens up with the current
favourite label text displayed in the
entry field as well as in the label
preview area.
Enter the new label text and select the
Label screen button. You are
returned to the favourites page.
Page 33 of 143
Basic operation33
Selecting the contacts source
The contacts list first displayed upon
access differs depending on the
application currently active and the
devices connected.
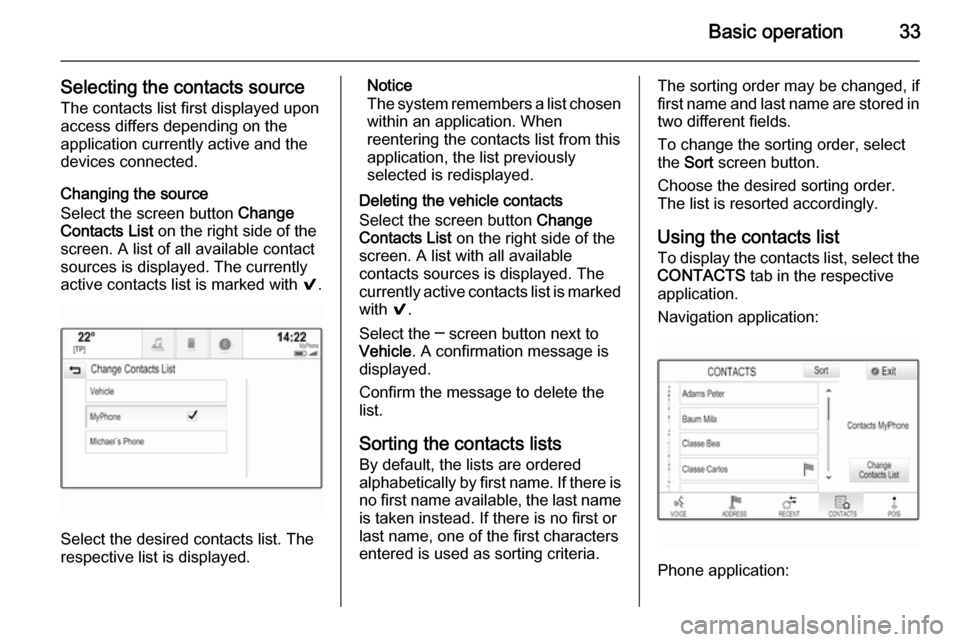
Changing the source
Select the screen button Change
Contacts List on the right side of the
screen. A list of all available contact
sources is displayed. The currently
active contacts list is marked with 9.
Select the desired contacts list. The
respective list is displayed.
Notice
The system remembers a list chosen within an application. When
reentering the contacts list from this
application, the list previously
selected is redisplayed.
Deleting the vehicle contacts
Select the screen button Change
Contacts List on the right side of the
screen. A list with all available
contacts sources is displayed. The
currently active contacts list is marked with 9.
Select the ─ screen button next to
Vehicle . A confirmation message is
displayed.
Confirm the message to delete the
list.
Sorting the contacts lists By default, the lists are ordered
alphabetically by first name. If there is
no first name available, the last name
is taken instead. If there is no first or
last name, one of the first characters
entered is used as sorting criteria.The sorting order may be changed, if
first name and last name are stored in two different fields.
To change the sorting order, select
the Sort screen button.
Choose the desired sorting order.
The list is resorted accordingly.
Using the contacts list
To display the contacts list, select the
CONTACTS tab in the respective
application.
Navigation application:
Phone application: