VAUXHALL INSIGNIA 2017.75 Owner's Manual
INSIGNIA 2017.75
VAUXHALL
VAUXHALL
https://www.carmanualsonline.info/img/38/19490/w960_19490-0.png
VAUXHALL INSIGNIA 2017.75 Owner's Manual
Trending: ABS, heater, wipers, battery, oil reset, automatic transmission, sunroof
Page 251 of 321
Vehicle care249Daytime running lightIn case of defective LEDs, have them
replaced by a workshop.
LED headlights
Headlights for low and high beam,
sidelights, daytime running lights and turn signal lights are designed as
LEDs and cannot be changed.
Have lights repaired by a workshop in
case of failure.
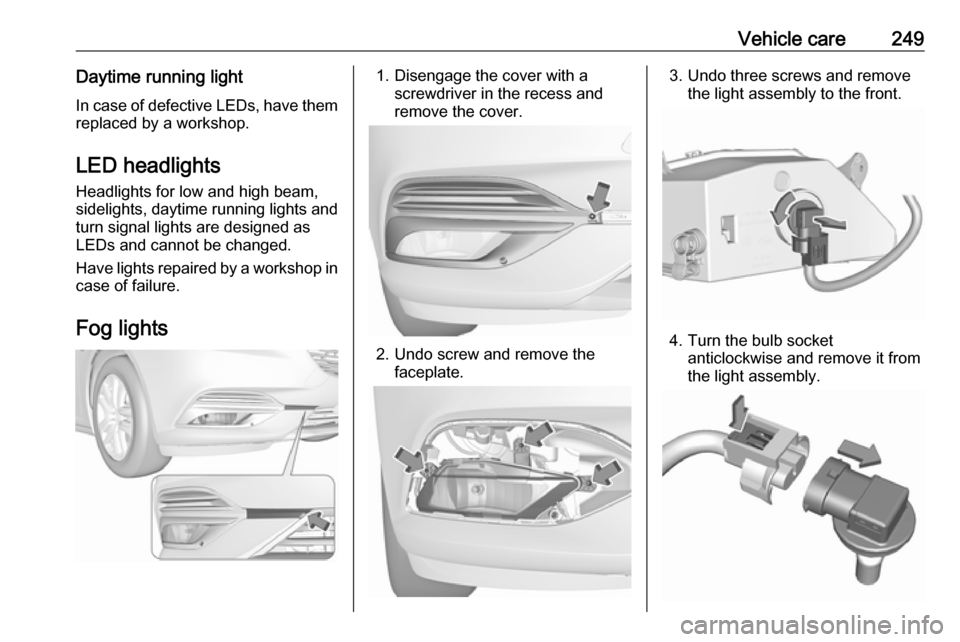
Fog lights1. Disengage the cover with a screwdriver in the recess and
remove the cover.
2. Undo screw and remove the faceplate.
3. Undo three screws and removethe light assembly to the front.
4. Turn the bulb socketanticlockwise and remove it from
the light assembly.
Page 252 of 321
250Vehicle care5. Disengage the bulb socket fromthe plug connector by pressing
the retaining lug.
6. Remove and replace the bulb socket with bulb and attach the
plug connector.
7. Insert the bulb socket into the light
assembly by turning clockwise
and engage.
8. Mount the light assembly by tightening the three screws.
9. Attach the faceplate and tighten the screw.
10. Attach and engage the cover.
Tail lights
Tail lights and brake lights are
designed as LEDs. In case of failure, have LEDs replaced by a workshop.5-door Hatchback
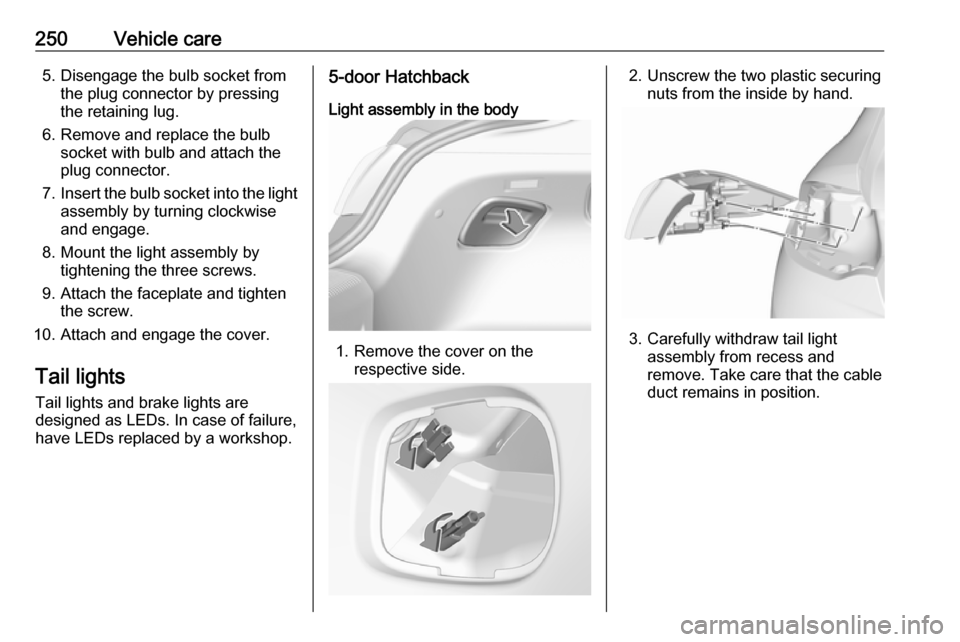
Light assembly in the body
1. Remove the cover on the respective side.
2. Unscrew the two plastic securing nuts from the inside by hand.
3. Carefully withdraw tail light assembly from recess and
remove. Take care that the cable
duct remains in position.
Page 253 of 321
Vehicle care251
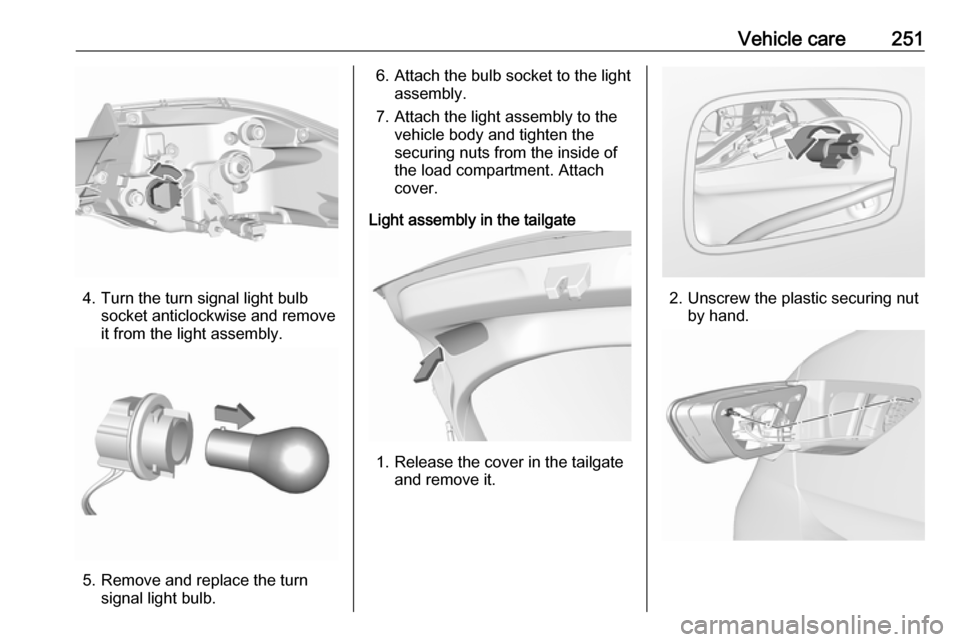
4. Turn the turn signal light bulbsocket anticlockwise and removeit from the light assembly.
5. Remove and replace the turn signal light bulb.
6. Attach the bulb socket to the lightassembly.
7. Attach the light assembly to the vehicle body and tighten the
securing nuts from the inside of
the load compartment. Attach
cover.
Light assembly in the tailgate
1. Release the cover in the tailgate and remove it.
2. Unscrew the plastic securing nutby hand.
Page 254 of 321
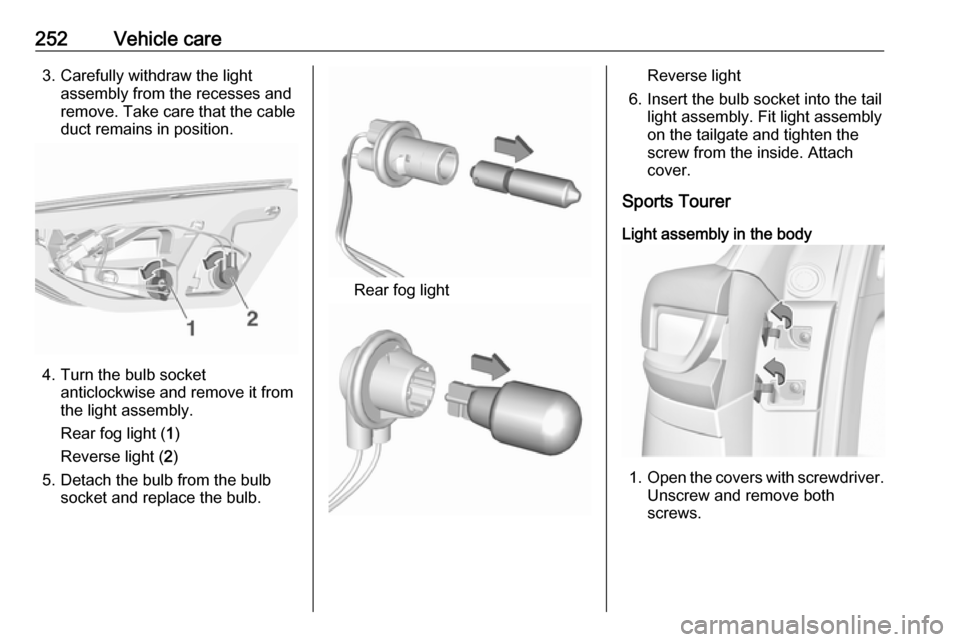
252Vehicle care3. Carefully withdraw the lightassembly from the recesses and
remove. Take care that the cable
duct remains in position.
4. Turn the bulb socket anticlockwise and remove it from
the light assembly.
Rear fog light ( 1)
Reverse light ( 2)
5. Detach the bulb from the bulb socket and replace the bulb.
Rear fog light
Reverse light
6. Insert the bulb socket into the tail light assembly. Fit light assembly
on the tailgate and tighten the
screw from the inside. Attach
cover.
Sports Tourer
Light assembly in the body
1. Open the covers with screwdriver.
Unscrew and remove both
screws.
Page 255 of 321
Vehicle care253
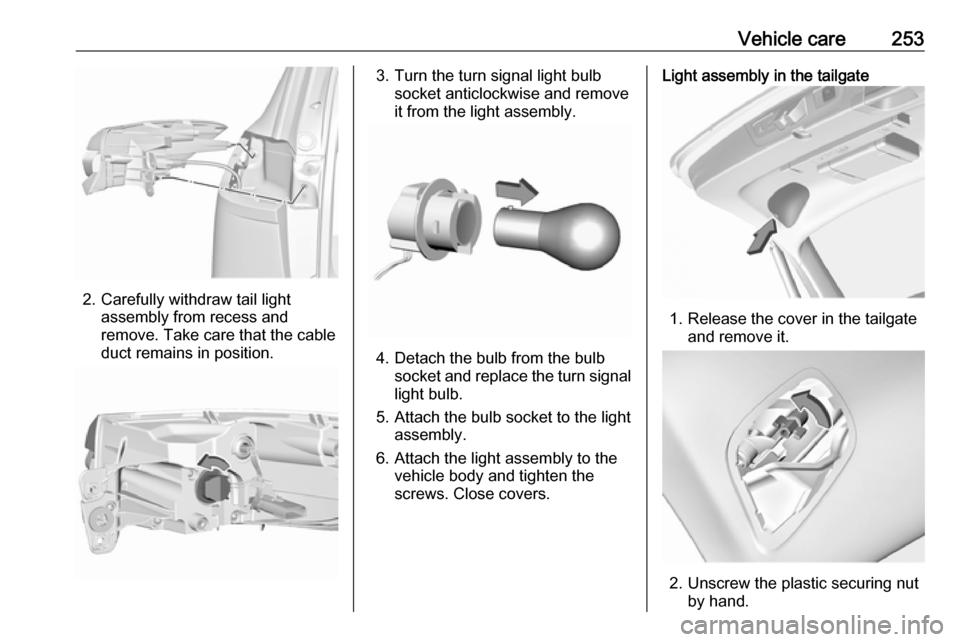
2. Carefully withdraw tail lightassembly from recess and
remove. Take care that the cable
duct remains in position.
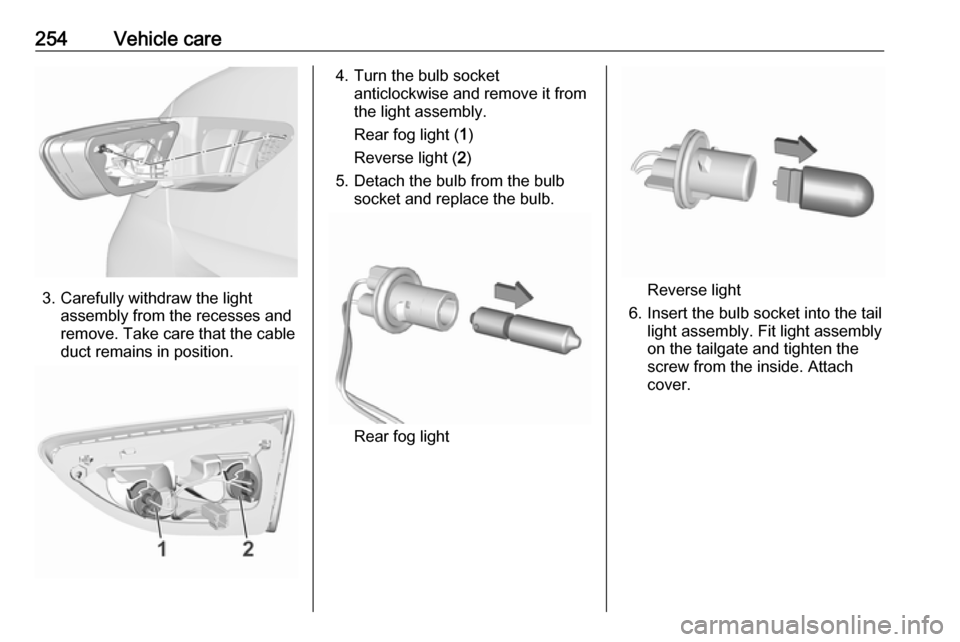
3. Turn the turn signal light bulb socket anticlockwise and removeit from the light assembly.
4. Detach the bulb from the bulb socket and replace the turn signal
light bulb.
5. Attach the bulb socket to the light assembly.
6. Attach the light assembly to the vehicle body and tighten the
screws. Close covers.
Light assembly in the tailgate
1. Release the cover in the tailgate and remove it.
2. Unscrew the plastic securing nutby hand.
Page 256 of 321
254Vehicle care
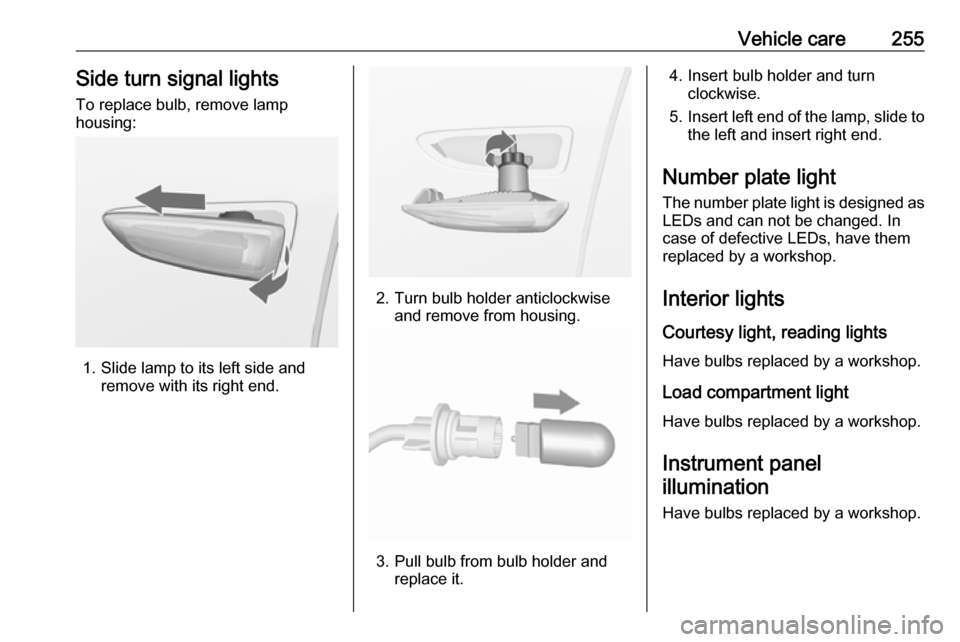
3. Carefully withdraw the lightassembly from the recesses and
remove. Take care that the cable
duct remains in position.
4. Turn the bulb socket anticlockwise and remove it from
the light assembly.
Rear fog light ( 1)
Reverse light ( 2)
5. Detach the bulb from the bulb socket and replace the bulb.
Rear fog light
Reverse light
6. Insert the bulb socket into the tail light assembly. Fit light assembly
on the tailgate and tighten the
screw from the inside. Attach
cover.
Page 257 of 321
Vehicle care255Side turn signal lights
To replace bulb, remove lamp
housing:
1. Slide lamp to its left side and remove with its right end.
2. Turn bulb holder anticlockwiseand remove from housing.
3. Pull bulb from bulb holder and replace it.
4. Insert bulb holder and turnclockwise.
5. Insert left end of the lamp, slide to
the left and insert right end.
Number plate light The number plate light is designed as
LEDs and can not be changed. In
case of defective LEDs, have them
replaced by a workshop.
Interior lights
Courtesy light, reading lights
Have bulbs replaced by a workshop.
Load compartment light
Have bulbs replaced by a workshop.
Instrument panel illumination
Have bulbs replaced by a workshop.
Page 258 of 321
256Vehicle careElectrical systemFuses
Data on the replacement fuse must
match the data on the defective fuse.
There are three fuse boxes in the
vehicle:
● engine compartment● instrument panel
Before replacing a fuse, turn off the
respective switch and the ignition.
A blown fuse can be recognized by its
melted wire.Caution
Do not replace the fuse until the
cause of the fault has been
remedied.
Some functions are protected by
several fuses.
Fuses may also be inserted without
existence of a function.
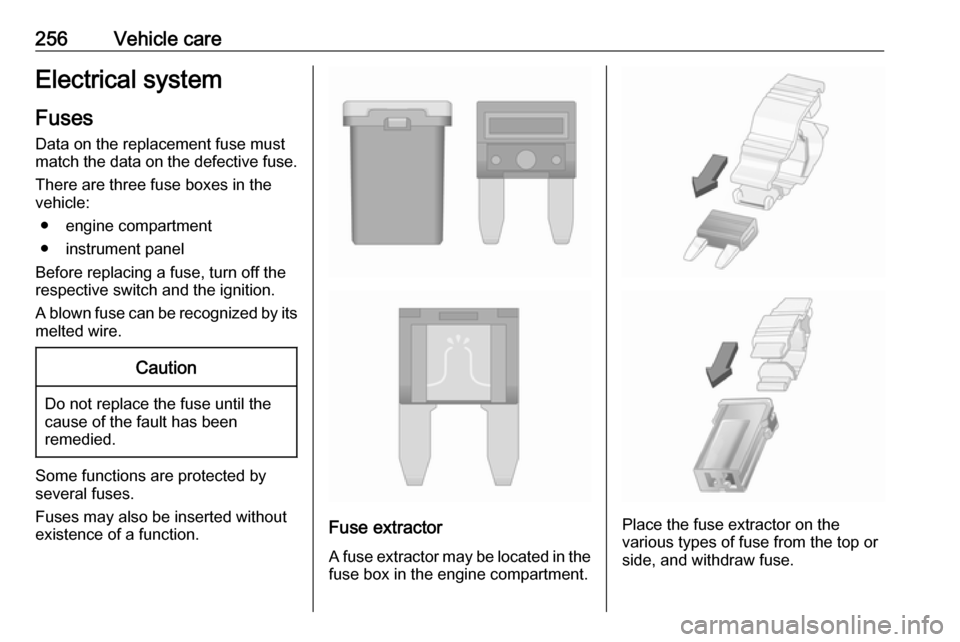
Fuse extractor
A fuse extractor may be located in the
fuse box in the engine compartment.Place the fuse extractor on the
various types of fuse from the top or
side, and withdraw fuse.
Page 259 of 321
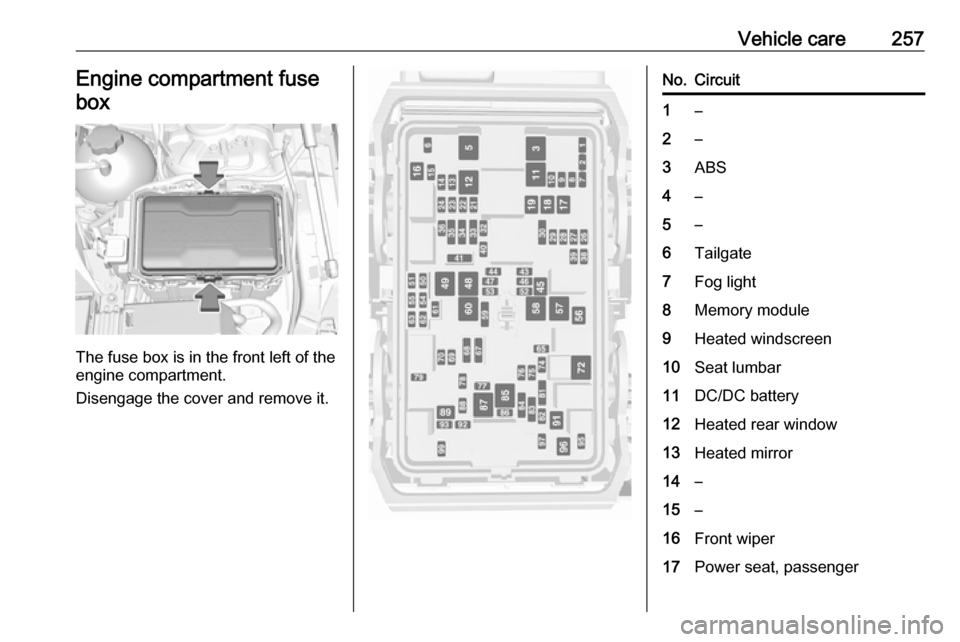
Vehicle care257Engine compartment fusebox
The fuse box is in the front left of the
engine compartment.
Disengage the cover and remove it.
No.Circuit1–2–3ABS4–5–6Tailgate7Fog light8Memory module9Heated windscreen10Seat lumbar11DC/DC battery12Heated rear window13Heated mirror14–15–16Front wiper17Power seat, passenger
Page 260 of 321
258Vehicle careNo.Circuit18Sunblind19Power seat, driver20–21Sunroof22Rear wiper/Airbag23Adaptive forward lighting24–25–26Transmission control module27Ignition/Instrument panel28–29Rear view camera/Air vent30Malfunction indicator light/
Trailer31–32Camera33Seat heat front34Seat heat rearNo.Circuit35Damping/All-wheel drive36Fuel system37–38–39–40Steering wheel lock41–42–43Heated steering wheel44Headlight range adjustment45–46Engine control module47–48DC/DC converter/Air vent/E-
Boost49Rear door control module50–51–No.Circuit52–53–54–55–56Starter57–58–59Left headlight (LED)60Cooling fan61–62–63–64–65Climate control66–67–68–
Trending: oil, rims, window, tire pressure, brake sensor, coolant temperature, fuel pressure
